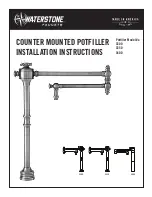
background image

KITCHEN FAUCETS

Installation Instructions and Use & Care Guide

For questions about features, operation/performance, parts, accessories, or service, call: 

1-800-422-1230

 or visit our website at...

www.kitchenaid.com

Model Series

KKFV01LP

Model Series

KKFV01SP

Model Series

KKFV01PP

READ AND SAVE THESE INSTRUCTIONS

FOR RESIDENTIAL USE ONLY

IMPORTANT:

Installer:

 Leave installation instructions with the homeowner.

Homeowner:

 Keep installation instructions for future reference. 

8559765B

Summary of Contents for KKFV01LP Series

Page 1: ...vice call 1 800 422 1230 or visit our website at www kitchenaid com Model Series KKFV01LP Model Series KKFV01SP Model Series KKFV01PP READ AND SAVE THESE INSTRUCTIONS FOR RESIDENTIAL USE ONLY IMPORTANT Installer Leave installation instructions with the homeowner Homeowner Keep installation instructions for future reference 8559765B ...

Page 2: ...Faucet hoses are equipped with compression type seals and do not require sealing compound to keep from leaking As with all metal objects follow proper handling techniques INSTALLATION INSTRUCTIONS IMPORTANT It is recommended that a qualified plumber installer install the faucet The faucet installation must comply with national and local plumbing codes and ordinances The faucet should be examined f...

Page 3: ...emove and replace aerator see Aerator Assembly in the Faucet Care section 12 Reinstall the aerator into the faucet and tighten with a wrench Model KKFV01LP 1 Remove the threaded collar flat metal washer and flat rubber washer from faucet NOTE Do not remove the rubber O ring from the bottom of the faucet base 2 Feed tubing through the hole in the sink or counter top and then insert threaded shank i...

Page 4: ...E FaucetExterior Clean the faucet using a clean cloth and warm water or a very diluted solution of mild dish detergent in warm water Dry and polish the faucet with a soft cloth NOTE Do not use abrasive sponges or anti lime or acidic cleansers such as scouring agents AeratorAssembly Periodically remove and clean the aerator under running water If the aerator is very dirty soak it in household vineg...

Page 5: ...et leaks or drips at the spout It is normal for the faucet to drip up to 1 minute after turning off the water Is the faucet lever in the OFF position The lever control pattern is triangular with OFF toward the front of the faucet See Operating the Faucet Is the faucet lever in the OFF position but continues to leak from the spout The cartridge and the cartridge seals should be inspected for wear a...

Page 6: ...0 11 12 ITEM DESCRIPTION PART NUMBER 1 Lever base assembly 2 Spring 3 Lever Stainless Steel W10198637 3 Lever Chrome W10198638 4 Setscrew 5 Cap 6 Retaining nut 7 Cartridge 8211401 8 Spout assembly 9 Short plastic insert 8211417 10 Screen washer W10186588 11 Sprayer Stainless steel 8211402 11 Sprayer Chrome 8211416 12 Aerator set 8211403 13 Screw 14 O ring 15 Base 16 Fiber washer 8211404 17 Check v...

Page 7: ...211401 8 Body 9 O ring 10 Base 11 Teflon ring 12 Long plastic insert 8211418 13 Rubber washer W10186587 14 Sprayer Stainless steel 8211408 14 Sprayer Chrome 8211415 15 Aerator set 8211403 16 Check valve assembly 8211410 17 Fiber washer 8211404 18 Hose 8211405 19 Weight 8211407 20 Mounting assembly 8211411 21 Spray button spring W10200280 This part is not serviceable Teflon is a registered trademar...

Page 8: ...chemicals photographic solutions etc 6 Any unauthorized modifications made to the product after it leaves KitchenAid or its suppliers premises whether performed by a contractor service company or you 7 Any labor costs during the limited warranty periods 8 Repair or replacement parts for units operated outside the United States 9 Transportation and labor costs associated with removal or reinstallat...

Reviews: