

CUSTOM DRAWER FRONT INSTALLATION INSTRUCTIONS
FOR WARMING DRAWERS
Tools and Parts
Gather the required tools and parts before starting installation. Read and follow the instructions provided with any tools listed here.
Tools Needed
■
Phillips screwdriver
■
Drill and appropriate bits
Parts Supplied
■
6 - #8–18 x
¹⁄₂
screws
■
Indicator light lens
Parts Needed
■
Custom drawer front
■
Custom handle (optional)
■
Adhesive recommended for plastic to wood
Install Custom Drawer Front Panel
The warming drawer has an interface that will allow a modest
range of panel sizes. The actual panel size should be selected by
the customer and their contractor to suit the desired effect. It is
recommended that a qualified carpenter make and install the
custom drawer front and handle(s) to match surrounding
cabinetry.
1. Install warming drawer unit as instructed by the installation
instructions provided with the warming drawer.
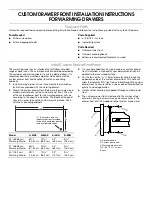
2. Create the custom drawer front. Below are the minimum and
maximum dimensions for the custom drawer front. The size
of the custom drawer front for the warming drawer will vary
according to the specific installation. The depth of the panel
will vary in order to have the custom warming drawer flush
with the surrounding cabinets.
3. It is recommended that if a wood or porous custom drawer
front is installed, a high quality spar polyurethane finish be
applied to the inner wood surface.
4. For the lens, drill a
⁵⁄₁₆
" (7.9 mm) diameter hole through the
appearance side of the custom drawer front. This hole will
allow the indicator “ON” light to be visible through the custom
drawer front. To secure the lens, use an adhesive specified for
plastic to wood application.
5. Install custom handle (not supplied) through custom drawer
front.
6. The custom drawer front is fastened to the stainless steel
drawer by driving 6 screws through clearance holes in the
drawer front into the wooden or other custom made panel.
Model
A–MAX
B–MAX
A–MIN
B–MIN
24" (60.96 cm)
Warming Drawer
23
³⁄₄
"
(60.3 cm)
10
⁵⁄₁₆
"
(26.2 cm)
23"
(58.4 cm)
9
¹⁄₁₆
"
(23.0 cm)
27" (68.58 cm)
Warming Drawer
26
³⁄₄
"
(67.9 cm)
10
⁵⁄₁₆
"
(26.2 cm)
26"
(66.1cm)
9
¹⁄₁₆
"
(23.0 cm)
30" (76.2 cm)
Warming Drawer
29
³⁄₄
"
(75.6 cm)
10
⁵⁄₁₆
"
(26.2 cm)
29"
(73.7cm)
9
¹⁄₁₆
"
(23.0 cm)
A
B
⁵⁄₁₆
" (7.9 mm) dia. hole for
indicator light lens (provided
in this kit). Locate lens directly
in front of indicator light.
A. Optional handle
B. Custom door panel
C. Warming drawer front
D. 6 - #8-18 x ¾" screws
E. Lens
A
D
D
C
B
E


