background image

3405633

Electric and 

Gas Dryers

A Note to You........................2

Understanding 
Dryer Safety ......................3-4

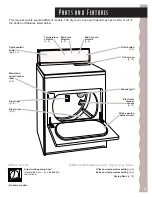
Parts and Features ..............5

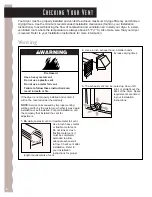
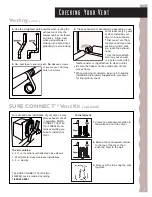
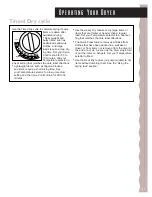
Checking Your Vent ............6

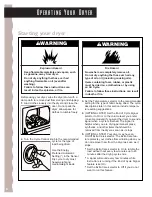
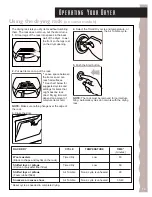
Operating Your Dryer ..........8

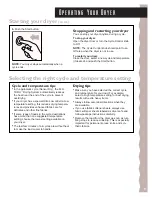
Starting your dryer ..........8

Selecting the right cycle 
and temperature setting..9

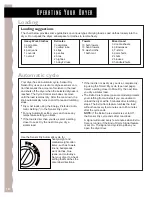
Loading ..........................10

Automatic cycle ............10

Timed Dry cycle ............11

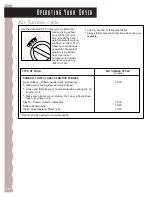
Air Tumble cycle ............12

Using the drying rack ....13

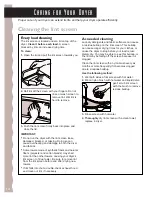
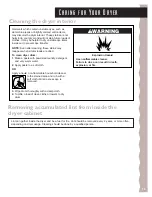
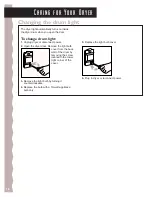
Caring for Your Dryer ........14

Troubleshooting..................17

Requesting Assistance 
or Service ............................19

Warranty ..............................

20

1•800•422•123

0

Call with questions 

or comments

www.kitchenaid.com

U s e   &   C a r e   G u i d e

Summary of Contents for 3405633

Page 1: ...arting your dryer 8 Selecting the right cycle and temperature setting 9 Loading 10 Automatic cycle 10 Timed Dry cycle 11 Air Tumble cycle 12 Using the drying rack 13 Caring for Your Dryer 14 Troubleshooting 17 Requesting Assistance or Service 19 Warranty 20 1 800 422 1230 Call with questions or comments www kitchenaid com U s e C a r e G u i d e ...

Page 2: ...ter checking Troubleshooting additional help can be found by checking the Requesting Assistance or Service section or by calling the telephone number above When calling you will need to know your appliance s complete model number and serial number You can find this information on the model and serial number label see diagram in the Parts and Features section Keep this book and the sales slip toget...

Page 3: ... be followed to minimize the risk of fire or explosion or to prevent property damage personal injury or death You will be killed or seriously injured if you don t follow instructions You can be killed or seriously injured if you don t follow instructions Your safety and the safety of others is very important We have provided many important safety messages in this manual and on your appliance Alway...

Page 4: ... it will be exposed to the weather Do not tamper with controls Do not repair or replace any part of the dryer or attempt any servicing unless specifically recommended in this Use and Care Guide or in published user repair in structions that you understand and have the skills to carry out Do not use fabric softeners or products to eliminate static unless recommended by the manufacturer of the fabri...

Page 5: ...ing hamper door Cycle control knob pp 8 12 Model and serial number label p 2 Drum light p 16 Dryer drum p 15 Additional features your dryer may have Ultra Low temperature setting p 9 Extra Low temperature setting p 9 Drying Rack p 13 Temperature selector p 8 Extra care selector p 8 End of cycle selector p 8 Other Doors Super wide opening door Reversible door see Installation Instructions On some m...

Page 6: ...t hood Smaller hoods increase drying times wWARNING Your dryer must be properly installed and vented to achieve maximum drying efficiency and shorten drying times Use the minimum recommended installation clearances found in your Installation Instructions to avoid blocking the flow of combustion and ventilation air Install your dryer in a well ventilated room where the temperature is always above 4...

Page 7: ...ure the flapper on the outside end of vent moves freely When cleaning is complete be sure to follow the Installation Instructions supplied with your dryer for final product check Checking Your Vent The kit contains 2 4 ft vent sections with attached close elbows 1 Wall plate for close clearance installations 2 4 in clamps For safe and easy installation of your dryer a com plete exhaust vent kit is...

Page 8: ...ould be removed from the dryer as soon as it stops 5 OPTIONAL STEP Your dryer may have an On Off Extra Care selector The Extra Care fea ture protects your clothes from wrinkling when you do not remove them from the dryer as soon as it stops Set the Extra Care selector to On to tumble the load without heat every few minutes up to 45 minutes after the drying cycle ends A signal will sound every few ...

Page 9: ...tempera tures and provides enhanced fabric care for delicates and other fine fabrics If some types of loads in the cycle descriptions have more than one suggested temperature setting choose the lowest setting available on your dryer The last few minutes of all cycles are without heat to make the load cooler to handle Selecting the right cycle and temperature setting Drying tips Make sure you have ...

Page 10: ... dry as you like complete dry ing using the Timed Dry cycle see next page Select a setting closer to More Dry the next time you dry a similar load The Extra Care feature on some models protects your clothing from wrinkles if you are unable to unload the dryer within 5 minutes after tumbling stops The Extra Care feature tumbles the load without heat every few minutes up to 45 minutes after the cycl...

Page 11: ... the Cycle Control knob for 20 to 30 minutes 30 Heavy Dry 70 60 50 40 30 20 Cool Down OFF Quick Press Rack Dry Use the Heavy Dry feature to dry large items or items that are thicker or heavier than a regular load Set your Temperature selector to a heat set ting that matches the care label directions The Quick Press feature removes wrinkles from clothes that have been packed in a suitcase or closet...

Page 12: ...m Rubber Pillows padded bras stuffed toys Make sure coverings are securely stitched Shake and fluff pillows by hand several times during the Air Tumble cycle Make sure pillows are completely dry Foam rubber pillows take a long time to dry Plastic Shower curtains tablecloths Rubber backed rugs Olefin Polypropylene Sheer nylon 20 30 20 30 40 50 10 20 AIR TUMBLE CYCLE minutes TYPE OF LOAD Reset cycle...

Page 13: ...t of moisture items hold NOTE Make sure nothing hangs over the edge of the rack 3 Close the door 4 Select the Timed Dry cycle and temperature or the Air Tumble cycle 5 Push the Start button NOTE The rack must be removed for normal tum bling Automatic cycles do not work with the drying rack TIME minutes 60 60 90 30 40 RACK DRY Wool sweaters Block to shape and lay flat on the rack Stuffed toys or pi...

Page 14: ...ldup Use the following method 1 Wet both sides of lint screen with hot water 2 Wet a nylon brush with hot water and liquid deter gent scrub lint screen with the brush to remove residue buildup 2 Roll lint off the screen with your fingers Do not rinse or wash screen to remove lint Wet lint is hard to remove 3 Push the lint screen firmly back into place and close the lid IMPORTANT Do not run the dry...

Page 15: ...m water 2 Apply paste to a soft cloth OR Apply a liquid non flammable household cleaner to the stained area and rub with a soft cloth until all excess dye is removed 15 Cleaning the dryer interior 3 Wipe drum thoroughly with a damp cloth 4 Tumble a load of clean cloths or towels to dry drum wWARNING Explosion Hazard Use nonflammable cleaner Failure to do so can result in death explosion or fire Re...

Page 16: ...he dryer drum when you open the door To change drum light 1 Unplug dryer or disconnect power 2 Open the dryer door Remove the light bulb cover from the back wall of the dryer by removing the screw located in the lower right corner of the cover 16 Changing the drum light 6 Plug in dryer or reconnect power 5 Replace the light bulb cover Caring for Your Dryer ...

Page 17: ...big or heavy Tissue or paper left in pockets Pilling surface fuzz caused by normal wear and laundering attracts lint Static electricity Overdrying Dryer fabric softener improperly used See package directions Load includes synthetics synthetic blends permanent press and knit fabrics that build up static electricity Wrinkling Overloading Overdrying especially permanent press and synthetic fabrics La...

Page 18: ... Are household chemical odors being drawn into dryer Proper ventilation must be used if painting or staining near the dryer NOTE Store and use paints varnishes etc away from your dryer whenever possible If you still have problems see the Requesting Assistance or Service section on page 19 1 Dryer will not start Is the dryer door firmly closed Are the controls set in an On position Did you firmly p...

Page 19: ...ributors KitchenAid service technicians are trained to fulfill the product warranty and provide after warranty service anywhere in the United States To locate the authorized KitchenAid service company in your area you can also look in your telephone directory Yellow Pages If you need replacement parts If you need to order replacement parts we recom mend that you only use factory authorized parts T...

Page 20: ...ials or workmanship Service must be provided by an authorized KitchenAid servicing outlet Replacement parts for any electrical element on electric models or any burner on gas models to correct defects in materials or workmanship Replacement of the motor due to defects in materials and workmanship Replacement parts for the dryer drum if it rusts due to defects in materials or workmanship Replacemen...

Reviews: