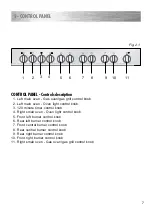
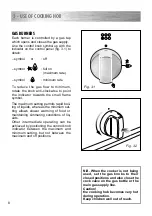
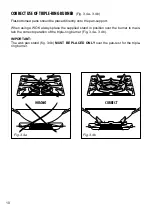
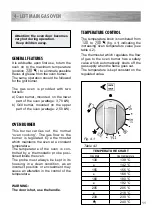
background image

Instructions for use -  Installation advice

DOUBLE OVEN

GAS COOKER

CK 300 FFD

IE

Summary of Contents for CK 300 FFD

Page 1: ...Instructions for use Installation advice DOUBLE OVEN GAS COOKER CK 300 FFD IE ...

Page 2: ...2 ...

Page 3: ...ion 33 42 Electrical section 43 44 Guarantee 45 After Sales Service 46 IMPORTANT INFORMATION FOR CORRECT DISPOSAL OF THE PRODUCT IN ACCORDANCE WITH EC DIRECTIVE 2002 96 EC At the end of its working life the product must not be disposed of as urban waste It must be taken to a special local authority differentiated waste collection centre or to a dealer providing this service Disposing of a househol...

Page 4: ...age is to be considered as inappropriate and therefore dangerous The manufacturer declines all responsibility in the event of damage caused by improper incorrect or illogical use of the appliance Important This appliance is designed and manufactured solely for the cooking of domestic household food and is not suitable for any non domestic application and therefore should not be used in a commercia...

Page 5: ...his film must be removed before using the appliance WARNING When correctly installed your product meets all safety requirements laid down for this type of product category However special care should be taken around the rear or the underneath of the appliance as these areas are not designed or intended to be touched and may contain sharp or rough edges that may cause injury Fire risk Do not store ...

Page 6: ...ner R 3 00 kW 4 Auxiliary burner A 1 00 kW 5 Semi rapid burner SR 1 75 kW 6 Auxiliary burner A 1 00 kW 1 COOKING HOB Important Note The electric ignition is incorporated in the knobs The appliance has a safety valve system fitted the flow of gas will be stopped if and when the flame should accidentally go out ...

Page 7: ...b 3 120 minute timer control knob 4 Right small oven Oven light control knob 5 Front left burner control knob 6 Rear left burner control knob 7 Front central burner control knob 8 Rear central burner control knob 9 Rear right burner control knob 10 Front right burner control knob 11 Right small oven Gas oven gas grill control knob 2 CONTROL PANEL 7 11 ...

Page 8: ... symbol The maximum setting permits rapid boil ing of liquids whereas the minimum set ting allows slower warming of food or maintaining simmering conditions of liq uids Other intermediate operating can be achieved by positioning the control knob indicator between the maximum and minimum setting but not between the maximum and off positions N B When the cooker is not being used set the gas knobs to...

Page 9: ... clockwise Fig 3 2 to the full flame position marked by the symbol Fig 3 1 and hold the knob in until the flame has been lit In the case of a mains failure light the burner with a match or lighted taper 2 Wait for about ten seconds after the gas burner has been lit before letting go of the knob valve activation delay 3 Adjust the gas valve to the desired position If the burner flame should go out ...

Page 10: ... the pan support When using a WOK always place the supplied stand in position over the burner to main tain the correct operation of the triple ring burner Fig 3 4a 3 4b IMPORTANT The wok pan stand fig 3 4b MUST BE PLACED ONLY over the pan rest for the triple ring burner Fig 3 4a WRONG Fig 3 4b CORRECT ...

Page 11: ...ven at a constant temperature The temperature of the oven is con trolled by a thermostatic probe posi tioned inside the oven The probe must always be kept in its housing in a clean condition as an incorrect position or encrustment may cause an alteration in the control of the temperature WARNING The door is hot use the handle TEMPERATURE CONTROL The temperature knob is numbered from to fig 4 1 ind...

Page 12: ...he burner lights before releasing the knob time to prime the valve 5 Close the oven door slowly and adjust the burner according to the power required If the flame extinguishes for any reason the safety valve will automatically shut off the gas supply to the burner To re light the burner first turn the oven control knob to position wait for at least 1 minute and then repeat the lighting procedure F...

Page 13: ... the oven door to the full extent WARNING Risk of explosion The oven door must be open during this operation 2 Lightly press and turn the tempera ture knob clockwise fig 4 5 to the position fig 4 1 3 Press the knob firmly until the burner lights Never continue this operation for more than 15 seconds If the burn er has still not ignited wait for about 1 minute prior to repeating the ignition In cas...

Page 14: ...ny one time Grilling for longer than the recommended time may mean the appliance overheats Attention the oven door becomes very hot during operation Keep children away HOT ZONE Fig 4 7 A Fig 4 8 OVEN LIGHT The cooker is equipped with a light that illuminates the oven to enable visually controlling the food that is cooking This light is controlled by a control knob fig 4 8 Notes The grill burner ha...

Page 15: ...which maintains the oven at a constant temperature The temperature of the oven is con trolled by a thermostatic probe posi tioned inside the oven The probe must always be kept in its housing in a clean condition as an incorrect position or encrustment may cause an alteration in the control of the temperature 1 8 0 2 0 5 2 3 0 1 3 0 1 5 5 Fig 5 1 TEMPERATURE CONTROL The temperature knob is numbered...

Page 16: ...ockwise fig 5 4 to the max position fig 5 1 3 Press the knob firmly until the burner lights Never continue this operation for more than 15 seconds If the burner has still not ignited wait for about 1 minute prior to repeating the igni tion In case of mains failure press the knob firmly and immediately put a lit match or taper to the opening F fig 5 3 4 Wait about 10 15 seconds after the burner lig...

Page 17: ... If the burn er has still not ignited wait for about 1 minute prior to repeating the ignition In case of mains failure press the knob firmly and put a lit match or taper to the pipe of the burner fig 5 6 3 After lighting the burner wait a few seconds before releasing the knob until the safety valve stays open Do not close completely the oven door The grill must always be used with the oven door sl...

Page 18: ...ny one time Grilling for longer than the recommended time may mean the appliance overheats Attention the oven door becomes very hot during operation Keep children away Fig 5 8 OVEN LIGHT The cooker is equipped with a light that illuminates the oven to enable visually controlling the food that is cooking This light is controlled by a control knob fig 5 8 Notes The grill burner has only one setting ...

Page 19: ...Y Bread Loaf 500g Flour wt 225 7 8 20 25 mins Bread Rolls 225 7 8 10 15 mins Pizza Dough 225 8 15 20 mins Shortcrust pastry 200 6 20 30 mins Quiches Flans 180 190 4 5 30 40mins ROAST MEATS Beef medium joint 190 5 20 25 mins lb 20mins Lamb 190 5 25 30mins lb 25mins Pork 190 5 30mins lb 30mins Chicken 190 5 20 25mins lb 30mins Turkey 180 4 15 20mins lb 20mins Stews Casseroles 170 3 11 2 2hours Tempe...

Page 20: ... can be set to a maximum of 120 minutes and a buzzer will sound at the end of the countdown The knob must be rotated clockwise as far as the 120 minute position first and then set to the required time by rotating it anticlockwise 4 0 60 8 0 2 0 1 0 0 Fig 7 1 ...

Page 21: ...n Attention The appliance gets very hot mainly around the cooking areas It is very important that children are not left alone in the kitchen when you are cooking Do not use a steam cleaner because the moisture can get into the appliance thus make it unsafe 8 CLEANING AND MAINTENANCE IMPORTANT NOTES Installation and any demonstration information or adjustments are not included in the warranty The c...

Page 22: ...protected by a finger print proof lacquer To avoid damaging this lacquer do not clean the stainless steel with abrasive cleaners or abrasive cloths or scouring pads ONLY SOAPY WARM WATER MUST BE USED TO CLEAN THE COATED STAINLESS STEEL SURFACES STAINLESS STEEL SURFACES UNCOATED The hob sides are made from un coated stainless steel Can be cleaned with an appropriate stainless steel cleaner FLEXIBLE...

Page 23: ... use it when the burn ers are not in place CORRECT REPLACEMENT OF THE BURNERS It is very important to check that the burner flame distributor F and the cap C has been correctly positioned see fig 8 1 8 2 failure to do so can cause serious problems Check that the electrode S fig 8 1 is always clean to ensure trouble free sparking Check that the probe T fig 8 1 next to each burner is always clean to...

Page 24: ... burner rib must be enter in their logement as shown by the arrow The burners must be correctly positioned so that they cannot rotate fig 8 4 Then position the cap A and the ring B fig 8 4 8 5 Attention After use of the burners the cooking hob becomes very hot Keep children away Fig 8 3 Fig 8 4 A B ...

Page 25: ...be easily removed for cleaning by unscrewing the 2 retaining screws Fig 8 6 Do not store flammable material in the oven or in the storage com partment STORAGE COMPARTMENT The storage compartment is accessible through the pivoting panel fig 8 7 Fig 8 6 ...

Page 26: ...atch which stops it sliding out faces the inside of the oven To dismantle operate in reverse order Fig 8 8 Fig 8 9 INSIDE OF OVEN This must be cleaned after every use Remove and refit the side runner frames as described on the next chapter With the oven warm wipe the inside walls with a cloth soaked in very hot soapy water or another suitable product The bottom of the oven side runner frames tray ...

Page 27: ...nges fig 8 10B Hold the door as shown in fig 8 10 Gently close the door and withdraw the lower hinge pins from their location fig 8 10C Withdraw the upper hinge pins from their location fig 8 10D Rest the door on a soft surface To replace the door repeat the above steps in reverse order Fig 8 10D Fig 8 10C Fig 8 10B Fig 8 10A REMOVING THE OVEN DOOR Fig 8 10 ...

Page 28: ...lug the appliance before carrying out any maintenance operations or repairs The surfaces of adjacent furniture and walls must be capable of withstanding tempera tures in excess of 75 C If the cooker is installed adjacent to furniture which is higher than the gas hob cooktop a gap of at least 200 mm must be left between the side of the cooker and the furniture Some appliances are supplied with a pr...

Page 29: ... the furniture The furniture walls adjacent to the cooker must be made of material resistant to heat The veneered synthetical material and the glue used must be resistant to a temperature of 90 C in order to avoid ungluing or deformations The cooker may be located in a kitchen a kitchen diner or bed sitting room but not in a room containing a bath or shower Curtains must not be fitted immediately ...

Page 30: ... the rear of the cooker on a piece of the polystyrene packag ing exposing the base for the fit ting of the feet Fit the 4 legs by screwing them tight into the support base as shown in picture 9 3 Fig 9 3 LEVELLING THE COOKER The cooker may be levelled by screwing the lower ends of the feet IN or OUT fig 9 4 Fig 9 4 ...

Page 31: ...le carry out this manoeuvre to prevent dam age to the adjustable feet fig 9 5 Fig 9 6 Fig 9 7 WARNING Be careful do not lift the cooker by the door handle when raising to the upright position fig 9 6 WARNING When moving cooker to its final position DO NOT DRAG fig 9 7 Lift feet clear of floor fig 9 5 ...

Page 32: ...ises the permanent opening shall be an air vent If there are other fuel burning appliances in the same room BS 5540 Part 2 1989 should be consulted to determine the requisite air vent requirements If the cooker is installed in a cellar or basement it is advisable to provide an air vent of effective area 100 cm2 irrespective of the room volume If the room or internal space containing these applianc...

Page 33: ...lation of the cooker to Natural Gas or LP Gas must be carried out by a qualified gas engineer Installers shall take due account of the provisions of the relevant British Standards Code of Practice the Gas Safety Regulations and the Building Standards Scotland Consolidation Regulations issued by the Scottish Development Department INSTALLATION TO NATURAL GAS Installation to Natural Gas must conform...

Page 34: ...nce with BS669 part 1 and be of the correct construction for the type of gas being used The hose should not be crushed or trapped or be in contact with sharp or abrasive edges It should also not be subjected to corrosion by acidic cleansing agents The hose should also be connected in such away that it does not touch the floor NB Gas hoses designed for natural gas MUST NOT be used for supplying LPG...

Page 35: ...table spanners fig 10 2 After connection to the mains gas supply the couplings should be checked for gas soundness tightness as per current regulations for the gas type being used Fig 10 2 IMPORTANT PRESCRIPTIONS FOR GAS CONNECTION 700 mm Rear wall Suggested area for gas mains connection 200 mm Fig 10 3 ...

Page 36: ... and turn the screw F until adjustment is correct fig 10 5 For G 30 G 31 gas tighten up the reg ulation screw Fig 10 4a J J Fig 10 4b INJECTORS REPLACEMENT OF TOP BURNERS If the injectors are not supplied they can be obtained from the Service Centre The diameter is marked on the injector in cents of millimetre Select the injectors to be replaced according to the Table for the choice of the injecto...

Page 37: ...ble 72 X Semi rapid SR 1 75 0 45 32 65 adjustable 97 Z Rapid R 3 00 0 75 42 85 adjustable 115 Y Triple ring TR 3 50 1 50 65 95 adjustable 135 T Left Oven 3 70 0 75 42 92 fully open adjustable 140 5 Left Grill 2 50 80 fully open 120 4 Right Oven 2 20 0 63 39 72 fully open adjustable 110 4 Right Grill 2 00 70 fully open 105 2 Nominal Power kW Reduced Power kW G 30 28 30 mbar G 31 37 mbar G 20 20 mba...

Page 38: ...r unscrew the injector indicated by the arrow in fig 10 7 and replace it by the proper one according to the kind of gas Then replace the burner repeating the above steps in reverse order b grill burner Remove the burner by unscrewing the front screw fig 10 8 Gently suspend the burner as shown in figure 10 9 Be careful not to damage the wire of the electric ignition and the probe of the safety valv...

Page 39: ...cross head screwdriver slacken the screw securing the air flow regulation collar fig 10 10 and 10 11 and move the collar forward or backward to increase or reduce the air aperture in accordance with gas type and the indications in the TABLE FOR THE CHOICE OF THE INJECTORS Light the burner and check the flame ...

Page 40: ...the arrow in fig 10 13 and replace it by the proper one according to the kind of gas Then replace the burner repeating the above steps in reverse order b grill burner Remove the burner by unscrewing the front screw fig 10 14 Gently suspend the burner as shown in figure 10 15 Be careful not to dam age the wire of the electric ignition and the probe of the safety valve Using a 7 mm box spanner repla...

Page 41: ...river slacken the screw securing the air flow regulation collar fig 10 16 and 10 17 and rotate the collar clockwise or anti clockwise to increase or reduce the air aperture in accordance with gas type and the indications in the TABLE FOR THE CHOICE OF THE INJECTORS Light the burner and check the flame ...

Page 42: ...pass screw must be fixed thoroughly LUBRICATION OF THE GAS TAPS If the gas tap becomes stiff it is neces sary to dismount it accurately clean it with gasoline and spread a bit of special grease resistant to high temperatures on it The operations must be executed by a qualified technician IMPORTANT All intervention regarding installation maintenance and conversion of the appliance must be fulfilled...

Page 43: ...D FOR ANY OTHER REA SON THEN THE FUSE SHOULD BE REMOVED AND THE CUT OFF PLUG DISPOSED OF SAFELY TO PREVENT THE HAZARD OF ELECTRIC SHOCK THERE IS A DANGER OF ELECTRI CAL SHOCK IF THE CUT OFF PLUG IS INSERTED INTO ANY 13 AMP SOCKET OUTLET If a replacement plug is to be fitted please observe the wiring code shown overleaf Warning This appliance must be earthed A properly earthed three pin plug fused ...

Page 44: ...r cable section fig 11 2 Connect the wires to the terminal block B as shown in the diagram in figure 11 3 or connect the phase wires to the terminal block B and the earth wire to the terminal PE as shown in figure 11 2 Take up any slack in the cable and secure with the cable clamp D Replace the cover A N B The earth conductor must be left about 3 cm longer than the others Fig 11 2 D B PE A N L FEE...

Page 45: ... not misused neglected or damaged it it has not been modified it is not second hand it has not been used commercially you have not fitted a plug incorrectly and you supply your receipt to show when you brought it The appliance has been installed as per the instructions contained within this booklet This guarantee does not affect your statutory rights GUARANTEE ...

Page 46: ...46 If you require After Sales Service contact the MASTERCARE Domestic Appliance Helpline Telephone 08701 565550 Ser Nr AFTER SALES SERVICE ...

Page 47: ...et are given as simply indicative The manufacturer reserves the right considering the characteristics of the models described here at any time and without notice to make eventual necessary modifications for their construction or for commercial needs ...

Page 48: ...code 1102763 ß2 Part Number 57723 ...

Reviews: