background image

Summary of Contents for 2500

Page 1: ...Kenmore 2500 15 GALLON CENTRAL HUMIDIFIER Installation Maintenance Repair Parts Troubleshooting Sears Roebuck and Co Hoffman Estates IL 60179 U S A ...

Page 2: ...alizethat the wrong use of any toolcan be danger ous Be sureyou knowhow to use the tools and equipmentto avoid any possiblehazards If you have any doubtwe ask that youcontactyourSearssalesperson They willarrangefor profes sionalinstallation SEARS INSTALLATION WARRANTY In additionto any warrantyextended to you on the Sears mer chandiseinvolved which warranty becomes effectivethe date themerchandise...

Page 3: ...my home s relative humidity First give your humidifiertime to build up the humidityto an acceptablelevel Instruments are availableto measurerelative humidity but from a practicalstandpoint your comfortis the best guide Youcannot dependon table top or wall hungdial gauges 3 How long will It take my humidifier to build up the humidity In my home Much depends on the outside temperature time of year h...

Page 4: ... Materials needed for this type installation are available at Sears 11inch minimum 36 inchmaximum usingflex hoseprovided Purchaseaddttlc_laJ hosefor greaterspans Plenum _otachrm to Return Air Plenum Place Humidifier Duct SupplyAi Plenum Air Conditioner Coil inspection EE I t_ This humidifier is assembled with the bypass duct on the left side Fig 3 This is suitable for installation as shown in Fig ...

Page 5: ...ifier and water This fiber duct installation hardware is not supplied and must be pumhased from your local hardware store 1Mark a levellineon plenum Holdstiffeneragainst the ple numwithbottomedgeonlevelline andflangestowardyou Mark the locationof ell holes Includinglarge rectangularopeningin centeron plenum Fig 8 2 Drill or puncha large hole in one cornerof rectangle This willallowyouto insertthe ...

Page 6: ... water line Turn off the water supply Drain by opening a fau cet at a lower level of the line 2 Position the saddle valve on the water line as close to the humidifier as possible You have been supplied with 10 feet of 1 4 plastic tubing SPECIAL NOTE When measuring the distance from the saddle valve location to the humidifier keep in mind that the tubing must be supported therefore it must runalong...

Page 7: ...the tubingend intothe quick disconnectsocket as far asit willgoand holditthere threadthe brasscompression nut onto the quick disconnect socket then tighten using two wrenches oneto holdquick disconnect socketandoneto tighten nut DO NOT over tighten nut 11 Connectthe quickdisconnectsocketto theplugonthe valve body Fig 16 To connect pull back sleeve push socket onto plug release sleeve To disconnect...

Page 8: ...ir Plenum Opening Knob DUCT MOUNT Humid Electdcal Disconnect Humidifier t 120 VAC Wall Outlet 1 Remove knob end coverfrom humidistat To remove cover placescrewdriver bladeinslotatsideof humidistat andtwist 2 Convert humidistat for wall mounting by removing control unit from backplate Reassemble control unit to backplate as illustrated in Pig 22 with spacers to rear and shaft forward Remove electri...

Page 9: ... operating properly 10 SPLASH INSIDE HUMIDIFIER This humidifier depends on the difference of air pressure between the supply air plenum and the return air plenum to propel air through the humidifier Some furnaces have higher pressures than others This could result in air travelling at high speed through the humidifier This can cause droplets of water to be picked up and splashed against the inside...

Page 10: ...ON WHAT TO CHECK WHAT TO DO 1 Does humidifierneed cleaning 2 Is mediawheel rotating 3 Hun_idistat setting 4 Water to unit Too little Humidity Too much Humidity Humidifier 1 Is humidifier level Overflows 2 Float valve 3 Air flow too high Humidifier 1 Mounting or plenum Making Noise 2 Water pressure 3 Media Wheel 5 Excessive air loss in house 6 Is water level correct 7 Is damper open 1 Humidistat se...

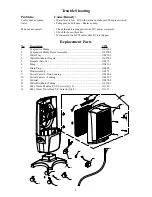
Page 11: ...exible Tube 3 Tube Clamp Reservoir Water Tray Liner Support Bracket Gear Media Wheel with Gear Media Clip 3 Req Media Pad 42 9335 Slinger Washer Float Valve Includes Key Nos 19 24 Float A PACKING LIST 20 22513801 21 28110101 22 28110201 23 21569101 24 03029401 25 21572601 26 21571001 27 21571202 28 21572701 29 21586101 30 03022701 31 STD610603 32 41067501 33 05299101 34 05299201 STD610803 21584001...

Page 12: ...r has been overflowing the float valve button may be worn Remove float valve button turn over and reinsert or replace if both surfaces are worn Part Number 281101 01 11 Reassemble parts in reservoir Flex wire support outward to capture media wheel shaft under dimples and slide back into humidifier Engage latch on right hand side with float valve stem 12 Attach water supply quick connect attach ove...

Page 13: ...t Call 9 00 a m 5 00 p m Monday Saturday 1 800 827 6655 SEARS r IR_ _ _ri _ America s Repair Specialists Tell Sears You Want It Installed Then Relax When Sears arranges the installation you can be sure the job is clone right We will arrange for professional workmanship and we ll take care of the entire project What s more during installa tion you get insured protection against property damage and ...

Reviews: