background image

Summary of Contents for 110.80714

Page 1: ..._J d _ _ _ _ __ _ _ _ I_ _ 7_ _ _ _ AI CENTRO DE LAVANDERIA de 24 161 cm de ancho Lavadora Secadora el_ctrica Vi3C _ _ _J_ J _J _ J_ l _ Models Modelos 1 10 80714 88752 I v i _V_i ll _ l_v W10034990 Sears Roebuck and Co Hoffman Estates IL 60179 U S A www sears com ...

Page 2: ...Protection Agreement now and protect yourself from unexpected hassle and expense The Master Protection Agreement also helps extend the life of your new product Here s what s included in the Agreement v Expert service by our 12 000 professional repair specialists v Unlimited service and no charge for parts and labor on all covered repairs v No lemon guarantee replacement of your covered product if ...

Page 3: ...of parts or systems resulting from unauthorized modifications made to this product DISCLAIMER OF IMPLIED WARRANTIES LIMITATION OF REMEDIES Customer s sole and exclusive remedy under this limited warranty shall be product repair as provided herein Implied warranties including warranties of merchantability or fitness for a particular purpose are limited to one year or the shortest period allowed by ...

Page 4: ... ignite or explode Do not allow children to play on or in the washer dryer Close supervision of children is necessary when the washer dryer is used near children Before the washer dryer is removed from service or discarded remove the doors to the washer dryer compartments Do not reach into the washer dryer if the tub agitator or drum is moving Do not install or store the washer dryer where it will...

Page 5: ...ts and Venting Requirements before purchasing parts Mobile home installations require metal exhaust system hardware available for purchase from your local Sears store or Sears Service Center For further information please call 1 800 4 MY HOME 1 800 469 4663 Parts listed are available from your local Sears store or Sears Service Center For further information please call 1 800 4 MY HOME 1 800 469 4...

Page 6: ... 1 2 m of the hot and cold water fill valves and water pressure of 5 100 psi 34 5 689 6 kPa The laundry center must not be installed or stored in an area where it will be exposed to water and or weather Do not operate your washer in temperatures at or below 32 F 0 C Some water can remain in the washer and can cause damage in low temperatures See Vacation Storage and Moving Care for winterizing inf...

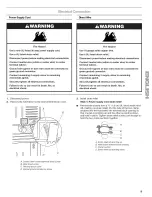
Page 7: ...ocal codes and ordinances A copy of the above code standards can be obtained from National Fire Protection Association One Batterymarch Park Quincy MA 02269 To supply the required 3 or 4 wire single phase 120 240 volt 60 Hz AC only electrical supply or 3 or 4 wire 120 208 volt electrical supply if specified on the serial rating plate on a separate 30 amp circuit fused on both sides of the line A t...

Page 8: ... aluminum At least 5 ft 1 52 m long GROUNDING INSTRUCTIONS For a grounded cord connected washer dryer This washer dryer must be grounded In the event of malfunction or breakdown grounding will reduce the risk of electric shock by providing a path of least resistance for electric current This washer dryer uses a cord having an equipment grounding conductor and a grounding plug The plug must be plug...

Page 9: ...st be connected to green ground connector Connect remaining 2 supply wires to remaining 2 terminals gold Securely tighten all electrical connections Failure to do so can result in death fire or electrical shock f Disconnect power 3 2 Remove the hold down screw and terminal block cover U _ A c Install strain relief Style 1 Power supply cord strain relief Remove the screws from a 3 4 1 9 cm UL liste...

Page 10: ... complete installation following instructions for your type of electrical connection 4 wire recommended 3 wire if 4 wire is not available Electrical Connection Options If your home has And you will be Go to Section connecting to 4 wire receptacle A UL listed 4 wire connection NEMA Type 14 30R 120 240 volt Power supply cord _ minimum 30 amp dryer power supply cord 4 wire direct A fused 4 wire conne...

Page 11: ...ten screw B G F E D A Neutral wire white or center wire B Center silver colored terminal block screw C Neutral ground wire D External ground conductor screw E Ground wire green or bare of power supply cord F Internal ground conductor location G 3 4 1 9 cm UL listed strain relief 4 Connect the other wires to outer terminal block screws Tighten screws 5 Tighten strain relief screws 6 Insert tab of t...

Page 12: ...ing terminals G Neutral white or center wire Loosen or remove center silver colored terminal block screw Connect neutral wire white or center wire of power supply cord to the center silver colored terminal screw of the terminal block Tighten screw B C D A Neutral wire white or center wire B Center silver colored terminal block screw C Neutral ground wire D Internal ground conductor screw E 3 4 1 9...

Page 13: ...3 wire connection Use for direct wire or power supply cord where local codes do not permit connecting cabinet ground conductor to neutral wire 1 Remove center silver colored terminal block screw 2 Remove neutral ground wire from internal ground conductor screw Connect neutral ground wire and the neutral wire white or center wire of power supply cord cable under center silver colored terminal block...

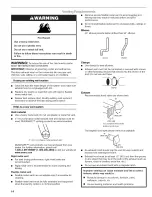
Page 14: ... this is a new vent system Vent material Use a heavy metal vent Do not use plastic or metal foil vent 4 10 2 cm heavy metal exhaust vent and clamps must be used DURASAFE TM venting products are recommended 4 10 2cm heavymetal exhaust vent DURASAFE TM vent products can be purchased from your dealer For further information please call 1 800 4 MY HOME 1 800 469 4663 or visit our website at www sears ...

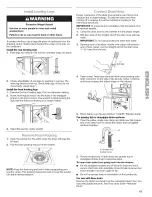
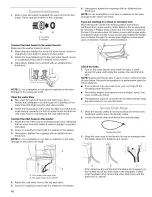
Page 15: ... Check the drain hose to see whether it is the proper length 2 Wet the inside of the straight end of the drain hose with tap water IMPORTANT Do not use any lubricant other than water 3 Squeeze ears of the silver double wire clamp with pliers to open Place clamp over the straight end of the drain hose W 6 4 mm from the end 4 Open clamp Twist hose back and forth while pushing onto drain connector on...

Page 16: ... hot water faucet and that the cold water hose is connected to the cold water faucet Connect the inlet hoses to the washer 1 Attach the hot water hose to the bottom inlet valve Attaching the hot water hose first makes it easier to tighten connection with pliers 2 Screw on coupling by hand until it is seated on the washer 3 Using pliers tighten the couplings with an additional two thirds turn NOTE ...

Page 17: ...aust by using standard offset connections To cover the hole in the side one of the following plugs can be added 692790 white 3979370 graphite 3977784 biscuit Follow the instructions in the kit to install Kits are available from your local Sears store or Sears Service Center Part Number 26 49901 Less than 5 12 7 cm mismatch Part Number 26 49908 5 12 7 cm to 18 45 7 cm mismatch Part Number 26 49904 ...

Page 18: ... fit over the exhaust outlet and inside the exhaust hood Make sure the vent is secured to exhaust hood with a 4 10 2 cm clamp 2 Move laundry center into its final position Do not crush or kink vent Make sure laundry center is level 1 Check that all parts are now installed If there is an extra part go back through the steps to see which step was skipped 2 Check that you have all of your tools 3 Dis...

Page 19: ...e the washer lid 4 Turn the WATER LEVEL selector knob to the correct setting for your wash load and the type of fabric being washed WATER LEVEL MEDIUM LOAD S_A__R6E LOAD LO_D RESZT Choose a load size that allows the load to move freely for best fabric care See Loading You may change the load size selection after the washer has started filling by turning the selector to a different setting Set the ...

Page 20: ...nd slow spin speeds to reduce wrinkling Soak The Soak cycle features 4 minutes of agitation followed by an unlimited soak time to help remove heavy soils and stains that need pretreatment You will need to reset the washer to a SPIN setting to remove water The Soak cycle should be followed by the Heavy Duty or Permanent Press or Prewash cycle with additional detergent NOTE Hot water is not recommen...

Page 21: ...her operation LAUNDRY TIPS Preparing clothes for washing Follow these recommendations to help you prolong the life of your garments Close zippers snaps and hooks to avoid snagging other items Remove pins buckles and other hard objects to avoid scratching the washer interior Remove non washable trim and ornaments Empty pockets and turn them inside out Turn down cuffs brush away lint and dirt Turn s...

Page 22: ...of oil on it including cooking oils items containing foam rubber or plastic must be dried on a clothesline or by using an Air Cycle Failure to follow these instructions can result in death or fire To restart your dryer 1 Close the door 2 Select a new cycle and temperature if desired 3 Press PUSH TO START DRYER Load clothes loosely into the dryer Do not pack the dryer Allow space for clothes to tum...

Page 23: ...lect a setting closer to LESS DRY the next time you dry a similar load If the load is not as dry as you like complete drying using the Timed Dry cycle The next time you dry a similar load select a setting closer to MORE DRY NOTE Drying time with an automatic cycle varies according to the type of fabric size of load and temperature setting See Drying Cycle and Temperature Tips Timed Dry Use this cy...

Page 24: ...re found When replacing your inlet hoses mark the date of replacement on the label with a permanent marker the Lint Scp e s Every load cleaning The lint screen is located on the back wall of the dryer Remove lint before each load A screen blocked by lint can increase drying time B A Screen B Cover 3 Roll lint off the screen with your fingers Do not rinse or wash screen to remove lint Wet lint is h...

Page 25: ...ry center or disconnect power Turn off the water supply to the washer This helps avoid accidental flooding due to a water pressure surge while you are away To winterize laundry center 1 Shut off both water faucets 2 Disconnect and drain water inlet hoses 3 Put 1 qt 1 L of R V type antifreeze in the basket 4 Run washer on a drain and spin setting for about 30 seconds to mix the antifreeze and water...

Page 26: ...ub before starting the washer Is water splashing off the load Evenly distribute the load in the washer basket and make sure the height of the load does not exceed the top row of basket holes The fill or spray rinses can splash off the load Washer won t run fill rinse or agitate washer stops Electrical Shock Hazard Plug into a grounded 3 prong outlet Do not remove ground prong Do not use an adapter...

Page 27: ...Did you line dry your clothing If so you can expect some lint on the clothing The air movement and tumbling of a dryer removes lint from the load Was paper or tissue left in the pockets Is your water colder than 60 F 15 6 C Wash water colder than 60 F 15 6 C may not completely dissolve the detergent Did you use the proper cycle time and agitation speed for the load Reducing wash time duration and ...

Page 28: ...r reset the circuit breaker If a problem continues call an electrician Unusualsounds Has the dryer had a period of non use If the dryer hasn t been used for a while there may be a thumping sound during the first few minutes of operation Is a coin button or paper clip caught between the drum and front or rear of the dryer Check the front and rear edges of the drum for small objects Clean out pocket...

Page 29: ...vy to dry quickly Separate the load to tumble freely Lint on load Is the lint screen clogged Lint screen should be cleaned before each load Stains on load or drum Was dryer fabric softener properly used Add dryer fabric softener sheets at the beginning of the cycle Fabric softener sheets added to a partially dried load can stain your garments Drum stains are caused by dyes in clothing usually blue...

Page 30: ...rotecci6n puede ahorrarle dinero e inconvenientes Adquiera un Contrato Maestro de Protecci4n hey y prot_jase contra molestias y gastos inesperados El Contrato Maestro de Proteccidn tambien ayuda a prolongar la vida de su nuevo producto He aquf Io que se incluye en el Contrato v Servicio experto por nuestros 12 000 especialistas en reparaci6n competentes v Servicio ilimitado y gratuito para repuest...

Page 31: ...como resultado de modificaciones no autorizadas que se hayan efectuado en este producto EXCLUSION DE GARANT AS IMPL CITAS LIMITACION DE RECURSOS El _nico y exclusivo recurso del cliente seg_n los terminos de esta garantia limitada sera el de reparar el producto segt n se estipula en la presente Las garantfas implfcitas incluyendo las garantias de comerciabilidad o de capacidad para un prop6sito pa...

Page 32: ...jueguen encima o dentro de la lavadora la secadora Es necesario una supervisi6n cuidadosa de los nihos cada vez que se use la lavadora la secadora cerca de ellos Antes de poner la lavadora la secadora fuera de servicio o desecharla quite las puertas a los compartimientos de la lavadoraTla secadora No introduzca las manos en la lavadora la secadora cuando la tina el agitador o el tambor estb_nmovim...

Page 33: ...6n antes de comprar las piezas Las instalaciones en casas rodantes necesitan articulos de ferreterfa para sistemas de ventilacidn de metal que se pueden comprar en su tienda Sears o en el centro de servicio tecnico Sears de su Iocalidad Para mas informaci6n Ilame per favor 1 800 4 MY HOME 1 800 469 4663 Las piezas aquf enumeradas se pueden adquirir en la tienda Sears o en el Centro de Servicio Sea...

Page 34: ...es o inferiores a 32 F 0 C El agua que quede en la lavadora puede ocasionar dafios a bajas temperaturas Vea la secci6n Cuidado para las vacaciones almacenaje o en caso de mudanza para saber c6mo acondicionarla para el invierno No haga funcionar su secadora a temperaturas inferiores a 45 F 7 C A temperaturas inferiores es posible que la secadora no se apague al final de un ciclo automatico Esto pue...

Page 35: ...adero ilustracibn C El lavadero debe tener una capacidad mfnima de 20 gal 76 L La parte superior del lavadero debe estar a 34 86 4 cm de altura cuando menos sobre el piso y no podra estar a mas de 96 2 4 m de la base de la lavadora Asegurarse de que la conexi6n electrica sea adecuada y de conformidad con el C6digo Nacional Electrico ANSl NFPA 70 Oltima edici6n y con todos los c6digos y ordenanzas ...

Page 36: ... encajar en un tomacorriente para 3 hilos de tipo NEMA 10 30R Si hace la conexibn con cableado directo El cable de suministro electrico debe ser igual al del suministro electrico de 4 alambres o de 3 alambres y debe ser Cable blindado flexible o cable de cobre forrado no metalico con alambre puesto a tierra protegido con un conducto metalico flexible Todos los alambres conductores de corriente deb...

Page 37: ...lambres de suministro restantes con las 2 terminales restantes las doradas Apriete firmemente todas las cone Jones electricas No seguir estas instrucciones puede causar la muerte incendio o choque electrico 1 Desconecte el suministro de energia 2 Quite el tornillo de sujeci6n y la tapa del bloque de terminal U A C A Tornillo de bloque de terminal de color plateado del centre B Tornillo de sujecidn...

Page 38: ...iones para el tipo de su conexi6n electrica Alambre de 4 hilos se recomienda Alambre de 3 hilos si no dispone de alambre de cuatro Opciones para la conexibn electrica Si su casa tiene Y usted va a Vaya a la secci6n conectar con Un contacto de Un cable de Conexi6n de 4 hilos tipo NEMA suministro 4 hilos 14 30R electrico para Cable de _ secadora suministro aprobado de electrico UL de 120 240 voltios...

Page 39: ...o hilo blanco e central B Tornillode bloque de terminal de color plateado del centro C Hilo de conexidn a tierra neutro D Tornilloconductor a tierra extemo E Hilo de tierra verde o desnudo del corddn de suministro el_ctrico E Ubicacidn del conductor a tierra interno G Protector de cables de 3 4 1 9 cm que est_ en la Iista de UL Conecte los otros hilos a los tornillos exteriores del bloque de termi...

Page 40: ...erminal neutro D Bornes de horquilla con extremos hacia arriba E Protector de cables que est_ en la lista de UL de 3 _ 1 9 cm F Bomes anulares G Neutro hilo blanco o central 1 Afloje o saque el tornillo central de color plateado del bloque terminal 2 Conecte el hilo neutro hilo blanco o central del cable de suministro electrico al tornillo central de color plateado del bloque terminal Apriete el t...

Page 41: ...el gabinete con el hilo neutro 1 Saque el tornillo central del bloque terminal 2 Saque el hilo de tierra neutro del aparato del tornillo conductor de tierra externo Conecte el hilo de tierra del aparato y el hilo neutro hilo blanco o central del cord6n cable de suministro electrico debajo del tornillo central de color plateado del bloque terminal Apriete el tornillo D E A Hilo neutro hilo blanco o...

Page 42: ...per complete cuando la secadora esta en su ubicaci6n final Quite el exceso del ducto de metal flexible para evitar que se doble y se tuerza Io cual podrfa dar lugar a una reducci6n del flujo de aire y a un rendimiento insuficiente No instale el ducto de escape de metal flexible en paredes techos o pisos encerrados Codes Los codes de 45 proveen un mqorflujo de aire quelos codes de 90 Bien Mejor Abr...

Page 43: ...ficios de los puntales triangulares en las esquinas frontales Use una Ilave de tuercas para terminar de atornillar las patas hasta que la marca en forma de diamante no quede visible 3 Ponga con cuidado el centro de lavanderia en la posici6n vertical 1 Abra la tapa de la lavadora El seguro debajo de la secadora mantendra la tapa abierta 2 Retire el anillo de embalaje de hule espuma fuera de la lava...

Page 44: ...iqueta cold fr o al grifo de agua fria Atornille el acoplamiento con la mano hasta que se asiente en la arandela 4 Apriete los acoplamientos con los alicates girandolos dos tercios de vuelta adicional NOTA No apriete demasiado ni use cinta o selladores en la valvula Se pueden da_ar las valvulas Limpie el agua de las lineas Haga correr el agua a traves de los grifos y de las mangueras de entrada de...

Page 45: ...o o al tubo vertical con el fleje plastico A 6 B abajo B O Si los grifos de agua y el tubo vertical de desag0e estan empotrados coloque el extreme con forma de gancho de la manguera de desagQe en el tubo vertical Enrolle el fleje de plastico con firmeza alrededor de las mangueras de entrada de agua y de la manguera de desagQe C arriba Seleccione su tipo de instalacibn de ventilacibn Instalaciones ...

Page 46: ...to y directo al exterior Planifique la instalaci6n a fin de usar el menor nQmero posible de codos y vueltas Cuando use los codos o haga vueltas deje todo el espacio que sea posible Doble el ducto gradualmente para evitar torceduras Use la menor cantidad posible de vueltas de 90 Determinacibn de la Iongitud del ducto de escape y de los codos necesarios para obtener un bptimo rendimiento de secado U...

Page 47: ... de plastico en el case de que deba transportar el centre de lavander a 4 Revise la Iocalizaci6n final del centro de lavanderia AsegQrese de que el ducto de escape no este aplastado o retorcido 5 Cerci6rese de que el centre de lavander a este nivelado y las patas niveladoras delanteras esten ajustadas Consulte Para nivelar el Centro de lavanderia 6 Para una instalaci6n con cable de suministro de e...

Page 48: ...as deben moverse con facilidad en el agua de lavado Sobrecargar la lavadora puede causar una limpieza insatisfactoria 3 Cierre la tapa de la lavadora 4 Gire la perilla de Nivel del agua WATER LEVEL al ajuste apropiado para la carga y el tipo de tela que se van a lavar 5 WATER LEVEL MEDIUM LOAD SMALL LARGE _OA_LOAOe _ESEr Seleccione un tamaSo de carga que permita que esta se mueva libremente para e...

Page 49: ...uste de Exprimido SPIN para quitar el agua El ciclo de remojo debera seguirse por el ciclo de Lavado pesado Planchado permanente o Prelavado agregando detergente adicional NOTA No se recomienda usar agua caliente para el remojo Es posible que se fijen algunas manchas Prelavado Prewash Use este ciclo para obtener hasta 4 minutes de agitaci6n para ayudar a quitar suciedad profunda y manchas rebeldes...

Page 50: ...s duros para evitar que rayen el interior de la lavadora Quite todo adorno y ornamento que no sea lavable Vacie los bolsillos y vuelvalos al reves Doble los pur_os y limpie con un cepillo la pelusa y la suciedad Vuelva al reves las prendas de tejido sintetico para evitar que se Ilenen de pelusas Ate los cordones y fajas de modo que no se enreden Remiende Io que este roto asi como las costuras y do...

Page 51: ...la temperatura recomendados para el tipo de carga que se va a secar Vea Consejos de secado ciclos y temperatura 4 Presione el bot6n Empuje para poner en marcha la secadora PUSH TO START DRYER PUSH TO START DRYER Peligro de Incendio Ninguna lavadora puede eliminar completamente el aceite No seque ningun articulo que haya tenido alguna vez cualquier tipo de aceite incluyendo los aceites de cocina Lo...

Page 52: ...ntas acerca de las temperaturas de secado para las diferentes cargas de ropa refierase alas instrucciones en la etiqueta de cuidado de las prendas AUTO DRY II MORE DRY NORMAL DRY LESS DRY 10 TOUCH UP 5O 110 lo0 0 80 lo 60 TIMED DRY Secado automatico II Auto Dry II Use este ciclo para secar la mayor a de sus cargas El nivel de secado esta determinado por termostatos que reaccionan a la cantidad de ...

Page 53: ...lee y vaporee inflamables tales como la gasolina alejados de la secadora No seguir estas instruccionee puede ocasionar la muerte explosi6n o incendio Reemplace las mangueras de entrada de agua despues de 5 a_os de uso para reducir el riesgo de fallas Inspeccione peri6dicamente y cambie las mangueras si se hallan protuberancias torceduras cortes desgaste o perdidas de agua Guando reemplace sus rnan...

Page 54: ...e colores que destir_en tales como mezclillas o articulos de algod6n de colores vivos pueden ter_ir el interior de la secadora Estas manchas no dafian su secadora ni mancharan las cargas futuras de ropa Seque los articulos de colores que destir_en al reves para evitar la transferencia del tinte En el interior del gabinete de la secadora SegL_nel uso de la secadora se debe quitar la pelusa cada 2 a...

Page 55: ... que esta combado o desnivelado puede contribuir a que la lavadora haga ruido y vibre Los sonidos se pueden reducir colocando una madera laminada de 3A 1 9 cm debajo de la lavadora Vea lnstrucciones de instalaci6n Esta nivelada la lavadora La lavadora debe estar nivelada Vea lnstrucciones de instalaci6n Esta balanceada la carga Distribuya la carga uniformemente en la canasta de la lavadora y asegO...

Page 56: ...a pausa por unos 2 minutos durante ciertos ciclos Deje continuar el ciclo Algunos ciclos presentan perfodos de agitaci6n y remojo Esta sobrecargada la lavadora Lave cargas mas pequeSas Est_i abierta la tapa La tapa debe estar cerrada durante el funcionamiento La lavadora no agita ni exprime con la tapa abierta La lavadora continua Ilenando o desaguando el ciclo parece estar atascado Est_i la parte...

Page 57: ...de la carga Se dej6 papel o paSuelo de papel en los bolsillos Esta la temperatura del agua por debajo de los 60 F 15 6 0 El agua de lavado con una temperatura inferior a 60 F 15 6 C quizas no disuelva por completo el detergente Ha usado el tiempo del ciclo y la velocidad de agitaci6n apropiados para la carga Otra manera de reducir la formaci6n de pelusa es reducir el tiempo la duraci6n del lavado ...

Page 58: ... vibrar si no esta instalada adecuadamente Vea las Instrucciones de instalaci6n Las prendas estan enredadas o hechas un ovillo Si la carga esta hecha un ovillo rebotara haciendo vibrar a la secadora Separe los articulos de la carga y reinicie la secadora El temporizador no parece avanzar Se ha ajustado la secadora en secado programado o al aire Timed or Air Dry El temporizador se mueve lenta y con...

Page 59: ...a y pesada para secarse con rapidez Separe la carga de mode que pueda rotar libremente Pelusa en la ropa Estd obstruido el filtro de pelusa El filtro de pelusa debe ser limpiado antes de cada carga Manchas en la carga o en el tambor Se ha empleado adecuadamente el suavizante de telas Agregue hojas de suavizante de telas al comienzo del ciclo Las hojas del suavizante de telas que se agregan a una c...

Page 60: ...quipment and electronics call or go on line for the location of your nearest Sears Parts Repair Center 1 800 488 1222 Call anytime day or night U S A only www sears com To purchase a protection agreement U S A or maintenance agreement Canada on a product serviced by Sears 1 800 827 6655 U S A 1 800 361 6665 Canada Para pedir servicio de reparaci6n a domicilio y para ordenar piezas 1 888 SU HOGAR 1...

Reviews: