background image

Summary of Contents for 000 BTU Multi-Room Air Conditioner

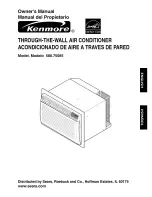
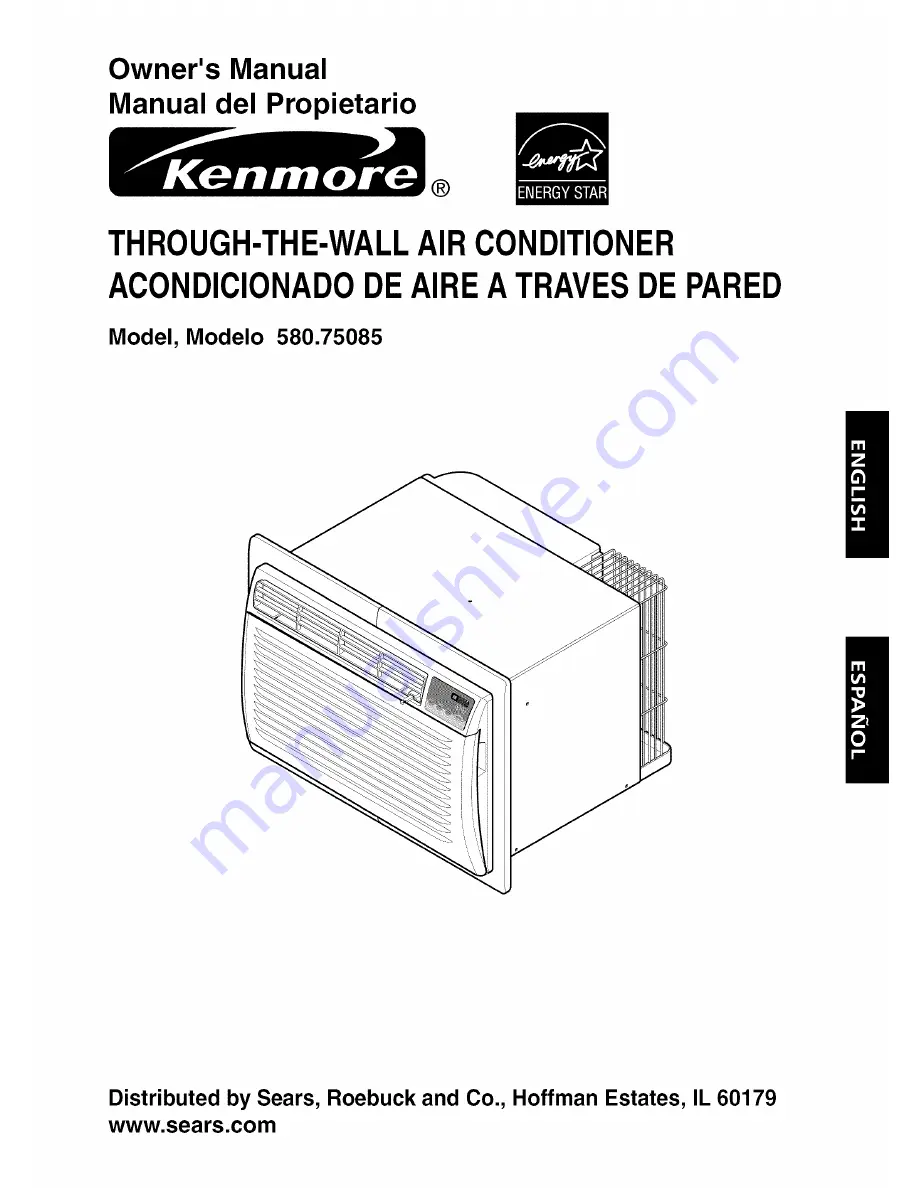
Page 1: ...ner s Manual Manual del Propietario THROUGH THE WALL AIR CONDITIONER ACONDIClONADO DEAIREA TRAVESDE PARED Model Modelo 580 75085 Distributed by Sears Roebuck and Co Hoffman Estates IL 60179 www sears com ...

Page 2: ...om cooling according to instructions in this owner s manual Sears will repair this air conditioner free of charge if defective in material or workmanship FULL FIVE YEAR WARRANTY ON SEALED REFRIGERATION SYSTEM For five years from the date of purchase when this air conditioner is operated and maintained for normal room cooling according to instructions in this owner s manual Sears will repair the se...

Page 3: ... conditioner must be plugged into a properly grounded wall receptacle If the wall receptacle you intend to use is not adequately grounded or protected by a time delay fuse or circuit breaker have a qualified electrician install the proper receptacle Do not run air conditioner with packing sheet of the back of the sleeve and packing corner and blue tape of the air conditioner This could result in m...

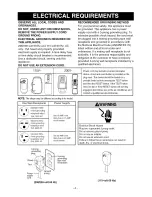
Page 4: ...talled by a qualified electrician 115V T 230V Power cord may include a current interrupter device A test and reset button is provided on the plug case The device should be tested on a periodic basis by first pressing the TEST button and then the RESET button If the TEST button does not trip or if the RESET button will not stay engaged discontinue use of the air conditioner and contact a qualified ...

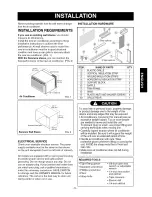
Page 5: ...equipped with a 3 prong service plug to provide proper service and safe positive grounding Do not change plug in any way Do not use an adapter plug If your present wall outlet does not match your plug call a qualified electrician to make the necessary corrections SAVE CARTON for storage and this OWNER S MANUAL for future reference The carton is the best way to store unit during winter or when not ...

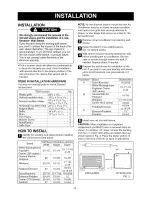
Page 6: ...25 7 8 Emerson Fedders 26 3 4 Carrier 51S Series 25 3 4 Friedrich 27 Height Depth 15 1 4 16 17 1 2 or 22 15 5 8 16 7 8 17 1 8 16 1 2 or 23 16 3 4 16 3 4 or 19 3 4 15 17 32 16 23 32 15 3 4 15 16 7 8 18 5 8 16 3 4 16 3 4 NOTE All wall sleeves used to mount the new Air Conditioner must be in sound structural condition and have a rear grille that securely attaches to sleeve or rear flange that serves ...

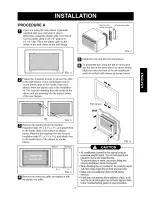
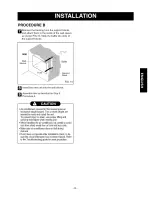
Page 7: ... 8x 13 8x 25 32 and attach that to the inside front of the sleeve as shown below Ir Etljii o I Indoor Outdoor 9 1 2 _ _ 6 _ FIG 6 L_ I_Remove the metal rear grille and replace it with the plastic rear grille 7 Remove the Plastic rear grille metal rear gl FIG 7 _ Install the new unit into the wall sleeve To assemble trim snap the tab of each piece into the slot of the other piece as shown below Sli...

Page 8: ...side front of the sleeve as shown below Place the plastic grille _1 Fasten the 4 washer screws to secure the grille to the wall sleeve If you need plastic nuts to mount plastic grille to the inside of the wall sleeve there are plastic nuts in the installation kit The nuts are installed from the inside of the sleeve and are pressed into the square holes of the rear flanges Fasten the screws or Vert...

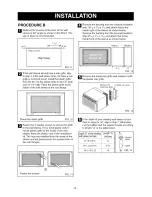
Page 9: ...15 pvt_ E_o _I Airconditioners coveredin thismanualposean excessiveweighthazard Twoor morepeopleare neededto moveandinstallthe unit To preventinjuryor strain use properliftingand carryingtechniques whenmovingunit Whenhandlingthe airconditioner becarefulto avoid cutsfromsharpmetalfinsonfrontandrearcoils Makesureairconditioner doesnotfall during removal If unitdoesnotoperateafterinstallation check t...

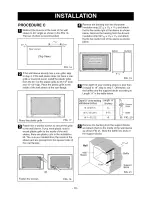
Page 10: ... the inside of the sleeve and are pressed into the square holes of the rear flanges or Fasten the screws FIG 18 _1 Remove the backing from the Horizontal Insulation strip 237 32 X 13 8 X 13 18 and attach that to the inside right of the sleeve as shown below Remove the backing from the Around Insulation strip 5927 32 X 13 8x 13 8and attach that to the inside front of the sleeve as shown below Indoo...

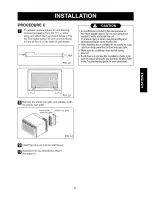
Page 11: ... preventinjuryorstrain useproperliftingand carryingtechniques when movingunit Whenhandling the airconditioner becarefulto avoid cutsfromsharpmetalfinsonfrontandrearcoils Makesureairconditioner doesnotfall during removal Ifunitdoesnotoperateafterinstallation check to be surethe circuitinterrupter has notbeentripped Refer to the Troubleshooting guidefor resetprocedure _J Remove the metal rear grille...

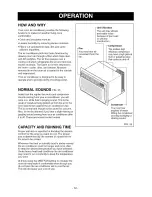
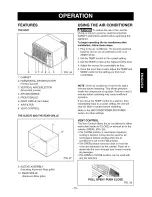
Page 12: ... not be cause for concern Also do not be alarmed if you hear a slight hissing or gurgling sound coming from your air conditioner after it is off These are normal coolant noises CAPACITY AND RUNNING TIME Proper unit size is important in deciding the desired comfort for the area you want to cool The proper size is determined by the number of square feet in the area to be cooled Whenever the heat or ...

Page 13: ...able NOTE If the air conditioner is turned off wait 3 minutes before restarting This allows pressure inside the compressor to equalize Failure to wait 3 minutes before restarting may cause inefficient operation If you move the TEMP control to a warmer then immediately back to a cooler setting the unit will shut off Wait 3 minutes before restarting Refer to the AIR CONDITIONER FEATURES section for ...

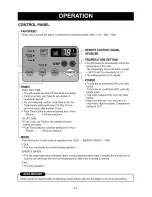
Page 14: ... automatically control the temperature of the room The temperature can be set within a range of 60 F to 86 F by increments of I F The setting appears in the display POWER To turn the air conditioner ON push this button To turn the air conditioner OFF push the button again This button takes priority over any other button When you first turn it on the unit is in cool mode High fan speed Temperature ...

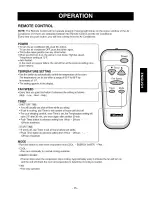
Page 15: ...crements of I F The setting appears in the display FAN SPEED Every time you push this button it advances the setting as follows High _Low _Ned _ High TIMER SHUT OFF TIME You will usually use shut off time while you sleep If unit is running use Timer to set number of hours until shut off Fan Speed Timer Mode For your sleeping comfort once Time is set the Temperature setting will raise 2 F after 30 ...

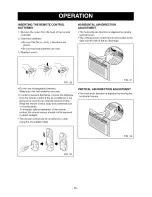
Page 16: ...be used for an extended period of time Keep the remote control away from extremely hot or humid places To maintain optimal operation of the remote control the remote sensor should not be exposed to direct sunlight The remote control can be mounted on a wall using the mountable holder HORIZONTAL AIR DIRECTION ADJUSTMENT The horizontal air direction is adjusted by moving vertical louver The vertical...

Page 17: ...binet may be washed with mild soap or detergent and lukewarm water then polished with liquid appliance wax To ensure continued peak efficiency the condenser coils outdoor side of the unit should be checked periodically and cleaned if they become clogged with soot or dirt from the atmosphere Brush or vacuum exterior coils to remove debris from fins I I j _ I KN FIG 35 HOW TO REMOVE THE FRONT GRILLE...

Page 18: ...erto Maintenance sectionof owner smanual Todefrost thecoil settheMODEto Cool Fanspeedto high andthe TEMPControlset toolow Tempcontroltoa highertemperature THEAIRCONDITIONER COOLING BUTROOM ISTOOWARM Check if Then Dirtyairfilter airrestricted Cleanairfilter Referto Maintenance sectionof owner smanual TEMPControlset toowarm SetTEMPControlto a lowertemperature Frontof unitis blockedbydrapes blinds fu...

Page 19: ... 19 ...

Page 20: ...las instrucciones en el manual del propietario Sears reparar este aire acondicionado gratuitamente si existen defectos en el material o la mano de obra GARANTIA COMPLETA DE CINCO ANOS EN EL SISTEMA SELLADO DE REFRIGERACION Durante cinco afios a partir de la fecha de compra cuando este aire acondicionado funcione y se mantenga para el enfriamiento normal seg0n las instrucciones en el manual del pro...

Page 21: ...enchufe de pared correctamente puesto a tierra Si el enchufe de pared que planea utilizar no esta adecuadamente puesto a tierra o protegido pot un fusible de retardo o un interruptor Ilame a un electricista cualificado para instalar el enchufe apropiado No ponga en funcionamiento el aire acondicionado con la hoja de embalaje adherida a la parte posterior del soporte de pared y la esquina de embala...

Page 22: ...na conexi6n de pared adecuada de tres terminales con conexi6n a tierra 115V 230V Elcabledealimentaci6n puede incluirundispositivo interruptor decorriente Lacarcasa delenchufe cuenta conunbot6ndeprueba y otrodereinicio Eldispositivo debe comprobarse peri6dicamente presionando primero elboton TEST y despues RESET Sielbot6nTEST nosedesconecta osi elboton RESET nopermanece activo suspenda elusodelaire...

Page 23: ...hufe de tres dientes para proporcionar el servicio apropiado y poner a tierra el positivo de forrna segura No carnbie el enchufe de ninguna rnanera No utilice un enchufe adaptador Si su enchufe de pared actual no adrnite su enchufe Ilarnea un electricista cualificado para realizar las correcciones necesarias GUARDE LA CAJA DE CARTON para el alrnacenarniento y este MANUAL DEL PROPIETARIO para futur...

Page 24: ...2 27 16 3 4 25 7 8 15 17 32 26 3 4 15 3 4 25 3 4 16 7 8 27 16 3 4 Profundidad 16 17 1 2 6 22 16 7 8 17 1 8 6 23 16 3 4 6 19 3 4 16 23 32 15 18 5 8 16 3 4 NOTA Todos los soporte de pared utilizados para montar el nuevo aire acondicionado deben estar en condiciones estructurales sanas y tenet una rejilla posterior que se acople con seguridadal soporte de pared o una pestaSa posterior que sirva como ...

Page 25: ...orte de pared segun se muestra a continuaci6n Interior 9 1 2 Exterior FIG 6 L_ Extraiga larejillademetalposterior y sustitOyala potlarejilla plastica posterior Extraiga la rejilla Rejilla plasticaposterior metalicaposte_ FIG 7 _ Instale la nueva unidad en el soporte de pared r_Para el montaje encaje la lengeeta de cada pieza en la ranura de la otra pieza segun se muestra a continuaci6n Deslice la ...

Page 26: ...6n Las tuercas estan instaladas en el interior del soporte de pared y esta n presionando las perforaciones cuadradas de las pestafias posteriores L_ Retire el envoltorio de la tira vertical de aislamiento 15 9 16 x 1 3 8 x 1 3 8 y unala a la parte interior derecha del soporte de pared segun se muestra a continuaci6n Retire el envoltorio de la tira de aislamiento envolvente de 67 1 8 x 1 3 8x 25 32...

Page 27: ... representan unpeligroporpesoexcesivo Son necesarias dos o rnaspersonasparadesplazar e instalarlaunidad Paraevitarlesioneso esfuerzos excesivos utilicelas tecnicasdelevantarniento y desplazarniento apropiadas al moverlaunidad Uanipuleconcuidadoelaireacondicionado tenga cuidadode evitarcortesde lasaristasafiladasde metaldelas bobinasfrontaly posterior Asegt_rese dequeelaireacondicionado nose caiga ...

Page 28: ...aladas en el interior del soporte de pared y esta n presionando las perforaciones cuadradas de las pestaSas posteriores Apriete los tornillos 6 FIG 18 _1 Retire el envoltorio de la tira horizontal de aislamiento de 23 7 32 x 1 3 8x 1 3 16 y t nala a la parte interior derecha del soporte de pared segt n se muestra a continuaci6n Retire el envoltorio de la tira de aislamiento envolvente de 59 27 32 ...

Page 29: ...e el ajuste segun Io descrito en el paso 6 procedimiento A _ t 1 1 t __l e e _ Losairesacondicionados tratadosen estemanual representan unpeligroporpesoexcesivo Son necesariasdoso maspersonasparadesplazare instalarlaunidad Paraevitarlesiones o esfuerzosexcesivos utilicelas t nicasde levantamiento y desplazamiento apropiadas al moverlaunidad Uanipulecon cuidadoel aireacondicionado tenga cuidadodeev...

Page 30: ... no se alarme si escucha un leve ruido silbante o borboteante que procede de su aire acondicionado despues de apagado stos son ruidos normales del liquido refrigerador CAPACIDAD Y TIEMPO DE EJECUClON El tamafioapropiado de la unidad es importante a la hora de decidir la comodidad del Areaque desea enfriar El tamafio apropiado es determinado pot el numero de pies cuadrados del Areaa enfriar Siempre...

Page 31: ...modo flujo de aire 5 Una vez enfriado el cuarto ajuste los controles TEMP y MODO a la posici6n que encuentre ma sc6moda NOTA Si apaga el aire acondicionado espere 3 minutos antes de volver a encenderlo Esto permite que la presi6n interior del compresor se iguale Si decide no esperar 3 minutos antes de volver a encenderlo puede causar un funcionamiento ineficaz Si cambia el control TEMP a una posic...

Page 32: ...R el aire acondicionado presione este bot6n Para APAGAR el aire acondicionado presione de nuevo el bot6n Este bot6n tiene prioridad sobre cualquier otro bot6n Cuando la encienda por primera vez la unidad estara en modo frio alta velocidad del ventilador control de temperatura en 720 F HORA DE INICIO Si la unidad est apagada utilice el temporizador para establecer el ntJmerode horas antes de inicia...

Page 33: ...omo sigue a continuaci6n Alto _ Bajo _ Medio _ Alto TEMPORIZADOR HORA DE APAGADO Normalmente utilizara el tiempo de apagado mientras usted duerme Si la unidad esta funcionando utilice el temporizador para fijar el nt_mero de horas hasta que se apague Para su tranquilidad al dormir una vez que el temporizador este configurado el control de temperatura se elevara hasta los 2o F tras 30 minutos y de ...

Page 34: ...cia lejos de lugares extremadamente calientes o humedos Para mantener el funcionamiento 6ptimo del mando a distancia el sensor no se debe exponerse a la luz directa del sol El mando a distancia puede instalarse en una pared utilizando el soporte instalable AJUSTE DEL DIRECCIONAMIENTO DE AIRE HORIZONTAL El direccionamiento de aire horizontal se ajusta moviendo la rejilla de ventilacion vertical La ...

Page 35: ...on un jab6n suave o detergente y agua tibia y despues pulirse con cera de aplicacion liquid Para asegurar una eficacia maxima continua las bobinas del condensador lado exterior de la unidad deberan comprobarse periodicamente y limpiarse si se bloquean con hollin o suciedad de la atmosfera Cepille o aspire las bobinas exteriores para eliminar la suciedad de los bordes C0MO DESMONTAR LA REJILLA FRON...

Page 36: ...del propietario Control TEMP fijado demasiado bajo Para descengelar la bobina fije el MODO a Cool la velocidad del ventilador a Alta y el control TEMP a una temperatura m_ s alta EL AIRE ACONDICIONADO ENFRiA PERO EL CUARTO EST DEMASIADO CALIDO Compruebe si Despu_s Filtro de aire sucio aire restringido Limpie el filtro de aire Consulte la secciSn de mantenimiento del manual del propietario EL contr...

Page 37: ..._ 37 _ ...

Page 38: ... 38 ...

Page 39: ...icado para muchos argosde operaci6n confiable Sin embargo al igual que todos los puede requerir de mantenimiento o reparaci6n productos preventivas de vez en cuando Es ahi cuando el contrato de protecci6n maestra le puede ahorrar dinero y molestias El Contrato de protecci6n maestra tambien le ayuda a ampliar la vida de su nuevo producto Lo siguiente es Io que se incluye en el contrato Piezas y man...

Page 40: ...ke vacuums lawn equipment and electronics call or go on line for the location of your nearest Sears Parts Repair Service Center 1 800 488 1222 U S A 1 800 469 4663 Canada Call anytime day or night www sears com www sears ca To purchase a protection agreement on a product serviced by Sears 1 800 827 6655 U S A 1 800 361 6665 Canada Para pedir servicio de reparaci6n a domicilio y para ordenar piezas...

Reviews: