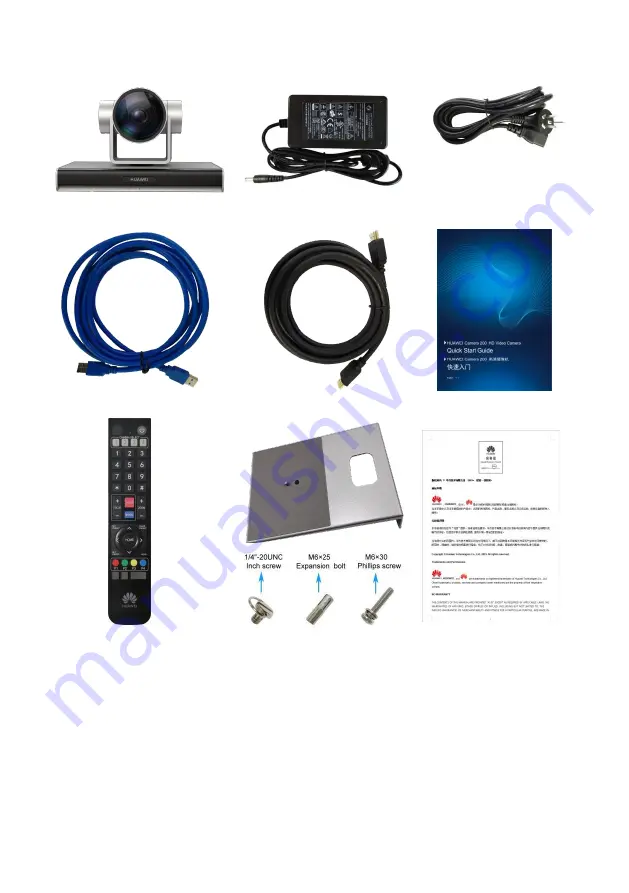
background image

Included Equipment 


Power cable (1) 

Note: Power cables may 

vary by country. 

Camera 200 (1) 

Power adapter (1) 


USB 3.0 cable (1)   

HDMI cable (1) 

Quick Start Guide (1) 


Remote control (1) 

AAA batteries (2) 

Mounting bracket (1) 

1/4"-20UNC screw (1) 

Expansion bolts (4) 

M6 × 30 Philips screws (4)


Certificate of Compliance & 

Safety Precautions 

&Warranty Card (1) 

http://www.huawei.com 

Issue: 02 (2019-11-28) 

Copyright © Huawei Technologies Co., Ltd. 2019. All rights reserved. 

Summary of Contents for Quidway Eudemon 200

Page 1: ...able 1 HDMI cable 1 Quick Start Guide 1 Remote control 1 AAA batteries 2 Mounting bracket 1 1 4 20UNC screw 1 Expansion bolts 4 M6 30 Philips screws 4 Certificate of Compliance Safety Precautions Warranty Card 1 http www huawei com Issue 02 2019 11 28 Copyright Huawei Technologies Co Ltd 2019 All rights reserved ...

Page 2: ...ared receiver Receives infrared signals supports NEC protocol 4 Power button Powers camera on or off 5 Power port 12 V DC power input port 6 RS232 IN port Serial port Supports IR transparent transmission Cascades with upper level camera Supports VISCA PELCO P and PELCO D protocols 7 RS232 OUT port Cascades with lower level camera 8 USB 3 0 Connects to PC USB 2 0 compatible Supports UVC 1 1 protoco...

Page 3: ...e installed on top of the display If the display is 170 mm or thinner the Camera 200 can be mounted on top of a display or placed horizontally with an additional L shaped bracket not included Placed Horizontally Place the camera on a flat surface If you have to place the camera on a sloping surface the slope must be less than 15 for the camera to function properly Mounted on Top of a Display Use t...

Page 4: ...1 Expansion bolts 4 M6 30 Philips screws 4 Not included hammer drill 1 electric screwdriver 1 hammer 1 and Phillips screwdriver 1 First drill four holes in the wall for mounting the bracket each with a diameter of 8 mm 0 31 in and depth of 35 40 mm 1 38 1 57 in The two upper ...

Page 5: ...installation then install Installation Procedure The camera can be mounted both on top and on bottom of the bracket as shown below Ceiling Mounted Requires Not included ceiling bracket 1 1 4 20UNC screw recommended Bracket Requirements ...

Page 6: ...which can be inserted into the location hole of the Camera 200 The distance between the screw hole on the bracket and location pillar must be 14 5 mm 0 57 in to match the holes of the Camera 200 If the bracket has a front side and back side the location pillar must be placed on the front and the screw hole on the back A screw hole and one 1 4 20UNC screw using UNC screw included with purchased cei...

Page 7: ... upgrades in the future HDMI adapter connection Use an HD VI adapter if the Box 500 s HDMI input is used for the demo and no HDMI port is available for direct connection with the camera Insert the supplied HD VI to DVI COM adapter into the Box 500 s HD VI port Connect it to the DVI HDMI adapter not included and to the Camera 200 s HDMI port and then connect the COM cable to the Camera 200 s RS232 ...

Page 8: ... and the indicator turns steady orange Once the PC client rejoins a conference the camera will automatically awaken Setting the sleep mode to OFF In this case after a video conference on the PC ends the HDMI port will keep outputting images the PTZ stays as it is and the camera keeps working The camera quickly displays images the moment the PC client rejoins the conference Powering the Camera On C...

Page 9: ...2 Select the correct video input port under Device Control Camera Parameters and configure the default video format to 1080p 60 Hz 3 Select the local video input port under Device Control Video Control for camera control operations 2 Box 500 700 900 HD video conferencing endpoints 1 Log in to the web interface Under System Settings Input Output Video Input select CAMERA200 as the input camera type...

Page 10: ... device to enter into standby mode Pressing again causes device re check and returns it to HOME position If preset position is 0 PTZ will go to the preset position 0 when idle for 12 seconds or more Camera address selection button Number buttons set or call preset 0 9 3 Chinese menu 4 English menu 6 Restore factory defaults 9 Flip image upside down 4K video format 0 4K30 1 4K25 2 1080p 60 3 1080p ...

Page 11: ...rst press CLEAR PRESET then press a number from 0 to 9 to delete the corresponding preset Clear all presets or Rotate PTZ up and down select an item under MENU or Rotate PTZ left and right change the parameter value under MENU MENU Enter exit on screen menu or return to previous menu HOME PTZ returns to middle position confirms modification or enters the next menu BLC ON OFF Turn backlight on or o...

Page 12: ...B 3 0 supports MJPEG 1920 1080p30 1280 720p30 1024 576p30 960 540p30 800 448p30 640 360p30 and 320 176p30 YUY2 1920 1080p30 1280 720p30 960 540p30 640 360p30 640 480p30 and 320 176p30 H 264 1920 1080p30 1280 720p30 1024 576p30 960 540p30 800 448p30 640 360p30 and 320 176p30 NV12 1920 1080p30 1280 720p30 960 540p30 640 360p30 640 480p30 and 320 176p30 Horizontal field of view 8 8 Tele end to 89 0 W...

Page 13: ...nd manual Infrared remote control Infrared signal reception Control distance 7 m Control angle 45 Power and power supply Input voltage 100 240 V AC 50 60 Hz 1 5 A max Output voltage 12 V DC Power Operating 12 W Standby 3 W Physical specifications Control port rate 9 600 baud Operating temperature 0 C to 40 C Operating humidity 10 to 90 non condensing Operating altitude 5000 m 16 404 ft Dimensions ...

Page 14: ...ices according to local regulations Please recycle if possible Contact your device provider to learn more about safety precautions This is a Class A product In a living environment this product may cause radio interference in which case preventative measures may be required FAQs Q Why can t I use the PTZ to control the camera from an HD video conferencing endpoint A 1 The serial connection between...

Page 15: ...0p A Check whether the USB port on the PC supports USB 3 0 and re plug the USB cable at both ends for verification If the conference client uses YUY2 NV12 uncompressed encoding slow USB insertion will cause the USB port to be recognized as USB 2 0 The limited USB 2 0 transmission rate cannot support 720p video In this case a USB 3 0 connection is required If MJPEG and H 264 are used for compressed...

Page 16: ... OUT port of the second camera to the RS232 IN port of the third camera and so on Up to seven cameras can be cascaded 3 The VISCAprotocol cascades a maximum of seven cameras The address codes are automatically negotiated and increase by 1 with each added camera 4 If control is abnormal check the cables and their connections Check that the keyboard can control the first camera If the first camera c...

Page 17: ...17 Pin Assignment No Pin RS232 IN Pin RS232 OUT 1 DTR DTR 2 DSR DSR 3 TXD TXD 4 GND GND 5 RXD RXD 6 GND GND 7 IR OUT NC 8 NC NC ...

Page 18: ...18 ...

Reviews: