background image

Battery Backup Unit 

User Guide 

Safety Precautions 

To use the battery properly and safely, read the safety precautions carefully before using 

ly observe these precautions when using the battery. 

Basic R

z


ut permission. In the case of a battery fault, 

z


, safety design, or performance design of the battery 

Enviro

z


ed that you reserve a space of 

z


ay from heat sources or exposed fire 

z


agnetic or electric field, such as microwave ovens, refrigerators, and mobile 

the battery and strict

equirements 

Do not disassemble the battery witho
contact the authorized service center. 

Do not change the structure
without prior authorization

nmental Requirements 

z


Keep the battery away from water sources or damp areas. 

z


Install the battery in strict compliance with the requirements of suppliers. 

Do not place any object on the battery. It is recommend
at least 10 cm around the battery for heat dissipation. 

z


Do not place the battery near any inflammable materials such as foams. 

During the installation, keep the battery aw
sources such as electric heaters and candles. 

During the installation, keep the battery away from electric appliances that generate 
strong m
phones. 

Instructions for Use 


Fully charge the battery when you use it for the first time. If the battery is out of power, 
charge it immediately. If you do not plan on using the battery for a long time, fully 
charge it, and then charge it at least once per three months (for the 2 Ah battery) or six 
months (for the 4 Ah battery). Otherwise, the battery will be damaged. 

1


Summary of Contents for HW-Li2Ah

Page 1: ... the battery away from water sources or damp areas z Install the battery in strict compliance with the requirements of suppliers Do not place any object on the battery It is recommend at least 10 cm around the battery for heat dissipation z Do not place the battery near any inflammable materials such as foams During the installation keep the battery aw sources such as electric heaters and candles ...

Page 2: ...he dedicated battery charger otherwise the battery may be z Stop using the battery and disconnect it from the mains supply before connecting or disconnecting cables z Keep your hands dry when connecting or disconnecting z Do not stamp pull drag or excessively bend the c damaged causing malfunction of the battery Do not use the damaged or deteriorating pow z Do not disassemble the battery without p...

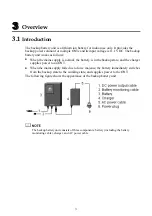
Page 3: ... charger z witches e ONT battery unit works as follows When the mains supply is no supplies power to an ONT When the mains supply fails due to force majeure the battery immediately s from the backup state to the working state and supplies power to th The following figure shows the appearance of the backup battery unit The backup battery unit consists of three components battery including the batte...

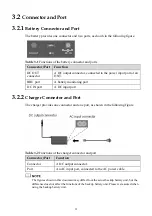
Page 4: ... monitoring port DC IN port A DC input port 3 2 2 Charger Connector and Port The charger provides one connector and one port as shown in the following figure Table 3 2 Functions of the charger connector and port Connector Port Function Connector A DC output connector Port An AC input port connected to the AC power cable The figures shown in this document may differ from the actual backup battery u...

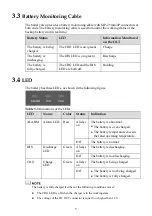
Page 5: ... shown in the following figure ALARM DIS CHG Table 3 3 Indications of the LEDs LED Name Color Status Indication Always on The battery is abnormal z The battery is over charged z The battery temperature exceeds the rated operating temperature ALARM Alarm LED Red Off The battery is normal Always on The battery is discharging DIS Discharge LED Green Off The battery is not discharging Always on The ba...

Page 6: ...mm To Step 1 wdriver Ensure that the two Step 2 the two mounting holes at the back of wall mount the battery do as follows Secure two M3 mounting screws into the wall using a scre screws have the same spacing as the two mounting holes Place the battery onto the mounting screws through the battery as shown in the following figure The following figure shows the battery mounted on the wall 6 ...

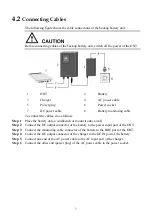
Page 7: ...ables do as follows Step 1 Place the battery onto a workbench or mount it onto a wall Step 2 Connect the DC output connector of the battery to the power input port of the ONT Step 3 Connect the monitoring cable connector of the battery to the BBU port of the ONT Step 4 Connect the DC output connector of the charger to the DC IN port of the battery Step 5 Connect one end of the AC power cable to th...

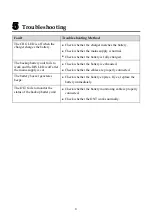
Page 8: ...battery unit fails to work and the DIS LED is off after z Check whether the cables are properly connected the mains supply is cut z Check whether the battery is exhausted The battery buzzer generates beeps z ttery expires If yes replace the battery immediately Check whether the ba The OLT fails to monitor the status of the backup battery unit z her the battery monitoring cable is properly z Check ...

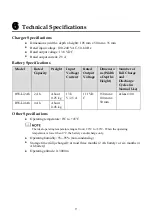
Page 9: ...d Discharge Cycles in Normal Us Capacity Current Voltage Height e About 0 25 kg HW Li2Ah 2 Ah HW Li4Ah 4 Ah 0 45 kg V 2 5 A 1VD C x 50 mm at least 300 About 13 8 11 150 mm x 100 mm Other S temperature 0 C to 45 C pecifications z Operating The ideal operating temperature ranges from 20 C to 30 C When the operating e only z fully charged at most three months 2 Ah battery or six months 4 z Operating ...

Page 10: ...s document are the property of their respective holders Notice The purchased products services and features are stipulated by the contract made between Huawei and the customer All or part of the products services and features described in this document may not be within the purchase scope or the usage scope Unless otherwise specified in the contract all statements information and recommendations i...

Page 11: ...tter services please read this warranty card carefully fill in the required information and preserve this card in good condition Your Name Address Postal Code Telephone Product Type Product Serial Number Purchase Date Invoice Number Dealer Name Dealer s Address Telephone Preserve well No reissue Dealer s Seal ...

Page 12: ... b The defects are caused by the fact that the product is dismantled or altered by anyone that is not from a Huawei authorized service partner c The defects are caused by the fact that the product is used in a harsh environment that is not suitable for the operation of the product d The defects are caused by any force majeure including but not limited to fire earthquake lightning and tsunami e The...

Reviews: