Summary of Contents for Rp5000 - Point of Sale System
Page 76: ......
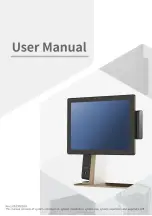
The HP Rp5000 - Point of Sale System boasts a reliable and efficient performance. For comprehensive guidance on setup and hardware features, simply download the free "Hardware Reference Manual" from our website. Empower your business with this user-friendly manual, providing valuable insights and instructions for seamless operation.
Page 76: ......