background image

HP Photosmart Premium Fax C410

series

Downloaded from ManualsPrinter.com Manuals

Summary of Contents for Photosmart Premium Fax e-All-in-One Printer - C410

Page 1: ...HP Photosmart Premium Fax C410 series Downloaded from ManualsPrinter com Manuals ...

Page 2: ...Downloaded from ManualsPrinter com Manuals ...

Page 3: ... Print from anywhere 69 Print from the Web without a computer 71 7 Scan Scan to a computer 73 Scan to a memory card or USB storage device 74 8 Copy Copy text or mixed documents 79 9 Fax Send a fax 87 Receive a fax 92 10 Save photos Save photos to your computer 95 Back up photos from a memory card to a USB storage device 96 11 Work with cartridges Check the estimated ink levels 99 Order ink supplie...

Page 4: ...eshooting 142 Errors 191 14 Technical information Notice 237 Cartridge chip information 237 Specifications 238 Environmental product stewardship program 240 Regulatory notices 246 Regulatory wireless statements 249 Regulatory telecommunication notices 252 Japan safety statement 256 Index 259 2 Contents Downloaded from ManualsPrinter com Manuals ...

Page 5: ...e Finish setting up the HP Photosmart Get to know the HP Photosmart Print Scan Copy Fax Save photos Work with cartridges Solve a problem Technical information HP Photosmart Premium Fax C410 series Help 3 HP Photosmart Premium Fax C410 series Help Downloaded from ManualsPrinter com Manuals ...
Page 6: ...Chapter 1 4 HP Photosmart Premium Fax C410 series Help HP Photosmart Premium Fax C410 series Help Downloaded from ManualsPrinter com Manuals ...

Page 7: ...performed tasks such as printing photos scanning and making copies Print a variety of documents Scan documents and photos Make a copy Send and receive faxes Load paper Replace the cartridges How do I 5 How do I Downloaded from ManualsPrinter com Manuals ...
Page 8: ...Chapter 2 6 How do I How do I Downloaded from ManualsPrinter com Manuals ...

Page 9: ...etwork interface card NIC The computer must be connected to the wireless network that you intend to install the HP Photosmart on To connect the HP Photosmart using WiFi Protected Setup WPS Do one of the following Use the Push Button PBC method a Select the setup method Press the Wireless button Highlight Wi Fi Protected Setup and press OK Highlight Push Button and press OK b Set up a wireless conn...

Page 10: ...ill need the following A wireless 802 11 network that includes a wireless router or access point A desktop computer or laptop with either wireless networking support or a network interface card NIC The computer must be connected to the wireless network that you intend to install the HP Photosmart on Broadband Internet access recommended such as cable or DSL If you connect the HP Photosmart on a wi...

Page 11: ...o each printer OR Use an ad hoc network profile on your computer to connect to the product If your computer is not currently configured with an ad hoc network profile consult the Help file for your computer Operating System for the proper method to create an ad hoc profile on your computer Once the ad hoc network profile has been created insert the installation CD that came with the product and in...

Page 12: ... future reference Click Next 5 Continue to follow the prompts to complete setup of the ad hoc network connection To create a network profile Windows XP NOTE The product comes configured with a network profile with hp product model 6 digit unique identifier as the network name SSID However for security and privacy HP recommends you create a new network profile on your computer as described here 1 I...

Page 13: ...access points are not used i Click OK to close the Wireless network properties window and then click OK again j Click OK again to close the Wireless Network Properties Connection window Using the LAN card configuration program create a network profile that has the following values Network name SSID Mynetwork example only NOTE You should create a network name that is unique and easy for you to reme...

Page 14: ...e down arrow button until No my network does not use encryption is highlighted and then press OK Go to step 7 5 If prompted enter your WEP key as follows Otherwise go to step 7 a Use the arrow buttons to highlight a letter or number on the visual keyboard and then press OK to select it NOTE You must enter the exact uppercase capital and lowercase small letters Otherwise the wireless connection wil...

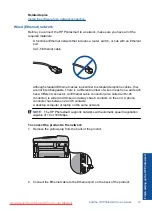
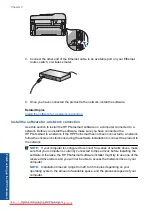
Page 15: ...ach one and each has a different connector An Ethernet cable connector also called an RJ 45 connector is wider and thicker and always has 8 contacts on the end A phone connector has between 2 and 6 contacts A desktop computer or laptop on the same network NOTE The HP Photosmart supports networks with automatic speed negotiation capable of 10 or 100 Mbps To connect the product to the network 1 Remo...

Page 16: ...k follow the onscreen instructions during the software installation to connect the product to the network NOTE If your computer is configured to connect to a series of network drives make sure that your computer is currently connected to these drives before installing the software Otherwise the HP Photosmart software installer might try to use one of the reserved drive letters and you will not be ...

Page 17: ...t 6 Follow the prompts to install the software When you have finished installing the software the product is ready for use 7 To test your network connection go to your computer and print a self test report to the product Tips for setting up and using a networked printer Use the following tips to set up and use a networked printer When setting up the wireless networked printer make sure your wirele...

Page 18: ...dditional wall plug attached to it This enables you to connect other telecom devices to the wall jack where you plug in the HP Photosmart If your country region is listed in the table below you probably have a parallel type telephone system In a parallel type phone system you are able to connect shared telephone equipment to the phone line by using the 2 EXT port on the back of the HP Photosmart N...

Page 19: ...ed to continue answering questions If you answered No please continue answering questions 2 Do you have a private branch exchange PBX phone system or an integrated services digital network ISDN system If you answered Yes proceed directly to Case C Set up the HP Photosmart with a PBX phone system or an ISDN line You do not need to continue answering questions If you answered No please continue answ...

Page 20: ... 7 Do you subscribe to a voice mail service through your telephone company at the same phone number you will use for fax calls on the HP Photosmart Yes I have a voice mail service No After you have completed answering the questions proceed to the following section to select your fax setup case Select your fax setup case Select your fax setup case Now that you have answered all the questions about ...

Page 21: ...istinctive ring service You answered Yes to question 3 only Case D Fax with a distinctive ring service on the same line Case D Fax with a distinctive ring service on the same line Voice calls You answered Yes to question 4 only Case E Shared voice fax line Case E Shared voice fax line Voice calls and voice mail service You answered Yes to questions 4 and 7 only Case F Shared voice fax line with vo...

Page 22: ...phone wall jack 2 Use the phone cord supplied in the box with the HP Photosmart to connect to the 1 LINE port To set up the HP Photosmart with a separate fax line 1 Using the phone cord supplied in the box with the HP Photosmart connect one end to your telephone wall jack then connect the other end to the port labeled 1 LINE on the back of the HP Photosmart NOTE If you do not use the supplied cord...

Page 23: ...ot be able to send and receive faxes with the HP Photosmart Figure 3 2 Back view of the HP Photosmart 1 Telephone wall jack 2 DSL filter and cord supplied by your DSL provider 3 Use the phone cord supplied in the box with the HP Photosmart to connect to the 1 LINE port To set up the HP Photosmart with DSL 1 Obtain a DSL filter from your DSL provider 2 Using the phone cord supplied in the box with ...

Page 24: ...cted to the fax phone port of your ISDN converter try using the port designated for multiple purposes it might be labeled multi combi or something similar If you are using a PBX phone system set the call waiting tone to off NOTE Many digital PBX systems include a call waiting tone that is set to on by default The call waiting tone will interfere with any fax transmission and you will not be able t...

Page 25: ... able to fax successfully This special phone cord is different from the phone cords you might already have in your home or office 2 Turn on the Auto Answer setting 3 Change the Distinctive Ring setting to match the pattern that the telephone company assigned to your fax number NOTE By default the HP Photosmart is set to answer all ring patterns If you do not set the Distinctive Ring to match the r...

Page 26: ...lly This special phone cord is different from the phone cords you might already have in your home or office 2 Now you need to decide how you want the HP Photosmart to answer calls automatically or manually If you set up the HP Photosmart to answer calls automatically it answers all incoming calls and receives faxes The HP Photosmart will not be able to distinguish between fax and voice calls in th...

Page 27: ...and fax calls at the same phone number and you also subscribe to a voice mail service through your telephone company set up the HP Photosmart as described in this section NOTE You cannot receive faxes automatically if you have a voice mail service at the same phone number you use for fax calls You must receive faxes manually this means you must be available to respond in person to incoming fax cal...

Page 28: ...Fax line shared with computer dial up modem no voice calls received If you have a fax line on which you receive no voice calls and you also have a computer dial up modem connected on this line set up the HP Photosmart as described in this section Since your computer dial up modem shares the phone line with the HP Photosmart you will not be able to use both your modem and the HP Photosmart simultan...

Page 29: ...nswer automatically after the number of rings you set in the Rings to Answer setting Then it will begin emitting fax reception tones to the sending fax machine and receive the fax Case H Shared voice fax line with computer dial up modem If you receive both voice calls and fax calls at the same phone number and you also have a computer dial up modem connected on this phone line set up the HP Photos...

Page 30: ...modem to a telephone wall jack Disconnect the cord from the telephone wall jack and plug it into the port labeled 2 EXT on the back of the HP Photosmart 3 Connect a phone to the OUT port on the back of your computer dial up modem 4 Using the phone cord supplied in the box with the HP Photosmart connect one end to your telephone wall jack then connect the other end to the port labeled 1 LINE on the...

Page 31: ...if you suspect the call is a voice call you will need to answer it before the HP Photosmart answers the call To set up the HP Photosmart to answer calls automatically turn on the Auto Answer setting If you set up the HP Photosmart to answer faxes manually you must be available to respond in person to incoming fax calls or the HP Photosmart cannot receive faxes To set up the HP Photosmart to answer...

Page 32: ...osmart to connect to the 1 LINE port To set up the HP Photosmart with a shared voice fax line with answering machine 1 Remove the white plug from the port labeled 2 EXT on the back of the HP Photosmart 2 Unplug your answering machine from the telephone wall jack and connect it to the port labeled 2 EXT on the back of the HP Photosmart NOTE If you do not connect your answering machine directly to t...

Page 33: ...corded greeting The HP Photosmart monitors the call during this time listening for fax tones If incoming fax tones are detected the HP Photosmart will emit fax reception tones and receive the fax if there are no fax tones the HP Photosmart stops monitoring the line and your answering machine can record a voice message Case J Shared voice fax line with computer dial up modem and answering machine I...

Page 34: ...phone cord supplied in the box with the HP Photosmart to connect to the 1 LINE port To set up the HP Photosmart on the same phone line as a computer with two phone ports 1 Remove the white plug from the port labeled 2 EXT on the back of the HP Photosmart 2 Find the phone cord that connects from the back of your computer your computer dial up modem to a telephone wall jack Disconnect the cord from ...

Page 35: ...elephone to the HP Photosmart You can use standard phone cords for these connections 6 If your modem software is set to receive faxes to your computer automatically turn off that setting NOTE If you do not turn off the automatic fax reception setting in your modem software the HP Photosmart will not be able to receive faxes 7 Turn on the Auto Answer setting 8 Set your answering machine to answer a...

Page 36: ...faxing if you are using your computer dial up modem to send an e mail or access the Internet There are two different ways to set up the HP Photosmart with your computer based on the number of phone ports on your computer Before you begin check your computer to see if it has one or two phone ports If your computer has only one phone port you will need to purchase a parallel splitter also called a c...

Page 37: ...al up modem to a telephone wall jack Disconnect the cord from the telephone wall jack and plug it into the port labeled 2 EXT on the back of the HP Photosmart 3 Connect a phone to the OUT port on the back of your computer dial up modem 4 Using the phone cord supplied in the box with the HP Photosmart connect one end to your telephone wall jack then connect the other end to the port labeled 1 LINE ...

Page 38: ...rmany www hp com de faxconfig Switzerland French www hp com ch fr faxconfig Switzerland German www hp com ch de faxconfig United Kingdom www hp com uk faxconfig Spain www hp com es faxconfig The Netherlands www hp com nl faxconfig Belgium France www hp com be fr faxconfig Belgium Dutch www hp com be nl faxconfig Portugal www hp com pt faxconfig Sweden www hp com se faxconfig Finland www hp com fi ...

Page 39: ...Photosmart Printer parts Control panel features Display icons HP Apps Manager Printer parts Front view of the printer Get to know the HP Photosmart 37 Get to know the HP Photosmart Downloaded from ManualsPrinter com Manuals ...

Page 40: ...mory card slot for Secure Digital and xD cards 10 Photo light 11 Memory card slot for CompactFlash cards 12 Front USB port for your camera or other storage device 13 Lid backing 14 Lid 15 Glass 16 Cartridge door access handle 17 Paper width guide for the main input tray 18 Main input tray also referred to as the input tray Top and rear views of the printer Chapter 4 38 Get to know the HP Photosmar...

Page 41: ...ocation 24 Rear USB port 25 Ethernet port 26 Power connection Use only with the power adapter supplied by HP 27 1 LINE fax and 2 EXT phone ports 28 Two sided printing accessory Printer parts 39 Get to know the HP Photosmart Downloaded from ManualsPrinter com Manuals ...

Page 42: ...show more of a photo 10 Wireless Opens the Network menu where you can access the Wireless Setup Wizard and Wi Fi Protected Setup 11 ePrint Opens the Web Services menu where you can view change and print your e mail address 12 Apps Provides a quick and easy way to access and print information from the Web such as maps coupons coloring pages and puzzles Also use to print a variety of blank forms suc...

Page 43: ...nd faxes Display icons The following icons can appear at the top right side of the display to provide important information about the HP Photosmart Icon Purpose Shows that the ink level in all the ink cartridges is 50 or more Shows that one or more of the ink cartridges are low on ink You should replace the ink cartridge when the print quality is no longer acceptable Shows that an unknown ink cart...

Page 44: ...nnectivity Manage HP Apps Add new HP Apps a Press the arrow buttons to scroll to the HP Apps menu option Press OK b Press the arrow buttons to scroll to the More menu option and then press OK c Highlight the desired app that you want to add and then press OK Follow the prompts d View the animation for this topic Chapter 4 42 Get to know the HP Photosmart Get to know the HP Photosmart Downloaded fr...

Page 45: ...day Photo Paper Print colorful everyday snapshots at a low cost using paper designed for casual photo printing This affordable photo paper dries quickly for easy handling Get sharp crisp images when you use this paper with any inkjet printer It is available in semi gloss finish in several sizes including A4 8 5 x 11 inch and 10 x 15 cm 4 x 6 inch with or without tabs For longer lasting photos it i...

Page 46: ...ted or matte coated on both sides for two sided use They are the perfect choice for near photographic reproductions and business graphics for report covers special presentations brochures mailers and calendars HP Premium Presentation Paper or HP Professional Paper These papers are heavy two sided matte papers perfect for presentation proposals reports and newsletters They are heavyweight for an im...

Page 47: ...on s worth of photos or multiple prints to share ColorLok HP recommends plain papers with the ColorLok logo for printing and copying of everyday documents All papers with the ColorLok logo are independently tested to meet high standards of reliability and print quality and produce documents with crisp vivid color bolder blacks and dry faster than ordinary plain papers Look for papers with the Colo...

Page 48: ...ack of paper forward until it stops NOTE If the photo paper you are using has perforated tabs load photo paper so that tabs are closest to you Slide paper width guide inward until it stops at edge of paper c Lower photo tray lid Chapter 5 46 Paper basics Paper basics Downloaded from ManualsPrinter com Manuals ...
Page 49: ...th short edge forward and print side down Slide stack of paper forward until it stops Slide paper width guide inward until it stops at edge of paper c Lower output tray Lower output tray and pull tray extender towards you as far as it will go Flip the paper catch at the end of the tray extender Load media 47 Paper basics Downloaded from ManualsPrinter com Manuals ...
Page 50: ...rom the main input tray b Load envelopes Insert one or more envelopes into far right side of main input tray with envelope flaps on left and facing up Slide stack of envelopes forward until it stops Slide paper width guide inward against stack of envelopes until it stops c Lower output tray Chapter 5 48 Paper basics Paper basics Downloaded from ManualsPrinter com Manuals ...
Page 51: ...ou are ready to print remove only the paper you plan to use immediately When you have finished printing return any unused photo paper to the plastic bag Do not leave unused photo paper in the input tray The paper might start to curl which might reduce the quality of your printouts Curled paper can also cause paper jams Always hold photo paper by the edges Fingerprints on photo paper can reduce pri...

Page 52: ...Chapter 5 50 Paper basics Paper basics Downloaded from ManualsPrinter com Manuals ...
Page 53: ...ments Most print settings are automatically handled by the software application You need to change the settings manually only when you change print quality print on specific types of paper or transparency film or use special features To print from a software application 1 Make sure you have paper loaded in the input tray 2 On the File menu in your software application click Print 3 Make sure the p...

Page 54: ...ing shortcut select the shortcut and click Save As To delete a shortcut select the shortcut and click Delete 6 Click OK to close the Properties dialog box 7 Click Print or OK to begin printing Related topics Recommended papers for printing Load media View the print resolution Use printing shortcuts Set the default print settings Stop the current job Print photos Print photos saved on your computer...

Page 55: ...ith supported types of photo paper If Maximum dpi is not listed in the Print quality drop down list you can enable it from the Advanced tab For more information see Print using the maximum dpi 11 In the HP Real Life Technologies area click the Photo fix drop down list and select from the following options Off applies no HP Real Life Technologies to the image Basic enhances low resolution images mo...

Page 56: ...us Secure MultiMedia Card MMC Mobile RS MMC adapter required Secure Digital SD Secure Digital Mini adapter required Secure Digital High Capacity SDHC TransFlash MicroSD Card adapter required or xD Picture card 3 CompactFlash CF types I and II 4 Front USB port For digital cameras and removable drives c Select photo Highlight View Print and press OK Highlight photo and press OK Chapter 6 54 Print Pr...

Page 57: ... Press OK to preview print job d Print photo Press Print Photos Print single photo on full size paper a Load paper Load full size paper in the main input tray b Insert memory Print photos 55 Print Downloaded from ManualsPrinter com Manuals ...
Page 58: ...tal High Capacity SDHC TransFlash MicroSD Card adapter required or xD Picture card 3 CompactFlash CF types I and II 4 Front USB port For digital cameras and removable drives c Select photo Highlight View Print and press OK Highlight photo and press OK Increase number of copies and press OK d Change page layout Press OK to preview print job Press Menu to change print settings Highlight Layout and p...

Page 59: ...G Duo adapter optional or Memory Stick Micro adapter required 2 MultiMediaCard MMC MMC Plus Secure MultiMedia Card MMC Mobile RS MMC adapter required Secure Digital SD Secure Digital Mini adapter required Secure Digital High Capacity SDHC TransFlash MicroSD Card adapter required or xD Picture card 3 CompactFlash CF types I and II 4 Front USB port For digital cameras and removable drives Print phot...

Page 60: ... press OK Press Back e Print photo Press Print Photos 2 View the animation for this topic Related topics Recommended papers for photo printing Edit photos before printing Stop the current job Print a creative project 1 Do one of the following Print album pages a Load paper Load up to 13 x 18 cm 5 x 7 inch photo paper in photo tray or full size photo paper in main input tray b Insert memory Chapter...

Page 61: ...D Secure Digital Mini adapter required Secure Digital High Capacity SDHC TransFlash MicroSD Card adapter required or xD Picture card 3 CompactFlash CF types I and II 4 Front USB port for digital cameras and removable drives c Select project type Highlight Create and press OK Highlight Album Pages and press OK d Follow prompts Print panoramic photos a Load paper Load 10 x 30 cm 4 x 12 inch panorama...

Page 62: ...re MultiMedia Card MMC Mobile RS MMC adapter required Secure Digital SD Secure Digital Mini adapter required Secure Digital High Capacity SDHC TransFlash MicroSD Card adapter required or xD Picture card 3 CompactFlash CF types I and II 4 Front USB port For digital cameras and removable drives c Select project type Highlight Create and press OK Highlight Panorama Prints and press OK Chapter 6 60 Pr...

Page 63: ...emory Stick Magic Gate Memory Stick Duo or Pro Duo adapter optional Memory Stick Pro HG Duo adapter optional or Memory Stick Micro adapter required 2 MultiMediaCard MMC MMC Plus Secure MultiMedia Card MMC Mobile RS MMC adapter required Secure Digital SD Secure Digital Mini adapter required Secure Digital High Capacity SDHC TransFlash MicroSD Card adapter required or xD Picture card 3 CompactFlash ...

Page 64: ...Memory Stick Pro HG Duo adapter optional or Memory Stick Micro adapter required 2 MultiMediaCard MMC MMC Plus Secure MultiMedia Card MMC Mobile RS MMC adapter required Secure Digital SD Secure Digital Mini adapter required Secure Digital High Capacity SDHC TransFlash MicroSD Card adapter required or xD Picture card 3 CompactFlash CF types I and II 4 Front USB port For digital cameras and removable...

Page 65: ...oad paper Load up to 13 x 18 cm 5 x 7 inch photo paper in photo tray or full size photo paper in main input tray c Select project type Highlight Create and press OK Highlight Scan and Reprint and press Print Photos 2 View the animation for this topic Print a creative project 63 Print Downloaded from ManualsPrinter com Manuals ...
Page 66: ...r click the Options tab to select options such as As laid out on screen Only the selected frame and Print all linked documents 5 Click Print or OK to print the Web page TIP To print Web pages correctly you might need to set your print orientation to Landscape Print forms and templates Quick Forms The HP Photosmart contains built in templates that enable you to print common forms such as narrow or ...

Page 67: ...alog box Depending on your software application this button might be called Properties Options Printer Setup Printer or Preferences 5 Click the Advanced tab 6 In the Features area select the Enable maximum dpi setting check box 7 Click the Features tab 8 In the Paper Type drop down list click More and then select the appropriate paper type 9 In the Print Quality drop down list click Maximum dpi NO...

Page 68: ...rinting Borderless Print to the top bottom and side edges of 10 x 15 cm 4 x 6 inch and 13 x 18 cm 5 x 7 inch HP Photo Papers Paper saving Printing Print two sided documents with mutliple pages on same sheet to reduce paper usage Photo Printing With White Borders Print a photo with a white border around the edges Fast Economical Printing Produce draft quality printouts quickly Presentation Printing...

Page 69: ...original HP shortcuts cannot be deleted Set the default print settings If there are settings that you frequently use for printing you might want to make them the default print settings so they are already set when you open the Print dialog box from within your software application To change the default print settings 1 In the HP Solution Center click Settings point to Print Settings and then click...

Page 70: ...ix and press OK Select desired option and press OK Add frame a Select photo Highlight View Print and press OK Highlight photo and press OK b Edit photo Press Menu Highlight Add Frame and press OK Select desired option and press OK Adjust brightness a Select photo Highlight View Print and press OK Highlight photo and press OK b Edit photo Press Menu Highlight Brightness and press OK Set brightness ...

Page 71: ...ve more control over what your printout looks like NOTE To help prevent unauthorized email HP assigns a random email address to your printer never publicizes this address and by default does not respond to any sender HP ePrint also provides industry standard spam filtering and transforms email and attachments to a print only format to reduce the threat of a virus or other harmful content However H...

Page 72: ...wn arrow until Print Info Page is highlighted and then press OK The email address appears on the printout 2 Compose and send an email to your printer a Create a new email and type the printer s email address in the To box b Type text in the body of the email and attach the documents or images that you want to print c Send the email The printer prints your email NOTE To receive email your printer m...

Page 73: ...ess the ePrint button 2 Press the down arrow button to highlight Enable Web Services and then press OK 3 Press OK to accept the terms of use 4 Follow the prompts on the display Related topics Add the HP Photosmart to a network Print a Web page using HP Apps To print using HP Apps 1 Make sure you have paper loaded in the main input tray 2 Press the Apps button 3 Highlight the app that you want to p...

Page 74: ...Chapter 6 72 Print Print Downloaded from ManualsPrinter com Manuals ...
Page 75: ...scan and reprint a photo For more information see Print a creative project Scan to a computer 1 Do one of the following Single page scan a Load original Lift lid on product Load original print side down on right front corner of glass Scan 73 Scan Downloaded from ManualsPrinter com Manuals ...
Page 76: ...ess Start Scan Highlight Scan to Computer and press OK Highlight desired option and press OK 2 View the animation for this topic Related topics Stop the current job Scan to a memory card or USB storage device NOTE You can send the scanned image as a JPEG image to the memory card or storage device that is currently inserted This enables you to use the photo print options to print borderless prints ...

Page 77: ...Load original print side down on right front corner of glass Close lid b Insert memory Scan to a memory card or USB storage device 75 Scan Downloaded from ManualsPrinter com Manuals ...

Page 78: ... High Capacity SDHC TransFlash MicroSD Card adapter required or xD Picture card 3 CompactFlash CF types I and II 4 Front USB port For digital cameras and removable drives c Start scan Press Start Scan Highlight Scan to Memory Card or Scan to USB Flash Drive and press OK Highlight desired option and press OK Multiple page scan a Load original Remove any staples or clips from the original document S...

Page 79: ... Stick Micro adapter required 2 MultiMediaCard MMC MMC Plus Secure MultiMedia Card MMC Mobile RS MMC adapter required Secure Digital SD Secure Digital Mini adapter required Secure Digital High Capacity SDHC TransFlash MicroSD Card adapter required or xD Picture card 3 CompactFlash CF types I and II 4 Front USB port For digital cameras and removable drives Scan to a memory card or USB storage devic...

Page 80: ...ht Scan to Memory Card or Scan to USB Flash Drive and press OK Highlight desired option and press OK 2 View the animation for this topic Related topics Stop the current job Chapter 7 78 Scan Scan Downloaded from ManualsPrinter com Manuals ...

Page 81: ...reative project Copy text or mixed documents 1 Do one of the following 1 sided original to 1 sided copy a Load paper Load full size paper in the main input tray b Load original Lift lid on product Load original print side down on right front corner of glass Copy 79 Copy Downloaded from ManualsPrinter com Manuals ...

Page 82: ...number of copies d Start copy Press Start Copy 1 sided original to 2 sided copy a Load paper Load full size paper in the main input tray b Load original Slide original with print side up into document feeder tray until the product detects the pages Chapter 8 80 Copy Copy Downloaded from ManualsPrinter com Manuals ...

Page 83: ... keypad to increase number of copies e Start copy Press Start Copy 2 sided original to 2 sided copy a Load paper Load full size paper in the main input tray b Load original Slide original with print side up into document feeder tray until the product detects the pages Slide paper width guide inward until it stops at edge of paper c Specify 2 sided option Press 2 Sided on control panel Highlight Co...

Page 84: ...nt feeder tray until the product detects the pages Slide paper width guide inward until it stops at edge of paper c Specify 2 sided option Press 2 Sided on control panel Highlight Copy and press OK Highlight 2 Sided Original 1 Sided Copy and press OK d Specify number of copies Press up arrow button or use keypad to increase number of copies e Start copy Press Start Copy 2 View the animation for th...

Page 85: ...Press the down arrow button to highlight the appropriate paper size present in the input tray and then press OK To set the paper type for copies 1 Press OK when Copy is highlighted on the Home Screen 2 Press the Menu button to select Copy Settings 3 Press the down arrow button to highlight Paper Type and then press OK 4 Press the down arrow button until the appropriate paper type appears and then ...

Page 86: ...aki Plain Paper Glossy Hagaki Premium Photo L Japan only Premium Photo Advanced Photo Paper Advanced Photo To change the copy quality from the control panel 1 Press OK when Copy is highlighted on the Home Screen 2 Press the Menu button to select Copy Settings 3 Press the down arrow button to highlight Quality and then press OK 4 Press the up arrow or down arrow button to select a copy quality and ...

Page 87: ...ct what the output would be if the default paper type and size were loaded in the input tray Previews appear when you select Preview on the Copy Menu or when you use the crop feature to specify a specific area of the original to copy To preview your copy from the control panel 1 Press OK when Copy is highlighted on the Home Screen 2 Press the Menu button to select Copy Settings 3 Change copy setti...

Page 88: ...Chapter 8 86 Copy Copy Downloaded from ManualsPrinter com Manuals ...

Page 89: ...fax Receive a fax Send a fax 1 Do one of the following Fax photo a Load original Lift lid on product Load original print side down on right front corner of glass Fax 87 Fax Downloaded from ManualsPrinter com Manuals ...

Page 90: ...r tray until the product detects the pages Slide paper width guide inward until it stops at edge of paper b Press Start Fax and wait for tone c Enter number Fax 2 sided document a Load original Remove any staples or clips from the original document Slide original with print side up into document feeder tray until the product detects the pages Chapter 9 88 Fax Fax Downloaded from ManualsPrinter com...

Page 91: ...ient that you are going to send them a fax before sending it When you send a fax manually you can hear the dial tones telephone prompts or other sounds through the handset on your telephone This makes it easy for you to use a calling card to send your fax Depending on how the recipient has their fax machine set up the recipient might answer the phone or the fax machine might take the call If a per...

Page 92: ... you can hang up the telephone If you want to continue speaking with the recipient remain on the line until the fax transmission is complete Send a fax to multiple recipients You can send a fax to multiple recipients without first setting up a group speed dial NOTE The list of recipients you specify for this fax is not saved and only works for sending faxes in black If you intend to send other fax...

Page 93: ...send time by using the numeric keypad and then press OK If prompted press 1 for AM or 2 for PM 6 Enter the fax number by using the keypad 7 Press Start Fax The HP Photosmart scans all pages and the scheduled time appears on the display The HP Photosmart sends the fax at the scheduled time To cancel a scheduled fax 1 Press OK when Fax is highlighted on the Home Screen 2 Press the Menu button to sel...

Page 94: ...ple page fax you must load the originals in the document feeder tray You cannot fax a multiple page document from the glass 2 Press OK when Fax is highlighted on the Home screen 3 Press the down arrow button to access speed dials 4 Press the down arrow button until the appropriate speed dial entry is highlighted or enter the speed dial code by using the keypad on the control panel Press OK 5 Press...

Page 95: ...swer setting so that the product does not automatically answer incoming calls 4 If you are currently on the phone with the sender instruct the sender to press Start on their fax machine 5 When you hear fax tones from a sending fax machine do the following a Press Start Fax on the control panel b When prompted press the down arrow button to highlight Receive Fax Manually and then press OK 6 After t...

Page 96: ...Chapter 9 94 Fax Fax Downloaded from ManualsPrinter com Manuals ...

Page 97: ...nal Memory Stick Pro HG Duo adapter optional or Memory Stick Micro adapter required 2 MultiMediaCard MMC MMC Plus Secure MultiMedia Card MMC Mobile RS MMC adapter required Secure Digital SD Secure Digital Mini adapter required Secure Digital High Capacity SDHC TransFlash MicroSD Card adapter required or xD Picture card 3 CompactFlash CF types I and II 4 Front USB port For digital cameras and remov...

Page 98: ... next step 3 Follow Prompts Follow onscreen prompts on computer to save photos to computer 4 View the animation for this topic Related topics Stop the current job Back up photos from a memory card to a USB storage device To back up photos 1 Insert memory a Insert a memory card into appropriate slot on product Chapter 10 96 Save photos Save photos Downloaded from ManualsPrinter com Manuals ...

Page 99: ...ecure Digital High Capacity SDHC TransFlash MicroSD Card adapter required or xD Picture card 3 CompactFlash CF types I and II 4 Front USB port For digital cameras and removable drives b When photo light stops flashing connect a storage device to the front USB port 2 Save photos Highlight Yes back up Memory Card to storage device and press OK 3 Remove memory 4 View the animation for this topic Rela...

Page 100: ...Chapter 10 98 Save photos Save photos Downloaded from ManualsPrinter com Manuals ...

Page 101: ...t cartridge available to avoid possible printing delays You do not have to replace the cartridges until the print quality is unacceptable NOTE Ink from the cartridges is used in the printing process in a number of different ways including in the initialization process which prepares the product and cartridges for printing and in printhead servicing which keeps print nozzles clear and ink flowing s...

Page 102: ...nd select the online shopping feature Cartridge information and links to online shopping also appear on ink alert messages In addition you can find cartridge information and order online by visiting www hp com buy supplies NOTE Ordering cartridges online is not supported in all countries regions If it is not supported in your country region contact a local HP reseller for information about purchas...

Page 103: ...on cartridge then remove it from slot 3 Insert new cartridge a Remove cartridge from packaging b Twist orange cap to snap it off A forceful twist may be required to remove the cap Replace the cartridges 101 Work with cartridges Downloaded from ManualsPrinter com Manuals ...

Page 104: ...s designated HP printing device This warranty does not cover HP ink products that have been refilled remanufactured refurbished misused or tampered with During the warranty period the product is covered as long as the HP ink is not depleted and the end of warranty date has not been reached The end of warranty date in YYYY MM format may be found on the product as indicated Chapter 11 102 Work with ...

Page 105: ...per into the input tray 2 Press Setup 3 Press the down arrow button to highlight Tools and then press OK 4 Press the down arrow button to highlight Print Quality Report and then press OK The product prints a print quality report that you can use to diagnose print quality issues To evaluate the print quality report 1 Check the ink levels shown on the page If a cartridge shows very low ink levels an...

Page 106: ...p edges and extend with uniform color all the way across the page Figure 11 1 Color bars expected result 1 Black cartridge 2 Cyan cartridge 3 Magenta cartridge 4 Yellow cartridge 5 Photo cartridge If any of the color bars are irregularly streaked lighter on one side or contain one or more streaks of a different color refer to the following steps Figure 11 2 Color bars irregularly streaked or faded...

Page 107: ...the PHA TTOE line on the diagnostic page shows a different value or aligning does not help clean the printhead NOTE If cleaning the printhead does not solve this print quality issue contact HP support for service 3 Look at the large text above the alignment pattern The type should be sharp and clear Figure 11 4 Sample text area expected result If the type is jagged align the printer and then print...

Page 108: ...ce If you do not see any defects on the print quality report then the printing system is working correctly There is no reason to replace supplies or have the product serviced because they are functioning properly If you still have a print quality problem here are some other things you can check Check the paper Check the print settings Make sure your image has sufficient resolution If the problem s...

Page 109: ...to date product information and expert assistance and includes the following features Fast access to qualified online support specialists Software and driver updates for the product Valuable product and troubleshooting information for common problems Proactive product updates support alerts and HP newsgrams that are available when you register the product 3 Call HP support Support options and avai...

Page 110: ...en the situation occurs Answers to these questions Has this situation happened before Can you re create it Did you add any new hardware or software to your computer at about the time that this situation began Did anything else occur prior to this situation such as a thunderstorm product was moved etc For the list of support phone numbers see Support phone numbers Support phone numbers The support ...

Page 111: ...LFDQD 5HXQLRQ 5RP QLD ﺍﻟﺴﻌﻮﺑﻴﺔ 6LQJDSRUH 6ORYHQVN UHSXEOLND 6RXWK IULFD 56 6XRPL 6YHULJH 6ZLW HUODQG PLQ 㠰 ࡷࡎ ﺗﻮﻧﺲ 7ULQLGDG 7REDJR 7XQLVLH 7 UNL H òVWDQEXO QNDUD ò PLU XUVD HUHO QXPDUD ﺍﻟﻤﺘﺤﺪﺓ ﺍﻟﻌﺮﺑﻴﺔ ﺍﻹﻣﺎﺭﺍﺕ 8QLWHG LQJGRP 8QLWHG 6WDWHV 8UXJXD 9HQH XHOD DUDFDV 9HQH XHOD 9L W 1DP www hp com support GRSSHOWHU 2UWVWDULI S P DOOV FRVW RVW FHQW SHDN FHQW RII SHDN SHU PLQXWH 0LQ 8 SHUF YH HW NHV WHOHIRQ...

Page 112: ...ps Troubleshooting common setup issues 1 Disconnect the USB cable from the computer 2 Uninstall the software if you have already installed it For more information see Uninstall and reinstall the software 3 Restart your computer 4 Turn off the product wait one minute then restart it 5 Reinstall the HP Photosmart software CAUTION Do not connect the USB cable to the computer until prompted by the sof...

Page 113: ...wer strip is turned on Or try plugging the product directly into a power outlet Test the power outlet to make sure it is working Plug in an appliance that you know works and see if the appliance has power If not then there might be a problem with the power outlet If you plugged the product into a switched outlet make sure the outlet is switched on If it is switched to on but still does not work th...

Page 114: ... did not solve the issue try the next solution Solution 5 Contact HP support for service Solution If you have completed all of the steps provided in the previous solutions and are still having a problem contact HP support for service Go to www hp com support If prompted choose your country region and then click Contact HP for technical support Cause You might need assistance to enable the product ...

Page 115: ...een the product and computer Solution 4 Check that the cartridges are installed properly and have ink Solution 5 Load paper in the input tray Solution 1 Press the On button to turn on the product Solution Look at the display on the product If the display is blank and the On button is not lit the product is turned off Make sure the power cord is firmly connected to the product and plugged into a po...

Page 116: ... information see Load media Cause The product might have been out of paper The wrong measurements are showing in menus on the display Solution Change the country region setting NOTE You will be prompted to set both the language and the country region settings by using the following procedure To set your language and country region 1 Press Setup 2 Press the down arrow button to highlight Preference...

Page 117: ...eet the minimum requirements to install the software A red X appears on the USB connect prompt Solution Check that the product is turned on and then try the USB connection again To retry the USB connection 1 Verify that the USB cable is set up properly as follows Unplug the USB cable and plug it in again or try plugging the USB cable into a different USB port Do not attach the USB cable to a keybo...

Page 118: ...rtant that you follow the uninstall procedure carefully to ensure you have removed the software completely from the computer before reinstalling it To uninstall the software completely a On the Windows taskbar click Start Settings Control Panel or just Control Panel b Double click Add Remove Programs or click Uninstall a program c Remove all the items that are related to the HP Photosmart Software...

Page 119: ... dialog box appears type MSCONFIG and then press Enter The MSCONFIG utility application appears c Click the General tab d Click Selective Startup e If there is a check mark next to Load Startup Items click the check mark to remove it f Click the Services tab and select the Hide All Microsoft Services box g Click Disable all h Click Apply and then click Close NOTE If you receive a message stating A...

Page 120: ...is not assigned to drive letter D enter the appropriate drive letter b Follow the prompts on the computer screen to install the software 6 Try using the product again Cause The source of the error was unknown The registration screen does not appear Solution You can access the registration Sign up now screen from the Windows taskbar by clicking Start pointing to Programs or All Programs HP Photosma...

Page 121: ... ROM into your computer s CD ROM drive and then start the Setup program NOTE If the Setup program does not appear locate the setup exe file on the CD ROM drive and double click it NOTE If you no longer have the installation CD you can download the software from www hp com support 7 Follow the onscreen instructions and the instructions provided in the Start Here guide that came with the product Whe...

Page 122: ...per type for your print job HP recommends that you use HP papers or any other paper type that is appropriate for the product Make sure only one type of paper is loaded at a time Always make sure the paper you are printing on is flat For best results when printing images use HP Advanced Photo Paper 4 Check the print settings to make sure you have selected the appropriate paper type and print qualit...

Page 123: ...tridge Print quality typically deteriorates as cartridges run out of ink NOTE Ink level warnings and indicators provide estimates for planning purposes only When you receive a low ink warning message consider having a replacement cartridge available to avoid possible printing delays You do not need to replace the ink cartridges until print quality becomes unacceptable b Look at the color bars in t...

Page 124: ...n print this diagnostic page again If cleaning the printhead does not solve this print quality issue replace the cartridge corresponding to the streaked bar NOTE If replacing the cartridge does not solve this print quality issue contact HP support for service If any of the color bars show regular white streaks refer to the following steps Check for the PHA TTOE line below the color bars If the lin...

Page 125: ...omatic device servicing routines may solve the problem in a day or so Figure 12 6 Sample text area uneven ink distribution If the text is smeared check if the paper is curled clean the printhead and then print this diagnostic page again Figure 12 7 Sample text area streaks or smears d Look at the alignment pattern above the color bars The lines should be straight and sharp Figure 12 8 Alignment pa...

Page 126: ...f the test page still shows streaks or fading If print quality still seems poor after you complete both stages of cleaning try aligning the printer If print quality problems persist after cleaning and aligning contact HP support 9 If the print quality report has alignment errors such as crooked vertical lines align the printer To align the printer a Load letter or A4 unused plain white paper into ...

Page 127: ...image If you are printing a photo or graphic and the resolution is too low it will be fuzzy when printed If a digital photo or rasterized graphic has been resized it can be blurry or fuzzy when printed If the problem is a horizontal band of distortion at the bottom of photo prints print the photo with a high print quality setting such as Best or Maximum dpi You can also try to rotate the photo 180...

Page 128: ...t incorrectly The product prints meaningless characters The pages in my document came out in the wrong order The margins are not printing as expected A blank page came out while printing The product prints slowly Envelopes print incorrectly Try the following solutions to resolve the issue Solutions are listed in order with the most likely solution first If the first solution does not solve the pro...

Page 129: ... order with the most likely solution first If the first solution does not solve the problem continue trying the remaining solutions until the issue is resolved Solution 1 Reset the product Solution 2 Print a previously saved version of the document Solution 1 Reset the product Solution Turn off the product and your computer for 60 seconds then turn them both on and try printing again Cause There w...

Page 130: ...ument will automatically print in the correct order 7 Click OK and then click Print or OK in the Print dialog box NOTE When you are printing multiple copies each set is printed completely before the next set is printed Cause The print settings were set to print the first page of your document first Because of the way the paper feeds through the product the first page will be print side up at the b...

Page 131: ...nput tray Cause The paper size setting might not have been set correctly for the project you were printing If this did not solve the issue try the next solution Solution 3 Load the stack of paper correctly Solution Remove the stack of paper from the input tray reload the paper and then slide the paper width guide inward until it stops at the edge of the paper For more information see Load media Ca...

Page 132: ...raft provides the fastest print speed To select a print speed or quality 1 Make sure you have paper loaded in the input tray 2 On the File menu in your software application click Print 3 Make sure the product is the selected printer 4 Click the button that opens the Properties dialog box Depending on your software application this button might be called Properties Options Printer Setup Printer or ...

Page 133: ...ct Memory card troubleshooting Use this section to solve these memory card problems My memory card no longer works in my digital camera The product does not read the memory card The photos on the memory card do not transfer to my computer My memory card no longer works in my digital camera Solution Reformat your memory card in your camera or format your memory card on a Windows computer by selecti...

Page 134: ...you fully insert the memory card into the appropriate slot on the product If the memory card is not inserted properly the product will not respond and the attention light will blink rapidly After the memory card has been inserted properly the Photo light will blink green for a few seconds and then remain lit Cause The memory card was not fully inserted in the appropriate slot on the product If thi...

Page 135: ...tion 2 Turn on the product Solution 3 Turn on the computer Solution 4 Check the connection from the product to your computer Solution 1 Install the product software Solution Install the product software that came with the product If it is installed restart your computer To install the product software 1 Insert the product CD ROM into your computer s CD ROM drive and then start the Setup program 2 ...

Page 136: ...up the product and connecting it to your computer see the setup information that came with the product Cause The product was not properly connected to the computer Scan troubleshooting Use this section to solve these scan problems Scanned image is blank Scanned image is incorrectly cropped Scanned image has incorrect page layout Scanned image shows dotted lines instead of text Text format is incor...

Page 137: ... Scanned image is incorrectly cropped Solution The autocropping feature in the software crops anything that is not part of the main image Sometimes this might not be what you want In that case turn off autocropping in the software and crop the scanned image manually or not at all Cause The software was set to automatically crop scanned pictures Scanned image has incorrect page layout Solution Turn...

Page 138: ...r missing Try the following solutions to resolve the issue Solutions are listed in order with the most likely solution first If the first solution does not solve the problem continue trying the remaining solutions until the issue is resolved Solution 1 Adjust the brightness in the software Solution 2 Clean the glass and lid Solution 3 Select the correct OCR language Solution 1 Adjust the brightnes...

Page 139: ...olution does not solve the problem continue trying the remaining solutions until the issue is resolved Solution 1 Turn on the product Solution 2 Make sure that the original is placed correctly Solution 3 Wait until the product completes the current operation Solution 4 The product does not support the paper type or envelope Solution 5 Check for a paper jam Solution 1 Turn on the product Solution L...

Page 140: ...r tray If this did not solve the issue try the next solution Solution 3 Wait until the product completes the current operation Solution Check the On light If it is blinking the product is busy Cause The product was busy copying or printing If this did not solve the issue try the next solution Solution 4 The product does not support the paper type or envelope Solution Do not use the product to copy...

Page 141: ... the glass or in the document feeder tray If you are loading your original on the glass place it print side down on the right front corner as shown below To copy a photo position the photo so that the long edge of the photo is along the front edge of the glass If you are loading your original in the document feeder tray place the paper with the print side up in the tray as shown below Place the pa...

Page 142: ... and then print a copy Solution Fit to Page can only enlarge the original up to the maximum percentage allowed by your model For example 200 might be the maximum enlargement percentage allowed by your model Enlarging a passport photo by 200 might not enlarge it enough for it to fit a full size page If you want to make a large copy of a small original scan the original into the computer resize the ...

Page 143: ...have been stuck on the glass or on the back of the document lid The product interprets anything it detects on the glass as part of the image The printout is blank Solution Load the original on the glass or in the document feeder tray If you are loading your original on the glass place it print side down on the right front corner as shown below To copy a photo position the photo so that the long ed...

Page 144: ...xes but can send faxes The product is having problems receiving a manual fax The product is not answering incoming fax calls Pages of a fax I received are missing Faxes are received but do not print Parts of a fax I received are cut off The fax I received is blank The computer to which I am connecting has only one phone port I hear static on my telephone line since connecting the product The fax t...

Page 145: ...d phone use Solution 13 Check for and resolve any error messages Solution 14 Lower the fax speed Solution 15 If you are faxing over the Internet using IP phone resend the fax at a later time Solution 1 Make sure the product is set up for faxing correctly Solution Make sure you set up the product properly for faxing based on the equipment and services you have on the same phone line as the product ...

Page 146: ...lank and the On light is not lit the product is turned off Make sure the power cord is firmly connected to the product and plugged into a power outlet Press the On button to turn on the product Cause The product was turned off If this did not solve the issue try the next solution Solution 3 Make sure you are using the correct type of phone cord Solution NOTE This possible solution applies only in ...

Page 147: ...e with a 2 wire phone cord adapter you can use it with a 4 wire phone cord in case the supplied 2 wire phone cord is too short Attach the 2 wire phone cord adapter to the port labeled 1 LINE on the back of the product Attach your 4 wire phone cord to the open port on the adapter and to the telephone wall jack For more information on using the 2 wire phone cord adapter see the documentation that ca...

Page 148: ...duct to connect to the telephone wall jack Use the 2 EXT port to connect to any other equipment such as an answering machine or a telephone as shown below 1 Telephone wall jack 2 Use the phone cord supplied in the box with the product 3 Telephone optional For more information on setting up the product see the printed documentation that came with the product Cause Other office equipment such as an ...

Page 149: ...ode ECM off and contact your telephone company To change the ECM setting from the control panel 1 Press Setup 2 Press the down arrow button to highlight Advanced Fax Setup and then press OK The Advanced Fax Setup menu appears 3 Press the down arrow button to highlight Error Correction Mode and then press OK The Error Correction Mode menu appears 4 Press the down arrow button to highlight Off or On...

Page 150: ... out a digital signal on the phone line that can interfere with the product preventing the product from sending and receiving faxes The DSL filter removes the digital signal and allows the product to communicate properly with the phone line To check if you already have a filter installed listen to your phone line or dial tone If you hear noise or static on the line you probably do not have a DSL f...

Page 151: ...fic phone equipment For example you might have assigned one port for telephone and Group 3 fax and another port for multiple purposes If you have problems when connected to the fax phone port of your ISDN converter try using the port designated for multiple purposes it might be labeled multi combi or something similar For more information on how to set up the product with a PBX phone system or ISD...

Page 152: ...tting was set too fast If this did not solve the issue try the next solution Solution 15 If you are faxing over the Internet using IP phone resend the fax at a later time Solution Try resending your fax at a later time Also make sure your Internet service provider supports faxing over the Internet If the problem persists contact your Internet service provider Cause You were faxing over the Interne...

Page 153: ... and you are still having problems faxing check the fax settings listed in the report to verify the settings are correct A blank or incorrect fax setting can cause problems faxing If the test fails review the report for more information on how to fix any problems found 6 After you pick up the fax report from the HP Photosmart press OK If necessary resolve any problems found and rerun the test The ...

Page 154: ...g the fax number from a telephone and listen for fax tones If you cannot hear fax tones the receiving fax might not be turned on or connected or a voice mail service could be interfering with the recipient s phone line You can also ask the recipient to check the receiving fax machine for any problems Cause The receiving fax machine was having problems The product is having problems sending a manua...

Page 155: ...lied in the box with the product 3 Telephone For more information on setting up the product with your telephone see the printed documentation that came with the product Cause The telephone used to initiate the fax call was not connected directly to the product or was not connected properly If this did not solve the issue try the next solution Solution 3 Start sending the fax within 3 seconds of he...

Page 156: ... I sent are missing Try the following solutions to resolve the issue Solutions are listed in order with the most likely solution first If the first solution does not solve the problem continue trying the remaining solutions until the issue is resolved Solution 1 Check the receiving fax machine for problems Solution 2 Check the phone line for noise Solution 3 Verify multiple pages are not being pic...

Page 157: ...On 5 Press OK Cause The phone line connection was noisy Phone lines with poor sound quality noise can cause faxing problems If this did not solve the issue try the next solution Solution 3 Verify multiple pages are not being picked up from the document feeeder Solution Print a Last Transaction report to verify the number of pages that were sent If two or more pages stuck together and were fed into...

Page 158: ... the phone line contact the sender to have them resend the fax The quality might be better when you try again If the problem persists turn Error Correction Mode ECM off and contact your telephone company To change the ECM setting from the control panel 1 Press Setup 2 Press the down arrow button to highlight Advanced Fax Setup and then press OK The Advanced Fax Setup menu appears 3 Press the down ...

Page 159: ...ding the fax Solution Make a copy to check the quality of the printout If the printout is too light you can darken it by adjusting the Lighter Darker setting when sending the fax Cause The Lighter Darker setting might have been set too light If you were sending a faded washed out or handwritten fax or a document with a watermark such as a red seal or stamp you can change the Lighter Darker setting...

Page 160: ...sending a black and white fax Try sending the fax in black and white Cause You were sending a fax in color If this did not solve the issue try the next solution Solution 2 Lower the fax resolution Solution For faster transmission use Standard resolution This setting provides the fastest possible transmission with the lowest quality of fax The default resolution is Fine which can take longer to sen...

Page 161: ... quality noise can cause faxing problems If this did not solve the issue try the next solution Solution 4 Check the receiving fax machine for problems Solution Try calling the fax number from a telephone and listen for fax tones If you cannot hear fax tones the receiving fax might not be turned on or connected or a voice mail service could be interfering with the recipient s phone line You can als...

Page 162: ...wering machine is connected to the correct port Solution 2 Set up the product to answer faxes automatically Solution 1 Make sure the answering machine is connected to the correct port Solution NOTE This possible solution applies only in the countries regions that receive a 2 wire phone cord in the box with the product including Argentina Australia Brazil Canada Chile China Colombia Greece India In...

Page 163: ...umber of rings supported The maximum number of rings varies by country region In this setup the answering machine will answer the call and the product will monitor the line If the product detects fax tones the product will receive the fax If the call is a voice call the answering machine will record the incoming message For more information on setting up the product when you have an answering mach...

Page 164: ...intercepting the fax Solution 5 If you have an answering machine on the same phone line as the product record a new outgoing message Solution 6 If you have an answering machine on the same phone line as the product make sure it is connected to the correct port Solution 7 If you use a distintive ring service make sure the Distinctive Ring setting matches the ring pattern for your fax number Solutio...

Page 165: ...p you might be able to set the product to answer incoming calls automatically To find out what the recommended answer mode is for your office setup see the printed documentation that came with the product If you must have Auto Answer off you will need to press Start Fax to receive a fax Cause Auto Answer was turned off which means that the product would not answer incoming calls You must be availa...

Page 166: ... this silent time Cause If you had an answering machine on the same phone line with the product you might have had one of the following problems Your outgoing message might have been too long or too loud to allow the product to detect fax tones and the sending fax machine might have disconnected Your answering machine might not have had enough quiet time after your outgoing message to allow the pr...

Page 167: ...the line If the product detects fax tones the product will receive the fax If the call is a voice call the answering machine will record the incoming message For more information on setting up the product see Set up the HP Photosmart for faxing Cause The answering machine was not set up properly with the product If this did not solve the issue try the next solution Solution 7 If you use a distinti...

Page 168: ... of phone equipment such as an answering machine a computer dial up modem or a multi port switch box the fax signal level might be reduced The signal level can also be reduced if you use a splitter or connect extra cables to extend the length of your phone A reduced fax signal can cause problems during fax reception If you are using a splitter or extension cables try removing them and connecting t...

Page 169: ...te the faxes stored in memory by turning off the product Cause The memory of the product was full If this did not solve the issue try the next solution Solution 11 Check for error messages on the display Solution If an error condition exists that is preventing the product from printing faxes review the display for information on the error condition Make sure The product is on Press the On button t...

Page 170: ...st If the first solution does not solve the problem continue trying the remaining solutions until the issue is resolved Solution 1 Lower the fax speed Solution 2 Check for error messages on the display Solution 1 Lower the fax speed Solution You might need to send and receive faxes at a slower rate Try setting the Fax Speed to Medium 14400 or Slow 9600 if you use one of the following An Internet p...

Page 171: ...ct is on Press the On button to turn on the product The product is set up correctly for faxing See the printed documentation for more information There is paper loaded in the input tray There is no paper jam The print carriage is not stalled or blocked Turn off the product remove any objects that are blocking the print cartridge carriage including any packing materials and then turn on the product...

Page 172: ...d plugged into a power outlet Press the On button to turn on the product Cause The product was turned off If this did not solve the issue try the next solution Solution 2 Check the Auto Answer setting Solution Depending on your office setup you might be able to set the product to answer incoming calls automatically To find out what the recommended answer mode is for your office setup see the print...

Page 173: ...is set to All Rings Cause The Distinctive Ring setting was not set to All Rings and you were not using a distinctive ring service If this did not solve the issue try the next solution Solution 5 Clear the memory of the product Solution If Backup Fax Reception is enabled and there is an error condition on the product the memory might become full of faxes that have not yet been printed and the produ...

Page 174: ...splay for information on the error condition Make sure The product is on Press the On button to turn on the product The product is set up correctly for faxing See the printed documentation for more information There is paper loaded in the input tray There is no paper jam The print carriage is not stalled or blocked Turn off the product remove any objects that are blocking the print cartridge carri...

Page 175: ... begins printing all the unprinted faxes from memory in the order they were received If you do not have Backup Fax Reception enabled or if the fax was not stored in memory for some reason for example if the product was out of memory you will need to contact the sender and ask for the fax to be resent For more information see Load media Cause The paper was not loaded correctly in the input tray If ...

Page 176: ...n the display Solution If an error condition exists that is preventing the product from printing faxes review the display for information on the error condition Make sure The product is on Press the On button to turn on the product The product is set up correctly for faxing See the printed documentation for more information There is paper loaded in the input tray There is no paper jam The print ca...

Page 177: ...ee Load media Cause The paper width guide was not positioned correctly If this did not solve the issue try the next solution The fax I received is blank Solution Check with the sender to see if the sending fax machine is having problems Cause The sending fax machine had a problem The computer to which I am connecting has only one phone port Solution This possible solution applies only in the count...

Page 178: ...ne wall jack to the product you might not be able to fax successfully This special phone cord is different from the phone cords you might already have in your home or office 3 Remove the white plug from the port labeled 2 EXT on the back of the product 4 Using another phone cord connect one end to the port labeled 2 EXT on the back of the product Connect the other end of the phone cord to the para...

Page 179: ...not be able to distinguish between fax and voice calls in this case if you suspect the call is a voice call you will need to answer it before the product answers the call To set up the product to answer calls automatically turn on the Auto Answer setting If you set up the product to answer faxes manually you must be available to respond in person to incoming fax calls or the product cannot receive...

Page 180: ...ne cord is different from the phone cords you might already have in your home or office 3 Remove the white plug from the port labeled 2 EXT on the back of the product 4 Using another phone cord connect one end to the port labeled 2 EXT on the back of the product Connect the other end of the phone cord to the parallel splitter on the side with the single phone port 5 Unplug your computer modem from...

Page 181: ...e product will not be able to receive faxes 9 Turn on the Auto Answer setting 10 Change the number of rings to wait on the product to the maximum number of rings supported by your product The maximum number of rings varies by country region 11 Set your answering machine to answer after a low number of rings 12 Run a fax test When the phone rings your answering machine will answer after the number ...

Page 182: ...uccessfully This special phone cord is different from the phone cords you might already have in your home or office 3 Remove the white plug from the port labeled 2 EXT on the back of the product 4 Using another phone cord connect one end to the port labeled 2 EXT on the back of the product Connect the other end of the phone cord to the parallel splitter on the side with the single phone port 5 Unp...

Page 183: ...ne line since connecting the product Try the following solutions to resolve the issue Solutions are listed in order with the most likely solution first If the first solution does not solve the problem continue trying the remaining solutions until the issue is resolved Solution 1 Make sure the product is set up for faxing correctly Solution 2 Try removing the splitter Solution 3 Try another power o...

Page 184: ...report from the HP Photosmart press OK If necessary resolve any problems found and rerun the test The product prints a report with the results of the test If the test fails review the report for information on how to fix the problem For more information see The fax test failed Cause The product was not set up properly for faxing If this did not solve the issue try the next solution Solution 2 Try ...

Page 185: ...ardware Test failed The Fax Connected to Active Telephone Wall Jack test failed The Phone Cord Connected to Correct Port on Fax test failed The Using Correct Type of Phone Cord with Fax test failed The Fax Line Condition test failed The Dial Tone Detection test failed The Fax Hardware Test failed Solution Turn off the product by pressing the On button located on the control panel and then unplug t...

Page 186: ...ll jack then connect the other end to the port labeled 1 LINE on the back of the product For more information on setting up the product for faxing see the printed documentation 1 Telephone wall jack 2 Use the phone cord supplied in the box with the product If you are using a phone splitter this can cause faxing problems A splitter is a two cord connector that plugs into a telephone wall jack Try r...

Page 187: ...as an answering machine or a telephone 1 Telephone wall jack 2 Use the phone cord supplied in the box with the product 2 After you have connected the phone cord to the port labeled 1 LINE run the fax test again to make sure it passes and the product is ready for faxing 3 Try to send or receive a test fax The Using Correct Type of Phone Cord with Fax test failed Solution Make sure you used the phon...

Page 188: ...og phone line and try sending or receiving a fax Check the connection between the telephone wall jack and the product to make sure the phone cord is secure Make sure you have correctly connected the product to the telephone wall jack Using the phone cord supplied in the box with the product connect one end to your telephone wall jack then connect the other end to the port labeled 1 LINE on the bac...

Page 189: ...ave analog or digital check with your service provider The Dial Tone Detection test failed Solution Other equipment which uses the same phone line as the product might be causing the test to fail To find out if other equipment is causing a problem disconnect everything except the product from the phone line and then run the test again If the Dial Tone Detection Test passes without the other equipm...

Page 190: ...he line and listen for a dial tone If you do not hear a normal sounding dial tone it might be a phone line set up for digital phones Connect the product to an analog phone line and try sending or receiving a fax NOTE If you are unsure of the kind of phone line you have analog or digital check with your service provider After you resolve any problems found run the fax test again to make sure it pas...

Page 191: ...xes at high speed 33600 bps If this did not solve the issue try the next solution Solution 2 Make sure the phone cord is connected to the correct port on the product Solution You can only send and receive faxes by connecting a phone cord to the port labeled 1 LINE on the product This means that your connection to the Internet must be done either through a converter box which supplies regular analo...

Page 192: ...d communication 242 The sending fax machine is attempting to receive instead of send 243 244 245 246 Error Correction Mode The sending fax machine prematurely ended the session 247 248 249 251 Error Correction Mode There was a communication error with the sending fax machine 252 Telephone line conditions were too poor to receive a fax 253 The sending fax machine attempted to use an unsupported pag...

Page 193: ...ax machine stopped accepting pages 383 The telephone connection was lost 390 391 There was a communication error with the receiving fax machine To change the ECM setting from the control panel 1 Press Setup 2 Press the down arrow button to highlight Advanced Fax Setup and then press OK The Advanced Fax Setup menu appears 3 Press the down arrow button to highlight Error Correction Mode and then pre...

Page 194: ...document you were copying exceeded the memory of the product Photo tray problem Try the following solutions to resolve the issue Solutions are listed in order with the most likely solution first If the first solution does not solve the problem continue trying the remaining solutions until the issue is resolved Solution 1 Load more paper in the photo tray Solution 2 Make sure paper is loaded correc...

Page 195: ...ithin the photo tray and is no higher than the top of the paper width guide Cause There was too much paper loaded in the photo tray If this did not solve the issue try the next solution Solution 4 Make sure the sheets of paper are not stuck together Solution Remove the paper from the photo tray and shuffle the paper so it does not stick together Reload the paper into the photo tray and try printin...

Page 196: ...t Software Solution 2 Turn on the product Solution 3 Turn on the computer Solution 4 Check the connection from the product to your computer Solution 1 Install the HP Photosmart Software Solution Install the HP Photosmart Software that came with the product If it is installed restart your computer To install the HP Photosmart Software 1 Insert the product CD ROM into your computer s CD ROM drive an...

Page 197: ...ected to the computer through a wired or wireless connection make sure that the respective connections are active and the product is turned on For more information on setting up the product and connecting it to your computer see the setup information that came with the product Cause The product was not properly connected to the computer File messages The following is a list of file related error m...

Page 198: ...Solution Reinsert the memory card If this does not work retake the photos with your digital camera If you already transferred the files to your computer try printing those files by using the product software The copies might not be damaged Cause Some of the files on the inserted memory card or attached storage device were damaged If this did not solve the issue try the next solution Solution 2 Pri...

Page 199: ... attached storage device were damaged If this did not solve the issue try the next solution Solution 2 Reformat the memory card in your digital camera Solution Check the computer screen for an error message telling you that the images on the memory card are corrupted If the file system on the card is corrupt reformat the memory card in your digital camera CAUTION Reformatting the memory card will ...

Page 200: ...backwards or upside down If this did not solve the issue try the next solution Solution 3 Push the memory card all the way forward Solution Remove the memory card and reinsert it in the memory card slot until it stops Cause You had not fully inserted the memory card Cannot crop Try the following solutions to resolve the issue Solutions are listed in order with the most likely solution first If the...

Page 201: ...2 Remove the memory card and reinsert it correctly Solution 3 Push the memory card all the way forward Solution 1 Remove all but one memory card Solution Remove all but one memory card The product reads the remaining memory card and displays the first photo stored on the memory card Cause There were two or more memory cards inserted into the product at the same time If this did not solve the issue...

Page 202: ...format your memory card in your camera or format your memory card in a Windows XP computer by selecting the FAT format For more information see the documentation that came with your digital camera CAUTION Reformatting the memory card will delete any photos stored on the card If you have previously transferred the photos from your memory card to a computer try printing the photos from the computer ...

Page 203: ... related error messages Improper shutdown Improper shutdown Solution Press the On button to turn the product on and off Cause The last time the product was used it was not turned off properly If the product is turned off by turning off the switch on a power strip or by using a wall switch the product can be damaged Ink cartridge and printhead messages The following is a list of printhead and ink c...

Page 204: ... cartridges were inserted into the wrong slots General printer error Try the following solutions to resolve the issue Solutions are listed in order with the most likely solution first If the first solution does not solve the problem continue trying the remaining solutions until the issue is resolved Solution 1 Reset the product Solution 2 Contact HP support Solution 1 Reset the product Solution Tu...

Page 205: ...t were shipped with your printer These cartridges will have SETUP after the ink cartridge number listed on the label These cartridges are specially formulated for first time use of your printer However subsequent replacement cartridges cannot be labeled SETUP Make sure you are using ink cartridges that are compatible with the HP Photosmart For a list of compatible ink cartridges see the printed do...

Page 206: ...tridge or a cartridge that has been used in another product the ink level indicator might be inaccurate or unavailable Ink level warnings and indicators provide estimates for planning purposes only When you receive an ink alert message consider having replacement ink cartridges available to avoid possible printing delays You do not need to replace the ink cartridges until print quality becomes una...

Page 207: ...ace The print carriage moves to the center of the product NOTE Wait until the print carriage stops moving before proceeding 3 Make sure the ink cartridges are installed in the correct slots Match the shape of the icon and color of the ink cartridge with the slot that has the same shaped icon and color 4 Run your finger along the top of the ink cartridges to locate any cartridges that are not snapp...

Page 208: ... the error message and then press the tab on the ink cartridge to release it from the slot 8 Press the ink cartridge back down into place The tab should make a snapping noise when the ink cartridge is correctly seated If the ink cartridge did not make a snapping noise the tab might need to be readjusted 9 Remove the ink cartridge from the slot 10 Gently bend the tab away from the ink cartridge CAU...

Page 209: ...sed Leaving the latch handle raised can result in incorrectly seated ink cartridges and problems printing The latch must remain down in order to correctly install the ink cartridges Cause The print carriage latch was not closed properly If this did not solve the issue try the next solution Solution 3 Clean the electrical contacts Solution Clean the cartridge electrical contacts To clean the electr...

Page 210: ...n the ink cartridge to release it from the slot 4 Hold the ink cartridge by its sides with the bottom pointing up and locate the electrical contacts on the ink cartridge The electrical contacts are four small rectangles of copper or gold colored metal on the bottom of the ink cartridge 1 Ink window 2 Electrical contacts Chapter 12 208 Solve a problem Solve a problem Downloaded from ManualsPrinter ...

Page 211: ...aning the cartridge contacts you might have a damaged cartridge Check to see if your cartridge is still under warranty and the end of warranty date has not been reached If the end of warranty date has been reached purchase a new ink cartridge If the end of warranty date has not been reached contact HP support for service or replacement Go to www hp com support If prompted choose your country regio...

Page 212: ...ice capacity warning Solution If you are going to move or transport the product after receiving this message make sure you keep it upright and do not tip it on its side to avoid ink leakage Printing can continue but ink system behavior might change Cause The product has nearly maximized the ink service capacity Ink system failure Solution Turn off the product unplug the power cord and wait 10 seco...

Page 213: ...tridges were not installed If this did not solve the issue try the next solution Solution 2 Make sure the ink cartridges are installed correctly Solution Make sure all of the ink cartridges are properly installed Refer to the following steps to resolve this error To make sure the ink cartridges are properly installed 1 Make sure the product is turned on 2 Open the ink cartridge access door by lift...

Page 214: ...he message has not gone away proceed to the next step If none of the ink cartridges were sticking up proceed to the next step 7 Locate the ink cartridge that is indicated in the error message and then press the tab on the ink cartridge to release it from the slot 8 Press the ink cartridge back down into place The tab should make a snapping noise when the ink cartridge is correctly seated If the in...

Page 215: ... solution Solution 3 Contact HP support Solution Contact HP support for service Go to www hp com support If prompted choose your country region and then click Contact HP for information on calling for technical support Cause There was a problem with the ink cartridges Install printhead and then cartridges Try the following solutions to resolve the issue Solutions are listed in order with the most ...

Page 216: ...printhead 1 Make sure that the product is turned on 2 Open the ink cartridge door 3 Remove every ink cartridge by pushing the tab on the ink cartridge and then pulling the ink cartridge out of its slot Place the ink cartridges on a piece of paper with the ink openings pointing up 4 Lift the latch handle on the print carriage until it stops Chapter 12 214 Solve a problem Solve a problem Downloaded ...

Page 217: ...5 Remove the printhead by lifting it straight up 6 Make sure the latch handle is raised and then reinsert the printhead Errors 215 Solve a problem Downloaded from ManualsPrinter com Manuals ...

Page 218: ...lose the ink cartridge door Cause The printhead or ink cartridges were not installed or incorrectly installed If this did not solve the issue try the next solution Solution 2 Contact HP support Solution Contact HP support for service Go to www hp com support If prompted choose your country region and then click Contact HP for information on calling for technical support Cause There was a problem i...

Page 219: ...ink cartridges Check the print quality of the current print job If it is not satisfactory try cleaning the printhead to see if that improves the quality Information about ink levels will not be available CAUTION HP recommends that you do not remove an ink cartridge until a replacement is ready to install HP recommends that you use genuine HP ink cartridges Genuine HP ink cartridges are designed an...

Page 220: ...rtridge is installed check the print quality If it is not satisfactory run the cleaning procedure from the toolbox Cause The genuine HP ink cartridge was previously used in some other product Printhead appears to be missing or damaged Try the following solutions to resolve the issue Solutions are listed in order with the most likely solution first If the first solution does not solve the problem c...

Page 221: ...lace them on a piece of paper with the ink opening pointing up 4 Lift the latch handle on the print carriage until it stops 5 Remove the printhead by lifting it straight up Errors 219 Solve a problem Downloaded from ManualsPrinter com Manuals ...

Page 222: ...zzles and contacts 3 Electrical contacts CAUTION Touch the nozzle and the electrical contact areas only with cleaning materials and not with your finger To clean the printhead a Lightly dampen a clean lint free cloth and wipe the electrical contact area from the bottom to the top Do not go past the edge between the nozzles and the electrical contacts Clean until no new ink shows on the cloth Chapt...

Page 223: ...eaned areas dry with a dry lint free cloth before proceeding to the next step 7 Clean the electrical contacts inside the product To clean the electrical contacts in the product a Lightly dampen a clean lint free cloth with bottled or distilled water b Clean the electrical contacts in the product by wiping with the cloth from top to bottom Use as many fresh clean cloths as necessary Clean until no ...

Page 224: ... cartridges Leaving the latch handle raised can result in incorrectly seated ink cartridges and problems printing The latch must remain down in order to correctly install the ink cartridges 10 Using the colored shaped icons for help slide the ink cartridge into the empty slot until it clicks into place and is seated firmly in the slot 11 Close the ink cartridge door Chapter 12 222 Solve a problem ...

Page 225: ...he following solutions to resolve the issue Solutions are listed in order with the most likely solution first If the first solution does not solve the problem continue trying the remaining solutions until the issue is resolved Solution 1 Reinstall the printhead Solution 2 Contact HP support Solution 1 Reinstall the printhead Solution Check to make sure the printhead is installed and the ink cartri...

Page 226: ...on a piece of paper with the ink opening pointing up 4 Lift the latch handle on the print carriage until it stops 5 Remove the printhead by lifting it straight up Chapter 12 224 Solve a problem Solve a problem Downloaded from ManualsPrinter com Manuals ...

Page 227: ...between nozzles and contacts 3 Electrical contacts CAUTION Touch the nozzle and the electrical contact areas only with cleaning materials and not with your finger To clean the printhead a Lightly dampen a clean lint free cloth and wipe the electrical contact area from the bottom to the top Do not go past the edge between the nozzles and the electrical contacts Clean until no new ink shows on the c...

Page 228: ...s dry with a dry lint free cloth before proceeding to the next step 7 Clean the electrical contacts inside the product To clean the electrical contacts in the product a Lightly dampen a clean lint free cloth with bottled or distilled water b Clean the electrical contacts in the product by wiping with the cloth from top to bottom Use as many fresh clean cloths as necessary Clean until no ink shows ...

Page 229: ...ng the ink cartridges Leaving the latch handle raised can result in incorrectly seated ink cartridges and problems printing The latch must remain down in order to correctly install the ink cartridges 10 Using the colored shaped icons for help slide the ink cartridge into the empty slot until it clicks into place and is seated firmly in the slot 11 Close the ink cartridge door Errors 227 Solve a pr...

Page 230: ...rrent print job If it is not satisfactory it could mean the internal clock failed and the product was not able to service the printhead as scheduled Try cleaning the printhead to see if that improves the quality To clean the printhead from the control panel 1 Press Setup 2 Press the down arrow button to highlight Tools and then press OK 3 Press the down arrow button to highlight Clean Printhead an...

Page 231: ...ore ink cartridges were missing If this did not solve the issue try the next solution Solution 2 Check if all ink cartridges are properly installed Solution Make sure all of the ink cartridges are properly installed Refer to the following steps to resolve this error To make sure the ink cartridges are properly installed 1 Make sure the product is turned on 2 Open the ink cartridge access door by l...

Page 232: ...he message has not gone away proceed to the next step If none of the ink cartridges were sticking up proceed to the next step 7 Locate the ink cartridge that is indicated in the error message and then press the tab on the ink cartridge to release it from the slot 8 Press the ink cartridge back down into place The tab should make a snapping noise when the ink cartridge is correctly seated If the in...

Page 233: ...ore information see Replace the cartridges Cause One or more of the ink cartridges were not installed If this did not solve the issue try the next solution Solution 3 Clean the ink cartridge contacts Solution Clean the cartridge electrical contacts To clean the electrical contacts 1 Make sure the product is turned on 2 Open the cartridge access door by lifting the blue access handles on the side o...

Page 234: ...n the ink cartridge to release it from the slot 4 Hold the ink cartridge by its sides with the bottom pointing up and locate the electrical contacts on the ink cartridge The electrical contacts are four small rectangles of copper or gold colored metal on the bottom of the ink cartridge 1 Ink window 2 Electrical contacts Chapter 12 232 Solve a problem Solve a problem Downloaded from ManualsPrinter ...

Page 235: ...g the cartridge contacts you might have a damaged cartridge Check to see if your cartridge is still under warranty and the end of warranty date has not been reached If the end of warranty date has been reached purchase a new ink cartridge If the end of warranty date has not been reached contact HP support for service or replacement Go to www hp com support If prompted choose your country region an...

Page 236: ... com support If prompted choose your country region and then click Contact HP for information on calling for technical support Cause The ink cartridges were not intended for use in this product Chapter 12 234 Solve a problem Solve a problem Downloaded from ManualsPrinter com Manuals ...

Page 237: ...om the product Press Cancel on the control panel If the print job does not stop press Cancel again It can take a few moments for the print job to be cancelled Stop the current job 235 Stop the current job Downloaded from ManualsPrinter com Manuals ...

Page 238: ...Chapter 13 236 Stop the current job Stop the current job Downloaded from ManualsPrinter com Manuals ...

Page 239: ...dge chip information The HP cartridges used with this product contain a memory chip that assists in the operation of the product In addition this memory chip collects a limited set of information about the usage of the product which might include the following the date when the cartridge was first installed the date when the cartridge was last used the number of pages printed using the cartridge t...

Page 240: ...operating temperature range 15 ºC to 32 ºC 59 ºF to 90 ºF Allowable operating temperature range 5 ºC to 40 ºC 41 ºF to 104 ºF Humidity 15 to 80 RH non condensing 28 ºC maximum dewpoint Non operating Storage temperature range 40 ºC to 60 ºC 40 ºF to 140 ºF In the presence of high electromagnetic fields it is possible the output from the HP Photosmart may be slightly distorted HP recommends using a ...

Page 241: ...egal sized paper will fall on the first sheet NOTE For a complete list of supported media sizes see the printer driver Two sided printing accessory paper specifications Type Size Weight Paper Letter 8 5 x 11 inches Executive 7 25 x 10 5 inches A4 210 x 297 mm A5 148 x 210 mm 60 to 90 g m2 16 to 24 lb Brochure paper Letter 8 5 x 11 inches A4 210 x 297 mm Up to 180 g m2 48 lb bond Cards and photos 4...

Page 242: ...ty reports CCITT ITU Group 3 fax with Error Correction Mode 33 6 Kbps transmission 3 seconds per page speed at 33 6 Kbps based on ITU T Test Image 1 at standard resolution More complicated pages or higher resolution take longer and use more memory Ring detect with automatic fax answering machine switching Photo dpi Very Fine dpi Fine dpi Standard dpi Black 200 x 200 8 bit grayscale 300 x 300 200 x...

Page 243: ...e sheet to reduce paper usage For more information see Use printing shortcuts Smart Web printing The HP Smart Web Printing interface includes a Clip Book and Edit Clips window where you can store organize or print clips you have gathered from the Web For more information see Print a Web page Energy Savings information To determine the ENERGY STAR qualification status for this product see Power con...

Page 244: ...ridges free of charge For more information go to the following Web site www hp com hpinfo globalcitizenship environment recycle Power consumption Hewlett Packard printing and imaging equipment marked with the ENERGY STAR logo is qualified to the U S Environmental Protection Agency s ENERGY STAR specifications for imaging equipment The following mark will appear on ENERGY STAR qualified imaging pro...

Page 245: ...τες συσκευές σε μια καθορισμένη μονάδα συλλογής απορριμμάτων για την ανακύκλωση άχρηστου ηλεκτρικού και ηλεκτρονικού εξοπλισμού Η χωριστή συλλογή και ανακύκλωση των άχρηστων συσκευών θα συμβάλει στη διατήρηση των φυσικών πόρων και στη διασφάλιση ότι θα ανακυκλωθούν με τέτοιον τρόπο ώστε να προστατεύεται η υγεία των ανθρώπων και το περιβάλλον Για περισσότερες πληροφορίες σχετικά με το πού μπορείτε ...

Page 246: ...eze bevindt zich op de hoofdprintplaat Wanneer deze batterij leeg is moet deze volgens de geldende regels worden afgevoerd Battery disposal in Taiwan Attention California users The battery supplied with this product may contain perchlorate material Special handling may apply For more information go to the following Web site www dtsc ca gov hazardouswaste perchlorate Chapter 14 244 Technical inform...

Page 247: ...ων δεδομένων ρολογιού πραγματικού χρόνου ή των ρυθμίσεων προϊόντος και έχει σχεδιαστεί έτσι ώστε να διαρκέσει όσο και το προϊόν Τυχόν απόπειρες επιδιόρθωσης ή αντικατάστασης αυτής της μπαταρίας θα πρέπει να πραγματοποιούνται από κατάλληλα εκπαιδευμένο τεχνικό Az Európai unió telepek és akkumulátorok direktívája A termék tartalmaz egy elemet melynek feladata az hogy biztosítsa a valós idejű óra vag...

Page 248: ...rs in Germany Noise emission statement for Germany HP Photosmart Premium Fax C410 series declaration of conformity Regulatory model identification number For regulatory identification purposes your product is assigned a Regulatory Model Number The Regulatory Model Number for your product is SDGOB 0826 This regulatory number should not be confused with the marketing name HP Photosmart Premium Fax C...

Page 249: ...eceiving antenna Increase the separation between the equipment and the receiver Connect the equipment into an outlet on a circuit different from that to which the receiver is connected Consult the dealer or an experienced radio TV technician for help For further information contact Manager of Corporate Product Regulations Hewlett Packard Company 3000 Hanover Street Palo Alto Ca 94304 650 857 1501 ...

Page 250: ...many Sehanzeige Arbeitsplätze Das Gerät ist nicht für die Benutzung am Bildschirmarbeitsplatz gemäß BildscharbV vorgesehen Noise emission statement for Germany Geräuschemission LpA 70 dB am Arbeitsplatz im Normalbetrieb nach DIN 45635 T 19 Chapter 14 248 Technical information Technical information Downloaded from ManualsPrinter com Manuals ...

Page 251: ...ty Regulatory wireless statements This section contains the following regulatory information pertaining to wireless products Exposure to radio frequency radiation Regulatory wireless statements 249 Technical information Downloaded from ManualsPrinter com Manuals ...

Page 252: ...rio isto é não tem direito à proteção contra interferência prejudicial mesmo de estações do mesmo tipo e não pode causar interferência a sistemas operando em caráter primário Res ANATEL 282 2001 Notice to users in Canada Notice to users in Canada Note à l attention des utilisateurs canadiens For Indoor Use This digital apparatus does not exceed the Class B limits for radio noise emissions from the...

Page 253: ...product may be used in the following EU and EFTA countries Austria Belgium Bulgaria Cyprus Czech Republic Denmark Estonia Finland France Germany Greece Hungary Iceland Ireland Italy Latvia Liechtenstein Lithuania Luxembourg Malta Netherlands Norway Poland Portugal Romania Slovak Republic Slovenia Spain Sweden Switzerland and United Kingdom Products with 2 4 GHz wireless LAN devices France For 2 4 ...

Page 254: ...ns the following topics Notice to users of the U S telephone network FCC requirements Notice to users of the Canadian telephone network Notice to users in the European Economic Area Notice to users of the German telephone network Australia wired fax statement Chapter 14 252 Technical information Technical information Downloaded from ManualsPrinter com Manuals ...

Page 255: ...o you will be given advance notice so you will have the opportunity to maintain uninterrupted service If you experience trouble with this equipment please contact the manufacturer or look elsewhere in this manual for warranty or repair information Your telephone company might ask you to disconnect this equipment from the network until the problem has been corrected or until you are sure that the e...

Page 256: ...une interface peut se composer de n importe quelle combinaison d appareils à condition que le total des numéros REN ne dépasse pas 5 Basé sur les résultats de tests FCC Partie 68 le numéro REN de ce produit est 0 0B This equipment meets the applicable Industry Canada Terminal Equipment Technical Specifications This is confirmed by the registration number The abbreviation IC before the registration...

Page 257: ...network termination point In the event of problems you should contact your equipment supplier in the first instance This equipment is designed for DTMF tone dialing and loop disconnect dialing In the unlikely event of problems with loop disconnect dialing it is recommended to use this equipment only with the DTMF tone dial setting Notice to users of the German telephone network Hinweis für Benutze...

Page 258: ...Japan safety statement For safety use i Chapter 14 256 Technical information Technical information Downloaded from ManualsPrinter com Manuals ...

Page 259: ...Japan safety statement 257 Technical information Downloaded from ManualsPrinter com Manuals ...

Page 260: ...Chapter 14 258 Technical information Technical information Downloaded from ManualsPrinter com Manuals ...

Page 261: ...nt Environmental product stewardship program 240 environmental specifications 238 error messages memory cards 198 reading or writing file 195 F fax answering machine set up 30 31 175 computer modem set up 26 27 31 33 175 coupler 175 distinctive ringing 23 DSL set up 21 Internet over 188 IP phone using 188 ISDN line set up 22 not answering 170 parallel splitter 175 PBX system set up 22 problems rec...

Page 262: ...ubleshooting 126 print cartridges low ink 129 print from anywhere 69 70 print quality report 103 printer found screen Windows 15 printhead problems 223 printing slow troubleshoot 130 problems copy 137 error messages 191 print 126 scan 134 R recycle ink cartridges 242 regulatory notices regulatory model identification number 246 wireless statements 249 regulatory telecom notices 252 reinstall softw...

Page 263: ...ot fax problems 142 150 152 154 156 157 158 160 162 168 170 173 175 181 188 incorrect measurements 114 setup 110 USB cable 112 troubleshooting copy 137 error messages 191 memory card 131 print 126 scan 134 U uninstall software 118 USB cable installation 112 V voice mail set up with fax 25 33 voice mail set up with fax 175 W wall jack test fax 184 warranty 110 WEP key setup 11 wireless router 13 In...

Page 264: ...262 Index Downloaded from ManualsPrinter com Manuals ...

Reviews: