background image

HP Pavilion 10 Notebook PC

Maintenance and Service Guide

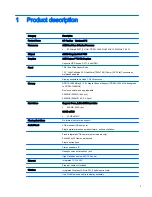
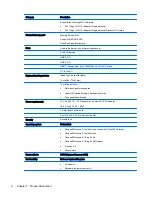
Summary of Contents for 10

Page 1: ...HP Pavilion 10 Notebook PC Maintenance and Service Guide ...

Page 2: ...t Edition March 2014 Document Part Number 758965 002 Product notice This guide describes features that are common to most models Some features may not be available on your computer Not all features are available in all editions of Windows 8 This computer may require upgraded and or separately purchased hardware drivers and or software to take full advantage of Windows 8 functionality See http www ...

Page 3: ...hat should only be accessed by an authorized service provider See Chapter 5 Removal and replacement procedures for Customer Self Repair parts for details Accessing parts described in Chapter 6 Removal and replacement procedures for Authorized Service Provider only parts can damage the computer or void your warranty iii ...

Page 4: ...iv Important Notice about Customer Self Repair Parts ...

Page 5: ...nother hard surface such as an adjoining optional printer or a soft surface such as pillows or rugs or clothing to block airflow Also do not allow the AC adapter to come into contact with the skin or a soft surface such as pillows or rugs or clothing during operation The computer and the AC adapter comply with the user accessible surface temperature limits defined by the International Standard for...

Page 6: ...vi Safety warning notice ...

Page 7: ...onents 13 Display components 16 Miscellaneous parts 17 Sequential part number listing 17 4 Removal and replacement procedures preliminary requirements 19 Tools required 19 Service considerations 19 Plastic parts 19 Cables and connectors 20 Drive handling 20 Grounding guidelines 21 Electrostatic discharge damage 21 Packaging and transporting guidelines 22 Equipment guidelines 23 5 Removal and repla...

Page 8: ...Using Setup Utility 49 Changing the language of Setup Utility 49 Navigating and selecting in Setup Utility 49 Displaying system information 50 Restoring factory default settings in Setup Utility 50 Exiting Setup Utility 50 Updating the BIOS 51 Determining the BIOS version 51 Downloading a BIOS update 51 Using Advanced System Diagnostics 52 8 Backing up restoring and recovering 53 Creating recovery...

Page 9: ...e restore media 58 Backing up your information 58 10 Specifications 60 Computer specifications 60 35 6 cm 10 1 in HD display specifications 61 Hard drive specifications 62 Specification information in Device Manager 62 11 Power cord set requirements 63 Requirements for all countries and regions 63 Requirements for specific countries and regions 63 12 Recycling 65 Battery 65 Index 66 ix ...

Page 10: ...x ...

Page 11: ... 1600 MHz downgrade to DDR3L 1066MHz Non accessible non upgradeable 2048 MB 256MX 16x 4 pcs 4096 MB 256MX 16 X 2 X 4 pcs Hard drives Supports 7 mm 2 5 in SATA hard drive 500 GB 5400 rpm 32 GB eMMC 32 GB eMMC Fixed optical drives No internal optical drive support Audio Visual VGA webcam HD design in Single digital microphone with software echo cancellation Fixed Integrated VGA camera select models ...

Page 12: ...ad includes Multi touch gestures enabled Support Windows 8 modern trackpad gestures Taps enabled as default Power requirements 19 V dc 2 1 A 40 W adapter non Smart nPFC AC adapter 19 5 V dc 3 33 A 65 W 1 meter length power cord 3 cell 24 Wh 2 2 Ah 4 hour battery life Security Security lock Operating system Preinstalled Microsoft Windows 8 1 small screen touch with Office 365 Personal Microsoft Win...

Page 13: ... and then click Device Manager in the left column A list displays all the devices installed on your computer To find out information about system hardware components and the system BIOS version number press fn esc Locating software To find out what software is installed on your computer From the Start screen click the down arrow in the lower left corner of the screen For Ubuntu Linux information s...

Page 14: ...tional video or audio device such as a high definition television any compatible digital or audio component or a high speed HDMI device 4 RJ 45 network jack Connects a network cable 5 USB 3 0 port Each USB 3 0 port connects an optional USB device such as a keyboard mouse external drive printer scanner or USB hub 6 USB 2 0 port Each USB 2 0 port connects an optional USB device such as a keyboard mo...

Page 15: ...onnected to the jack the computer speakers are disabled NOTE Be sure that the device cable has a 4 conductor connector that supports both audio out headphone and audio in microphone 8 Memory card reader Reads optional memory cards that store manage share or access information To insert a card Hold the card label side up with connectors facing the slot insert the card into the slot and then push in...

Page 16: ...am light On The webcam is in use 5 WLAN antennas 1 Sends and receive wireless signals to communicate with wireless local area networks WLANs The antennas are not visible from the outside of the computer For optimal transmission keep the areas immediately around the antennas free from obstructions For wireless regulatory notices see the section of the Regulatory Safety and Environmental Notices tha...

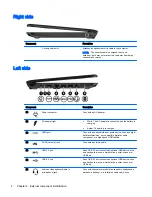
Page 17: ...Top Top 7 ...

Page 18: ...n screen pointer and selects or activates items on the screen 2 Left TouchPad button Functions like the left button on an external mouse 3 Right TouchPad button Functions like the right button on an external mouse 8 Chapter 2 External component identification ...

Page 19: ... button briefly to exit Hibernation CAUTION Pressing and holding down the power button will result in the loss of unsaved information If the computer has stopped responding and Windows shutdown procedures are ineffective press and hold the power button down for at least 5 seconds to turn off the computer To learn more about your power settings see your power options From the Start screen type powe...

Page 20: ...ith the spacebar or the esc key 3 Windows key Returns you to the Start screen from an open app or the Windows desktop NOTE Pressing the Windows key again will return you to the previous screen 4 Action keys Execute frequently used system functions NOTE On select models the f5 action key turns the radiance backlight keyboard feature off or on 10 Chapter 2 External component identification ...

Page 21: ...nd provide information you may need when you troubleshoot system problems or travel internationally with the computer IMPORTANT All laser etched labels described in this section will be located on the bottom of your computer Service label Provides important information to identify your computer When contacting support you will probably be asked for the serial number and possibly for the product nu...

Page 22: ...ly Regulatory label s Provide s regulatory information about the computer Wireless certification label s Provide s information about optional wireless devices and the approval markings for the countries or regions in which the devices have been approved for use 12 Chapter 2 External component identification ...

Page 23: ...pported parts for your computer go to http partsurfer hp com select your country or region and then follow the on screen instructions NOTE Details about your computer including model serial number product key and length of warranty are on the service tag at the bottom of your computer See Service tag on page 16 for details Computer major components 13 ...

Page 24: ...14 Chapter 3 Illustrated parts catalog ...

Page 25: ...MHz 3 95 W System Board for Windows 8 1 Standard 769701 501 UMA E1 Micro 6200T 4 GB 1 GHz DDR3L 1066 MHz 1 MB L2 300 MHz 3 95 W System Board for FreeDos and Ubuntu 769702 001 UMA E1 Micro 6200T 4 GB 1 GHz DDR3L 1066 MHz 1 MB L2 300 MHz 3 95 W System Board for Windows 8 1 Standard 769702 501 UMA E1 Micro 6200T 1 GHz DDR3L 1066 MHz 1 MB L2 300 MHz 3 95 W eMMC System Board for FreeDos and Ubuntu 7776...

Page 26: ...cluded with the Display back cover 5 Display cable included with the Display back cover 6 WLAN antenna included with the Display back cover 7 Display back cover 758637 001 8 Display panel10 1 High Definition LED AntiGlare 1366x768 3 6mm SVA Flat Touchscreen Whole unit replacement not illustrated 773020 001 16 Chapter 3 Illustrated parts catalog ...

Page 27: ...are part number Description 675794 001 WLAN 802 11bgn 1x1 Wi Fi Adapter Single antenna 718440 001 RTC battery 753077 001 WLAN 802 11bgn 1x1 Wi Fi Adapter Bluetooth Combo Single antenna 758633 001 AC adapter 40 W 19 5V adapter non Smart nPFC 758636 001 Screw kit 758637 001 Display cover black includes brackets cable and WLAN antenna 758638 001 Base enclosure 758639 001 Battery 758640 001 Display be...

Page 28: ... use in South Africa 769701 001 UMA E1 Micro 6200T 2 GB 1 GHz DDR3L 1066 MHz 1 MB L2 300 MHz 3 95 W System Board for FreeDos and Ubuntu 769701 501 UMA E1 Micro 6200T 2 GB 1 GHz DDR3L 1066 MHz 1 MB L2 300 MHz 3 95 W System Board for Windows 8 1 Standard 769702 001 UMA E1 Micro 6200T 4 GB 1 GHz DDR3L 1066 MHz 1 MB L2 300 MHz 3 95 W System Board for FreeDos and Ubuntu 769702 501 UMA E1 Micro 6200T 4 ...

Page 29: ... of the considerations that you must keep in mind during disassembly and assembly procedures NOTE As you remove each subassembly from the computer place the subassembly and all accompanying screws away from the work area to prevent damage Plastic parts CAUTION Using excessive force during disassembly and reassembly can damage plastic parts Use care when handling the plastic parts Apply pressure on...

Page 30: ...d drive shut down the computer If you are unsure whether the computer is off or in Hibernation turn the computer on and then shut it down through the operating system Before handling a drive be sure that you are discharged of static electricity While handling a drive avoid touching the connector Before removing a diskette drive or optical drive be sure that a diskette or disc is not in the drive a...

Page 31: ...recautions Keep components in their electrostatic safe containers until you are ready to install them Use nonmagnetic tools Before touching an electronic component discharge static electricity by using the guidelines described in this section Avoid touching pins leads and circuitry Handle electronic components as little as possible If you remove a component place it in an electrostatic safe contai...

Page 32: ...n a grounded surface before removing items from their containers Always be properly grounded when touching a component or assembly Store reusable ESD sensitive parts from assemblies in protective packaging or nonconductive foam Use transporters and conveyors made of antistatic belts and roller bushings Be sure that mechanized equipment used for moving materials is wired to ground and that proper m...

Page 33: ...istance between the operator and ground To be effective the conductive strips must be worn in contact with the skin The following grounding equipment is recommended to prevent electrostatic damage Antistatic tapes Antistatic smocks aprons and sleeve protectors Conductive bins and other assembly or soldering aids Nonconductive foam Conductive tabletop workstations with ground cords of one megohm re...

Page 34: ...region and then follow the on screen instructions Component replacement procedures NOTE Details about your computer including model serial number product key and length of warranty are on the service tag at the bottom of your computer This chapter provides removal and replacement procedures for Authorized Service Provider only parts There are as many as 40 screws that must be removed replaced or l...

Page 35: ...and TouchPad cable for use in Russia 758644 251 Island Type Keyboard black includes TouchPad and TouchPad cable for use in Bulgaria 758644 261 Island Type Keyboard black includes TouchPad and TouchPad cable for use in Romania 758644 271 Island Type Keyboard black includes TouchPad and TouchPad cable for use in Belgium 758644 A41 Island Type Keyboard black includes TouchPad and TouchPad cable for I...

Page 36: ... to release the keyboard 4 Turn the computer upright and carefully tilt the keyboard and slide it toward the display to disconnect the tabs holding the keyboard in position Disconnect the TouchPad cable from the top cover by releasing the ZIF connector 1 and carefully removing the cable 2 26 Chapter 5 Removal and replacement procedures for Authorized Service Provider parts ...

Page 37: ...5 Slide the keyboard cable ZIF connector 3 and slide the disconnected cable 4 Lift the keyboard 5 to remove it Reverse this procedure to install the keyboard Component replacement procedures 27 ...

Page 38: ...e operating system 2 Disconnect all external devices connected to the computer 3 Disconnect the power from the computer by first unplugging the power cord from the AC outlet and then unplugging the AC adapter from the computer 4 Remove the keyboard see Keyboard on page 25 Remove the base enclosure and top cover screws 1 Position the computer upright and open it as far as possible 2 Remove the foll...

Page 39: ...uter NOTE Rubber screw covers are available in the Rubber Kit spare part number 758641 001 5 Remove the four Phillips 6 0 2 5 screws on the back side of the base enclosure 6 Lift the base enclosure to remove it Reverse this procedure to install the base enclosure Component replacement procedures 29 ...

Page 40: ...nd WLAN antenna 758637 001 Before removing the display assembly follow these steps 1 Shut down the computer If you are unsure whether the computer is off or in Hibernation turn the computer on and then shut it down through the operating system 2 Disconnect all external devices connected to the computer 3 Disconnect the power from the computer by first unplugging the power cord from the AC outlet a...

Page 41: ...antennas can result in degradation of the computer s wireless performance 5 Replace the panel if this is a whole unit touchscreen replacement by reversing these procedures The whole unit panel replacement is complete NOTE If you are replacing an assembly component for a non touchscreen display continue the steps below Display assembly Remove the display assembly 1 Place the computer upright and op...

Page 42: ...el 3 4 5 and remove the display bezel 6 4 Remove the eight Phillips 2 0 3 0 screws for the display panel and carefully lift the panel NOTE Carefully release any adhesive tape 32 Chapter 5 Removal and replacement procedures for Authorized Service Provider parts ...

Page 43: ... display cable or webcam follow these procedures NOTE The display hinges are spared with the back cover a Position the display back cover face up b Remove the display brackets by removing the 10 Phillips and broadhead screws 1 and 2 securing the hinge brackets to the back cover and then lift the brackets 3 to remove them Component replacement procedures 33 ...

Page 44: ...e it d Release the wireless antenna transceivers from the back cover The wireless antenna transceivers are attached to the display bezel with double sided tape e Remove the wireless antenna from the retaining channels and lift the antenna 34 Chapter 5 Removal and replacement procedures for Authorized Service Provider parts ...

Page 45: ...wing Disconnect the module connector 1 and lift the module 2 from the adhesive holding it in place on the display bezel and if you have not already done so when removing the display cable Reverse this procedure to install the display panel Component replacement procedures 35 ...

Page 46: ...apter from the computer 4 Remove the keyboard see Keyboard on page 25 5 Remove the base enclosure see Base enclosure on page 28 To remove the battery CAUTION Removing a battery that is the sole power source for the computer can cause loss of information To prevent loss of information save your work and shut down the computer through Windows before removing the battery 1 Turn the computer upside do...

Page 47: ...puter on and then shut it down through the operating system 2 Disconnect all external devices connected to the computer 3 Disconnect the power from the computer by first unplugging the power cord from the AC outlet and then unplugging the AC adapter from the computer 4 Remove the keyboard see Keyboard on page 25 5 Remove the base enclosure see Base enclosure on page 28 6 Remove the battery see Bat...

Page 48: ...h to prevent incorrect insertion NOTE If the WLAN antennas are not connected to the terminals on the WLAN module the protective sleeves must be installed on the antenna connectors as shown in the following illustration Reverse this procedure to install the WLAN module 38 Chapter 5 Removal and replacement procedures for Authorized Service Provider parts ...

Page 49: ...puter by first unplugging the power cord from the AC outlet and then unplugging the AC adapter from the computer 4 Remove the keyboard see Keyboard on page 25 5 Remove the base enclosure see Base enclosure on page 28 6 Remove the battery see Battery on page 36 Remove the speaker assembly 1 Position the top cover upside down with the speakers in front 2 Disconnect the speaker cable from the system ...

Page 50: ...hen unplugging the AC adapter from the computer 4 Remove the keyboard see Keyboard on page 25 5 Remove the base enclosure see Base enclosure on page 28 6 Remove the battery see Battery on page 36 To remove a hard drive 1 Position the top cover upside down on a flat surface Remove the four Phillips 2 5 3 5 screws that secure the hard drive to the top cover 1 NOTE Some models may only have two screw...

Page 51: ...hard drive cover remove the four Phillips 3 0 3 5 screws 1 that secure the cover to the drive and then lift the cover straight up and off the hard drive 2 Reverse this procedure to install a hard drive Component replacement procedures 41 ...

Page 52: ...n unplugging the AC adapter from the computer 4 Remove the keyboard see Keyboard on page 25 5 Remove the base enclosure see Base enclosure on page 28 6 Remove the battery see Battery on page 36 7 Remove the following components a Display video cable if not already removed b WLAN see WLAN Bluetooth combo card on page 37 c Speaker assembly see Speaker assembly on page 39 d Hard drive see Hard drive ...

Page 53: ...system board and lift the heat shield 2 NOTE Some models may only have four screws 3 Remove the three Phillips 2 5 3 5 screws 1 from the system board 4 Lift the right side of the system board up at an angle 2 5 Pull the system board 3 up and toward the right to remove it Component replacement procedures 43 ...

Page 54: ...t it down through the operating system 2 Disconnect all external devices connected to the computer 3 Disconnect the power from the computer by first unplugging the power cord from the AC outlet and then unplugging the AC adapter from the computer 4 Remove the keyboard see Keyboard on page 25 5 Remove the base enclosure see Base enclosure on page 28 6 Remove the battery see Battery on page 36 7 Rem...

Page 55: ... on page 40 Remove the RTC battery 1 Position the system board upside down 2 Use a thin screwdriver or similar tool to pry the battery out of the socket 1 3 Remove the battery from the socket 2 Reverse this procedure to install the RTC battery Component replacement procedures 45 ...

Page 56: ...ost BIOS updates on the HP website are packaged in compressed files called SoftPaqs Some download packages contain a file named Readme txt which contains information regarding installing and troubleshooting the file Determining the BIOS version To determine whether available BIOS updates contain later BIOS versions than those currently installed on the computer you need to know the version of the ...

Page 57: ...te is more recent than your BIOS make a note of the path to the location on your hard drive where the BIOS update is downloaded You will need to access this path when you are ready to install the update NOTE If you connect your computer to a network consult the network administrator before installing any software updates especially system BIOS updates BIOS installation procedures vary Follow any i...

Page 58: ... want to run and then follow the on screen instructions NOTE If you need to stop a diagnostic test press esc Downloading HP PC Hardware Diagnostics UEFI to a USB device NOTE Instructions for downloading HP PC Hardware Diagnostics UEFI are provided in English only 1 Go to http www hp com 2 Click Support Drivers and then click the Drivers Downloads tab 3 Enter the product name in the text box and th...

Page 59: ...art Setup Utility 2 Use the arrow keys to select System Configuration Language and then press enter 3 Use the arrow keys to select a language and then press enter 4 When a confirmation prompt with your language selected is displayed press enter 5 To save your change and exit Setup Utility use the arrow keys to select Exit Exit Saving Changes and then press enter Your change takes effect immediatel...

Page 60: ...elect Exit Exit Saving Changes and then press enter The Setup Utility factory settings take effect when the computer restarts NOTE Your password security and language settings are not changed when you restore the factory settings Exiting Setup Utility To exit Setup Utility and save your changes from the current session If the Setup Utility menus are not visible press esc to return to the menu disp...

Page 61: ...ning on battery power or connected to an optional power source During the download and installation follow these instructions Do not disconnect power from the computer by unplugging the power cord from the AC outlet Do not shut down the computer or initiate Suspend or Hibernation Do not insert remove connect or disconnect any device cable or cord 1 Access the page on the HP website that provides s...

Page 62: ...es If it reports an error replace the memory modules immediately Battery test This test analyzes the condition of the battery and calibrates the battery if necessary If the battery fails the test contact support to report the issue and purchase a replacement battery System Tune Up This group of additional tests checks your computer to make sure that the main components are functioning correctly Sy...

Page 63: ...p and then select Help and Support Creating HP Recovery media HP Recovery Manager is a software program that offers a way to create recovery media after you successfully set up the computer HP Recovery media can be used to perform system recovery if the hard drive becomes corrupted System recovery reinstalls the original operating system and the software programs installed at the factory and then ...

Page 64: ...tem Choose the method that best matches your situation and level of expertise Windows offers several options for restoring from backup refreshing the computer and resetting the computer to its original state For more information and steps see Help and Support From the Start screen type help and then select Help and Support If you need to correct a problem with a preinstalled application or driver ...

Page 65: ...ly allows System Recovery and Minimized Image Recovery What you need to know HP Recovery Manager recovers only software that was installed at the factory For software not provided with this computer you must either download the software from the manufacturer s website or reinstall the software from the media provided by the manufacturer Recovery through HP Recovery Manager should be used as a fina...

Page 66: ...u can change the computer boot order which is the order of devices listed in BIOS where the computer looks for startup information You can change the selection for an optical drive or a USB flash drive To change the boot order 1 Insert the HP Recovery media you created 2 Restart the computer quickly press esc and then press f9 for boot options 3 Select the optical drive or USB flash drive you want...

Page 67: ...tes a set of system restore discs using blank writable DVDs DVD R or DVD R HP recommends using blank DVD R discs from a manufacturer you trust because these recovery DVDs are so important You need approximately 3 blank DVD R discs The program states how many discs are needed at the beginning of the process To create restore DVDs 1 Click the System menu icon at the far right of the top panel and th...

Page 68: ...een instructions NOTE If you are unable to boot start up your computer with the primary operating system and you did not create a system recovery disc you must purchase an Ubuntu Operating System DVD to reinstall the operating system For additional information refer to the Worldwide Telephone Numbers booklet for more information Backing up your information You should back up your computer files on...

Page 69: ...icon at the far right of the top panel and then click System Settings Backup icon 2 Click Restore select the location of the backup files and the folder name and then click Forward 3 Under Restore from When select the date of the files to be restored and click Forward 4 Select the location and folder where the files are to be restored and click Forward 5 Follow the on line instructions 6 Click Res...

Page 70: ...c 3 33 A 65 W DC plug of external HP power supply Temperature Operating writing to optical disc 5 C to 35 C 41 F to 95 F Nonoperating 20 C to 60 C 4 F to 140 F Relative humidity Operating 10 to 90 Nonoperating 5 to 95 Maximum altitude unpressurized Operating 14 7 to 10 1 psia 15 m to 3 048 m 50 ft to 10 000 ft Nonoperating 14 7 to 4 4 psia 15 m to 12 192 m 50 ft to 40 000 ft Shock Operating 125 g ...

Page 71: ... U S Active diagonal size 35 6 cm 10 1 in Resolution 1600x900 HD Active area 309 399x173 952 PPI 112 Surface treatment Anti glare Contrast ratio 300 1 typical Response time 8 ms Brightness 220 nits typical Viewing angle SVA Backlight LED Luminance uniformity 13 points 1 4 typ 1 6 max Lifetime 1 2 luminance 12 000 hours Color coordinate white 0 313 0 329 Color tolerance White 0 02 Color tolerance W...

Page 72: ...dware specification information You can also add hardware or modify device configurations using Device Manager NOTE Windows 7 and Windows Vista include the User Account Control feature to improve the security of your computer You may be prompted for your permission or password for tasks such as installing software running utilities or changing Windows settings Refer to Windows Help and Support for...

Page 73: ...t All power cord sets must be approved by an acceptable accredited agency responsible for evaluation in the country or region where the power cord set will be used The power cord sets must have a minimum current capacity of 10 A and a nominal voltage rating of 125 or 250 V ac as required by the power system of each country or region The appliance coupler must meet the mechanical configuration of a...

Page 74: ... must bear a T mark and registration number in accordance with the Japanese Dentori Law The flexible cord must be Type VCTF 3 conductor 0 75mm2 or 1 25mm2 conductor size The wall plug must be a two pole grounding type with a Japanese Industrial Standard C8303 7 A 125 V ac configuration 4 The flexible cord must be Type RVV 3 conductor 0 75mm2 conductor size Power cord set fittings appliance coupler...

Page 75: ...he battery in general household waste Follow the local laws and regulations in your area for battery disposal HP encourages customers to recycle used electronic hardware HP original print cartridges and rechargeable batteries For more information about recycling programs see the HP Web site at http www hp com recycle Battery 65 ...

Page 76: ...fications 60 connector power 4 connectors service considerations 20 D default settings restoring for Ubuntu Linux computer models 50 deleted files restoring 54 diskette drive precautions 20 display assembly removal 31 spare part numbers 30 31 Display back cover spare parts 16 display bezel spare part number 17 display bracket spare parts 16 display cable spare parts 16 display components spare par...

Page 77: ...lastic parts 19 pointing device product description 2 ports charging powered 4 HDMI 4 product description 2 USB 2 0 4 USB 3 0 4 power adapter spare part numbers 18 power button identifying 9 power connector identifying 4 power cord set requirements 63 spare part numbers 17 18 power requirements product description 2 processor product description 1 product description audio 1 chipset 1 display pane...

Page 78: ...lots memory card reader 5 security cable 4 speaker assembly removal 39 spare part number 15 39 speakers identifying 11 spare part number 18 specifications computer 60 display 61 hard drive 62 static shielding materials 23 supported discs recovery 53 system board removal 42 spare part numbers 15 18 42 system information displaying for Ubuntu Linux computer models 50 system recovery 55 for Ubuntu Li...

Reviews: