background image

69-2139EFS—1

RCWL301A Instruction Manual

Premium Portable Wirefree Chime with Push, Converter, and Door Contacts
Thank you for choosing this Honeywell product. Please use the following instructions 
to ensure correct installation and use. Keep these notes in a safe place for future 
reference.

Checking Pack Contents

Unpack your chime kit and identify the following parts:

Chime

Wall mounting bracket

Bell push

Bell push/converter/extender

Door contacts

2x CR2032 battery for bell push and converter

4x mounting screws for door contacts

4x mounting screws for push/converter

2x mounting screws for chime

2x wall anchors

2x adhesive pads

Bell wire (for use with converter and door contact)

Self-adhesive icons

You will need:

3x LR6 ‘AA’ Alkaline batteries

Phillips screwdriver

Small flat bladed screwdriver

1/4-in. (6 mm) masonry drill

Safety

Before proceeding with the installation, please note the following safety warnings:

Always follow the manufacturer’s advice when using power tools and wear suitable 
protective equipment (e.g. safety goggles) when drilling holes, etc.

Before drilling holes in walls, check for hidden electricity cables and water pipes. 
The use of a cable/pipe locator is advisable if in doubt.
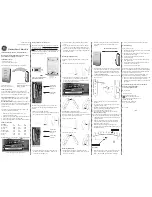
Quick Start

The bell push supplied with this kit is pre-programmed to operate with the chime. You 
need to do the following to get started:

Open the bell push

Fit the push battery

Fit the chime batteries

Check the volume setting

When you operate the bell push, the chime will sound and the 1st icon will flash.

If you use the converter, an additional push or you want to assign a different 
icon to your push, you will need to follow the Programming Procedure.
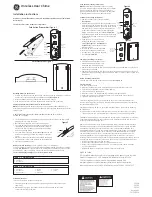
Open the bell push/converter/extender

Connect the push/converter/extender to the door contacts

Fit the push/converter/extender battery

Follow programming procedure to program push/converter/extender to the chime

When the door contacts (a normally closed circuit) are separated/opened the 
alert will sound and the icon assigned to the converter will flash.

Mount the door contacts to the door and door frame.

Mount the push/converter/extender near the door frame.
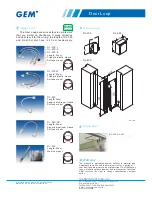
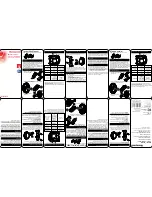
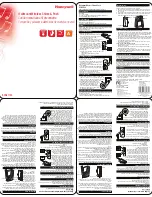
Open the Bell Push

Insert a flat bladed screwdriver into the slot A at the base of the push. Carefully lever 
the cover and base apart (Fig. 1).

Fit the Push Battery

Insert the CR2032 coin cell. Ensure the face marked ‘+’ is uppermost (Fig. 2).

Fit the Chime Batteries

To remove the chime battery cover, press at point B and slide the cover back 1/4 in. (5 
mm), then lift off. Insert 3 x LR6 ‘AA’ alkaline batteries (not supplied). Observe polarity 
as marked inside the battery compartment (Fig 3).

M27199

A

Fig. 1

M27153

CR2032

+

CR2032

+

Fig. 2

M27200

B

Fig. 3

Summary of Contents for RCWL301A

Page 1: ...l push supplied with this kit is pre programmed to operate with the chime You need to do the following to get started Open the bell push Fit the push battery Fit the chime batteries Check the volume setting When you operate the bell push the chime will sound and the 1st icon will flash If you use the converter an additional push or you want to assign a different icon to your push you will need to ...

Page 2: ...con associated with a push Programming Procedure Learn Procedure To enable your chime to learn the identity of your transmitter Press the button on top of the chime and keep it pressed Each Icon will light in turn When the Icon you want is lit release the button While the Icon you have selected is lit operate your push The chime will sound The Icon will flash Unlearn Procedure If you want to remov...

Page 3: ...k of the push Connect the push converter extender to the door contacts Fit the Push Converter Extender Battery Insert the CR2032 coin cell Ensure the face marked is uppermost Fig 9 Program the Push converter extender to the chime Press the button of the chime and keep it pressed Each Icon will light in turn When the Icon is lit release the button While the Icon is lit separate the door contacts Th...

Page 4: ...placed more often Amber light flashes When the chime battery is low an amber light will flash every 5 seconds Fit new batteries in the chime type LR6 AA cells Only use alkaline batteries When the push converter function is used with the door contacts the chime does not operate Ensure that the wiring to the push is correct Check that the correct terminals have been used and the screws are tightened...

Page 5: ...consejable si tiene dudas Arranque rápido El pulsador de timbre que se suministra con este kit está preprogramado para operar con la campanilla Para comenzar debe hacer lo siguiente Abra el pulsador del timbre Coloque la batería del pulsador Coloque las baterías de la campanilla Revise la regulación del volumen Cuando accione el pulsador del timbre la campanilla sonará y el primer icono destellará...

Page 6: ...nto de programación Procedimiento de memorización Para posibilitar que su campanilla aprenda la identidad de su transmisor Presione el botón en la parte superior de la campanilla y manténgalo oprimido Cada icono se iluminará uno por uno Cuando el icono que desea se ilumine suelte el botón Mientras esté iluminado el icono que ha seleccionado accione su pulsador La campanilla sonará El icono destell...

Page 7: ... los contactos de la puerta La campanilla tocará el sonido de alerta El icono destellará Fije los contactos de la puerta a la puerta y al marco Instalación del pulsador convertidor extensor Colóquelo utilizando la almohadilla adhesiva de doble lado o los tornillos que se proporcionan Fig 10 Pruebe el pulsador antes de fijarlo Evite fijarlo a estructuras metálicas M27203 Fig 7 Conexión promedio C1 ...

Page 8: ...rca de objetos metálicos Otros equipos pueden ocasionar interferencia de radio que afecte su campanilla Las paredes y los techos disminuyen el alcance Las baterías con poca carga disminuyen el alcance Cambie cada 12 18 meses En temperaturas frías inferiores a 5ºC las baterías podrían necesitar reemplazarse con mayor frecuencia La luz ámbar destella Cuando la batería de la campanilla está baja una ...

Reviews: