background image

PD43 | PD43c

Commercial Printer

User Manual

Summary of Contents for Intermec PD43

Page 1: ...PD43 PD43c Commercial Printer User Manual ...

Page 2: ...istics INCA under license Intellitag Intellitag Gen2 JANUS LabelShop MobileLAN Picolink Ready to Work RoutePower Sabre ScanPlus ShopScan Smart Mobile Computing SmartSystems TE 2000 Trakker Antares and Vista Powered are either trademarks or registered trademarks of Intermec by Honeywell For patent information please refer to www hsmpats com Wi Fi is a registered certification mark of the Wi Fi Alli...

Page 3: ... to this document The document was originally released as Revision 001 Version Number Date Description of Change 002 9 2014 Added new sections Using the Label Dispenser Calibrating the Label Taken Sensor Exporting a Configuration File to a USB Device Installing a Configuration File from a USB Device ...

Page 4: ...iv PD43 and PD43c Commercial Printer User Manual ...

Page 5: ...ut the PD43 2 Printer Features 2 About the Front Panel 9 About the Ready to Work Indicator 9 About the Icon Front Panel 10 About the LCD Front Panel 11 About the Ready Screen 12 View Basic Printer and Connection Information 14 About the Main Menu 15 Navigate in the Main Menu 16 About the Onscreen Keypads 17 About the Printer Wizards 18 Use a Wizard 20 About Printer Command Languages 20 About Finge...

Page 6: ...r 40 Load Media for the Label Dispenser 40 Load External Media for the PD43 46 Set the PD43c Rear Feed Guides 47 Load External Media Rolls for the PD43c 48 Load Boarding Passes for the PD43c 49 Load Airline Media 50 Adjust the Label Stop Sensor 52 About Ribbon 53 Load Ribbon 54 Change the Ink Direction 58 Use the Notchless Ribbon Core Adapter 59 Connect the Printer to Power 62 Use the Setup Wizard...

Page 7: ...vers 78 How to Connect the Printer to Your PC 79 Connect the Printer Using a USB Cable 79 Connect the Printer Using a Serial or Parallel Cable 81 How to Connect the Printer to Your Network 82 Connect the Printer to an Ethernet Network 82 About Wi Fi Communications 84 Connect the Printer to a Wireless Network 85 Configure Wi Fi Communications from the Printer Web Page 87 About Bluetooth Communicati...

Page 8: ...enu 103 How to Load a Printer Profile with Programming Commands 104 About USB Storage Device Directories 104 Print a File from a USB Storage Device 105 Upload Applications and Files from a USB Storage Device 105 Export Applications and Files to a USB Storage Device 106 Export a Configuration File to a USB Storage Device 106 Install a Configuration File from a USB Storage Device 107 Upload or Delet...

Page 9: ...rinter Odometer 128 6 Maintain the Printer 129 Clean the Printhead 130 Replace the Printhead 131 Clean the Platen Roller 133 Clean the Exterior of the Printer 134 A Specifications 135 Printer Specifications 136 Supported Bar Code Symbologies 139 Test Labels 143 Print Quality Labels 147 B Default Settings 151 Default Configuration 152 Bluetooth Settings 152 Display and Audio Settings 153 Error Info...

Page 10: ...OM Settings 164 System I O Settings 165 System Network Services 166 System Maintenance Alert Settings 167 Wireless 802 11 General Settings 168 Wireless 802 11 Network Settings 169 Wireless 802 11 Security Settings 170 C Print Labels with INPrint 173 About the INPrint Page 174 Print INPrint Labels 174 Predefined INPrint Label Formats 175 ...

Page 11: ...carefully before connecting the printer Because moving parts are exposed when the cover is open ensure that the cover is closed before you operate the printer Do not put your fingers inside the print mechanism when the power is on Place the printer on an even surface which can safely support its weight and supplies Warning A warning alerts you of an operating procedure practice condition or statem...

Page 12: ... read the warning text on the envelope Replace only with same type and rating of fuse to ensure continued protection against risk of fire Global Services and Support Warranty Information To understand the warranty for your Intermec product visit the Intermec web site at www intermec com and click Support Returns and Repairs Warranty Disclaimer of warranties The sample code included in this documen...

Page 13: ... for your local representative from the Intermec web site click About Us Contact Us Who Should Read This Manual This user manual is for the person who is responsible for installing configuring operating and maintaining the PD43 and PD43c printers This document provides you with information about the features of the printer and how to install configure operate maintain and troubleshoot it Before yo...

Page 14: ...r example to find the PD43 product page click Printers Industrial Printers PD43 4 Click the Manuals tab If your product does not have its own product page click Support Manuals Use the Product Category the Product Family and Product to find your documentation Patent Information For patent information see http www hsmpats com ...

Page 15: ...1 1 About the Printers This chapter introduces the PD43 printers and includes descriptions of printer features and basic operation ...

Page 16: ...ermal transfer TTR model for printing with a ribbon Features of both printers include Print speeds of up to 8 ips with 203 dpi printhead or 6 ips with 300 dpi printhead Multiple selectable printer languages including Intermec Smart Printing Fingerprint Direct Protocol Intermec Printer Language IPL DSim ESim and ZSim Ethernet option Wi Fi Bluetooth and RFID options PD43 only USB port for storage de...

Page 17: ... Manual 3 PD43 and PD43c Front Panel PD43 and PD43c Front Panel and Side Feature Descriptions LCD Model Feature Description 1 Directional pad 2 Home button 3 LCD screen 4 Back button 5 Ready to Work LED 6 Print Feed button 7 USB host port 8 Power switch 1 3 5 6 7 8 2 4 ...

Page 18: ...rinter User Manual PD43 and PD43c Front Panel Features and Descriptions Icon Model PD43 and PD43c Front Panel and Side Feature Descriptions Icon Model Feature Description 1 Icon front panel 2 Ready to Work LED 3 Print Feed button 4 USB host port 5 Power switch ...

Page 19: ...r User Manual 5 PD43 Rear Panel PD43 Rear Panel Feature Descriptions Feature Description 1 Dome top window 2 Wi Fi antenna optional 3 Media compartment door 4 Configuration label 5 Media lock location 6 External media feed slot 7 AC power connector 1 2 3 6 7 5 4 ...

Page 20: ... Printer User Manual PD43c Rear Panel PD43c Rear Panel Feature Descriptions Feature Description 1 Power switch 2 Configuration label 3 USB host port 4 USB device port 5 Ethernet port optional 6 Power connector 7 Rear media feed guides optional 1 3 4 5 6 7 2 ...

Page 21: ... Printers PD43 and PD43c Commercial Printer User Manual 7 PD43 Bottom Panel PD43 Bottom Panel Feature Descriptions Feature Description 1 Cable guide 2 USB device port 3 USB host port 4 Ethernet connector optional 1 2 3 4 ...

Page 22: ... Media Compartment Features PD43 Media Compartment Feature Descriptions Feature Description 1 Ribbon takeup roller PD43 TTR models only 2 Print mechanism release button 3 Media holder guides 4 Printhead 5 Sensor bar 6 Media guides 7 Platen roller 8 Label stop sensor 3 1 2 4 5 6 7 8 ...

Page 23: ...port on the front panel About the Ready to Work Indicator The Ready to Work indicator on the front of the printer turns on when the printer is ready to print Ready to Work Indicator Location Ready to Work Indicator Status Ready to Work Indicator Status Description On Printer is ready for a print job Blinking Printer is not ready for a print job Off Printer is turned off not communicating or not re...

Page 24: ...ed Firmware upgrade in progress Flashing Firmware is currently resetting all defaults or printer in calibration mode All On Bluetooth is enabled Off Bluetooth is not enabled or Wi Fi Bluetooth module is not installed With Wi Fi Bluetooth module Flashing Sending or receiving data Steady No data in motion through the network connection Off No connection All On Wi Fi is enabled Off Wi Fi is not enabl...

Page 25: ...hot Off Printhead temperature OK All Icon Front Panel Status Icons Continued Icon Color and Description Printer Models LCD Interface Navigation Button Descriptions Button Description Menu Home button Press to toggle between the Ready screen and the printer Main Menu Directional pad Press or to move the selection highlight to another item Press to select the highlighted item and to save settings in...

Page 26: ...to show different kinds of information The status bar at the top of the screen includes these information and status icons Fingerprint 10 200 27 89 01 04 2014 12 00 Ready Note Icons for Wi Fi and Bluetooth status appear only when the optional Wi Fi Bluetooth module is installed The IP address appears when the printer is connected to an Ethernet or wireless network and the Idle Information paramete...

Page 27: ...and shows the strength of the Wi Fi connection Strong Good Weak No signal Wi Fi is disabled Connectivity icon Blinks when data is moving through a wired or wireless connection to the printer Bluetooth icon This icon appears when the Wi Fi Bluetooth module is installed Bluetooth is enabled Bluetooth is disabled Information and Status Icon Descriptions Continued Icon Description ...

Page 28: ...select the one of the icons in the status bar at the top of the Ready screen 2 Press A list of basic printer or connection information appears 3 Press or to scroll through the list Optional Press or to view information for one of the other icons 4 Press or to return to the Ready screen Fingerprint 10 200 27 89 01 04 2014 12 00 Ready 1SJOUFS JOGPSNBUJPO JDPO TFMFDUFE 4UBUVT CBS PD43A03000000200 313...

Page 29: ...rams item appears in the Main Menu only if the printer is using Fingerprint or Direct Protocol as the command language Select Settings to view and change printer settings Select Tools to print test labels manage a connected USB storage device restore printer default settings or save and load printer profiles Select Wizards to see a list of wizards that help you configure printing or communication ...

Page 30: ...elect another item in the list and then press If the item you selected requires you to select an option from a preset list press or to scroll through the list items If the item you selected requires alphabetic or numeric input such as Network Name press and use the alphanumeric or numeric keypad on the screen to type a value If you changed the value for an item press to save your changes A Saving ...

Page 31: ...tings you may need to use the alphanumeric or numeric keypads on the screen Alphanumeric Keypad Alphabetic Characters Alphanumeric Keypad Numeric Characters and Punctuation Numeric Keypad Y b i h g f e d c j s r q p o n m l k t u v w x y z 123 a Password a 1 2 9 8 7 6 5 4 3 0 1 Password Y abc _ 1 Y 9 8 7 6 5 4 3 2 1 0 1 Password 1 ...

Page 32: ...oggle between shifted and unshifted key characters For example do this to toggle between and in the numeric keypad When you are finished typing characters press to return to the list of items About the Printer Wizards The printer firmware includes several wizards you can use to quickly set up printing and communications You can start the wizards from the Main Menu Printing Wizards Name Description...

Page 33: ...or discoverable Bluetooth devices and sets up Bluetooth communications This item appears in the Communications wizards list when the optional Wi Fi Bluetooth module is installed Calibration Wizard Name Description Media Calibrates the label stop sensor and shows current print settings RFID Calibrates the RF power setting for the RFID module and adjusts RFID tag media settings for best performance ...

Page 34: ... items in a list Press to select the highlighted item Select and press to continue to the next screen About Printer Command Languages A printer command language is a set of instructions that controls printer functions Configure the printer Return the status of the printer Control peripheral devices Format a label or receipt for printing The printer supports these command languages and language sim...

Page 35: ...mand language can also be used with Smart Printing applications Direct Protocol lets you combine predefined layouts and variable data to create labels tickets and tags If you are using bar code software like BarTender select Direct Protocol as your printer command language About IPL IPL Intermec Printer Language is a host based printer command language Use IPL to design modify and download label f...

Page 36: ...connected to a host computer If you are running printer based applications written in C select Smart Printing as your printer command language For help creating Smart Print applications go to the Intermec Developer Center at www intermec com developer About ESim ZSim Auto Configuration Use the ESim ZSim auto configuration feature when you are replacing another printer whose command language is unk...

Page 37: ...urn on the printer and connect to your Ethernet or Wi Fi network 1 Make sure that the printer has media and ribbon if necessary installed 2 On your PC open a browser 3 In the Location or Address bar type the printer IP address and press Enter The printer web page appears 4 Click Login The Login page appears 5 Type your Username and Password and click Login The default username is itadmin and the d...

Page 38: ... to enter a password for DSim or ZSim the password is 1138 To return to the Fingerprint menu system from DSim or ZSim the password is 8311 Set the Command Language with the Print Button If you have an icon printer you can use the Print button to set the printer command language 1 Make sure that the printer has media and ribbon if necessary installed 2 Turn off the printer 3 Turn the printer back o...

Page 39: ...ption or Accessory Description Ethernet Factory installed only Factory installed option Provides IEEE 802 3 Ethernet connection Supports 10BaseT and 100BaseTx Ethernet and Wi Fi Bluetooth modules can be installed at same time Wi Fi Bluetooth Factory installed only Radio module provides Wi Fi and Bluetooth connectivity Wi Fi Bluetooth and Ethernet modules can be installed at same time Wi Fi support...

Page 40: ...pressure for best results when printing on tag media Notchless Ribbon Core Adapter Enables use of ribbon with notchless core of less than 2 5 mm 1 in diameter or 10 16 cm 4 in wide For thermal transfer printing USB to Serial Adapter USB to RS 232 adapter Connects to printer USB Host port and provides serial connectivity to a PC USB to Parallel Adapter USB to IEEE 1284 adapter Connects to printer U...

Page 41: ... shelf Shelf holds fanfold boarding pass media up to 500 Installs on external media holder for PD43c Replacement parts Replacement parts include 203 dpi printhead 300 dpi printhead Platen roller Dome window PD43 Printer Options and Accessories Continued Option or Accessory Description ...

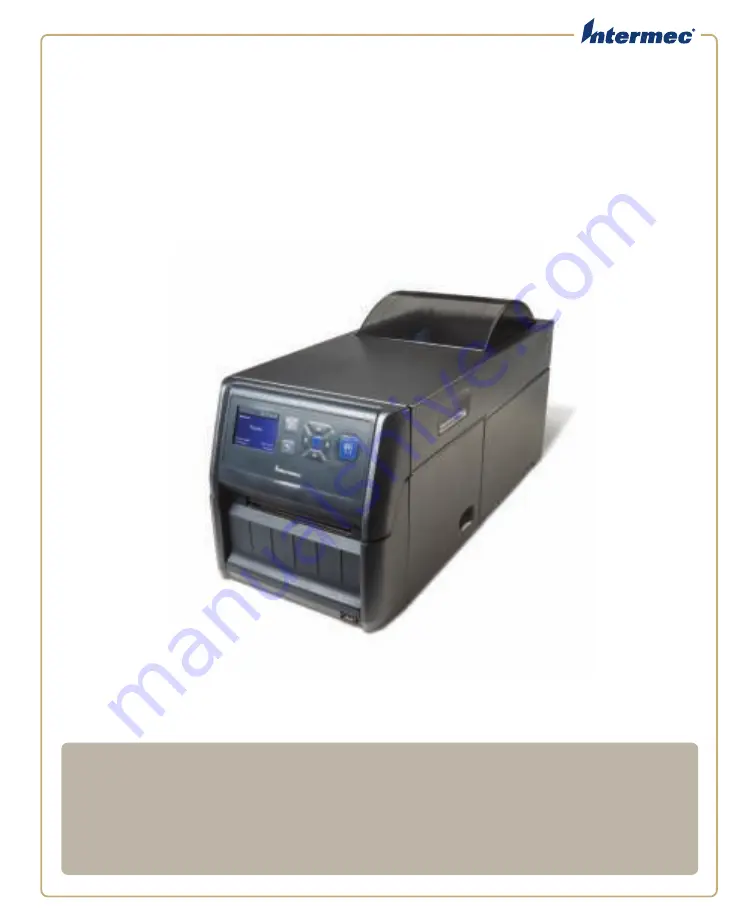
Page 42: ...Chapter 1 About the Printers 28 PD43 and PD43c Commercial Printer User Manual ...

Page 43: ...29 2 Set Up the Printer This chapter explains how to load media and ribbon print test labels and adjust the print quality ...

Page 44: ...If you are printing on tag media follow these guidelines for best results Install the optional thick media springs before printing For more information on this accessory contact your local sales representative After you install the thick media springs adjust the Media Sensitivity and Darkness settings for best print quality To extend the life of the printhead Intermec recommends that you install t...

Page 45: ...e linerless media roller accessory before printing 1 Open the top of the printer first and then open the media compartment door Note Feed adjust values for simulator command languages like ESim ZSim and DSim are preset Recommended Feed Adjust Values for Tear Off Printing Printer Setting 203 dpi 300 dpi Distance PD43 Start Adjust 133 197 16 7 mm 0 66 in Stop Adjust 0 0 0 mm 0 in PD43c Start Adjust ...

Page 46: ...dia core in the media compartment remove and discard the core 3 Place the media between the guides on the media bar If necessary slide the guides apart to adjust for the media width 4 Slide the guides to the sides of the media roll The guides move togther automatically to center the roll on the media bar ...

Page 47: ...D43 and PD43c Commercial Printer User Manual 33 If you are using media stored outside the printer feed the media through the external media feed slot 5 Press the release button and raise the print mechanism External media feed slot ...

Page 48: ...the sensor bar and between the media guides 7 If necessary adjust the label stop sensor to line up with the marks on the media 8 Slide the guides to the side edges of the media 9 Press the print mechanism down to lock it in place 10 Close the media compartment door and then close the top of the printer ...

Page 49: ...u must cut only the liner The cutter module includes the top of form sensor You can also install the optional cutter tray accessory which holds up to 20 labels or tickets After you load media you need to configure the cutter and the feed adjust settings You may need to adjust the recommended values slightly depending on your media type supply method and roll sizes or because of individual differen...

Page 50: ...the optional media cutter accessory is installed in the printer 1 Open the top of the printer first and then open the media compartment door 2 If there is an empty media core in the media compartment remove and discard the core 3 Place the media between the guides on the media bar If necessary slide the guides apart to adjust for the media width ...

Page 51: ... guides to the sides of the media roll The guides move togther automatically to center the roll on the media bar If you are using large rolls of media stored outside the printer such as in an external media holder feed the media through the external media feed slot External media feed slot ...

Page 52: ...Chapter 2 Set Up the Printer 38 PD43 and PD43c Commercial Printer User Manual 5 Press the release button and raise the print mechanism 6 Slide the media below the sensor bar and between the media guides ...

Page 53: ...top of the printer 12 Turn the printer on and configure the cutter If you have an icon printer use PrintSet 5 to configure the cutter If you already know the printer IP address you can configure the cutter using the printer web page If you have an LCD printer continue with the next step 13 After the printer finishes starting up press 14 Select Settings Printing Cutter 15 In the Cutter Control opti...

Page 54: ...t labels on self adhesive label stock with a liner As each label is printed the label is automatically peeled from the liner and is presented at the front of the printer for manual removal The label dispenser includes a label taken sensor After you load media perform a test feed or calibrate the sensor before you begin printing Recommended Feed Adjust Values for the Label Dispenser Printer Setting...

Page 55: ...Open the top of the printer first and then open the media compartment door 2 If there is an empty media core in the media compartment remove and discard the core 3 Place the media between the guides on the media bar If necessary slide the guides apart to adjust for the media width ...

Page 56: ...r User Manual 4 Slide the guides to the sides of the media roll The guides move together automatically to center the roll on the media bar If you are using media stored outside the printer feed the media through the external media feed slot External media feed slot ...

Page 57: ...Chapter 2 Set Up the Printer PD43 and PD43c Commercial Printer User Manual 43 5 Press the release button and raise the print mechanism 6 Slide the media below the sensor bar and between the media guides ...

Page 58: ... Manual 7 If necessary adjust the label stop sensor to line up with the marks or gaps on the media 8 Slide the guides to the side edges of the media 9 Press the side buttons on the label dispenser to open the front door 10 Remove the label closest to the end of the liner ...

Page 59: ... label dispenser front door 13 Press the print mechanism down to lock it in place 14 Close the media compartment door and then close the top of the printer 15 Press and hold for two seconds to begin a test feed The printer dispenses two labels at the front of the printer as it calibrates the media feed 16 If necessary adjust media settings You can also use the Main Menu wizards to help calibrate t...

Page 60: ...use large rolls of media or tag stock you can load the media from outside the printer 1 Place the media behind the printer and feed the media into the printer through the external media feed slot 2 Thread the media through the media guides as you would for media installed inside the printer External media feed slot ...

Page 61: ... screwdriver 1 Open the printer lid 2 Slide the feed guides to adjust them to the width of your media 3 Tighten the adjustment screw in the center of the guide plate to lock the guides in place Do not overtighten 4 If necessary adjust the printer media guides to the width of your media 5 If necessary press the release button to raise the print mechanism and adjust the label stop sensor Note This s...

Page 62: ... If you have the external media roll holder for the PD43c follow this procedure to load media rolls on the holder 1 Place the media on the bar between the guides and then slide the guides to the sides of the media roll 2 Slide the media into the external media feed slot 3 Thread the media through the printer as usual ...

Page 63: ...e PD43c If you have the ticket shelf accessory follow this procedure to load boarding pass media for the PD43c printer 1 Place the media in the ticket shelf 2 Feed the media over the top guide of the ticket shelf and into the printer external media feed slot 3 Thread the media through the printer as usual ...

Page 64: ...r airline use such as bag tags or boarding passes 1 Position the media at the rear of the printer If you have the optional boarding pass ticket shelf place the media on the shelf and feed it over the top of the guide into the printer If you have the optional external media holder place the media on the bar between the guides and then slide the guides to the sides of the roll to hold it in place ...

Page 65: ...edia 3 Slide the media into the printer 4 If this is the first time you have used this media width open the printer top and slide the media guides to match the media width You do not need to raise the print mechanism to adjust the guides 5 Thread the media all the way through the printer as usual 6 Close the printer top and press the Feed button Guides ...

Page 66: ...st the Label Stop Sensor For best performance adjust the label stop sensor to line up with the black marks on your media 1 Open the top of the printer 2 Press the release button and raise the print mechanism 3 Slide the label stop sensor to line up with the black marks on your media ...

Page 67: ...hat matches the media you are using and that you configure the printer for thermal transfer media The printer supports thermal transfer ribbon rolls with the ink coated side facing either inward or outward To determine which type of ribbon you have use a pen or other sharp object to scratch through the ribbon against a piece of paper If you see a mark on the paper your ribbon is wound ink out Dete...

Page 68: ...aise the printhead By default the printer is set to ink out operation when you use ribbon To change the printer to ink in operation use a ballpoint pen or other tool to slide the ink direction switch towards the rear of the printer 3 If there is an empty ribbon core in the media supply position remove the core and set it aside 4 Remove and discard the full ribbon takeup core INK OUT ...

Page 69: ...l 55 5 Place the new ribbon roll between the rear ribbon holders For ink out operation default the ribbon should come off the back of the roll For ink in operation the ribbon should come off the front of the roll 6 Place the takeup core between the front takeup core holders ...

Page 70: ...ter 56 PD43 and PD43c Commercial Printer User Manual 7 Press the release button and raise the print mechanism 8 Route the ribbon under the print mechanism and up to the takeup core 9 Press the printhead down to lock it in place ...

Page 71: ... have already configured the printer for thermal transfer printing continue with the next step Otherwise from the printer Main Menu select Settings Printing Media Print Method Ribbon TTR For an icon printer you must use the printer web page or Intermec PrintSet 5 to configure print settings You can also hold the Print button as the printer starts up to automatically calibrate the media and ribbon ...

Page 72: ...ia compartment door 3 Press the release button and raise the print mechanism The ink direction switch is located under the print mechanism By default the printer is set to ink out operation when you use ribbon To set the printer to ink in operation use a ballpoint pen or other tool to slide the ink direction switch towards the rear of the printer To set the printer to ink out operation slide the i...

Page 73: ... load media without notches in the core The ribbon core adapter is sold separately For information on purchasing this accessory contact your local sales representative 1 Insert one adapter into the media core and one adapter into the takeup core 2 Center the media roll and takeup core on the adapter 3 Press the release button and raise the print mechanism ...

Page 74: ... into the rear media holders For ink out operation default the ribbon should come off the back of the roll For ink in operation the ribbon should come off the front of the roll 5 Place the takeup core and adapter between the front media holders 6 Route the ribbon under the print mechanism and up to the takeup core ...

Page 75: ...Chapter 2 Set Up the Printer PD43 and PD43c Commercial Printer User Manual 61 7 Attach the ribbon to the takeup core 8 Turn the slack wheel to take up slack in the ribbon ...

Page 76: ...ts directly to AC power The PD43c uses an external AC adapter 1 For the PD43 connect the AC power cable from the printer to an AC power source Caution Use only the AC power adapter supplied with the printer The use of a power adapter not approved by Intermec voids the product warranty and may damage the printer AC power connector ...

Page 77: ...ress the power switch to turn the printer on As the printer starts up a progress bar appears on the LCD printer screen When the printer has finished starting up the Ready screen appears and the blue Ready to Work indicator turns on and stays on the icons turn on and then turn off one at a time on the icon panel When the printer has finished starting up the blue Ready to Work indicator turns on and...

Page 78: ...through the list items Press to select a highlighted item Select and press to continue to the next screen How to Set Up an Icon Printer If your printer has the icon front panel follow these guidelines for connecting and setting up the printer The way you set up an icon printer depends on whether you plan to connect the printer to your network or to a single PC If your network automatically assigns...

Page 79: ... print driver 1 Make sure the printer is turned on and connected to your desktop PC with a USB cable 2 On your desktop PC select Start Devices and Printers 3 In the Printers and Faxes section right click the printer and select Printing preferences You can change printer settings in the Printing Preferences dialog box For more information on the Windows print driver settings click Help Note Before ...

Page 80: ...ress The printer web page appears You can configure printer settings through the web page interface Set Up an Icon Printer with Wi Fi If your icon printer includes the Wi Fi network option follow this procedure to enable Wi Fi communications obtain the printer IP address and configure settings through the web page interface 1 Make sure the printer is turned on and connected to your desktop PC thro...

Page 81: ... then prints two test labels with media and communications settings Set the Command Language with the Print Button If you have an icon printer you can use the Print button to set the printer command language 1 Make sure that the printer has media and ribbon if necessary installed 2 Turn off the printer 3 Turn the printer back on All the LEDs light up As the printer starts up the LEDs turn off one ...

Page 82: ...the sensor use the wizard to calibrate the sensor for your media Label Taken Sensor Location Label Taken Sensor Location with Label Dispenser Note For best results calibrate the sensor each time you load media or move the printer to a different environment If you installed the label taken sensor module or the label dispenser in the printer calibrate the sensor before you begin printing Sensor Sens...

Page 83: ...he Main Menu From PrintSet 5 You can also print test labels from the printer web page which requires a network connection to a desktop PC You need to know the printer IP address to view the printer web page Print a Test Label in Start Up Mode You can print a test label when you first turn on the printer 1 Make sure that the printer has media and ribbon if necessary installed 2 Connect the printer ...

Page 84: ...print a label with the current print settings select and press Print a Test Label from the Main Menu If you have an LCD printer you can print a test label from the Main Menu 1 Make sure that the printer has media and ribbon if necessary installed 2 From the Ready screen press 3 Press to select Tools and then press The Tools menu appears with Test Labels selected 4 Press 5 Select Print Quality Prin...

Page 85: ... by pressing the Print button You can also cancel a batch print job from the front panel 1 During a batch print job press The printer stops printing and these icons appear 2 To resume printing press To cancel printing press to select and then press The print job is cancelled To view information press to select a status icon and then press Fingerprint 10 200 27 89 01 04 2014 12 00 2 of 5 Fingerprin...

Page 86: ...ume printing Cancel a Batch Print Job on the Icon Printer There are several ways to cancel a batch print job that you sent to an icon printer Cancel the job from the Windows print spooler on the PC Depending on the printer command language you are using you may be able to send a cancel job command to the printer For more information see the command information for your printer language Turn off po...

Page 87: ... to determine the best Tag Position and Output Power for RFID media If necessary modify the Tag Position TAGADJUST variable to make sure the RFID labels are properly aligned with the antenna Avoid printing on the thickest part of the label when possible For help configuring RFID parameters see the Intermec Fingerprint Command Reference Manual or the IPL Command Reference Manual About RFID Tag Posi...

Page 88: ...dia length are properly configured 2 From the Main Menu select Wizard Calibration RFID Calibration 3 To enable the RFID module select Enable 4 Load the RFID media 5 Select OK When the calibration is complete the printer displays the RFID Tag Position and Output Power UHF inlays only Note After you determine the correct RFID media settings you can save these settings to a printer profile and load t...

Page 89: ...ed value to achieve the best results 1 Make sure Start Adjust and Stop Adjust are set to 0 2 Measure the yChip value which is the distance between the RFID chip and the media edge aligned with the tear bar 3 Note the yAntDist value for your printer UHF RFID 277 dots 34 6 mm 1 362 in HF RFID 293 dots 36 6 mm 1 441 in 4 Use this formula to calculate the estimated Tag Position TagPosition yChip yAntD...

Page 90: ...Chapter 2 Set Up the Printer 76 PD43 and PD43c Commercial Printer User Manual ...

Page 91: ...77 3 Connect the Printer This chapter explains how to connect the PD43 printers to a PC and to an Ethernet or wireless network ...

Page 92: ...to the PrinterCompanion CD but you still need to install driver software follow this procedure to download InterDriver from the Intermec website and install the drivers 1 Open a web browser and go to www intermec com 2 Select Support Downloads 3 Select these items a In the Product Category list select Printers b In the Product Family list select Fixed Printer c In the Product list select PD43 PD43...

Page 93: ...appears click Finish The installer unpacks and installs the InterDriver files in the Intermec InterDriver folder in your program files directory and creates two shortcuts in the Windows Start menu Intermec InterDriver InterDriver Wizard Intermec InterDriver Check for Updates How to Connect the Printer to Your PC You can connect the printer to your PC using one of these cables USB cable USB to Seri...

Page 94: ...of the USB cable to the USB device port on the back of the printer and connect the other end to your PC A USB Host Connected message appears on the printer screen For the PD43 use the cable guides on the underside of the printer for cable strain relief 64 EFWJDF QPSU To PC USB port USB device port ...

Page 95: ...B to Serial adapter cable or USB to Parallel adapter cable for the printer you can connect the printer to the serial or parallel port on a PC 1 Connect the adapter cable to the USB host port on the printer For the PD43 printer use the cable guides on the underside of the printer for cable strain relief 64 IPTU QPSU USB host port To PC serial or parallel port ...

Page 96: ...u are using an icon printer you need to configure settings through an application such as PrintSet 5 How to Connect the Printer to Your Network You can connect the printer to your network using the Ethernet interface Wi Fi Bluetooth wireless interface These network interfaces provide features such as security FTP server web page and Alert handling Connect the Printer to an Ethernet Network If your...

Page 97: ... Printer User Manual 83 1 Connect an Ethernet cable to the Ethernet port on the rear of the printer and to your network For the PD43 use the cable guides on the underside of the printer for cable strain relief Ethernet port Ethernet port To PC Ethernet port ...

Page 98: ... settings through PrintSet 5 or the printer web page About Wi Fi Communications The printer supports Wi Fi communications when the optional Wi Fi Bluetooth module is installed You can configure Wi Fi communications by using the wireless wizard in the printer Main Menu from the printer web page You need to know the printer IP address from the printer Main Menu if your printer has a graphical interf...

Page 99: ... For a printer with the icon interface the Wi Fi icon turns on to show that Wi Fi is enabled If you are not using a DHCP network follow the next procedure to manually assign network settings such as the printer IP address to a printer with the LCD interface Fingerprint 10 200 27 89 01 04 2014 12 00 Ready 8J J POOFDUJPO JDPO PD Series Wi Fi icon Note If you are using an icon printer and you do not ...

Page 100: ...ming Power Mode Channel for Ad Hoc mode only Hidden SSID Select Network to configure these settings IP Assignment Method for IPv4 or IPv6 networks IP address Subnet mask and default router Select Security to configure all wireless network security settings 4 Change settings as needed for your network 5 When you are finished save your changes The printer immediately attempts to connect to your netw...

Page 101: ...rinter web page appears 3 Click Login The Login page appears 4 Type your Username and Password and click Login The default username is itadmin and the default password is pass 5 Click the Configure tab 6 Click Communications Wireless 802 11 The Wireless 802 11 page appears 7 Change settings as needed or click Default Settings to restore all default Wireless 802 11 settings 8 Click Save when you ar...

Page 102: ...en the Wi Fi Bluetooth module is installed the Bluetooth icon appears in the status bar on the LCD printer screen the Bluetooth icon turns on in the icon printer interface Bluetooth Icon in LCD Interface The icon is white when the Bluetooth connection is active and gray when the connection is inactive or disabled Note To connect to the printer from a Bluetooth enabled mobile computer you may need ...

Page 103: ...our Bluetooth scanner is turned on and discoverable and that the device is in range of the printer 7 Use the scanner to read the Scan to Connect bar code on the Bluetooth Settings label The printer attempts to connect to the scanner Connect to a Bluetooth Device Using a Wizard If your printer has the LCD interface you can also use the Bluetooth wizard to discover and connect to a Bluetooth device ...

Page 104: ... Web Page Use this procedure to configure Bluetooth from the printer web page The printer must be connected to an Ethernet or wireless network and you must know the printer IP address 1 On your PC start a browser 2 In the Location or Address bar type the printer IP address and press Enter The printer web page appears 3 Click Login The Login page appears 4 Type your Username and Password and then c...

Page 105: ...nd Fingerprint printer language commands directly to the printer or to enter information if you are running a Smart Printing application Bar code scanner Use Intermec USB bar code scanners for data input with a Smart Printing application The printer also supports other USB scanners that use a generic keyboard driver USB storage device Use a USB storage device to load applications configuration fil...

Page 106: ...t ports that you can connect a USB device to 1 If you are connecting a USB storage device make sure the device has a single partition and is formatted as FAT16 or FAT32 2 Connect the device to one of the USB host ports 3 If you connected a USB storage device to an LCD printer select Tools USB Menu for more options USB host port ...

Page 107: ...93 4 Configure the Printer This chapter explains how to view and change printer settings by using the Main Menu or the printer web pages ...

Page 108: ...inting Configuration settings for media such as media width and length print quality and performance System Settings Global system settings including printer name location and contact information display and keyboard input languages date and time unit of measure audio volume and printer command language Display settings including brightness time and date format menu access permissions and screen t...

Page 109: ...ng Ethernet or Wi Fi communications you can view a complete summary of all printer configuration settings from the printer web page You should have already connected your printer to your network and obtained an IP address 1 Open a web browser on your PC 2 In the Location or Address bar type the printer IP address and then press Enter The printer web page appears 3 Click the Configure tab Note This...

Page 110: ...om the Web Page If you are using Ethernet or Wi Fi communications you can change printer configuration settings from the printer web page You should have already connected your printer to your network and obtained an IP address 1 Open a web browser on your PC 2 In the Location or Address bar type the printer IP address and then press Enter The printer web page appears ...

Page 111: ...ck Printing For display audio service and general settings maintenance alert message triggers or to enable and disable 802 11 and Bluetooth or the virtual COM port click System Settings To set conditions that trigger error warning and information alert messages click Alerts For network related settings such as web and email server information or if you are using a network management application su...

Page 112: ...s when prompted Configure the Printer with PrintSet 5 PrintSet 5 is a printer configuration tool that enables you to easily change your configuration settings You can also use the setup wizards in PrintSet 5 to guide you through common configuration tasks 1 Make sure that you have Windows XP or later running on your PC 2 Download PrintSet 5 from the Downloads page of the Intermec website at www in...

Page 113: ... TYPE LABEL W GAPS You must log in as an itadmin to perform a SET operation but you do not need to log in to perform a GET operation If your printer uses the IPL programming language this example changes your media setting to labels with gaps STX SI T1 ETX For more information on how to change configuration settings with a programming language see either the Intermec Fingerprint Command Reference ...

Page 114: ... printer settings are not saved in a profile IP address for either IPv4 or IPv6 networks Media calibration settings for the label stop sensor Remote port or remote host values for a remote computer accessing the printer through raw TCP Save a Printer Profile from the Web Page From the printer web page you can save the current settings as a profile that you can load from the printer memory at any t...

Page 115: ...esident list includes profiles that are saved in the printer memory 3 To load a profile from the printer memory select the profile in the Resident list and then click Activate The profile is loaded To load a profile from another location a Click Browse and browse to the location of the file b Double click the file c Click Upload The profile is uploaded to the printer Note This procedure assumes yo...

Page 116: ...ter web page click the Manage tab 2 Click Profiles 3 Select a profile from the Resident list If you want to delete profiles or if you want to download profiles to your PC you can select more than one profile 4 Click Delete to delete the profile from the printer memory Click Download to download the profiles to your PC Click Activate to load the profile Note This procedure assumes you have already ...

Page 117: ...ss to save your profile name and go back to the Save Profile menu 6 Press and wait until Complete appears on the screen Load a Printer Profile from the Main Menu You can load a saved LCD printer profile to another printer from the Main Menu 1 From the Ready screen press The Main Menu appears 2 Select Tools Profiles The Profiles menu appears 3 Select Load In the Save Profile menu select Filename an...

Page 118: ... device so that the printer can properly install them Note To load printer profiles that modify communication settings that require itadmin rights you must log in as an itadmin RUN su p pass itadmin Programming Commands to Load a Printer Profile Connection Programming Commands Printer running Fingerprint RUN system usr bin cfg o xmlimportset k home user profiles myprofile Printer running IPL STX E...

Page 119: ...pears 4 Select Tools USB Menu Print File A list of printable files appears 5 Select the file from the list and press The file prints Upload Applications and Files from a USB Storage Device This topic explains how to upload applications and files to the printer from a USB storage device 1 Copy the files to the appropriate directory on the USB storage device 2 Insert the storage device into the USB ...

Page 120: ...rinter to a USB storage device 1 Make sure the USB storage device has a single partition and is formatted as FAT16 or FAT32 2 Insert the storage device into the USB host port on the printer The USB Device menu appears 3 Select Export Resources and then press All applications and files in printer memory are copied to the USB storage device Export a Configuration File to a USB Storage Device You can...

Page 121: ... 1 Insert the USB storage device in the printer USB host port 2 From the Ready screen press The Main Menu appears 3 Select Tools USB Menu 4 Select Configuration 5 Select Install Configuration The printer imports the configuration file For most printer languages the configuration file is imported directly into the working configuration and is not copied to the config directory An IPL configuration ...

Page 122: ...start a browser 2 In the Location or Address field type the printer IP address and press Enter The printer web page appears 3 Click the Manage tab 4 In the navigation list click the type of file you want to upload or delete Applications Fonts Images Label Formats or Web Forms The page for that type of file appears including a list of Resident Intermec supplied files of that type and a list of Cust...

Page 123: ...ation or file to the printer a Click Browse to locate your application or file b Double click the file to select it c Click Upload The application or file uploads to the printer To delete an application or file click the file name in the Customer Downloaded list and then click Delete The file is deleted ...

Page 124: ...Chapter 4 Configure the Printer 110 PD43 and PD43c Commercial Printer User Manual ...

Page 125: ...111 5 Troubleshoot the Printer This section explains how to troubleshoot the PD43 printers ...

Page 126: ...roduct Support To talk to an Intermec Product Support representative in the U S A or Canada call 1 800 755 5505 Outside the U S A and Canada go to www intermec com and click Contact Us to find your local Intermec representative Before you call Intermec Product Support make sure you have this information ready Printer serial number Printer configuration number Firmware type and version Printer comm...

Page 127: ... and troubleshoot some common problems you may encounter POGJHVSBUJPO MBCFM Problems and Possible Solutions Problem Possible Solution The printer does not feed media correctly Remove the media from the media compartment and reinstall the media The printer is connected to a serial port on my PC but the printer is not working Try these possible solutions Make sure the serial port settings are config...

Page 128: ...are weak spots on the printout Try these possible solutions in order There may be foreign particles on the media Clean or replace the media Make sure that your media and ribbon are compatible Make sure that you are using high quality media and ribbon The contrast may be too low Increase the contrast The printout is dark or there is excessive bleeding on the media Try these possible solutions in or...

Page 129: ...order The media may not be properly installed or aligned Reload the media The media margin or X start parameter may be set too low Increase the setting The content on my printout is compressed The print speed may be too high Lower the print speed Nothing shows up on my thermal transfer printout The ink coated side of the ribbon may not be facing the media Reload the ribbon When I feed or print a l...

Page 130: ...r is correctly configured for your network I cannot connect to the printer web page If you are connecting your printer with a crossover network cable you may need to disable the web browser s proxy settings on your computer to access the printer web page The printer has RFID media loaded but it is not writing to the tags After you load RFID media restart the printer to let the printer identify the...

Page 131: ... Position parameter The tag may be broken Try printing on a different label When I send a TAGREAD or TAGWRITE command I get this error message Tag format error The TAGFORMAT defined for the operation determines the number of required parameters You may need to modify the TAGFORMAT For help see the Intermec Fingerprint Command Reference Manual or the IPL CommandReferenceManual Formore information s...

Page 132: ... in the upper right corner of the screen The Login page appears 4 Type your Username and Password in the entry fields and then click Login The default username is itadmin and the default password is pass 5 Click the Services tab Restore Defaults My printer does not communicate with my desktop PC when they are connected with the USB to parallel adapter cable Windows may not have installed the drive...

Page 133: ...se to restore default network settings keep or delete user installed files and to restore all system settings like media type or serial port settings 1 From the Ready screen press The Main Menu appears 2 Select Tools Restore Defaults The Restore Defaults menu appears with all items in the list selected by default If you continue without changing anything the current network and system settings wil...

Page 134: ...ht find useful The latest version of the firmware is available from the printer Downloads page on www intermec com You can upgrade the printer firmware using the printer web page a USB storage device PrintSet 5 For more information see the PrintSet 5 online help Download the Printer Firmware Update Before you can upgrade the printer firmware you need to download the upgrade file from the Intermec ...

Page 135: ...lick the Services tab and then select Firmware Upgrade The Firmware Upgrade screen appears showing the current firmware version 6 Click Browse to locate the upgrade file select it and then click Open 7 Click Upgrade The printer web page shows that it is upgrading firmware on your printer Upgrade Firmware from a USB Storage Device You can upgrade the printer firmware from a USB storage device 1 Mak...

Page 136: ...here may be a condition that is preventing the printer from restarting For example the printer lid may not be fully closed Upgrade Firmware from the USB Menu If you have an LCD printer you can upgrade the printer firmware through the USB menu This procedure is different from upgrading firmware from a USB storage device without going through the USB menu 1 Make sure the USB storage device has a sin...

Page 137: ...le or disable each type of alert set the number of times the alert is repeated set the unit of measure that determines how often the alert is sent and change the default text message for the alert Configure Alerts This section explains how to configure alerts and alert messages You configure alert settings from the printer web page 1 On your desktop PC start a browser 2 In the Location or Address ...

Page 138: ... default settings for all alerts on the page click Default Settings Maintenance and Error Alert Messages Use these tables to understand and troubleshoot some common error alerts you may receive and how to fix them Maintenance and Error Alert Messages Message Description and Solution Label Not Taken Printing has been stopped because a label is obstructing the label taken sensor Remove the label to ...

Page 139: ...f media printed since the last reset Printhead Too Hot The printhead is overheated and needs to cool down Wait for printing to resume automatically Printhead Not Detected The printer is not detecting the printhead Check the printhead cable Faulty Dot The printhead has reached the number of faulty dots set in the Faulty Dots setting in Maintenance Alerts You may need to replace the printhead Replac...

Page 140: ...for assistance or troubleshooting Upgrading Firmware The printer is going to start upgrading the firmware Do not try to send anything to the printer Printer is Rebooting The printer is going to restart Wait until the printer is ready before attempting to communicate with it Started The printer is in the process of starting up Maintenance and Error Alert Messages Continued Message Description and S...

Page 141: ...ed and odometer values Statistic Description System information Printer uptime and CPU usage firmware and kernel versions printer configuration and serial numbers flash and RAM memory information Print Statistics Total labels printed RFID tag success rate odometer values total distance printed printer and current printhead Supply Printhead media and ribbon information Hardware Options Input output...

Page 142: ...ues compare to the alert values To check the printer odometer from the printer web page the printer must be turned on and connected to your Wi Fi or Ethernet network 1 On your desktop PC start a browser 2 In the Location or Address bar type the printer IP address and press Enter The web page for the printer appears 3 Click the System Information tab 4 Click Odometer The list of current odometer st...

Page 143: ...129 6 Maintain the Printer This section explains how to perform basic maintenance on the PD43 printers ...

Page 144: ...r from power 2 Open the printer and remove the media and ribbon if installed 3 Insert most of the cleaning card under the printhead and then lower the printhead 4 Pull out the cleaning card and raise the printhead 5 Wait for approximately 30 seconds to allow the cleaning fluid to dissolve the residue 6 Repeat Steps 3 through 5 if necessary 7 If necessary clean residue from the platen roller or tea...

Page 145: ...rint the type of media or ribbon you use the amount of energy to the printhead the print speed and the ambient temperature of the room you print in The firmware detects the new printhead when you restart the printer 1 Turn off the printer and disconnect the power cord 2 Open the top of the printer 3 Open the media compartment door 4 Press the printhead button and raise the printhead For a thermal ...

Page 146: ...still attached to the mechanism by a ribbon cable 7 Disconnect the cable from the printhead and remove the printhead from the printer 8 Connect the ribbon cable to the new printhead 9 Slide the printhead into the holders in the print mechanism 10 Press the printhead onto the locator pins in the mechanism Warning Do not touch the printhead surface area ...

Page 147: ...4 Close the media door and the top of the printer 15 Print a test label Clean the Platen Roller Follow this procedure to remove clean and replace the platen roller as part of standard maintenance for the printer Intermec recommends that you check the platen roller for debris and clean it each time you replace media 1 Turn the printer off and disconnect the power cord 2 Open the top of the printer ...

Page 148: ... into place 11 Replace the media in the printer 12 Press the print mechanism down to lock it in place 13 Close the media door and printer lid Clean the Exterior of the Printer Make sure to keep the exterior of the printer clean Maintaining a clean exterior will reduce the risk of dust or foreign particles reaching the inside of the printer and affecting printer functionality Use a soft cloth possi...

Page 149: ...135 A Specifications This appendix contains specifications for the printers ...

Page 150: ...43c with external media holder 6 0 kg 13 25 lbs PD43 8 3 kg 18 3 lbs Power Requirements PD43c 24 VDC 2 5 A 60 W From external power supply PD43 100 to 240 VAC 60 W Operating Temperature 5 C to 40 C 41 F to 104 F Storage Temperature 40 deg C to 60 deg C 40 F to 140 F Relative Humidity 10 to 85 non condensing Print Speed Resolution and General Media Specifications Print Mode Direct thermal or therma...

Page 151: ...talled Flexible wristbands up to 10 mils maximum Media Density 60 to 210 g m2 Liner Opacity maximum 76 TAPPI T425 Ribbon Width 25 4 to 110 mm 1 to 4 33 in Ribbon Roll Diameter maximum 68 mm 2 68 in Ribbon Core I D For 12 5 mm 0 5 in core 12 to 14 mm 0 47 to 0 55 in For 25 4 mm 1 0 in core 25 4 to 25 8 mm 1 0 to 1 016 in Ribbon Core Length 110 mm 4 33 in notched Ribbon Wound Ink Side In or out Labe...

Page 152: ...c Printer Language IPL DSim ESim ZSim Smart Printing Network services FTP HTTP Server SNMP Line Printer Remote Protocol lpr Telnet DHCP Ping IPSEC IKEv2 over IPv6 SSH Universal Font Scaling Technology and Standard Latin fonts Monotype Century Schoolbook CG Times CG Times Bold Letter Gothic Andale Mono WGL4 Andale Mono Bold WGL4 Univers 55 Univers Bold 65 Univers Condensed Bold Univers Extra Conden...

Page 153: ...lified Chinese optional Traditional Chinese optional Cyrillic Korean Optional Latin Greek Turkish Hebrew Arabic Baltic Baltic Rim Vietnamese Thai Supported graphic file types Supports 1 bit color depth black and white only PCX PNG GIF BMP Drivers Support for Microsoft Windows XP Vista Windows 7 Windows 8 Server 2003 and Server 2008 Supports 32 bit and 64 bit editions General Specifications Continu...

Page 154: ...28 Subset B Code 128 Subset C Code 128 UCC DUN 14 16 EAN EAN 8 EAN 13 EAN 128 EAN 128 subset A EAN 128 Subset B EAN 128 Subset C HIBC 39 HIBC 128 Industrial 2 of 5 Industrial 2 of 5 with checksum Interleaved 2 of 5 Interleaved 2 of 5 with checksum Interleaved 2 of 5 IATA ISBT 128 Matrix 2 of 5 Straight 2 of 5 ...

Page 155: ... code symbologies Add on 2 Add on 5 UPC 5 digits Add on code 2D bar code symbologies Aztec Code 16K Code 49 Data Matrix Dot Code Grid Matrix GS1 DataBar previously called RSS 14 GS1 DataBar Expanded GS1 DataBar Expanded Stacked GS1 DataBar Limited GS1 DataBar Stacked GS1 DataBar Stacked Omnidirectional GS1 DataBar Truncated MaxiCode MicroPDF417 MSI modified Plessey ...

Page 156: ...User Manual PDF417 Planet Plessey Postnet QR Code USPS 4 State Customer Bar Code Composite bar code symbologies EAN 8 Composite CC A CC B EAN 13 Composite CC A CC B GS1 Composite previously called EAN UCC Composite UPC A Composite CC A CC B UPC E Composite CC A CC B ...

Page 157: ...ypical test label looks like this Sample Configuration Label for Fonts Resource Labels Label Description Applications All Intermec utility programs and user installed applications Fonts Resident and user installed fonts Bar Codes Barcodes Resident bar codes partial label shown Images All images including resident and user installed files ...

Page 158: ...net Serial Port USB Device USB Host Bluetooth Thermal Printhead Front Panel Ribbon Power Supply Unit Print Statistics Number of labels printed current odometer value and total distance printed System Information General product information including Firmware version Product name configuration number serial number system name and command language Printhead resolution Mean printhead resistance Total...

Page 159: ... values Ethernet Settings MAC Address Primary and secondary DNS servers IPv4 settings IP assignment method IP address subnet mask default router DHCP response type IPv6 settings IP assignment method IP address Serial Port Settings Baud rate Data bits Parity Stop bits Flow control Hardware ENQ ACK XON XOFF To XON XOFF From New Line character Bluetooth Settings Bluetooth MAC address human readable a...

Page 160: ...ype Roaming state Power mode Channel Hidden SSID state Country string Access point MAC address RSSI Wi Fi Security Security Type Association PreShared Key Network Key Index Network Key 1 2 3 4 User Name Password Anonymous Name Inner Authentication CA Certificate Client Certificate Client Key Server Common Name 1 and 2 Validate Certificate PAC Acquire PAC Fast Roaming CCKM Supplicant State Printer ...

Page 161: ...ommercial Printer User Manual 147 Print Quality Labels Note Although you can print test labels on any size media the labels are designed to be printed on 10 16 cm x 15 24 cm 4 in x 6 in media Print Quality Labels Label Description Chess Diamond ...

Page 162: ...Appendix A Specifications 148 PD43 and PD43c Commercial Printer User Manual Pitch Ruler Bar Code Barcode Print Quality Labels Continued Label Description ...

Page 163: ...Appendix A Specifications PD43 and PD43c Commercial Printer User Manual 149 Wrinkle Print Quality Labels Continued Label Description ...

Page 164: ...Appendix A Specifications 150 PD43 and PD43c Commercial Printer User Manual ...

Page 165: ...151 B Default Settings This appendix contains all of the default settings for the printer ...

Page 166: ...h Bluetooth Settings Setting Description Default Security Selects the level of security that is used when pairing devices to the printer If you select Authentication you must enter a passkey If you select Auth Encrypt you must enter a passkey and traffic is encrypted Disable Device Name Sets the name that identifies the printer in the Bluetooth network Maximum length is 16 characters Printer model...

Page 167: ...that appearson the printer screen when it is in Idle mode IPv4 address Time Format Selects the format used to display time on the printer 24 Hour Date Format Selects the format used to display date on the printer dd mm yyyy Menu Access Determines if the Menu button on the printer web page is accessible Enable PIN Sets the password that allows access to the Menu button on the printer web page if th...

Page 168: ...lert is sent out for a specific printer event Delay Repeat Sets how often the alert is sent out for a specific printer event Range is 1 to 65535 Delay Unit Selects the unit of measure that determines how often the alert is sent out Message Sets the message that is sent out with each alert for a specific printer event Error Alert Default Settings Error Alert Status Delay Repeat Delay Unit Message O...

Page 169: ...Alert Default Settings Warning Alert Status Delay Repeat Delay Unit Message Ribbon Installed Disable 1 Occurrences Warning Ribbon installed Upgrading Firmware Disable 1 Occurrences Warning Upgrading firmware Odometer User Resettable Disable 1 Occurrences Warning Odometer User resettable has reached a preset value Odometer Printer Disable 1 Occurrences Warning Odometer Printer has reached a preset ...

Page 170: ... completed or when the printer is rebooting These alerts include Print Job Complete Printer is Rebooting Started Sent when a print job has begun Warning Alerts Warning alerts are sent when the printer may need attention shortly such as when the printhead needs maintenance or when the odometer has reached a present value A warning alert is also sent when the printer firmware is being upgraded Warni...

Page 171: ... IP address DHCP IPv4 IP Address Specifies the unique network level address that is assigned to each device in a TCP IP network IPv4 0 0 0 0 Subnet Mask Specifies a number that defines the range of IP addresses that can be used in a TCP IP network 0 0 0 0 Default Router Specifies the IP address of a router that is used when a device sends a packet to another subnet or to an unknown destination 0 0...

Page 172: ...ponse Mode Determines if the printer provides XML responses to printing requests over Telnet and HTTP False Display Language LCD printers only Selects the language the printer uses to display text on the screen English Display Language Web Page Selects the language the printer uses to display text on the web page English Keyboard Input Selects the language of the external keyboard that is connecte...

Page 173: ...ough a USB connection to configure media settings Media Settings Setting Description Default Media Type Selects the type of media that is loaded in the printer Media With Gaps Print Method Selects the method of printing that the printer is using Ribbon TTR for thermal transfer printers or No Ribbon DT for direct thermal printers Media Margin X Sets the width of the margin from the left edge of the...

Page 174: ...t of Measure parameter Variable Media Length Sets the length of the printable area measured from one edge of the label to the edge that is closest to the printhead Unit of measurement is defined in the Unit of Measurement parameter Variable Media Settings Continued Setting Description Default 935 044 001 INTERMEC 6001 36th Ave W Everett WA 98203 FEJB XJEUI 935 044 001 INTERMEC 6001 36th Ave W Ever...

Page 175: ...r retracts negative value after printing a label Unit of measurement is defined in the Unit ofMeasure parameter Range is 9999 to 9999 0 Media Calibration Mode Selects the mode the printer uses to calibrate media Use Slow if the printer has trouble identifying gaps or marks in media Fast Length Slow Mode If Media Calibration Mode is set to Slow the printer prints the media length plus 10 mm This va...

Page 176: ... label Testfeed The printer prints a configuration label No Action Media Settings Continued Setting Description Default Print Quality Settings Setting Description Default Print Speed Sets how fast the printer prints labels The unit of measure is defined in the Unit of Measure parameter 100 Media Sensitivity Sets the level of sensitivity of the media to the printhead heat for media and ribbon Varia...

Page 177: ...mitted data None Stop Bits Number of bits sent at the end of every character to allow the receiving signal hardware to detect the end of a character and to resynchronize with the character stream 1 Hardware Specifies if hardware flow control RTS CTS is used to manage the rate of data transmission between the device and the host Disable ENQ ACK Specifies if software flow control ENQ ACK is used to ...

Page 178: ...arity Specifies how the printer checks the integrity of the transmitted data None Stop Bits Number of bits sent at the end of every character to allow the receiving signal hardware to detect the end of a character and to resynchronize with the character stream 1 Hardware Specifies if hardware flow control RTS CTS is used to manage the rate of data transmission between the device and the host Disab...

Page 179: ...ultidrop communications 0 Virtual COM Settings Continued Setting Description Default System I O Settings Setting Description Default Wireless 802 11 Determines if the printer is allowed to communicate using its 802 11 radio Supported only if the optional Wi Fi Bluetooth module is installed Enable Bluetooth Determines if the printer is allowed to communicate using its Bluetooth radio Supported only...

Page 180: ...he web server is enabled in the printer Enable FTP Determines if the printer can use File Transfer Protocol FTP Enable Avalanche Determines if the printer can be managed by Wavelink Avalanche Enable Net1 Determines if the printer can use Telnet to communicate with Fingerprint Enable SmartSystems Determines if the printer can be managed by Intermec SmartSystems Foundation Enable SNMP Determines if ...

Page 181: ...parameter Range is 0 to 4294967295 0 Odometer Printer Sets the length of media in meters that the printer prints before the Odometer Printer alert is sent Unit of measurement is defined in the Unit of Measure parameter Range is 0 to 4294967295 0 Replace Printhead Sets the length of media in meters that the printer prints before the Replace Printhead alert is sent if this alert is configured Unit o...

Page 182: ...nother printer Infrastructure mode allows the printer to communicate through an access point Infrastructure Roaming Controls the roaming inclination of the printer The higher the level the less inclined the printer is to switch access points based on the printer received signal strength RSSI Off Power Mode Select the power management setting for the radio Constant Awake provides the highest throug...

Page 183: ...ss for IPv4 networks DHCP IPv4 IP Address Sets the unique network level address that is assigned to each device in an IPv4 network 0 0 0 0 Subnet Mask Sets a number that defines the range of IP addresses that can be used in an IPv4 network 0 0 0 0 Default Router Sets the IP address of a router that is used when a device sends a packet to another subnet or to an unknown destination 0 0 0 0 DHCP Res...

Page 184: ...ss to the wireless network Open WEP Pre Shared Key Defines the passphrase that allows the radio to authenticate over the wireless network for both WPA and WPA2 security Range is 8 to 64 characters None Network Key Index Selects the active network key to use for WEP security Range is 1 to 4 1 Network Key 1 Network Key 2 Network Key 3 Network Key 4 Defines a network key that is used for WEP security...

Page 185: ...er Common Name 1 Sets the certificate name that is on the primary authentication server If this value is none then the value for Server Common Name 2 is used Range is 1 to 96 characters None Server Common Name 2 Sets the certificate name that is on the secondary authentication server If this value is none then the value for Server Common Name 1 is used Range is 1 to 96 characters None Validate Cer...

Page 186: ... PAC file provisioning is on for EAP FAST authentication On Fast Roaming CCKM Determines if the printer can roam from one access point to another without reauthenticating with the server CCKM only works in wireless networks using LEAP Disable Wireless 802 11 Security Settings Continued Setting Description Default ...

Page 187: ...173 C Print Labels with INPrint This section explains how to use the INPrint feature to print labels ...

Page 188: ...his page Print INPrint Labels If the printer is connected to an Ethernet or Wi Fi network you can print labels by entering information in a web form You access web forms through the printer web page 1 On your desktop PC start a browser 2 In the Location or Address bar type the printer IP address and press Enter The printer web page appears 3 Click the INPrint tab 4 Select the web form you want to ...

Page 189: ...h INPrint PD43 and PD43c Commercial Printer User Manual 175 Predefined INPrint Label Formats Predefined INPrint Label Formats and Sample Illustrations Format Name Sample 203_returnadd_3x1 lbx 203_demo_4x6 lbx 203_shipaddr_4x6 lbx ...

Page 190: ...Appendix C Print Labels with INPrint 176 PD43 and PD43c Commercial Printer User Manual 203_packslip_4x6 lbx Predefined INPrint Label Formats and Sample Illustrations Format Name Sample ...

Page 191: ...pyright 2008 Christian Kellner Samuel Cormier Iijima http www gtk org Copyright 2001 2002 Brian Stafford brian stafford uk linux net http www stafford uklinux net libesmtp Copyright 1996 Markus Franz Xaver Johannes Oberhumer http www oberhumer com opensource lzo Copyright 2002 Nicolas Pitre Copyright 2003 Texas Instruments Inc Copyright 2003 Chris Larson Copyright 2004 Michael Opdenacker michaelo ...

Page 192: ...oadband Ltd Copyright 2003 Sun Microsystems Inc 4150 Network Circle Santa Clara California 95054 U S A Copyright c 2003 2010 Sparta Inc http www net snmp org Copyright C 2000 2011 Carsten Haitzler and various contributors Copyright c 1999 Carsten Haitzler The Rasterman http www enlightenment org Copyright c 2001 2002 2003 2004 2005 2006 Expat maintainers http www libexpat org Copyright 2009 Interm...

Page 193: ...r business interruption however caused and on any theory of liability whether in contract strict liability or tort including negligence or otherwise arising in any way out of the use of this software even if advised of the possibility of such damage Copyright 2006 Richard Wilson richard wilson netsurf browser org Copyright 2008 Sean Fox dyntryx gmail com http www netsurf browser org projects libns...

Page 194: ... Everett Washington 98203 U S A tel 425 348 2600 fax 425 355 9551 www intermec com 2014 Intermec by Honeywell All rights reserved by Honeywell PD43 and PD43c Commercial Printer User Manual 9 3 5 0 8 2 0 0 2 P N 935 082 002 ...

Reviews: