Document No. 900.0346 – Rev 1.01 – 03/07
ExitView
®
Height Strip Camera Installation Guide
The ExitView Height Strip Camera is designed for installation either on a door frame (recommended) or wall mounted as
close to the door as possible.
Unpacking the Kit
Before you begin the installation, make sure you have the following kit contents:
Installing the Height Strip Camera
•
Metal housing with camera* and camera cables
(barrel connector and BNC video connector)
•
Acrylic height strip
•
12 V power supply, with barrel connector end
(North American model only)
•
Hardware fastening kit (recommended for most door
frames):
• Four #12 Type A self-tapping screws and washers
• Bottom end plate
• Two end cap screws
* Camera lens is prefocused at the factory and does not require adjustment.
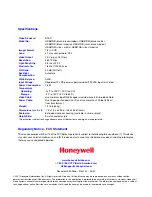
5/8 in. cabl
e
connect
ion hole
camera
5 ft
. mar
k
(
1
.5
m)
4
x 2 in. slo
ts
1.
Place a horizontal mark on the door frame or wall at the 5 ft. (1.5 m) height level
from the floor.
2.
Drill a 5/8 in. (16 mm) hole exactly 3 in. (76.2 mm) above the horizontal 5 ft. (1.5
m) mark.
3.
Thread the camera cables through the hole.
4.
Attach the 12 V power supply to the barrel connector cable of the camera; then
attach the BNC video connector cable to the video connection, using a standard
video cable (75 ohm coaxial is recommended).
Note
The barrel connector is center positive. The camera will not work if the
connection is made to center negative.
5.
Slide any extra cable length back into the door frame or wall.
6.
Hold the metal housing against the door frame or wall and align the 5 ft. (1.5 m)
marker hole on the housing with the 5 ft. (or 1.5 m) horizontal mark.
7.
Fasten the metal housing securely through the four 2 in. (50.8 mm) slots using
the self-tapping screws and washers provided.
8.
Remove the protective covering from the acrylic strip. Use a lint-free cloth to
remove any excess adhesive.
9.
Insert the acrylic strip into the housing from the bottom.
10. Attach the bottom end plate using the end cap screws provided.
11. Power up the camera and test the video connection.


