N8610-1V1 10/03 Rev. B
!"#$%&'()*+'
,-./0/11'2-3-./45-6780'!09:8';/<983
!
INSTALLATION AND SETUP GUIDE
GENERAL INFORMATION
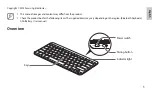
The 5839 is a wireless bidirectional alpha keypad that is
used in conjunction with a 5883 transceiver. The 5839 should
be used as an auxiliary keypad in addition to one or more
wired keypads. It should not be used as the only or primary
keypad.
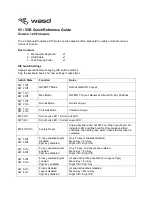
In non-addressable systems, the number of wireless keypads
that can be used is unlimited. In addressable systems, refer
to the table on the next page for limitations on the number
of keypads that may be addressed for each family of security
systems. For the following controls, the 5839 is compatible
only
with the revisions indicated:
Control Panel
Compatible Revisions
Vista-15P
WA15P-1.3 and higher
Vista-20P
WA20P-1.4 and higher
FA148C
WA15P-1.3 and higher
FA168C
WA20P-1.4 and higher
NOTES
:
Up to eight (8) 5839s can be used on any one partition.
Up to two (2) can be used on
each
of two partitions.
The 5839 is
not
recommended for use on more than two
(2) partitions of a multi-partition system
The keypad is compatible with most controls and performs
the same user functions as a wired alpha keypad.
Activate the 5839 by pressing
any
key on its keypad, (unless
powered by an external power-pack referred to in the
POWER CONNECTIONS paragraph).
The keypad returns to its inactive state if no keys are
pressed for 30 seconds. After activation, pressing the [
✱
] key
displays the current status whenever desired. The 5839
cannot
be used to program a control panel (an alpha
keypad hard-wired to the control is required).
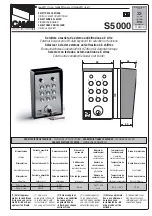
MOUNTING
The 5839 is designed to be wall mounted, mated to its
mounting plate. The mounting plate secures the keypad to
the wall and holds the battery in place. It is necessary to
keep the mounting plate attached to the keypad at all times.
Before mounting the 5839 permanently, determine a good
RF location by first conducting a Go/No GO test from the
panel. Refer to the Go/No GO test mode in the Installation
and Setup Guide for the panel.
Avoid mounting locations on or near large metal objects,
since these can decrease the transmission range or block
transmissions.
BATTERY INSTALLATION OR REPLACEMENT
Separate the keypad from its mounting plate by sliding the
keypad up and
away
from the mounting plate.
Install or replace the 9 Volt Ultralife Lithium battery (No.
465) in the battery compartment provided at the rear of the
keypad. Ensure that battery female (-) and male (+)
terminals are properly oriented with the battery spring clip
connections.
Reattach the keypad to its mounting plate by aligning the
four mounting holes in the keypad case back with the four
mounting clips on the mounting plate. Lower the keypad
onto the clips.
Anticipated battery life is 1.2 years.
PROGRAMMING
Before
enrolling the 5839, you must first be sure that a
wireless transmitter is already enrolled in a zone OR that a
House ID has been programmed into the panel.
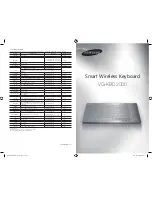
5839-002-V0
PANIC
READY
INSTANT
CODE
CHIME
MAX
TEST
BYPASS
OFF
AWAY
STAY
4
5
6
7
8
*
0
#
1
2
3
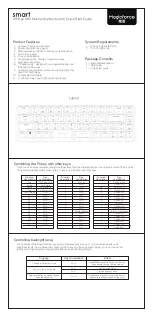
SHOWN WITH FLIP-DOWN
KEY COVER REMOVED
9
DISARMED
READY TO ARM
FIRST PRESS ANY KEY,
THEN PRESS AND HOLD
TO ENTER PROG. MODE
To enroll the 5839, program special keys, and enable sounds,
perform the following steps:
1. Place the control panel in Go/No-Go test mode.
All
partitions must be placed in Go/No-Go test mode (Vista-
32FB controls or higher) before continuing.
Wait at least
30 seconds before enrolling and programming the 5839
keypad and its associated 5883 transceiver.
NOTE:
It is recommended that you enroll the 5839
only
from its
final mounting position
to ensure proper signal
strength. Performing step 1 is only necessary when
first
enrolling the 5839. To modify only the Keys or Sounds
options, it is not necessary.
2. a. Enter 5839 program mode by first pressing any key to
activate the keypad, if necessary.
b. The prompt at right is displayed:
Waiting for mesg
c. Press and hold down keys [1] and [3] at the same time
for several seconds until all 2 x 16 character locations
on the LCD indicate solid black rectangles. This tests
all the elements of the LCD display.
3. After all display elements are
tested, the Options? prompt at
right appears:
5839 Rev.n.n.US
Options?
✱
=Y #=N
Where: 5839 Rev.n.n. = Keypad software revision level
US = Indicates this keypad is intended for use in the US
✱
= Press to advance to next prompt.
# = Press to exit from program mode.
4. a. The Setup? prompt at right
appears after selecting “Y” from
the previous prompt.
Setup?
✱
= Y # = N