background image

COMPONENT MAINTENANCE MANUAL

COMPONENT MAINTENANCE MANUAL

WITH

ILLUSTRATED PARTS LIST

FAN HYPER 120-03

Part Number

00001059 Amdt B
00001059 Amdt C

LMB-Honeywell Aerospace

(F0649)

36, Avenue Marie & Pierre Curie

19360 MALEMORT - FRANCE

Phone: +33 (0)5.55.92.16.33

Fax: +33 (0)5.55.92.19.00

Initial Issue: Dec 15/06
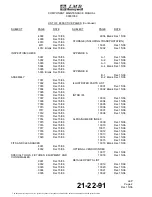
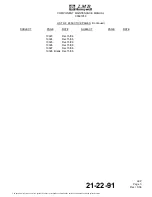
21-22-91

TP1

Revision No. 0

Dec 15/06

The document reference is online, please check the correspondence between the online documentation and the printed version.

Summary of Contents for 00001059 Amdt B

Page 1: ... B 00001059 Amdt C LMB Honeywell Aerospace F0649 36 Avenue Marie Pierre Curie 19360 MALEMORT FRANCE Phone 33 0 5 55 92 16 33 Fax 33 0 5 55 92 19 00 Initial Issue Dec 15 06 21 22 91 TP1 Revision No 0 Dec 15 06 The document reference is online please check the correspondence between the online documentation and the printed version ...

Page 2: ...rwise without the prior written permission of L M B SA Unless L M B SA the company has accepted a contractual obligation in respect of the information and data contained herein such information and data is provided without responsibility and the company disclaim all liability arising from its use Initial Issue Dec 15 06 21 22 91 TP2 Revision No 0 Dec 15 06 The document reference is online please c...

Page 3: ...gives a description of and the instructions for all components held by each operator FILING INSTRUCTIONS affected pages are given in a LIST OF EFFECTIVE PAGES make sure that the manual agrees with the LIST OF EFFECTIVE PAGES do not file the TRANSMITTAL LETTER together with the manual 21 22 91 TL Page 1 Dec 15 06 The document reference is online please check the correspondence between the online do...

Page 4: ...AINTENANCE MANUAL 00001059 This page intentionally left blank 21 22 91 TL Page 2 Dec 15 06 The document reference is online please check the correspondence between the online documentation and the printed version ...

Page 5: ... been added revised or deleted are outlined below together with the Highlights of the Revision LOCATIONS DESIGNATION DESCRIPTION OF CHANGE 21 22 91 HLTS Page 1 Dec 15 06 The document reference is online please check the correspondence between the online documentation and the printed version ...

Page 6: ...INTENANCE MANUAL 00001059 This page intentionally left blank 21 22 91 HLTS Page 2 Dec 15 06 The document reference is online please check the correspondence between the online documentation and the printed version ...

Page 7: ...ECORD OF REVISIONS INSERTED INSERTED REV ISSUE REV ISSUE No DATE DATE BY No DATE DATE BY 21 22 91 ROR Page 1 Dec 15 06 The document reference is online please check the correspondence between the online documentation and the printed version ...

Page 8: ...AINTENANCE MANUAL 00001059 This page intentionally left blank 21 22 91 ROR Page 2 Dec 15 06 The document reference is online please check the correspondence between the online documentation and the printed version ...

Page 9: ...ORD OF TEMPORARY REVISIONS INSERTED REMOVED TEMP REV ISSUE PAGE No No DATE DATE BY DATE BY 21 22 91 RTR Page 1 Dec 15 06 The document reference is online please check the correspondence between the online documentation and the printed version ...

Page 10: ...AINTENANCE MANUAL 00001059 This page intentionally left blank 21 22 91 RTR Page 2 Dec 15 06 The document reference is online please check the correspondence between the online documentation and the printed version ...

Page 11: ...59 SERVICE BULLETIN SERVICE BULLETIN INCORPORATION INTO CMM TITLE Number Rev Date Rev 21 22 91 SBL Page 1 Dec 15 06 The document reference is online please check the correspondence between the online documentation and the printed version ...

Page 12: ...AINTENANCE MANUAL 00001059 This page intentionally left blank 21 22 91 SBL Page 2 Dec 15 06 The document reference is online please check the correspondence between the online documentation and the printed version ...

Page 13: ... 15 06 2 Dec 15 06 3 Dec 15 06 4 Dec 15 06 5 Dec 15 06 6 Dec 15 06 7 Dec 15 06 8 Dec 15 06 TESTING AND FAULT ISOLATION 1001 Dec 15 06 1002 Dec 15 06 1003 Dec 15 06 1004 Dec 15 06 1005 Dec 15 06 1006 Dec 15 06 1007 Dec 15 06 1008 Dec 15 06 1009 Dec 15 06 1010 Dec 15 06 1011 Dec 15 06 1012 Blank Dec 15 06 1013 Dec 15 06 1014 Dec 15 06 1015 Dec 15 06 1016 Dec 15 06 1017 Dec 15 06 1018 Dec 15 06 1019 ...

Page 14: ...ONSUMABLES 9001 Dec 15 06 9002 Dec 15 06 9003 Dec 15 06 9004 Dec 15 06 9005 Dec 15 06 9006 Blank Dec 15 06 STORAGE INCLUDING TRANSPORTATION 15001 Dec 15 06 15002 Dec 15 06 APPENDIX A A 1 Dec 15 06 A 2 Dec 15 06 A 3 Dec 15 06 A 4 Blank Dec 15 06 APPENDIX B B 1 Dec 15 06 B 2 Blank Dec 15 06 ILLUSTRATED PARTS LIST 10001 Dec 15 06 10002 Blank Dec 15 06 INTRO IPL 10003 Dec 15 06 10004 Dec 15 06 10005 D...

Page 15: ...PAGE DATE SUBJECT PAGE DATE 10023 Dec 15 06 10024 Dec 15 06 10025 Dec 15 06 10026 Dec 15 06 10027 Dec 15 06 10028 Blank Dec 15 06 21 22 91 LEP Page 3 Dec 15 06 The document reference is online please check the correspondence between the online documentation and the printed version ...

Page 16: ...AINTENANCE MANUAL 00001059 This page intentionally left blank 21 22 91 LEP Page 4 Dec 15 06 The document reference is online please check the correspondence between the online documentation and the printed version ...

Page 17: ...d Description 4 2 Operation 8 A General Operation 8 B Detailed Operation 8 TESTING AND FAULT ISOLATION 1001 1 Testing Procedure 1001 A Reason for the Job 1001 B Job Set up Information 1001 C Job Set up 1002 D Procedure 1002 E Close up 1006 2 Fault Isolation 1013 A Reason for the Job 1013 B Job Set up Information 1013 C Job Set up 1014 D Fault Isolation Procedure 1015 E Close up 1020 SCHEMATIC AND ...

Page 18: ...4003 B Job Set up Information 4003 C Job Set up 4003 D Procedure 4003 E Close up 4003 4 Cleaning Method 4004 A Cleaning Method Table 4004 5 Procedure 1 Heavy Alkaline Cleaning 4005 A Reason for the Job 4005 B Job Set up Information 4005 C Job Set up 4005 D Procedure 4005 E Close up 4006 6 Procedure 2 Cleaning with Solvents by the Dipping or the Spraying Method 4007 A Reason for the Job 4007 B Job ...

Page 19: ... 7020 FITS AND CLEARANCES 8001 1 Fits and Clearances 8001 A Assembly of the bearings 01 590 on the rotor 01 630 8001 B Assembly of the bearings 01 590 in the bores of the equipped housing 01 640 and of the outer rear flange 01 560 8001 2 Tightening Torques 8002 A Table of Tightening Torques 8002 SPECIAL TOOLS FIXTURES EQUIPMENT AND CONSUMABLES 9001 1 Special Tool Fixtures and Equipment 9001 A Spec...

Page 20: ...Repairers B 1 REWORK SERVICE BULLETIN ACCOMPLISHMENT PROCEDURES NOT APPLICABLE ILLUSTRATED PARTS LIST 10001 1 Introduction 10003 A General 10003 B How to Use the Illustrated Parts List 10003 C Vendors List VL 10003 D Numerical Index NI 10003 E Detailed Parts List DPL 10004 F Updating 10006 VENDORS LIST 10008 Alpha Numeric Index 10009 Optional Vendor Index 10017 Detailed Parts List 10019 21 22 91 T...

Page 21: ...05 7001 ASSEMBLY OF THE EQUIPPED ROTOR 7004 7002 TEST SET UP FOR THE ADJUSTMENT OF THE DETECTION BOARD 7007 7003 SOLDERING OF THE WIRES ON THE POWER BOARD 7011 7004 SOLDERING OF THE WIRE 01 790 7012 7005 ASSEMBLY OF THE FILTER S A 7016 7006 SOLDERING OF THE WIRES ON THE FILTER BOARD 7017 7007 CONNECTION OF THE WIRES ON THE CONNECTORS 7019 9001 SPECIAL TOOLS 9002 9002 SPECIAL TOOLS 9003 Detailed Pa...

Page 22: ...AINTENANCE MANUAL 00001059 This page intentionally left blank 21 22 91 LOI Page 2 Dec 15 06 The document reference is online please check the correspondence between the online documentation and the printed version ...

Page 23: ...the component parts The parts are identified in all the Page Blocks of the manual by the IPL Figure and the item number 6 A check of the DISASSEMBLY TESTING and ASSEMBLY procedures in the workshop B How to Use the Manual 1 Make sure the manual contains the applicable data for your component Look for the part number on the Title Page 2 To identify a part or to find a part number refer to the IPL wh...

Page 24: ... Check 5001 to 5999 Repair 6001 to 6999 Assembly 7001 to 7999 Fits and Clearances 8001 to 8999 Special Tools Fixtures Equipment and Consumables 9001 to 9999 Illustrated Parts List 10001 to 10999 Special Procedure 11001 to 11999 Not applicable Removal 12001 to 12999 Not applicable Installation 13001 to 13999 Not applicable Servicing 14001 to 14999 Not applicable Storage including Transportation 150...

Page 25: ...ives step by step disassembly instructions in a correct sequence and it refers to the figure item numbers from the IPL illustration s when they are applicable Identify the type of fault to know how much the extent of disassembly is necessary do this to prevent disassembly reassembly work that is not necessary The procedure given below is when full disassembly is necessary b Put the component on a ...

Page 26: ...data and the torque values for assembly It also gives the permitted wear for in service service and the manufacturer s design wear tolerances b Fits and Clearances Table 1 The identifiers in column 1 show the location of the clearance or the dimension that you must measure 2 The identifiers in column 2 identify the parts in the IPL Figure Item number 3 Column 3 gives the initial manufacturing dime...

Page 27: ...he procedure for the removal of modules sub assemblies from complex modular components 15 Installation This Page Block gives the procedure for the installation of modules sub assemblies in complex modular components 16 Servicing This Page Block gives the self contained tasks which are necessary because of other maintenance tasks 17 Storage This Page Block gives the requirements for preparation for...

Page 28: ...ton N m Newton meter Nl Liter in standard conditions Temperature 0 C 32 F Pressure 1013 2 hPa 14 691 psi Pa Pascal rpm Revolution per minute s Second W Watt C Degree Celsius Ω Ohm 2 U S Units cu Cubic cu ft min Cubic foot per minute in standard conditions Temperature 20 C 68 F Pressure 1013 2 hPa 14 691 psi cu in Cubic inch INTRO 21 22 91 Page 6 Dec 15 06 The document reference is online please ch...

Page 29: ...ssure in pounds per square inch F Degree Fahrenheit 3 Multiplying Prefixes p Pico d Deci n Nano da Deca µ Micro h Hecto m Milli k Kilo c Centi M Mega G Measurement Conversion Table 1 From SI Measurement to U S Standard System 1 kPa 0 1450 psi 1 cm 0 3937 in 1 cm 0 1550 in 1 mbar 0 0145 psi INTRO 21 22 91 Page 7 Dec 15 06 The document reference is online please check the correspondence between the ...

Page 30: ...f ft 2 From U S Standard System to SI Measurement 1 cu ft min 28 317 l 1 psi 6 8948 kPa 1 psi 69 mbar 1 in 2 54 cm 1 in 25 4 mm 1 in 6 4516 cm 1 lbf 4 4482 N 1 oz 28 3495 g 1 inHg 3 3864 kPa 1 lb 0 4536 kg 1 lb min 0 4536 kg min 1 gal U S 3 7854 l min 1 Lbf in 0 1130 N m 1 Lbf ft 1 3558 N m INTRO 21 22 91 Page 8 Dec 15 06 The document reference is online please check the correspondence between the...

Page 31: ...e HP High Pressure ID Inner Diameter IP Intermediate Pressure IPL Illustrated Parts List LP Low Pressure max Maximum Mfr Manufacturer min Minimum MTOSS Maintenance Task Oriented Support System No Number OD Outer Diameter PNR Part Number para Paragraph Ref Refer to rel Relative S A Sub Assembly SB Service Bulletin SIL Service Information Letter TBD To be defined INTRO 21 22 91 Page 9 Dec 15 06 The ...

Page 32: ...by simulation This component maintenance manual is shop verified after all the functions tasks are actually done on the equipment 2 We will revise this statement after all verifications are made 3 The list of Page Blocks gives the shop verifications which are actually made We will revise this statement after all verifications are made INTRO 21 22 91 Page 10 Dec 15 06 The document reference is onli...

Page 33: ... 28 VDC supply An administrative label located on the housing of the fan gives the technical informations the part numbers of the system manufacturer EUROCOPTER and of the equipment manufacturer LMB HONEYWELL AEROSPACE EUROCOPTER part number ECF 704A42130046 LMB HONEYWELL AEROSPACE part number 00001059 B Characteristics 1 Mechanical Characteristics Length 240 mm 9 49 in Diameter 122 mm 4 80 in Wei...

Page 34: ... MANUAL 00001059 GENERAL DESCRIPTION Figure 1 GRAPHIC 21 22 91 991 001 A01 21 22 91 Page 2 Dec 15 06 The document reference is online please check the correspondence between the online documentation and the printed version ...

Page 35: ...E MANUAL 00001059 OVERALL DIMENSIONS Figure 2 GRAPHIC 21 22 91 991 002 A01 21 22 91 Page 3 Dec 15 06 The document reference is online please check the correspondence between the online documentation and the printed version ...

Page 36: ...ge hole A drain with heat sink function that contains the power board On PNR 00001059 Amdt B the drain has twelve drainage holes On PNR 00001059 Amdt C the drain has two drainage holes b A mobile mechanical part with A 7 blade aluminium turbine Two life lubricated tight ball bearings 2 Electrical part a An electronic unit composed of A thermal switch integrated into the winding A fault detection m...

Page 37: ...NECTED 2 A command and fault signals connector 01 130 PIN SIGNAL A B C D E F LOW SPEED HIGH SPEED NOT CONNECTED ON OFF FAULT SIGNAL FAULT SIGNAL 21 22 91 Page 5 Dec 15 06 The document reference is online please check the correspondence between the online documentation and the printed version ...

Page 38: ...L BOARD POWER BOARD BALL BEARINGS HOUSING ASSEMBLY IMPELLER STATOR DETAILED DESCRIPTION Sheet 1 of 2 Figure 3 GRAPHIC 21 22 91 991 003 A01 21 22 91 Page 6 Dec 15 06 The document reference is online please check the correspondence between the online documentation and the printed version ...

Page 39: ... 00001059 DETAILED DESCRIPTION Sheet 2 of 2 Figure 3 GRAPHIC 21 22 91 991 003 A01 21 22 91 Page 7 Dec 15 06 The document reference is online please check the correspondence between the online documentation and the printed version ...

Page 40: ...gh speed the nominal speed is reached in 5 s maximum 4 Internal Protections The electronic devices do the protections that fallow a Underspeed protection The fan is automatically stopped when an underspeed is detected for more than 4 1 5 s The under speed detection level is 4000 0 20 rpm it is the same for low speed and for high speed If the fan is stopped after an underspeed occurs it is necessar...

Page 41: ...formation 1 Tools Fixtures and Equipment a Special Tools CODE REFERENCE QTY DESIGNATION T01 80301454 1 TEST LEAD T02 80301458 1 TEST BENCH b Equipment DESIGNATION QTY CHARACTERISTICS AMCA AERAULIC TEST BENCH 1 AERAULIC TEST BENCH COMPLIANT WITH THE AMCA AIR MOVEMENT AND CONTROL ASSOCIATION 210 74 STANDARD c Instrumentation DESIGNATION QTY CHARACTERISTICS MEGOHMMETER 1 FRANCAISE D INSTRUMENTATION T...

Page 42: ... Connect the fan to the test lead T01 b Connect together the test lead T01 pins c Set the ON OFF switch of the test lead T01 to ON d Set the HIGH LOW switch of the test lead T01 to HIGH e With the megohmmeter measure the insulation resistance under 50 VDC between the test lead T01 pins together and the bonding stand off f Keep this voltage during 1 min g Make sure that the value is more than or eq...

Page 43: ...d position f Make sure that the fan operates at low speed g On the test lead T01 set the speed selection switch to the high speed position h Make sure that the fan operates at high speed i Remove the fan from the test bench T02 j Disconnect the test lead T01 from the fan SUBTASK 21 22 91 750 004 A01 4 Start up Current Test Ref Fig 1003 a Attach the fan on the test bench T02 b Connect the fan to th...

Page 44: ... the test bench T02 j Disconnect the test lead T01 from the fan SUBTASK 21 22 91 750 006 A01 6 Free Delivery Test at High Speed Ref Fig 1004 a Attach the fan on the test bench T02 b Connect the fan to the test lead T01 c Supply the fan under 28 VDC d On the test lead T01 set the power switch to the ON position and the speed selection switch to the high speed position e Check the rotation speed of ...

Page 45: ... aeraulic test bench j Disconnect the test lead T01 from the fan SUBTASK 21 22 91 720 002 A01 8 Operational Test at High Speed Ref Fig 1005 a Install the fan on the AMCA aeraulic test bench Ambient temperature 15 C to 40 C Pressure Altitude of the point below 1000 ft Hygrometry Relative hygrometry below 95 b Connect the fan to the test lead T01 c Supply the fan under 28 VDC d On the test lead T01 ...

Page 46: ...speed selection switch to the high speed position e Measure the noise with a noisemeter at 1 meter from the fan inlet side f Check the noise level of the fan in stable state Record the value g Make sure that the sound pressure level value is less than or equal to 93 dBA h Remove the fan from the test bench T02 i Disconnect the test lead T01 from the fan E Close up Not applicable 21 22 91 Page 1006...

Page 47: ...E MANUAL 00001059 TEST SET UP Figure 1001 GRAPHIC 21 22 91 991 004 A01 21 22 91 Page 1007 Dec 15 06 The document reference is online please check the correspondence between the online documentation and the printed version ...

Page 48: ...E MANUAL 00001059 TEST SET UP Figure 1002 GRAPHIC 21 22 91 991 005 A01 21 22 91 Page 1008 Dec 15 06 The document reference is online please check the correspondence between the online documentation and the printed version ...

Page 49: ...E MANUAL 00001059 TEST SET UP Figure 1003 GRAPHIC 21 22 91 991 006 A01 21 22 91 Page 1009 Dec 15 06 The document reference is online please check the correspondence between the online documentation and the printed version ...

Page 50: ...E MANUAL 00001059 TEST SET UP Figure 1004 GRAPHIC 21 22 91 991 007 A01 21 22 91 Page 1010 Dec 15 06 The document reference is online please check the correspondence between the online documentation and the printed version ...

Page 51: ...E MANUAL 00001059 TEST SET UP Figure 1005 GRAPHIC 21 22 91 991 008 A01 21 22 91 Page 1011 Dec 15 06 The document reference is online please check the correspondence between the online documentation and the printed version ...

Page 52: ...AINTENANCE MANUAL 00001059 This page intentionally left blank 21 22 91 Page 1012 Dec 15 06 The document reference is online please check the correspondence between the online documentation and the printed version ...

Page 53: ...SUBTASK 21 22 91 010 003 A01 3000 REMOVAL OF THE CONTROL BOARD 01 330A SUBTASK 21 22 91 010 003 B01 3000 REMOVAL OF THE CONTROL BOARD 01 330B SUBTASK 21 22 91 010 004 A01 3000 REMOVAL OF THE POWER BOARD 01 370 SUBTASK 21 22 91 010 004 B01 3000 REMOVAL OF THE POWER BOARD 01 370 SUBTASK 21 22 91 030 001 A01 3000 DISASSEMBLY OF THE DETECTION ROTOR 01 480 AND OF THE DETECTION BOARD 01 450 SUBTASK 21 2...

Page 54: ...E DETECTION BOARD 01 450 SUBTASK 21 22 91 440 001 A01 7000 ASSEMBLY OF THE FILTER S A 01 160 SUBTASK 21 22 91 820 001 A01 7000 ADJUSTMENT OF THE DETECTION BOARD POSITION 01 450 C Job Set up Not applicable 21 22 91 Page 1014 Dec 15 06 The document reference is online please check the correspondence between the online documentation and the printed version ...

Page 55: ...2 91 410 001 A01 Incorrect insulation between the mechanical ground and the electronic boards Replace the power board 01 370 Remove the power board 01 370 Ref SUBTASK 21 22 91 010 004 A01 or Ref SUBTASK 21 22 91 010 004 B01 Install the power board 01 370 Ref SUBTASK 21 22 91 410 002 A01 Replace the control board 01 330 Remove the control board 01 330 Ref SUBTASK 21 22 91 010 003 A01 or Ref SUBTASK...

Page 56: ...e power board 01 370 Ref SUBTASK 21 22 91 010 004 A01 or Ref SUBTASK 21 22 91 010 004 B01 Install the power board 01 370 Ref SUBTASK 21 22 91 410 002 A01 Replace the control board 01 330 Remove the control board 01 330 Ref SUBTASK 21 22 91 010 003 A01 or Ref SUBTASK 21 22 91 010 003 B01 Install the control board 01 330 Ref SUBTASK 21 22 91 410 003 A01 or Ref SUBTASK 21 22 91 410 003 B01 Replace th...

Page 57: ... 22 91 410 002 A01 Replace the control board 01 330 Remove the control board 01 330 Ref SUBTASK 21 22 91 010 003 A01 or Ref SUBTASK 21 22 91 010 003 B01 Install the control board 01 330 Ref SUBTASK 21 22 91 410 003 A01 or Ref SUBTASK 21 22 91 410 003 B01 Replace the filter board 01 170 Remove the filter board 01 170 Ref SUBTASK 21 22 91 040 001 A01 or Ref SUBTASK 21 22 91 040 001 B01 Install the f...

Page 58: ...10 002 A01 Replace the control board 01 330 Remove the control board 01 330 Ref SUBTASK 21 22 91 010 003 A01 or Ref SUBTASK 21 22 91 010 003 B01 Install the control board 01 330 Ref SUBTASK 21 22 91 410 003 A01 or Ref SUBTASK 21 22 91 410 003 B01 Replace the filter board 01 170 Remove the filter board 01 170 Ref SUBTASK 21 22 91 040 001 A01 or Ref SUBTASK 21 22 91 040 001 B01 Install the filter bo...

Page 59: ...ds are defective Replace the power board 01 370 Remove the power board 01 370 Ref SUBTASK 21 22 91 010 004 A01 or Ref SUBTASK 21 22 91 010 004 B01 Install the power board 01 370 Ref SUBTASK 21 22 91 410 002 A01 Replace the control board 01 330 Remove the control board 01 330 Ref SUBTASK 21 22 91 010 003 A01 or Ref SUBTASK 21 22 91 010 003 B01 Install the control board 01 330 Ref SUBTASK 21 22 91 4...

Page 60: ... 91 010 004 B01 Install the power board 01 370 Ref SUBTASK 21 22 91 410 002 A01 Replace the control board 01 330 Remove the control board 01 330 Ref SUBTASK 21 22 91 010 003 A01 or Ref SUBTASK 21 22 91 010 003 B01 Install the control board 01 330 Ref SUBTASK 21 22 91 410 003 A01 or Ref SUBTASK 21 22 91 410 003 B01 Replace the filter board 01 170 Remove the filter board 01 170 Ref SUBTASK 21 22 91 ...

Page 61: ...iagram A Reason for the Job Self explanatory B Job Set up Information Not applicable C Job Set up Not applicable D Procedure See next page E Close up Not applicable 21 22 91 Page 2001 Dec 15 06 The document reference is online please check the correspondence between the online documentation and the printed version ...

Page 62: ...MENT SPEED MEASUREMENT LINEAR DC DC CONVERTER ON OFF SPEED SELECTION FAULT CONTROL VCC POWER BOARD BRUSH LESS DC MOTOR ELECTRONIC TEMP SENSOR CURRENT MEASUREMENT COIL TEMPERATURE VCC 28VF COMMAND BOARD CURRENT REFERENCE FUNCTIONAL BLOCK DIAGRAM Figure 2001 GRAPHIC 21 22 91 991 009 A01 21 22 91 Page 2002 Dec 15 06 The document reference is online please check the correspondence between the online d...

Page 63: ...SIGNATION GRAPHIC 21 22 91 991 022 A01 10000 IPL FIGURE 1 C Job Set up Not applicable D Procedure CAUTION ALWAYS DISCARD O RINGS PLASTIC LOCK NUTS AND SPRING WASHERS ON DISASSEMBLY DISCARD WASHERS NUTS SPECIAL NUT AND SCREWS IF DAMAGED REPLACE BEARINGS IF THEY ARE REMOVED SUBTASK 21 22 91 010 001 a01 1 Removal of the Impeller 01 010 Ref IPL Fig 01 WARNING HANDLE THE IMPELLER CAREFULLY THE BLADES C...

Page 64: ... M81B that holds the wires and the cables on the filter board 01 170A b Unsolder the four wires and the two cables on the filter board 01 170A NOTE Set the soldering iron to 350 C 662 F for the wires and to 430 C 806 F for the cables c Remove the six screws 01 180 the eight washers 01 190 and the two screws 01 200 d Remove the filter board 01 170A SUBTASK 21 22 91 040 001 B01 For PNR 00001059 Amdt...

Page 65: ...f Remove the three screws 01 340 and the three washers 01 350 g Remove the control board 01 330A from the control board support 01 320A SUBTASK 21 22 91 010 003 B01 For PNR 00001059 Amdt C 6 Removal of the Control Board 01 330B Ref IPL Fig 01 CAUTION THERE IS ELECTRONIC MATERIAL UNDER THE COVER 01 280B DO NOT HEAT IT TOO MUCH a Heat the cover 01 280B with an hot air gun and remove it NOTE Drill ad...

Page 66: ...o washers 01 260 i Remove the grommet 01 240 j Install two nuts similar to 01 300 on the end of the tie rods 01 440 k Heat the tie rods 01 440 with a hot air gun close to the equipped housing 01 640 until you can unlock them l Remove the tie rods 01 440 m Remove the nuts from the tie rods SUBTASK 21 22 91 010 004 B01 For PNR 00001059 Amdt C 8 Removal of the Power Board 01 370 Ref IPL Fig 01 a Unso...

Page 67: ...n the detection rotor 01 480 to avoid the adjustment on assembly c Remove the three screws 01 460 and the three washers 01 470 d Remove the detection board 01 450 e Remove the screw 01 490 and the lockwasher 01 500 f Remove the detection rotor 01 480 SUBTASK 21 22 91 010 005 A01 10 Disassembly of the Equipped Rotor Ref IPL Fig 01 a Remove the retaining ring 01 510 the inner rear flange 01 520 and ...

Page 68: ...s 01 590 from the rotor 01 630 with an extractor i Remove the inner front flange 01 600 E Close up Not applicable 21 22 91 Page 3006 Dec 15 06 The document reference is online please check the correspondence between the online documentation and the printed version ...

Page 69: ...Materials CODE REFERENCE DESIGNATION M09A LOCAL PURCHASE DENATURED METHANOL NOTE Refer to the Consumable Materials Table Ref TASK 21 22 91 941 801 A01 for all the data in the list C Job Set up SUBTASK 21 22 91 620 001 A01 1 Preparation of the Unit a Put all the protective caps on the units D Procedure SUBTASK 21 22 91 160 001 A01 1 External Cleaning of the Unit WARNING DO NOT USE DIPPING OR SPRAYI...

Page 70: ... AFTER YOU COMPLETE THE PROCEDURE YOU MUST PUT PROTECTIVE CAPS OR APPLICABLE PACKAGING MATERIAL ON THE PARTS Self Explanatory B Job Set up Information 1 Referenced Information REFERENCE PAGE BLOCK DESIGNATION TASK 21 22 91 100 804 A01 4000 CLEANING METHOD TABLE C Job Set up Not applicable D Procedure SUBTASK 21 22 91 160 002 A01 1 Cleaning of the Sub Assembly a Refer to the Cleaning Method Table R...

Page 71: ...T PUT PROTECTIVE CAPS OR APPLICABLE PACKAGING MATERIAL ON THE PARTS Self explanatory B Job Set up Information 1 Referenced Information REFERENCE PAGE BLOCK DESIGNATION TASK 21 22 91 100 804 A01 4000 CLEANING PROCEDURE TABLE C Job Set up Not applicable D Procedure SUBTASK 21 22 91 160 003 A01 1 Cleaning of the Component Parts a Clean each part to remove oil grease and dirt b Make sure that the mati...

Page 72: ...NING PROCEDURES 1 Heavy alkaline cleaning Ref TASK 21 22 91 100 805 A01 2 Cleaning of the parts with solvents non chlorinated by dipping or spraying Ref TASK 21 22 91 100 806 A01 3 Light alkaline cleaning Ref TASK 21 22 91 100 807 A01 4 Cleaning of the parts with an alcohol based cleaning agent Ref TASK 21 22 91 100 808 A01 O O DO THE TWO STEPS ONE AFTER THE OTHER DO NOT USE CHLORINATED SOLVENT DO...

Page 73: ...NOT USE THIS MATERIAL FOR LIGHT ALLOYS THE MATERIAL SPECIFIED BELOW CONTAINS SODIUM HYDROXIDE IT CAUSES CORROSION OF ALUMINIUM BASED ALLOYS 1 Use materials which agree with the MIL TT C 490 MV specification 2 Example Cleaning material M48A C Job Set up SUBTASK 21 22 91 880 001 A01 1 Material Preparation a For the dilution proportions refer to the manufacturer s instructions Example Cleaning materi...

Page 74: ...ELOW THIS CAN CAUSE RISKS OF DISTORTION OR INTERNAL CORROSION USE THE CORRECT DRYING TEMPERATURE c Dry the part in hot air between 100 C and 110 C 212 F to 230 F E Close up Not applicable 21 22 91 Page 4006 Dec 15 06 The document reference is online please check the correspondence between the online documentation and the printed version ...

Page 75: ...HICH IS SPECIFIED BY THE MANUFACTURER IF YOU USE EQUIVALENT PRODUCTS AFTER YOU COMPLETE THE PROCEDURE YOU MUST PUT PROTECTIVE CAPS OR APPLICABLE PACKAGING MATERIAL ON THE PARTS Self explanatory B Job Set up Information 1 Consumable materials CODE REFERENCE DESIGNATION M49A 70030 CARECLEAN AS1 CLEANING MATERIAL a Example Cleaning material M49A C Job Set up WARNING THE SOLVENTS ARE DANGEROUS FOR YOU...

Page 76: ...rily in the solvent or apply the solvent to the part as a spray If necessary complete the cleaning with a soft brush or with a soft piece of material such as wood or plastic b At the end of the full cleaning operation put the part momentarily in clean solvent or apply clean solvent to the part as a spray c Dry the parts with clean and dry compressed air that is clean and dry free from dust and gre...

Page 77: ...n 1 Use materials that agree with Specification MIL TT C 490C method III 2 Example cleaning material M51A cleaning material M53A C Job Set up WARNING USE EYE PROTECTION DO NOT LET THE SOLVENTS TOUCH YOUR SKIN ALKALINE MATERIALS CAUSE IRRITATION TO YOUR EYES AND YOUR SKIN SUBTASK 21 22 91 880 002 A01 1 Preparation a For the dilution proportions refer to the manufacturer s instructions b Mix 5 of th...

Page 78: ...ENT MAINTENANCE MANUAL 00001059 E Close up Not applicable 21 22 91 Page 4010 Dec 15 06 The document reference is online please check the correspondence between the online documentation and the printed version ...

Page 79: ...al component parts electronic component parts printed circuits B Job Set up Information 1 Consumable Materials CODE REFERENCE DESIGNATION M09A DENATURED METHANOL OM23214 DENATURED METHANOL a Use a cleaning material which agrees with Specification MIL A 6090 b Example Cleaning material M09A C Job Set up Not applicable Use the cleaning material as it is D Procedure WARNING IN WORKSHOPS KEEP THE ALCO...

Page 80: ...AINTENANCE MANUAL 00001059 This page intentionally left blank 21 22 91 Page 4012 Dec 15 06 The document reference is online please check the correspondence between the online documentation and the printed version ...

Page 81: ...ARE DAMAGED SUBTASK 21 22 91 220 001 A01 1 Visual Inspection a Examine the surface condition of all the parts for signs of corrosion b Examine all the parts for abrasion cracks distortion and scratches NOTE Make sure that there is no interference between the impeller 01 010 and the equipped housing 01 640 c Examine all the sealing surfaces for indentations nicks and scratches d Examine all the thr...

Page 82: ...2 002 dia 22 007 mm 0 8662 to 0 8664 in c Rotor 01 630 Ref Fig 5003 1 7 997 dia 8 002 mm 0 3148 to 0 3150 in 2 7 997 dia 8 002 mm 0 3148 to 0 3150 in E Close up Not applicable 21 22 91 Page 5002 Dec 15 06 The document reference is online please check the correspondence between the online documentation and the printed version ...

Page 83: ...ia 0 8664 to 0 8666 in 01 640 EQUIPPED HOUSING EQUIPPED HOUSING 01 640 Figure 5001 GRAPHIC 21 22 91 991 010 A01 21 22 91 Page 5003 Dec 15 06 The document reference is online please check the correspondence between the online documentation and the printed version ...

Page 84: ...a 0 8662 to 0 8664 in 01 560 OUTER REAR FLANGE OUTER REAR FLANGE 01 560 Figure 5002 GRAPHIC 21 22 91 991 011 A01 21 22 91 Page 5004 Dec 15 06 The document reference is online please check the correspondence between the online documentation and the printed version ...

Page 85: ... 0 3150 in 0 002 2 Ø 8 0 003 mm Dia 0 3148 to 0 3150 in 01 630 ROTOR ROTOR 01 630 Figure 5003 GRAPHIC 21 22 91 991 012 A01 21 22 91 Page 5005 Dec 15 06 The document reference is online please check the correspondence between the online documentation and the printed version ...

Page 86: ...AINTENANCE MANUAL 00001059 This page intentionally left blank 21 22 91 Page 5006 Dec 15 06 The document reference is online please check the correspondence between the online documentation and the printed version ...

Page 87: ...OL b Standard Tools REFERENCE QTY DESIGNATION ASTRO TOOL M81969 14 02 1 CONTACTS INSERTION TOOL ASTRO TOOL M81969 14 10 1 CONTACTS INSERTION TOOL STANDARD 1 HOT AIR GUN c Equipment DESIGNATION QTY CHARACTERISTICS OVEN 1 90 C 194 F d Energy Sources DESIGNATION QTY CHARACTERISTICS ELECTRICAL POWER SOURCE 1 28 VDC e Instrumentation DESIGNATION QTY CHARACTERISTICS VOLTMETER 1 50 VDC AMMETER 1 STANDARD...

Page 88: ...7000 FIGURE 7007 TASK 21 22 91 200 801 A01 5000 INSPECTION CHECK TASK 21 22 91 820 802 A01 8000 TIGHTENING TORQUES C Job Set up Do the checking procedures Ref TASK 21 22 91 200 801 A01 before assembly D Procedure SUBTASK 21 22 91 410 001 A01 1 Assembly of the Equipped Rotor Ref IPL Fig 01 Ref Fig 7001 a Install the inner front flange 01 600 on the rotor 01 630 b Apply a layer of lubricating materi...

Page 89: ...flange 01 550 and the retaining ring 01 540 NOTE Make sure that the rotor 01 630 turns freely m Install the six spring washers 01 530 against the rear bearing 01 620 Ref Fig 7001 detail B n Install the inner rear flange 01 550 and the retaining ring 01 540 o Apply a layer of adhesive material M38B on the threaded part of the screws 01 610 p Attach the inner front flange 01 600 with the three screw...

Page 90: ...0 01 530 SPRINGWASHERS ALTERNATE INSTALLATION A ORIENTATION OF THE OUTER REAR FLANGE 01 560 01 520 INNER REAR FLANGE ASSEMBLY OF THE EQUIPPED ROTOR Figure 7001 GRAPHIC 21 22 91 991 013 A01 21 22 91 Page 7004 Dec 15 06 The document reference is online please check the correspondence between the online documentation and the printed version ...

Page 91: ...Ref SUBTASK 21 22 91 820 001 A01 NOTE Do not apply adhesive material M38B and do not tighten the screws 01 460 at this time f If you install the detection rotor 01 480 and the detection board 01 450 that you removed on disassembly 1 Apply a layer of adhesive material M38B on the threaded part of the screws 01 460 2 Attach the detection board 01 450 with the three screws 01 460 3 Torque the screws ...

Page 92: ...0 h If the results are correct lock the detection board 01 450 1 Remove one screw 01 460 2 Apply a layer of adhesive material M38B on the threaded part of the screw 01 460 3 Torque the screw 01 460 to the specified value Ref TASK 21 22 91 820 802 A01 4 Do steps 1 thru 3 again with the two other screws 01 460 one after the other 21 22 91 Page 7006 Dec 15 06 The document reference is online please c...

Page 93: ...640 EQUIPPED HOUSING ROTATION SPEED READ AREA STROBOSCOPE 28VDC SUPPLY TEST SET UP FOR THE ADJUSTMENT OF THE DETECTION BOARD Figure 7002 GRAPHIC 21 22 91 991 014 A01 21 22 91 Page 7007 Dec 15 06 The document reference is online please check the correspondence between the online documentation and the printed version ...

Page 94: ...and the six insulators 01 420 in position in the drain 01 430A NOTE Put all the wires of the power board 01 370 through the grommet 01 240 4 Apply a layer of adhesive material M38B on the thread of the screws 01 380 and 01 390 5 Attach the power board 01 370 to the drain 01 430A with three screws 01 380 six screws 01 390 fifteen washers 01 400 and six nuts 01 410 6 Torque the screws 01 380 and 01 ...

Page 95: ...01 760 m Put all the wires through the power board 01 370 by their related holes CAUTION FOR PNR 00001059 AMDT C MAKE SURE THAT THE DRAINAGE HOLE OF THE DRAIN 01 430B IS LOCATED AT THE BOTTOM n Put the drain power board assembly in position in the equipped housing 01 640 NOTE Pull the wires which go to the filter board through the dedicated hole of the equipped housing 01 640 o Install a 80 mm 3 1...

Page 96: ...ngth of yellow wire 01 790 and crimp it on 3 mm 0 118 in on the both sides y Solder the yellow wire 01 790 on the power board 01 370 with solder material M60X Ref Fig 7004 z Clean the solder and apply a layer of varnish SCC3 MXXD aa Bond the yellow wire 01 790 on the power board 01 370 with a spot of adhesive material M81B close to the solder 21 22 91 Page 7010 Dec 15 06 The document reference is ...

Page 97: ...59 SOLDERING OF THE WIRES ON THE POWER BOARD Figure 7003 GRAPHIC 21 22 91 991 015 A01 21 22 91 Page 7011 Dec 15 06 The document reference is online please check the correspondence between the online documentation and the printed version ...

Page 98: ... 00001059 SOLDERING OF THE WIRE 01 790 Figure 7004 GRAPHIC 21 22 91 991 016 A01 21 22 91 Page 7012 Dec 15 06 The document reference is online please check the correspondence between the online documentation and the printed version ...

Page 99: ...layer of adhesive material M38B on the thread of the three tie rods 01 440 j Attach the Control S A 01 290A with the three washers 01 310 and the three nuts 01 300 SUBTASK 21 22 91 410 003 B01 For PNR 00001059 Amdt C 6 Installation of the Control Board 01 330B Ref IPL Fig 01 Ref Fig 7004 a Put the control board 01 330B in position in the control board support 01 320B b Apply a layer of adhesive ma...

Page 100: ...s 01 660 and 01 670 on the filter board 01 170A as shown in Fig 7005 f Install heat shrinkable conduits 01 760 in the ferrites 01 660 and 01 670 to protect their inner side g Bond the three ferrites 01 650 01 660 and 01 670 with adhesive material M82B Ref Fig 7005 h Let dry at ambient temperature during twelve hours i Shrink a 60 mm 2 362 in length of heat shrinkable conduit 01 760 on the five wir...

Page 101: ...d so that they protect the wires through the ferrites 2 Apply a layer of adhesive material M38B on the thread of four screws 01 180 and one screw 01 200 3 Attach the filter board 01 170B to the equipped housing 01 670 with six screws 01 180 eight washers 01 190 and two screws 01 200 4 Torque the screws 01 180 and 01 200 to the specified value Ref TASK 21 22 91 820 802 A01 n Solder the power cables...

Page 102: ...L 00001059 ASSEMBLY OF THE FILTER S A Figure 7005 GRAPHIC 21 20 99 991 017 A01 21 22 91 Page 7016 Dec 15 06 The document reference is online please check the correspondence between the online documentation and the printed version ...

Page 103: ...59 SOLDERING OF THE WIRES ON THE FILTER BOARD Figure 7006 GRAPHIC 21 22 91 991 018 A01 21 22 91 Page 7017 Dec 15 06 The document reference is online please check the correspondence between the online documentation and the printed version ...

Page 104: ... tool M81969 14 04 Ref Fig 7007 NOTE If the wires are new cut them at 80 mm 3 15 in of the ferrite strip them on 4 mm 0 157 in and crimp a size 20 contact 01 810 g Apply a layer of adhesive material M38B on the thread of the six screws 01 050 h Attach the cover with six screws 01 050 and six washers 01 060 i Torque the screws 01 050 to the specified value Ref TASK 21 22 91 820 802 A01 j Apply a la...

Page 105: ...59 CONNECTION OF THE WIRES ON THE CONNECTORS Figure 7007 GRAPHIC 21 20 99 991 019 A01 21 20 99 Page 7019 Dec 15 06 The document reference is online please check the correspondence between the online documentation and the printed version ...

Page 106: ...l S A 01 290A 3 Let dry at ambient temperature during one hour d For PNR 00001059 Amdt C 1 Apply a layer of adhesive material M81B on the mating area of the cover 01 280B 2 Put the cover 01 280B in position on the Control S A 01 290B 3 Let dry at ambient temperature during one hour e If necessary bond the administrative technical label 01 680 the caution label 01 690 and the ESD label 01 700 Ref F...

Page 107: ... on the rotor 01 630 Press assembly without residual clearance B Assembly of the bearings 01 590 in the bores of the equipped housing 01 640 and of the outer rear flange 01 560 Free assembly 21 22 91 Page 8001 Dec 15 06 The document reference is online please check the correspondence between the online documentation and the printed version ...

Page 108: ... SCREW 1 14 10 09 01 140 SCREW 1 14 10 09 01 180 SCREW 1 13 10 00 01 200 SCREW 1 13 10 00 01 220 SCREW 0 85 7 52 01 250 SCREW 2 53 22 39 01 340 SCREW 1 13 10 00 01 380 SCREW 1 13 10 00 01 390 SCREW 1 13 10 00 01 460 SCREW 0 61 5 40 01 490 SCREW 0 15 1 33 01 570 SCREW 1 3 11 51 01 610 SCREW 0 4 3 54 21 22 91 Page 8002 Dec 15 06 The document reference is online please check the correspondence betwee...

Page 109: ...st bench Testing procedure T03 1 80300985 1 Press punch adaptor Installation of the bearings 01 590 T04 1 80300985 2 Press punch socket Installation of the bearings 01 590 T05 1 80300868 Rotor Installation Guide Installation of the rotor 01 630 T06 1 80301377 Minimum current tool Adjustment of the detection board 01 450 21 22 91 Page 9001 Dec 15 06 The document reference is online please check the...

Page 110: ... MANUAL 00001059 SPECIAL TOOLS Figure 9001 GRAPHIC 21 22 91 991 020 A01 21 22 91 Page 9002 Dec 15 06 The document reference is online please check the correspondence between the online documentation and the printed version ...

Page 111: ...1059 T05 T06 NOT ILLUSTRATED SPECIAL TOOLS Figure 9002 GRAPHIC 21 22 91 991 021 A01 21 22 91 Page 9003 Dec 15 06 The document reference is online please check the correspondence between the online documentation and the printed version ...

Page 112: ...ENATURED METHANOL USA OM23214 OT S 747 LOCAL VENDOR M09A 4001 TURCO 4181 TURCO FRANCE SA 3 IMP DU QUAI DE L INDUSTRIE 91200 ATHIS MONS F3172 FRANCE M48A 4001 70030 CARECLEAN AS1 CASTROL FRANCE SA 66 RTE DE SARTROUVILLE 78230 LEPECQ F3591 FRANCE M49A 4001 TURCO AVIATION SPR ATOFINA 4 CRS MICHELET LA DEFENSE 10 92800 PUTEAUX F7860 FRANCE M51A 4001 PROMOCLEAN TP 108 PROMOSOL SA BD HENRI CAHN 94360 BR...

Page 113: ... 7 81379 MUENCHEN D8375 DEUTSCHLAND MXXC 7001 VARNISH SCC3 ELECTROLUBE KINGSBURY PARK MIDLAND ROAD DE11 0AN SWADLINCOTE DERBYSHIRE K2337 UNITED KINGDOM MXXD 7001 SOLDER B SN60PB40 METAUX BLANCS OUVRES ET MATIERES PLASTIQUES R DE LA FONDERIE 21800 CHEVIGNY ST SAUVEUR F3586 FRANCE M60X 7001 SINGLE WALL CARDBOX LOCAL VENDOR M02E 15001 STORAGE BAG WITH DESICCANT USA MIL D 3464D CECA SA 4 A 8 CRS MICHE...

Page 114: ...AINTENANCE MANUAL 00001059 This page intentionally left blank 21 22 91 Page 9006 Dec 15 06 The document reference is online please check the correspondence between the online documentation and the printed version ...

Page 115: ...able D Procedure SUBTASK 21 22 91 530 001 A01 1 Packaging a The packing is composed of a 260 x 190 x 150 mm single wall cardboard box M02E b Place the fan in an antistatic plastic bag M03E containing humidity inhibitor and seal the bag in order to watertight c Close the cardboard box seal it with adhesive tape and stick an identification label SUBTASK 21 22 91 550 001 A01 2 Storage a Keep the comp...

Page 116: ... is done at factory The fans need no special care on the initial or later starts b Fans are fitted with lubricated for life bearings These bearings do not need any lubrication on the destorage and operation phases c After 6 years of storage the fan must be repaired by replacing the components the expiry date of which is reached d After unstorage replacement of expired components or before use chec...

Page 117: ...72 001 A01 Ref Fig 2 Dimensions Surface coating Marking Ref DESCRIPTION AND OPERATION Para 1 A 1 TASK 21 22 91 872 001 A01 Ref Fig 2 Marking Weight Ref DESCRIPTION AND OPERATION Para 1 B 1 TASK 21 22 91 872 001 A01 Weight 3 kg ELECTRICAL TESTS Insulation Resistance Test 50 VDC between test lead T01 pins connected together and bonding stand off Ref TESTING Para 1 D 1 SUBTASK 21 22 91 750 001 A01 In...

Page 118: ...e first 1 2 s PERFORMANCES TESTS Free Delivery Test at Low Speed under 28 VDC Power switch ON Speed selection switch LOW Rotation speed RS 8000 rpm RS 8600 rpm Ref TESTING Para 1 D 1 SUBTASK 21 22 91 750 005 A01 Input current I 7 5 A I 10 5 A Free Delivery Test at High Speed under 28 VDC Power switch ON Speed selection switch HIGH Rotation speed RS 12500 rpm RS 13100 rpm Ref TESTING Para 1 D 1 SUB...

Page 119: ... selection switch HIGH Pressure 1870 Pa at 200 l s Ref TESTING Para 1 D 1 SUBTASK 21 22 91 720 002 A01 Input current 28 A stabilized Sound Pressure Level Test Power switch ON Speed selection switch HIGH Ref TESTING Para 1 D 1 SUBTASK 21 22 91 750 007 A01 Noise level 93 dBA 1 m from the fan inlet side APPENDIX A 21 22 91 Page A 3 Dec 15 06 The document reference is online please check the correspon...

Page 120: ...NANCE MANUAL 00001059 This page intentionally left blank APPENDIX A 21 22 91 Page A 4 Dec 15 06 The document reference is online please check the correspondence between the online documentation and the printed version ...

Page 121: ...epairers TRADE NAME ADDRESS COMMENTS LMB Honeywell Aerospace 36 Avenue Marie Pierre CURIE 19360 MALEMORT FRANCE Fax 33 0 5 55 92 19 00 Tel 33 0 5 55 92 16 33 APPENDIX B 21 22 91 Page B 1 Dec 15 06 The document reference is online please check the correspondence between the online documentation and the printed version ...

Page 122: ...NANCE MANUAL 00001059 This page intentionally left blank APPENDIX B 21 22 91 Page B 2 Dec 15 06 The document reference is online please check the correspondence between the online documentation and the printed version ...

Page 123: ...NENT MAINTENANCE MANUAL 00001059 ILLUSTRATED PARTS LIST 21 22 91 Page 10001 Dec 15 06 The document reference is online please check the correspondence between the online documentation and the printed version ...

Page 124: ...AINTENANCE MANUAL 00001059 This page intentionally left blank 21 22 91 Page 10002 Dec 15 06 The document reference is online please check the correspondence between the online documentation and the printed version ...

Page 125: ...e illustration which shows the assembly with this part Record the item number of the illustrated part and refer to the Detailed Parts List which gives its part number and its description C Vendors List VL The manufacturer codes have the capital letter V in front of them These codes are used in the nomenclature of the Detailed Parts List to identify the source of procurement for the vendor items A ...

Page 126: ...he list but which are not illustrated are identified with a dash before the item number d An index letter before the item number is cross referenced to the figure which shows the modication of the part 2 Manufacturer s Part Number A manufacturer s part number is given to each assembly and to each detailed part if it is illustrated and also if it is not illustrated 3 Nomenclature a The nomenclature...

Page 127: ...efer to the figure item number of the next higher assembly ies or sub assembly ies Example Effectivity 1A 1B 1C is written 1ABC 5 Units per Assembly a The units per assembly column shows the quantity of units necessary for one next higher assembly b In some cases the information is replaced by the abbreviation RF for reference or AR as required 6 Abbreviations Used ALT FROM PNR XXX A part which is...

Page 128: ...d SEE CMM Refer to the Component Maintenance Manual SEE FIG FOR DET Refer to the figure for details SEE FIG FOR NHA Refer to the figure for the next higher assembly SEL FROM Selected from A part that you must select from a collection of parts as necessary SUPSD BY Superseded by xxx SUPSDS Supersedes xxx UNDERSIZE A part with a size which is smaller than its nominal dimension UNITS PER ASSY Units P...

Page 129: ...t add new figures at the end of the IPL 3 New Figures Added a When new illustrations are necessary the alternative figures are added They refer to the same nomenclature The alternative figure is given the basic figure number with a letter This letter is in front of the item number in the nomenclature 21 22 91 Page 10007 Dec 15 06 The document reference is online please check the correspondence bet...

Page 130: ... VF0225 SOURIAU 9 R PORTE DE BUC 78000 VERSAILLES FRANCE VF0649 LMB HONEYWELL AEROSPACE 36 AVENUE PIERRE ET MARIE CURIE 19360 MALEMORT SUR CORREZE FRANCE VF6220 RAYCHEM SA BP 8300 95802 CERGY PONTOISE CEDEX FRANCE VD9532 SCHNORR ADOLF GMBH CO KG 60 01 62 71050 DEUTCHLAND VS3428 BULTEN KANTHAL AB KANTHALDIVISIONEN S 73481 SWEDEN VS3657 MYONIC AG ECKWEG 8 CH 2500 BIEL BIENNE SWITZERLAND 21 22 91 Pag...

Page 131: ...ZHA 01 490A 1 E25125B30Q10ZJA 01 340A 3 E25125B30Q16ZJA 01 610A 3 E25125B30Q5ZHAP 01 220A 1 E25125B30Q8ZJAP 01 180A 6 380A 3 E25127A25Q6ZJAP 01 460A 3 E25409B30QZAPA 01 300A 3 E27411A30QZJUPA 01 410A 6 E27411A40QZJUPA 01 080A 2 E27624 40ZTTPA 01 090A 2 HA86506 01 020A 1 KZ05 04 01 790A AR RNF100 3 16 0 01 780A AR RNF100 3 32 0 01 770A AR RV822P5P6 10 01 590A 2 21 22 91 Page 10009 Dec 15 06 The doc...

Page 132: ... 01 560A 1 10023276 01 240A 1 10023277 01 210A 1 10023287 01 440A 3 10023797 01 430B 1 10023812 01 280B 1 10023813 01 320B 1 10023843 01 640A 1 10023844 01 160A 1 160B 1 10400111 optional see basic P N RV822P5P6 10 01 590A 2 10451003 optional see basic P N 23111CC030 01 120A 4 150A 4 190A 8 230A 1 310A 3 350A 3 400A 15 620A 3 21 22 91 Page 10010 Dec 15 06 The document reference is online please ch...

Page 133: ...0QZJUPA 01 410A 6 10452108 optional see basic P N HA86506 01 020A 1 10452119 optional see basic P N E27411A40QZJUPA 01 080A 2 10452186 optional see basic P N E25409B30QZAPA 01 300A 3 10457107 optional see basic P N E22165 220NBUT 01 510A 1 540A 1 10464006 optional see basic P N E25125B30Q10ZJA 01 340A 3 10464009 optional see basic P N 22225CF040010E 01 050A 6 10464012 optional see basic P N 22225C...

Page 134: ...0 optional see basic P N E25123B16Q6ZHA 01 490A 1 10464103 optional see basic P N E25114B40Q25ZJA 01 070A 1 10464136 optional see basic P N 22293CF030008E 01 110A 4 140A 4 10464141 optional see basic P N E25127A25Q6ZJAP 01 460A 3 10464186 optional see basic P N E25117A40Q6ZJAP 01 250A 2 10465028 optional see basic P N E25125B30Q5ZHAP 01 220A 1 12022912 01 700A 1 12022925 01 690A 1 12023289 01 680A...

Page 135: ...20A 4 150A 4 190A 8 230A 1 310A 3 350A 3 400A 15 620A 3 23117CC025 01 470A 3 23117CC040 01 060A 6 260A 2 241900 01 530A 6 30023465 01 010A 1 40021865 01 450A 1 40023278 01 360A 1 360B 1 40023279 01 290A 1 290B 1 40023281 01 330A 1 40023321 01 170A 1 40023322 01 370A 1 40023795 01 170B 1 40023796 01 330B 1 21 22 91 Page 10013 Dec 15 06 The document reference is online please check the correspondenc...

Page 136: ...1 8522 2349 A 01 800A 5 8526 1350 01 810A 2 95510030 optional see basic P N KZ05 04 01 790A AR 95550032 optional see basic P N RNF100 3 32 0 01 770A AR 95550038 optional see basic P N DR25 3 8 0 01 740A AR 95550052 optional see basic P N DR25 3 16 0 01 760A AR 95550056 optional see basic P N DR25 1 2 0 01 750A AR 95550085 01 270A AR 95550087 optional see basic P N DR25 3 4 0 01 730A AR 21 22 91 Pa...

Page 137: ...FIGURE ITEM TOTAL STOCK NUMBER NUMBER REQ D NUMBER 95550TBD optional see basic P N RNF100 3 16 0 01 780A AR 21 22 91 Page 10015 Dec 15 06 The document reference is online please check the correspondence between the online documentation and the printed version ...

Page 138: ...AINTENANCE MANUAL 00001059 This page intentionally left blank 21 22 91 Page 10016 Dec 15 06 The document reference is online please check the correspondence between the online documentation and the printed version ...

Page 139: ... 95550056 VF0649 DR25 3 16 0 ZZZZZZ 95550052 VF0649 DR25 3 4 0 ZZZZZZ 95550087 VF0649 DR25 3 8 0 ZZZZZZ 95550038 VF0649 E22165 220NBUT ZZZZZZ 10457107 VF0649 E25114B40Q25ZJA ZZZZZZ 10464103 VF0649 E25117A40Q6ZJAP ZZZZZZ 10464186 VF0649 E25123B16Q6ZHA ZZZZZZ 10464090 VF0649 E25125B30Q10ZJA ZZZZZZ 10464006 VF0649 E25125B30Q16ZJA ZZZZZZ 10464025 VF0649 E25125B30Q5ZHAP ZZZZZZ 10465028 VF0649 E25125B30...

Page 140: ...Z 10452119 VF0649 E27624 40ZTTPA ZZZZZZ 10451512 VF0649 HA86506 ZZZZZZ 10452108 VF0649 KZ05 04 ZZZZZZ 95510030 VF0649 RNF100 3 16 0 ZZZZZZ 95550TBD VF0649 RNF100 3 32 0 ZZZZZZ 95550032 VF0649 RV822P5P6 10 ZZZZZZ 10400111 VF0649 21 22 91 Page 10018 Dec 15 06 The document reference is online please check the correspondence between the online documentation and the printed version ...

Page 141: ...ONENT MAINTENANCE MANUAL 00001059 DETAILED PARTS LIST 21 22 91 Page 10019 Dec 15 06 The document reference is online please check the correspondence between the online documentation and the printed version ...

Page 142: ...10 300 310 350 440 370 430A 480 450 490 460 470 340 380 400 230 220 210 050 060 620 610 010 020 030 140 150 130 100 110 120 080 090 070 040 390 190 420 FAN HYPER 120 03 Figure 01 GRAPHIC 21 22 91 991 022 A01 21 22 91 Page 10020 Dec 15 06 The document reference is online please check the correspondence between the online documentation and the printed version ...

Page 143: ... COVER 1 ATTACHING PARTS 050A 22225CF040010E SCREW CHC M4 10U A4 80 VF0111 OPT TO 10464009 6 060A 23117CC040 WASHER Z4 A4 80 VF0111 OPT TO 10451015 6 070A E25114B40Q25ZJA SCREW H M4 25 A4 80 VF0110 OPT TO 10464103 ORDER OVERLGTH PN E25114B40Q25ZJAPA 1 080A E27411A40QZJUPA NUT H M4 A4 80 VF0110 OPT TO 10452119 2 090A E27624 40ZTTPA LOCKWASHER M4 VF0110 OPT TO 10451512 2 100A 50690302 CONNECTOR 1 IT...

Page 144: ...O 10464136 4 150A 23111CC030 WASHER Z3 A4 80 VF0111 OPT TO 10451003 4 160A 10023844 FILTER S A Amdt B NP 1A 1 160B 10023844 FILTER S A Amdt C NP 1B 1 170A 40023321 BOARD FILTER 160A 1 170B 40023795 BOARD FILTER 160B 1 ATTACHING PARTS 180A E25125B30Q8ZJAP SCREW CHC M3 08 A4 80 VF0110 OPT TO 10464045 ORDER OVERLGTH PN E25125B30Q8ZJAPA 6 190A 23111CC030 WASHER Z3 A4 80 VF0111 OPT TO 10451003 8 ITEM N...

Page 145: ...4 80 VF0111 OPT TO 10451003 1 240A 10023276 GROMMET 1 ATTACHING PARTS 250A E25117A40Q6ZJAP SCREW CS M4 06 A4 80 VF0110 OPT TO 10464186 ORDER OVERLGTH PN E25117A40Q6ZJAPA 2 260A 23117CC040 WASHER Z4 A4 80 VF0111 OPT TO 10451015 2 270A 95550085 CONDUIT SF001 06 AR 280A 10023239 COVER 1A 1 280B 10023812 COVER 1B 1 290A 40023279 CONTROL S A Amdt B NP 1A 1 290B 40023279 CONTROL S A Amdt C NP 1B 1 ITEM ...

Page 146: ...6 BOARD CONTROL 290B 1 ATTACHING PARTS 340A E25125B30Q10ZJA SCREW CHC M3 10U A4 80 VF0110 OPT TO 10464006 ORDER OVERLGTH PN E25125B30Q10ZJAPA 3 350A 23111CC030 WASHER Z3 A4 80 VF0111 OPT TO 10451003 3 360A 40023278 POWER S A Amdt B NP 1A 1 360B 40023278 POWER S A Amdt C NP 1B 1 370A 40023322 BOARD POWER 1 ATTACHING PARTS 380A E25125B30Q8ZJAP SCREW CHC M3 08 A4 80 VF0110 OPT TO 10464045 ORDER OVERL...

Page 147: ...B 10023797 DRAIN 360B 1 440A 10023287 TIE ROD 3 450A 40021865 BOARD DETECTION 1 ATTACHING PARTS 460A E25127A25Q6ZJAP SCREW CS M2 5 06 A4 80 VF0110 OPT TO 10464141 ORDER OVERLGTH PN E25127A25Q6ZJAPA 3 470A 23117CC025 WASHER Z2 5 A4 80 VF0111 OPT TO 10451022 3 480A 51021794 ROTOR DETECTION 1 ATTACHING PARTS 490A E25123B16Q6ZHA SCREW FS M1 6 06 A4 80 VF0110 OPT TO 10464090 1 500A 50710005 LOCKWASHER ...

Page 148: ...ER REAR 1 ATTACHING PARTS 570A 22291CF030010E SCREW FS M3 10 A4 80 VF0111 OPT TO 10464027 4 580A 20350342 O RING 1 590A RV822P5P6 10 BEARING VS3657 OPT TO 10400111 2 600A 10020147 FLANGE INNER FRONT 1 ATTACHING PARTS 610A E25125B30Q16ZJA SCREW CHC M3 20 A4 80 VF0110 OPT TO 10464025 ORDER OVERLGTH PN E25125B30Q16ZJAPA 3 620A 23111CC030 WASHER Z3 A4 80 VF0111 OPT TO 10451003 3 630A 51023244 ROTOR 1 ...

Page 149: ... 3 8 0 CONDUIT HEAT SHRINKABLE VF6220 OPT TO 95550038 AR 750A DR25 1 2 0 CONDUIT HEAT SHRINKABLE VF6220 OPT TO 95550056 AR 760A DR25 3 16 0 CONDUIT HEAT SHRINKABLE VF6220 OPT TO 95550052 AR 770A RNF100 3 32 0 CONDUIT HEAT SHRINKABLE VF6220 OPT TO 95550032 AR 780A RNF100 3 16 0 CONDUIT HEAT SHRINKABLE VF6220 OPT TO 95550TBD AR 790A KZ05 04 WIRE YELLOW VF0114 OPT TO 95510030 AR 800A 8522 2349 A CONT...

Page 150: ...AINTENANCE MANUAL 00001059 This page intentionally left blank 21 22 91 Page 10028 Dec 15 06 The document reference is online please check the correspondence between the online documentation and the printed version ...

Page 151: ...The document reference is online please check the correspondence between the online documentation and the printed version ...

Reviews: