background image

- 1 - 

Product is certified to comply with technical standards. 


Administrator Manual

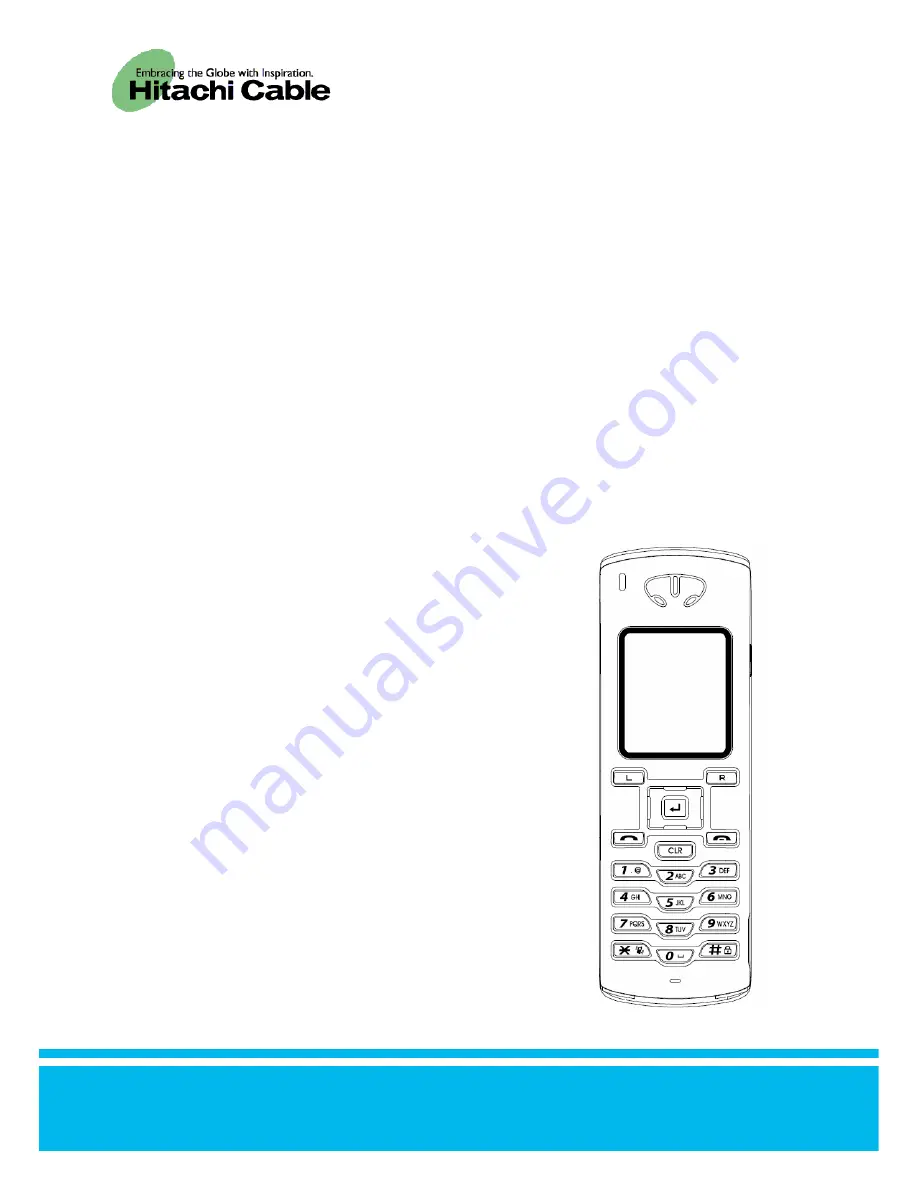
Thank you for purchasing the WirelessIP 3000. 

● 

Before use, kindly read this “Administrator Manual” 
thoroughly to have an understanding of the contents.  
 

● 

After reading, place it within reach at all times such as at 
the side of this product. 

WirelessIP 3000

TD61-2898A 


Summary of Contents for WirelessIP 3000

Page 1: ...ator Manual Thank you for purchasing the WirelessIP 3000 Before use kindly read this Administrator Manual thoroughly to have an understanding of the contents After reading place it within reach at all times such as at the side of this product WirelessIP 3000 TD61 2898A ...

Page 2: ...nt 1 18 Server 1 19 IMS Server 1 19 Outbound Proxy 1 20 Expire 1 20 Network Connection 1 21 Network Connection 1 21 Certificate Management 1 22 Certificate Management 1 22 Network Search 1 25 Ping 1 27 Manual Operations 1 27 Proxy Server 1 1 28 Proxy Server 2 1 28 Default Gateway 1 29 TFTP Server 1 29 Password 1 30 Administrator Password 1 30 User Password Reset 1 31 Version Upgrade 1 32 Error Log...

Page 3: ... 3 Configuration 2 4 System Setup 2 5 Load Upgrade 2 6 Change Password 2 6 Web Server Stop 2 7 Network Setup 2 7 Chapter 3 Appendix 3 1 Glossary 3 2 INDEX 3 5 ...

Page 4: ... 1 1 Chapter 1 Administrator Settings ...

Page 5: ...ct 5 Setup using the keys of the key and confirm using the key From the Setup menu Select 2 Phone lock using the keys of the key and confirm using the key From the Phone lock menu Select 1 User Pwd using the keys of the key and confirm using the key When you select 1 User Pwd the system asks you for the current password Enter the Admin password The default value is 000000 6 zeroes Set this using t...

Page 6: ...k config using the keys of the key and confirm using the key Network You can check the settings for the type of connected network as well as information about settings 1 From the Network config menu Select 1 Network config using the keys of the key and confirm using the key The list of profiles network settings is displayed ...

Page 7: ...ey and set this using the key 2 The network profile registration wizard is started Input the profile name For the Join Method select Auto or Manual using the keys After completion of editing press the key 3 Input the SSID value of the wireless LAN to connect to If left blank connection is made to the access point having the strongest wave signal from among the access points that can be connected t...

Page 8: ...EP is displayed Input the values as prompted on screen If WPA PSK is selected a screen for inputting a pre shared key is displayed Input the values as prompted on screen Finally press the key 5 Configure the settings for TCP IP For Use DHCP select Disabled or Enabled using the keys If returning to the previous screen press the key If Disabled is selected the screen for setting the IP address is se...

Page 9: ...If anything other than Disabled is selected the screen for setting the user ID and password is displayed Input the values as prompted on screen Finally press the key 7 Configure the settings for NAT Traversal For Mode select Disable SNAT UPnP or STUN using the keys If returning to the previous screen press the key If SNAT or STUN is selected the respective setting screens are displayed Input the v...

Page 10: ...he key The profile is saved and network reconnection is performed Up to a maximum of 5 profiles can be created Deletion Network profiles can be deleted 1 When deleting a profile from the Network confi screen select the profile to be deleted using the keys of the key and press the key to select the submenu Select 2 Delete and press the key A confirmation message is displayed Select Yes using the ke...

Page 11: ...keys of the key and press the key to select the submenu Select 3 Up or 4 Down and press the key Basic Information A profile s name and its connection method can be set 1 From the Config1 profile name menu Select 1 Basic info using the keys of the key and confirm using the key 2 When editing the Name select Edit using the key For the Join Method select Auto or Manual using the keys After completion...

Page 12: ...using the key Encryption These settings are related to encryption This product supports encryption based on WEP 64 128 256 bits 1 From the Config1 profile name menu Select 3 Security using the keys of the key and confirm using the key 2 Select Edit using the key For Mode select Disabled WEP or WPA PSK using the keys of the key Mode Explanation WEP Based on the WEP key that was set an effectively s...

Page 13: ...ence chart below Bit Hexadecimal Alphanumeric 256 bits 58 characters 29 characters 128 bits 26 characters 13 characters 64 bits 10 characters 5 characters Encryption Bit Length Hexadecimal 0 9 a f Alphanumeric 128 bits 26 characters 13 characters Input example 31 31 31 31 31 31 31 31 31 31 31 31 31 1111111111111 64 bits 10 characters 5 characters Input example 31 31 31 31 31 11111 If the WEP key h...

Page 14: ...rase as single byte alphanumeric characters with at least 8 characters but not more than 63 characters Finally save using the key Starting from the input pre shared key the key is automatically changed to a new value every fixed period This makes it more secure than WEP Hex Hexadecimal Code and Alpha ASCII Code equivalence chart Hex Alpha Hex Alpha Hex Alpha Hex Alpha Hex Alpha Hex Alpha Notice ...

Page 15: ...e settings related to network authentication 1 From the Config1 profile name menu Select 4 Authenticate using the keys of the key and confirm using the key 2 Select Edit using the key For Mode Select Disable WEB 8021X MD5 8021X TLS 8021X PEAP or 8021X TTLS using the keys Finally set using the key ...

Page 16: ...Use DHCP Select Enable or Disable using the keys of the key When setting the IP address manually set DHCP to Disable and input values for the items below IP address IP address of the WIP3000 Subnet mask Value of subnet mask Default gateway IP address of default gateway DNS server 1 IP address of primary DNS DNS server 2 IP address of secondary DNS Finally set using the key When DHCP is set to Enab...

Page 17: ...the system configuration it may not be necessary to set them 1 From the Config1 profile name menu Select 6 SIP Outb Proxy using the keys of the key and confirm using the key 2 The screen for inputting the IP address of the SIP Outb Proxy is displayed Select Edit using the key Enter the IP address Finally save using the key ...

Page 18: ...ed to 1 From the Config1 profile name menu Select 7 NAT Traversal using the keys of the key and confirm using the key 2 From the NAT Traversal menu Select 1 Mode using the keys of the key and confirm using the key Select Edit using the key For Mode select SNAT UPnP STUN or Disabled Finally save using the key 3 From the NAT Traversal menu Select 2 STUN using the keys of the key and confirm using th...

Page 19: ...lect Edit using the key Input the values for external IP and port number Finally save using the key QoS Settings related to QoS can be configured 1 From the Config1 profile name menu Select 8 QoS using the keys of the key and confirm using the key 2 Select Edit using the key For WMM Select On or Off using the keys of the key Finally save using the key ...

Page 20: ...ys of the key and confirm using the key Detailed information is displayed Select Edit using the key Set the priority 1 3 and the RTP Multiframe interval 20 40 ms Finally save using the key Jitter Buffer Settings related to jitter buffer can be configured 1 From the Config1 profile name menu Select 0 JitterBufSize using the keys of the key and confirm using the key 2 Select Edit using the key For j...

Page 21: ...ngs for the display name phone number user ID and URL Scheme 1 From the SIP menu Select 1 User account using the keys of the key and confirm using the key 2 Select Edit using the key The following information is displayed Display name Phone number User ID User password URL Scheme The phone number is mandatory while display name user ID and URL Scheme should be input as needed Finally save using th...

Page 22: ...t Edit using the key Input values for the following items SIP domain Proxy server 1 Register server 1 Proxy server 2 Register server 2 Finally save using the key IMS Server This configures the settings related to IMS server 1 From the SIP menu Select 3 IMS server using the keys of the key and confirm using the key 2 Select Edit using the key Input values for IM and Presence Finally save using the ...

Page 23: ...he key and confirm using the key 2 Select Edit using the key Input the IP address for outbound proxy server Finally save using the key Expire The settings for Regist Expire Timer Session Timer and Presence Expire Timer can be configured 1 From the SIP menu Select 5 Expire using the keys of the key and confirm using the key 2 Select Edit using the key Input values for the following items Regist Exp...

Page 24: ...g deleting and changing settings of profiles reconnection can be done manually 1 From the Network menu Select 3 Network reload using the keys of the key and confirm using the key 2 Select Auto Suspend Disconnect or Profile name using the keys of the key and confirm using the key Reload commences ...

Page 25: ... and confirm using the key Certificate Management When running 802 1x EAP TLS PEAP TTLS information on root certificates and private certificates can be imported and checked 1 From the Certs manager menu Select 1 View RootCA using the keys of the key and confirm using the key 2 From the Certs manager menu Select 2 View PrivateCA using the keys of the key and confirm using the key ...

Page 26: ...A using the keys of the key and confirm using the key A warning message is displayed Select Yes or No using the keys of the key If Yes is selected there is a prompt for input of the IP address of the download destination TFTP server After inputting the IP address press the key and download is started ...

Page 27: ...isted on the right will display Select Yes or No using the keys of the key If Yes is selected there is a prompt for input of the IP address of the download destination TFTP server After input of the IP address press the key and the download is started 5 From the Certs manager menu Select 5 Delete CA using the keys of the key and confirm using the key Select RootCA PrivateCA or Delete all using the...

Page 28: ...played When detailed information needs to be viewed select the SSID using the keys of the key and confirm using the key Access points that are set to reject ANY connection are not displayed in the detection result listing If the detected access point is encrypted the SSID is displayed with a net overlay In addition access points can be displayed for up to a maximum of 10 locations 3 To refresh the...

Page 29: ...ettings can be performed in order 5 When checking specific SSID and channel select the submenu by pressing the key and select 3 Advanced For example inputting the detected SSID into the SSID column in the right hand diagram and pressing the key starts the search for that SSID and the result is displayed In addition inputting the channel number to be checked into the Search channel column and press...

Page 30: ...he key Manual Operations 1 From the Ping test menu Select 1 Manual using the keys of the key and confirm using the key 2 Input the IP address to ping and the ping is started when the key is pressed recv Shows the response to the ping The following digits show the response time seconds time out Shows that there was no response to the ping To end the ping press either the or the key ...

Page 31: ...hat there was no response to the ping To end the ping press either the or the key 3 If proxy server 1 is not set a message as in the diagram on the right is displayed Proxy Server 2 1 From the Ping test menu Select 3 2nd Proxy using the keys of the key and confirm using the key 2 Proxy server 2 is pinged recv Shows the response to the ping The following digits show the response time seconds time o...

Page 32: ...sponse to the ping The following digits show the response time seconds time out Shows that there was no response to the ping To end the ping press either the or the key TFTP Server 1 From the Ping test menu Select 5 TFTP server using the keys of the key and confirm using the key 2 The TFTP server is pinged recv Shows the response to the ping The following digits show the response time seconds time...

Page 33: ... administrator password 1 From the Password menu Select 1 Admin Pwd using the keys of the key and confirm using the key 2 When Admin Pwd is selected there is a prompt for the current password Input the correct value and confirm using the key The initial value of password is 000000 6 zeroes 3 When you input the correct password the system asks you to input the new password The only characters that ...

Page 34: ...assword 1 From the Password menu Select 2 UserPwd Reset using the keys of the key and confirm using the key 2 Select Yes or No using the keys of the key and confirm using the key When the user password is reset it reverts to the initial value of 0000 4 zeroes 3 When Yes is selected the message as shown in the diagram on the right is displayed and returns to the Password menu Notice ...

Page 35: ... version can be upgraded online 1 From the Admin menu Select 3 Upgrade using the keys of the key and confirm using the key 2 Select 1 Program by pressing the key 3 A message is displayed Press the key Select Yes or No using the keys of the key and confirm using the key ...

Page 36: ...are commences When the downloading of firmware completes a confirmation message is displayed When the key is pressed and Yes is selected the version upgrade for firmware is started When it completes the WIP3000 is automatically restarted When in the midst of firmware upgrade do not cut off power to this product as this may cause failure If the version upgrade fails the message in the right hand di...

Page 37: ...istory for error messages is displayed 3 When an error message is selected from the list the details for the error are displayed The first and last error details can be displayed using the keys of the key 4 When deleting error messages Select Edit by pressing the key select 1 Delete all and press the key Select Yes using the keys of the key and press the key All the error messages are deleted ...

Page 38: ...b Server Here the functions of the Web server can be switched ON OFF 1 From the Admin menu Select 4 Web server using the keys of the key and confirm using the key 2 Select Enabled or Disabled using the keys of the key and confirm using the key ...

Page 39: ...min menu Select 6 Phone reset using the keys of the key and confirm using the key 2 Select Yes or No using the keys of the key and confirm using the key When Yes is selected initialization is started and reverts to the configuration conditions uploaded previously When initialization completes it automatically reboots ...

Page 40: ...apter 1 Administrator Settings Memory Info Memory Usage This displays the memory usage 1 From the Admin menu Select 7 Memory Info using the keys of the key and confirm using the key 2 Memory usage is displayed ...

Page 41: ... 2 1 Chapter 2 Web Settings ...

Page 42: ...the WirelessIP 3000 web settings start up the browser from the PC and access http host port Here input the IP address or host name of this product into host and the port number into port port number is 8080 this cannot be omitted Access restrictions The authentication screen for logging in to the WirelessIP 3000 web settings is displayed Input the username and password that are set in the Wireless...

Page 43: ...nformation regarding the phone such as its software version and TCP IP settings is displayed Display Items Model displays model name Software version displays software version of the WirelessIP 3000 IP address displays IP address of the phone Net mask displays net mask of the phone Default gateway displays default gateway of the phone MAC address displays MAC address of the phone ...

Page 44: ...Settings Management User Menu Configuration This is the menu for configuring the product 1 Select the item to be changed 2 Edit the value Example on screen is SYSTEM 3 Click the CHANGE VALUE button and change the settings ...

Page 45: ...uct is not rebooted the settings are not applied Depending on the item YOU MUST REBOOT button may not be displayed For those cases the settings are applied after the CHANGE VALUE button is clicked System Setup The phone s firmware configuration can be upgraded admin user password changed and the web server can be stopped ...

Page 46: ...ocated 2 Indicate the type of upgrade software config 3 Click the DO UPGRADE button Change Password This changes the user password of the phone Input the username admin into the ID column Input old password Input new password Input new password to confirm Click the CHANGE VALUE button If the inputted information is to be reset click the RESET button Set passwords as 5 7 digit numerals ...

Page 47: ... Server Stop This stops the web server used for accessing the WirelessIP 3000 web settings Note that access via WWW is not possible during the time the Web Server Stop button is clicked Network Setup Configures SIP Network 1 Select the item to be changed ...

Page 48: ... 2 8 Chapter 2 Web Settings Management User Menu 2 Edit the value Example on screen is USER ACCOUNT 3 Click the CHANGE VALUE button and change the settings ...

Page 49: ... 3 1 Chapter 3 Appendix ...

Page 50: ...chnology that identifies the types of traffic this traffic is called services transmitted and received by internet users and offers communications quality QoS Quality of Service that satisfies that type LAN Local Area Network This is the abbreviation for local area network It refers to small scale computer networks MAC address value This is the ID number that is assigned to be unique for each Ethe...

Page 51: ...ions Subnet Mask Within the IP address this is the numeral that defines which bits are used in network address for distinguishing networks The portion that is outside the network address becomes the host address for identifying the individual computers within the network Server This is a computer or software that offers data or functionality in own possession to client computers in a computer netw...

Page 52: ...e communications procedure that must mutually be in accord when multiple computers are communicating If the protocol differs communications are not possible Router This is the device for relaying data that flows in the network to other networks It has the function of analyzing the protocol looking at the address and selecting the route In addition all data of unsupported protocols is discarded Reg...

Page 53: ...ress 1 13 1 27 3 2 3 3 L LAN 3 2 3 3 M Mode 1 9 N Network 1 3 P PassPhrase 1 11 Ping 1 27 3 2 Profile Name 1 4 1 8 Protocol 3 2 3 3 3 4 Proxy server 1 19 3 4 R Register server 1 19 Router 3 3 3 4 S Server 1 19 3 2 3 3 Signal 3 3 SIP 1 18 1 19 1 20 1 21 1 22 1 25 1 27 3 2 SIP domain 1 19 SSID 1 4 1 5 1 9 1 25 3 3 Subnet Mask 1 13 3 2 3 3 T TCP 1 5 1 12 1 13 1 14 1 15 1 16 1 17 3 2 3 3 TCP IP 1 12 1...

Page 54: ...e http www wirelessip5000 com NOTICE This product is in accordance with the Japanese Foreign Exchange and Foreign Trade Law When you plan to export or take this product out to overseas similar law s and or regulation s applicable in your country may require approval or permission from a relative authority Copyright 2006 Hitachi Cable LTD First Edition February 2005 Second Edition June 2005 Third E...

Reviews: