background image

HITACHI

   Printer

Instruction Manual

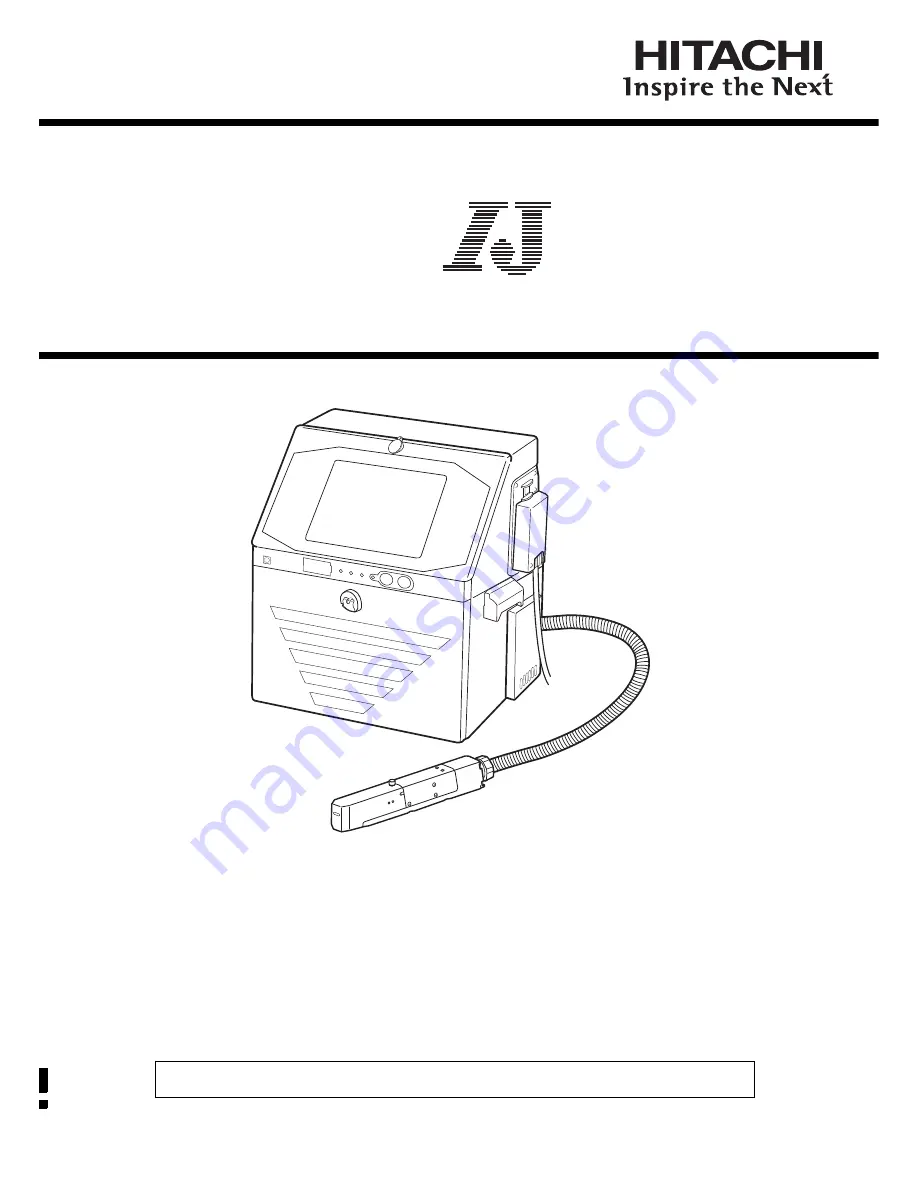
INK JET PRINTER FOR INDUSTRIAL MARKING 

Model UX

Thank you for purchasing the Hitachi IJ Printer Model UX.
This printer employs a noncontact, ink-jet method to print onto a print target.
This instruction manual describes the basic operating procedures, maintenance procedures, and other detailed 
handling procedures of the Hitachi IJ Printer Model UX.
If the printer is improperly handled or maintained, it may not operate smoothly and may become defective or 
cause an accident.  It is therefore essential that you read this manual to gain a complete understanding of the 
printer and use it correctly.
After thoroughly reading the manual, properly store it for future reference.

IF you changed the language of the screen by mistake, see Chapter 7.8 "Selecting Languages".

Summary of Contents for IJ UX

Page 1: ... procedures and other detailed handling procedures of the Hitachi IJ Printer Model UX If the printer is improperly handled or maintained it may not operate smoothly and may become defective or cause an accident It is therefore essential that you read this manual to gain a complete understanding of the printer and use it correctly After thoroughly reading the manual properly store it for future ref...

Page 2: ......

Page 3: ...you start operation of IJP Please implement periodical checkup of print status in the process even including during production Restrictions on Export User hereby agrees not to export or re export this product to any end user who the user has reason to suspect may utilize the product for the design development or reproduction of nuclear chemical or biochemical weapons The product or system includin...

Page 4: ... warning against performing an incorrect handling procedure is ignored CAUTION CAUTION is used to indicate the presence of a hazard which may cause personal injury or property damage if the warning against performing an incorrect handling procedure is ignored Pictograph Examples The symbols are used to indicate precautions including those related to potential warnings to be observed Detailed infor...

Page 5: ...nter in order to prevent it from filling with organic solvent vapor Secure adequate space for the ink makeup handling area and printer installation site At least 200 m must be provided per print head Ensure that adequate ventilation is provided 1 2 Installation Environment of Printer 3 CAUTION If extraneous noise enters the printer it may malfunction or break down For maximum noise immunity observ...

Page 6: ...section of the printer and to make a separate ground connection for the printer If you wish to receive ink particles in a beaker for a printing test for example use an electrically conductive beaker and connect the beaker securely to the ground Do not let the tip of the printing head enter the beaker Ink particles used for printing are electrically charged An ungrounded beaker has a gradually risi...

Page 7: ...remain inside Should you find a leak of ink or makeup inside the printer while the printer is running or being maintained wipe it off promptly with wiping paper or something similar Then with the maintenance cover open stop the printer power it down and repair the leak Continuing operation with a leak of ink or makeup will cause an anomaly resulting in abnormal printing Ink and makeup are flammabl...

Page 8: ...printer is operating do not look into the ink ejection hole in the end of the print head Ink or makeup may enter your eyes or mouth or soil your hands or clothing If any ink or makeup enters your eyes or mouth immediately flush with warm or cold water and consult a physician When ejecting the ink do it after confirming that there is no one in the ejection direction Operate with the end of the prin...

Page 9: ...armful interference and 2 this device must accept any interference received including interference that may cause undesired operation This equipment has been tested and found to comply with the limits for a Class A digital device pursuant to part 15 of the FCC Rules These limits are designed to provide reasonable protection against harmful interference when the equipment is operated in a commercia...

Page 10: ... ink for details AVERTISSEMENT Tenir hors de portée du feu L encre et la composition sont inflammables Tenir la machine hors de portée du feu Nettoyez et séchez immédiatement les projections d encre et de composition Soyez prudent lorsque vous manipulez l encre la composition Le stockage doit respecter les obligations réglementaires locales Lisez attentivement la fiche signalétique de sécurité de ...

Page 11: ...Screen display 2 5 3 BASIC OPERATION 3 1 3 1 Start operation 3 1 3 1 1 Start operation 3 1 3 1 2 When an error occurred at the start of operation 3 5 3 1 3 Ready and Standby state switching operation 3 10 3 1 4 Specifying the login user 3 12 3 2 Shut down operation 3 13 3 2 1 Automatically stopping by pressing one button UX D E only 3 13 3 2 2 Stopping ink ejection by pressing the screen button 3 ...

Page 12: ... 7 5 Print a bar code UX D E only 4 28 4 8 Set the print format Free layout UX D E only 4 30 4 8 1 Select the print items to be edited 4 30 4 8 2 Set the print items to be edited 4 31 4 8 3 Add and delete print items 4 34 4 8 4 Set dot matrix inter character space and other parameters 4 36 4 8 5 Print a bar code 4 37 4 8 6 Cautions for printing overlapped some print items 4 37 4 9 Print characters...

Page 13: ... 2 6 2 Set the date and time 6 8 6 3 Set up the touch screen 6 10 6 4 Changing the login user 6 12 6 5 Setting password for each user 6 15 7 AUXILIARY FUNCTIONS 7 1 7 1 Manage messages 7 2 7 1 1 Managing stored messages 7 2 7 1 2 Changing the message name 7 4 7 1 3 Deleting stored messages 7 5 7 1 4 Changing message number 7 6 7 1 5 Changing the group to which a message belongs 7 9 7 1 6 Checking ...

Page 14: ...ishing the ink 8 2 8 2 Replenishing the makeup 8 8 9 WHEN WARNING OR FAULT WAS GENERATED 9 1 9 1 Display when warning or fault was generated 9 1 9 2 On screen message descriptions 9 5 9 2 1 Fault messages 9 5 9 2 2 Warning messages 9 9 9 2 3 Other messages 9 12 9 3 When checking the warning and fault generation status 9 13 9 4 Remedial action to be taken in the event of a printing failure 9 14 10 ...

Page 15: ...makeup serves as the replenisher that makes up for the constituent loss due to ink evaporation during ink ejection It is also used as a cleaning solution 1 USAGE PRECAUTIONS 3 When using the cartridge bottle makeup as the cleaning solution Open the makeup cartridge bottle by turning its cap 1 Do not remove the over cap CAUTION Use the makeup by transferring it to the cleaning bottle 2 If the clean...

Page 16: ...up When restarting operation after storage drain the makeup from inside the printer and fill the printer with ink Refer to Technical manual 6 16 Long term Shutdown for detail Storage temperature Shutdown Period Guideline 1 0 to35 C 3 weeks 35 to 40 C 2 weeks 40 to 45 C 1 week 1 Maximum period the printer can be continuously shut down without being operated The values in the table are for MEK based...

Page 17: ... or the distance between the print material and the print head is short ink splashes may stain the end of the print head and the print head cover If this condition is left unresolved the stained status will be made worse resulting in a print error or emergency stop If a print error or emergency stop frequently occurs because of stain due to ink splashes stop the operation in progress and clean the...

Page 18: ...on 1 To stop the ink jet press OK 2 To stop the ink without cleaning press No cleaning stop No 051 CONFIRMATION OK Close No cleaning stop Press SHUTDOWN at HOME screen and the message Shutdown Process Confirmation appears Press No cleaning stop on the message Shutdown Process Confirmation 1 Do not use the SHUTDOWN OK to stop operation more than two successive times 2 When operation was stopped usi...

Page 19: ...ome possible by resetting the excitation voltage Reset the excitation voltage according to Technical Manual 6 10 Excitation V Adjustment Ink Temperature Correction Notice The selected setup does not allow ink temperature corrections to be made Solution Contact your local distributor No 187 CONFIRMATION Close 1 5 Cautions on operating time when printer is in service 1 Cautions when printer is repea...

Page 20: ... following message will appear Cancel the message by pressing the Close and be sure to inform your nearest local distributor When Viscosity Reading Instability or Viscosity Readings Out of Range occurs the unit will not enter the fault stop state and printing can be continued However you should contact your nearest local distributor for inspection 1 2 3 1 8 Gutter cleaning The IJ printer collects ...

Page 21: ... after the panel surface has dried Peel off the removable paper from the back of the protection sheet Do not touch the double sided tape on the back of the protection sheet Affix the protection sheet to the IJ printer screen display as shown in the figure 1 2 3 Protection sheet parts No 451902 3pcs pack The protection sheet can be used for UX series IJ printer 2 Usage Precautions Be careful not to...

Page 22: ...nt head This section performs printing Power cable RFID reader Reads ID of ink and makeup for certification 2 External views UX B Power lamp Main power switch Power cable Maintenance cover Opened closed for ink and makeup replacement and other maintenance purposes Print head This section performs printing USB cover Operating status indicator lamps Displays Ready Fault and Warning Maintenance cover...

Page 23: ...tion to the instruction of IJ printer Stainless steel of the main body has the character it not to be easy rust but it is a possibility that rust is generated when leaving it for a long time To prevent rust being generated we will recommend that the surface of the main body be kept clean as much as possible ...

Page 24: ...reservoir Ink reservoir Recovery filter Ink filter Main ink tank Inner cover Ink cartridge bottle 1 Makeup cartridge bottle 1 Appearance with inner cover removed 1 The Ink cartridge bottle and the makeup cartridge bottle are optional parts Lever handle Lever handle Pressure adjusting screw ...

Page 25: ...humbscrew Nozzle orifice Minus deflection electrode Gutter Plus deflection electrode Charge electrode Plus deflection electrode Nozzle orifice Gutter Minus deflection electrode Charge electrode Print head cover lock thumbscrew UX D B UX E Air exhaust port ...

Page 26: ...peration management Message name Current user ID user2 Inter laced Print count reset Startup Manual Makeup Ink 2 4 Screen display For operation of Menu refer to 3 3 5 Operation of screen transition New HMI Menu Status Warning Offline Online Status Warning Offline Online Screen name Current time New HMI Previous HMI Screen name Current time A touch panel is employed for data entry to operation scre...

Page 27: ...Full 002 The ink level in the main ink tank is too high Cause 1 The valve MV2 or valve MV7 is faulty 2 The High Level sensor in the main ink tank is faulty Solution 1 Drain proper amount of ink in the main ink tank 2 Check the High Level sensor 3 Contact your local distributor Reset Close HELP 2 Message For details of message refer to 9 When Warning or Fault was generated New HMI Previous HMI Mess...

Page 28: ...e print head cover and check whether or not the print head cover and the area around the nozzle are soiled by ink 2 Since the IJ printer prints by ejecting ink against the print material the outside and inside of the print head cover are soiled by splashing of the ink from the print material To prevent printing problems due to soiling check the soiling state and clean as required See 1 3 Print hea...

Page 29: ...escription count value and calendar character contents 3 Press the On switch Press for about 2 seconds Depending on the model there may not be a Start switch When the main power switch of is pressed the following Print description screen appears In the case of turning on the power again ensure that status indicator lamp is off when On switch is pressed The Print description screen shown below appe...

Page 30: ...wiping paper etc against the ink ejection port in preparation for splashing of the ejected ink TEST START PRINTING STARTUP SETTINGS LOGIN Ink Jet Startup Confirmation No 050 CONFIRMATION The ink jet will be turned ON Solution 1 To change the printer status to Ready press Ready 2 To change the printer status to Standby press Eject ink Ready Cancel Eject ink 4 Print head Wiping paper etc Press START...

Page 31: ...k ejection ink may momentarily spurt out and soil the paper However this is normal Wait until the status changes from Starting to Ready When the temperature is low approximately 20 C or lower it may take longer than usual for the printer to enter the Ready state Check the Ink pressure If there is a difference of 0 010 or more from the standard value adjust the pressure to the standard value 0 002 ...

Page 32: ...UTDOWN No cleaning stop 1 TEST START PRINTING SHUTDOWN SETTINGS LOGIN Shutdown Process Confirmation No 051 CONFIRMATION Shutdown will stop the ink jet Solution 1 To stop the ink jet press OK 2 To stop the ink without cleaning press No cleaning stop OK Close No cleaning stop Press SHUTDOWN Press No cleaning stop ...

Page 33: ...tion with makeup Clean the nozzle orifice charge electrode deflection electrode gutter and mounting base with makeup Also see 1 3 Print head cleaning 3 Loosen the screw and remove the print head cover 2 Nozzle Orifice Charge electrode Deflection electrode Mounting base Beaker Cleaning bottle Gutter Area to be cleaned Loosen the screw Print head cover Pull out Around nozzle Air exhaust port ...

Page 34: ...ange the printer status to Ready press Ready 2 To change the printer status to Standby press Eject ink Ready Cancel Eject ink With the print head cover removed press the STARTUP Ready Ink is ejected from the nozzle The status changes from Stop to Starting Operate the unit with the end of the print head remaining inside the beaker 4 Press STARTUP Press Ready ...

Page 35: ...e is no one in the ejection direction Operate with the end of the print head inserted in a beaker etc WARNING Install the print head cover Wait until the status changes to Ready If the Cover open error was displayed press the Close 6 Input the print target detection signal and check the printing state See 3 1 1 Start operation 7 Gutter Ink stream Side direction Upper direction Gutter entrance diam...

Page 36: ...t ink Use this procedure when you want to eject ink from the nozzle for a purpose other than printing Use only during maintenance To print press the STARTUP Ready Press the STARTUP Eject ink Ink ejection for maintenance Operation can be aborted by pressing the Cancel at the Ink Jet Startup Confirmation message If the print head cover installed the printer will not enter the Ready state even if thi...

Page 37: ... 0 0 0 0MP a Print Count 0 Makeup Ink TEST START PRINTING SHUTDOWN 100 OFFLINE READY ID User2 S AMP L E 1 3 1 3 Ready and Standby state switching operation 1 Ready state Standby state switching With the conveyor interlock being activated by Ready signal should this Ready signal be turned to Standby the conveyor will stop Press READY on the upper of the screen and the message Print Abort Confirmati...

Page 38: ... Count 0 Makeup Ink TEST START PRINTING SHUTDOWN 100 OFFLINE STANDBY ID User2 S AMP L E 1 Print Confirmation No 183 CONFIRMATION The newly created print data will be printed Solution Press OK to print OK Cancel 2 Standby state Ready state switching Press STANDBY on the upper of the screen and the message Print Confirmation appears Then press OK 1 Press OK Press STANDBY ...

Page 39: ...er is turned on See the Technical Manual 3 3 Selecting login user when power is turned on 2 Operation The administrator sets the login procedure necessary at power on beforehand Select login user 2015 07 07 12 45 OFFLINE STOP admin admin04 user07 user2 user05 admin08 admin06 user3 Q A Aa Z X C V B N M S D F G H J K L W E R T Y U I O P 4 7 8 9 5 6 1 0 2 3 Enter Password Turn on the power The Select...

Page 40: ... does not have to be turned off The power consumption does not change even if the main power switch remains ON Main power switch On switch Stop switch Press the Stop switch Press for about 2 seconds All operations up to IJ printer power OFF are performed automatically Depending on the model there may not be a Stop switch Stop the ink with the button on the screen at of par 3 2 2 and turn off the p...

Page 41: ...52 CONFIRMATION Shutdown will stop the ink jet Solution 1 To stop the ink jet press OK 2 To stop the ink without cleaning press No cleaning stop 3 To execute the auto power shutdown process after ink stop press STOP OK Close STOP No cleaning stop Press the SHUTDOWN OK A confirmation screen is displayed 1 Wait for the status to change from Stopping to Stop Press SHUTDOWN Stops ink jet Turns OFF the...

Page 42: ...FIRMATION Shutdown will stop the ink jet Solution 1 To stop the ink jet press OK 2 To stop the ink without cleaning press No cleaning stop OK Close No cleaning stop 2 UX B Wait for the status to change from Stopping to Stop Press SHUTDOWN Press the SHUTDOWN OK A confirmation screen is displayed 1 Stops ink jet ...

Page 43: ...s turned ON 3 2 3 Turning off the main power switch 1 UX D E Press Stop switch normally instead of main power switch to turn off the power at the end of operation If the IJ printer will not be used for a long time turn off the main power switch Do not turn off the main power switch while ink is being ejected See 11 EMERGENCY PROCEDURES The state when the power is turned on at the next operation di...

Page 44: ...lways install the nozzle rubber seal after cleaning it with makeup When installing the nozzle rubber seal be careful not to deform the charge electrode 1 2 3 Usage precautions Handling the nozzle rubber seal Charge electrode Nozzle orifice Nozzle rubber seal 3 2 4 Careful Cleaning 1 Overview This is the function to clean the printer carefully when IJ Printer is frequently used in high temperature ...

Page 45: ... HMI screens can move directly to other displays without going back to HOME screen Ink eject and Ink stop can operate only when HOME screen is displayed Please refer to 3 3 3 Change procedure of New HMI Previous HMI for the change procedure of the operation scheme New HMI and Previous HMI HOME Print description Calibration touch screen coordinates ...

Page 46: ...ust print parameters Environment setup menu Auxiliary function menu Maintenance menu Screen name See next page Change message Change message Edit message Print format Print specifications Change message Adjust print parameters Edit message Print format Print specifications Adjust print parameters Change message Select login user Create Edit message For print target data For save data Change messag...

Page 47: ...ecifications Various print setup Count conditions Calendar conditions Adjust Inter character space Substitution rules Shift code setup Op on UX D E Op on UX D E Time count conditions The display can be switched between screens Edit message Print format and Print specifications Screen name ...

Page 48: ...up Login management Manage messages Group Create user pattern Calibration touch screen coordinates Copy data IJP USB Copy data USB IJP Edit standard pattern Edit substitution rules Select languages Unit information Operation management Test print Excitation V update Nozzle test View alarm history Circulation control View software version Comm monitor Optional on UX B Password protection Solenoid v...

Page 49: ... T Y U I O P 4 7 8 9 5 6 1 0 2 3 Enter Password Current User ID user9 SETTINGS LOGIN EDIT ADJUST SAVE OPEN HOME 3 3 3 Change procedure of New HMI Previous HMI 1 Change procedure of New HMI Previous HMI The new HMI screen is displayed 1 Press menu LOGIN The Select login user screen will be displayed 2 The saved user names are displayed This icon shows Administrator This icon shows User Press the ad...

Page 50: ...255 Change message Select message Overwrite message Adjust print parameters Operation management Message name Current user ID admin Inter laced Print count reset Startup Manual Makeup Ink Enter Input the password for the administrator name admin and press Enter Logs in again using administrator name admin and the touch screen returns to the Print description screen Previous HMI is displayed 4 ...

Page 51: ... Current user ID user9 Press Login management in the environment setup menu The Login management menu is displayed 2 Press Select login user The Select login user screen is displayed 3 Displays the history of logged in users Select login user Set the password However it is not displayed when authorization is not given from the administrator The user ID currently logged in is displayed The saved us...

Page 52: ...ADJUST SAVE OPEN HOME Operating Time Ink Presure Standard Value 0 255 100 h 0 0 0 0MP a Print Count 1 000 Makeup Ink TEST START PRINTING STARTUP 100 OFFLINE STOP ID User2 Press user name user2 A password input window opens Caution Administrator user can t transfer to New HMI screens 4 Enter the password of user name user2 and press Enter Logs in again using user name user2 and the touch screen ret...

Page 53: ...n voltage is applied printing is permitted by the sensor signal 4 Starting State in which the printer changes from the inactive state to the standby state 5 Ink heating Start up in process with the ink being heated 6 Stopping State in which the printer changes from the standby state to the stop state 7 Drop adjust Period during which ink particles are not properly charged in the standby state 8 Co...

Page 54: ... ID user2 Print description 2015 07 07 12 45 ONLINE READY ID User2 Ink Low Warning The ink level in the ink reservoir is low Cause 1 The ink reservoir is almost empty 2 The Low Level sensor in the ink reservoir is faulty Solution 1 Replace the Ink Cartridge within 60 minutes 2 Check the Low Level sensor No 081 WARNING CLOSE Ink Low Warning Makeup Low Warning WARNING 3 When there is a Not reset ala...

Page 55: ...ace ink makeup cartridge Display the print layout and operatimg information 4 1 OPEN Calls and prints saved messages 4 3 SAVE Saves created messages The save procedure can select overwrite message or new message 4 4 4 6 ADJUST Creates and edits messages different from the current message 4 14 4 EDIT Inputs the characters to be printed 4 6 SETTINGS Displays operation status 5 2 LOGIN Logs in again ...

Page 56: ...00 ID User2 ABC 1 6 1000 Q 1 2 3 4 5 6 7 8 9 0 A Aa Z X C V B N M S D F G H J K L W E R T Y U I O P Paste Enter copy Insert Delete Space SETTINGS LOGIN EDIT ADJUST SAVE OPEN HOME OFFLINE STOP Press menu EDIT The Edit screen New HMI will be displayed 2 ...

Page 57: ... many selections When a button is pressed a selection menu is displayed in a window The set value selection is displayed on the input button Display the selection menu window by pressing the but ton and select the relevant item 2 Operation Maintenance Excitation V update screen is used as an example There are 3 types of settings 1 Excitation V ref setting Value input Display the numerical window b...

Page 58: ...Automatic update Incremental change Print trigger source Print data 11 1 20 1 9 Inc Data to be displayed For test Sensor Button input 0 19 Cancel Disable Dec Inc Excitation V update Standby 0 19 HOME Shutdown Manual Makeup Ink Print trigger source setting Press the applicable button 3 Automatic update setting Display the selection menu window by pressing the button and close from within that windo...

Page 59: ...1 Setting of value The numerical value is displayed on the screen When The set possible icon is displayed display the numerical window by pressing the numerical value and input the value 2 Setting of selection The set value selection is displayed on the screen When Slectable icon is displayed display the selection menu window by pressing the set value and select the set value from the items 2 Oper...

Page 60: ...SC 0 SC 85 Character unit CH Scanning unit SC Length mm mm Scanning Unit The background color is changed by pressing the set value The selection menu window is closed and the set value stays as same before When the selection is enabled the item becomes activated When the selection is disabled the item becomes inactivated Scanning Unit setting Item select Display the selection menu window by pressi...

Page 61: ...re canceled and the display returns to the previous screen Apply is not displayed 2 Screens with Back When Back is pressed the display returns to the previous screen When Apply is pressed the set contents are accepted When Back was pressed in the state in which Apply is not pressed a confirmation window is displayed and action is requested 2 Screen examples Screen with OK and Cancel Example of Dat...

Page 62: ... code Message name 1 none Inter char space MAX 27 02 5x7 Line spacing MAX 2 Dot matrix Print spec Edit message Column 1 Column 1 To Overall Add Col Insert C Delete C 2 lines 3 lines 1 line 2 2nd line 1st line Manual Shut down Apply HOME Adjustment char cond Print spec Edit message Apply HOME Shutdown Back Back Manual Makeup Ink Example of Save message screen Screen with Back button Example of Prin...

Page 63: ...e data entered will be used in the print message Solution 1 To save the input data and use it for print message press OK 2 To delete the input data press Cancel changes 3 To return to the previous screen press Cancel O K Cancel Cancel changes Apply HOME Shutdown Manual Makeup Ink Example of confirmation message when Back was pressed Accepts the set contents Return from set contents to original con...

Page 64: ...rint parameters Operation management Message name Maintenance Auxiliary function Environment setup menu 2015 07 07 12 45 Com 0 Current user ID user2 Select login user Create Edit message Inter laced Print count reset Startup Manual Makeup Ink Shutdown Manual 4 CREATION AND PRINTING OF MESSAGES 4 1 Print description screen initial screen 1 Overview The display is shifted to the screens for message ...

Page 65: ...please select it on the Touch screen setup screen Technical Manual 4 13 Print count reset Reset the print count to zero 0 4 1 Count reset Reset the count value to a preset value To show the Count reset button please set on the Touch screen setup screen 4 3 Technical Manual 4 13 Cartridge replacement Replace ink makeup cartridge 8 The SHUTDOWN is displayed during ink ejection The STARTUP is display...

Page 66: ...015 07 07 12 45 SETTINGS LOGIN EDIT ADJUST SAVE OPEN HOME Operating Time Ink Presure Standard Value 0 255 100 h 0 0 0 0MP a Print Count 1 000 Makeup Ink TEST START PRINTING STARTUP 100 OFFLINE STOP ID User2 2 Reset the print count a Previous HMI The Print description screen is displayed Press the Print count reset on the Print description screen Confirmation message of Print count reset will be di...

Page 67: ... currently being printed is called current message When the power is turned on the last current message is memorized The print layout of the current message is displayed on the Print description screen The contents of the current message can be changed by calling the message from the saved messages Saved message Messages can be given a message name Multiple messages can be saved beforehand ...

Page 68: ...r space set value are matched at all lines Only 1 column can be input c Free layout Setup of free layout An arbitrary position can be set for each print item The background of the current message edit screen is colored Edit screen background color Editing objective Background color Current message Light green Saved message Gray Print items are stacked from the bottom Columns vertical list with the...

Page 69: ...rint format Print specifications and Edit message various print setup screens the confirmation message Data Entry Confirmation is displayed Apply Back Functions of confirmation message Data Entry Confirmation Button Contents OK Applies the message by input value and switches to the Print description screen Cancel changes Cancels the input value and returns to the state before the change Cancel Ret...

Page 70: ...dit message Print spec Various print setup Individual setup Overall setup Free layout Character size and inter character space set value are matched at all lines Only 1 column can be input An arbitrary position can be set for each print item Back HOME Startup Manual Makeup Ink Change the display contents using the group search sort and select page functions so that the desired message name is disp...

Page 71: ...e message name list display screen Select page Selects the message name list page Sort The sort order can be switched by pressing the heading part of the message name list display Search The first several characters of a message name are input and only the message names beginning with those characters are displayed If the Search conditions are not input all the message names in that group are disp...

Page 72: ... print contents currently being printed are not affected Style displayed in the Details mode shows the type of print format Types of Style Type of style Meaning Individual Individual setup of fixed layout Overall Overall setup of fixed layout Free Set up of free layout Select message 2015 07 07 12 45 OK Com 0 Stop Details Message name Group No Group name 00 Search condition ABC001 ABC002 ABC003 LM...

Page 73: ...tartup Manual Makeup Ink Select message 2015 07 07 12 45 OK Com 0 Stop Details Message name Group No Group name 00 Search condition Cancel Prev Dsp Next Dsp Select page 1 100 Free number ABC001 ABC002 ABC003 LMN10 LMN20 ABC004 1 2 3 4 5 6 7 8 9 10 No Message name ABC005 A01 B C D 11 12 13 14 15 16 17 18 19 20 No Message name HOME Startup Manual Makeup Ink Select message 2015 07 07 12 45 OK Com 0 S...

Page 74: ...arch Sort Select page function Display All so that the desired message name is displayed 2 Select the message name and press the OK The selected message is called and the display returns to the Print description screen 3 b New HMI Press menu OPEN The Open screen will be displayed 1 Group folder Group Current massage name Sort Details or Simple List Scroll up Scroll down Example of Details screen S...

Page 75: ...laced Print count reset Startup Manual Makeup Ink 4 4 Overwrite messages to be printed 1 Overview Overwrites the current message by the same name If the message is saved using the overwrite message function when updating the count value the same print description can be selected later Message name cannot be changed See 4 6 Save created messages for message save 2 Operation a Previous HMI The Print...

Page 76: ... EDIT ADJUST SAVE OPEN HOME SAMPLE1 b New HMI Press menu SAVE The Save screen will be displayed 1 Press OVERWRITE MESSAGE Save is performed When save is completed it will return to the Print description screen HOME 2 Current massage name This button is activated when Current message name is displayed OVERWRITE MESSAGE NEW MESSAGE ...

Page 77: ...lay Switches the message name list display screen Select page Selects the message name list page Sort The sort order can be switched by pressing the heading part of the message name list display Search The first several characters of a message name are input and only the message names beginning with those characters are displayed If the Search conditions are not input all the message names in that...

Page 78: ... Prev Dsp Next Dsp Select page 1 3 Free number HOME Startup Manual Makeup Ink Change the display contents using Group Search Sort Select page function Display All so that the desired message name is displayed 2 Select the message name and press the OK To create a new message press the Create new message The change message screen is displayed 3 2 Operation Press the Create Edit message on the Print...

Page 79: ...ity messages the number of messages which can be saved decreases Maximum message save count Model type Maximum save count Remarks UX B 150 messages 150 messages can be saved without regard to their capacity UX D 300 messages 300 messages can be saved without regard to their capacity Option Up to 2 000 messages The save count depends on the capacity UX E 2 000 messages 2 000 messages can be saved w...

Page 80: ...value are matched at all lines Only 1 column can be input Back HOME Startup Manual Makeup Ink Free layout An arbitrary position can be set for each print item Save message 2015 07 07 12 45 OK Com 0 Stop Message name 0 1 GROUP001 Simple list Save message as name Group No Free space 20 Cancel A B C 0 0 1 HOME Startup Manual Makeup Ink 2 Operation a Previous HMI The Change message screen is displayed...

Page 81: ...sage 2015 07 07 12 45 Com 0 Stop Message name 0 1 GROUP001 Save message as name Group No Free space 20 A B C 0 0 1 A B C D E F G H I J Insert Over write Delete Back space K L M N O P Q R S T Dupli cate Paste U V W X Y Z Enter Space Cancel ABC001 123 Sign ABC Change Change etc HOME Startup Manual Makeup Ink 2 3 Press the OK The message is saved 4 Enter ...

Page 82: ...W E R T Y U I O P Paste Enter copy Insert Delete Space S AMP L E 1 1 SETTINGS LOGIN EDIT ADJUST SAVE OPEN HOME SAMPLE1 Enter b New HMI Press menu SAVE The Save screen will be displayed 1 Current massage name This button is activated when Current message name is displayed OVERWRITE MESSAGE NEW MESSAGE Current massage name Message name being input Cursor position Enter Input the message name and pre...

Page 83: ... char space MAX 27 Line spacing MAX 2 Back 3 lines Apply HOME Startup Manual Makeup Ink Methods of selecting the print item to be edited Type Features Directly touching the print item The touched item becomes the editing objective Previous column next column The topmost line of the previous column or the next column becomes the editing objective Select line The print item of the specified line in ...

Page 84: ...keup Ink To Overall To Overall To Overall Add Col Insert C Delete C 2 lines Back 2 Selecting all print items All the print items become the editing objective When placed into the Overall mode first matching to the format information of the 1st line is performed Overall mode is cancelled after closing the Change message screen To Overall One print item becomes the editing objective All the print it...

Page 85: ...ual Makeup Ink 2 lines 1 line To Overall Add Col Insert C Delete C 2 lines Back 4 7 2 Set the number of print lines 1 Function Sets the number of lines of the selected column The number of lines which can be set is 1 to 5 Maximum line count Model type Maximum line count UX B 3 lines UX D E 6 lines When the number of vertical dots exceeds the maximum number of dots the characters size becomes 5 8 5...

Page 86: ...p Manual Makeup Ink Add Col Insert C Delete C 4 7 3 Add and delete print items 1 Function Deletes inserts and adds print items in column units Methods of adding and deleting print items Type Features Delete column Deletes all the print items of the editing objective column Insert column Adds a column directly before the editing objective column Add column Adds a column at the end The colored colum...

Page 87: ... Startup Manual Makeup Ink 4 7 4 Set dot matrix inter character space and other parameters 1 Function Sets the line spacing dot matrix inter character space bold font and bar code Bold Sets the character to bold The magnification which can be set is 1 to 9 Line spacing Adjust the spacing with the line above Set for each column Can be set up to a maximum of 4 dots 1 2 The colored print item is the ...

Page 88: ...cter kind 4 5 5 5 5 8 5 7 9 8 9 7 7 10 10 12 11 11 12 16 18 24 24 32 30 40 36 48 Chimney 5 3 Chimney 5 5 Chimney 7 5 Chinese character X X X X X X X X X X X X Kana X X X X X X X X X X Alphabet letters numeric symbols X Space X User pattern Punct character X X X X Dedicated character X X X X X X X X X X X X X Accent character X X X X X X X X Greek character X X X X X X X X Russian character X X X X...

Page 89: ... set value Character kind 5 5 5 8 5 7 9 8 9 7 7 10 10 12 11 11 12 16 18 24 24 32 30 40 36 48 Chinese character 0 4 6 Kana 0 0 2 4 6 Dedicated character 1 1 Arabic numeric 0 2 0 0 0 2 2 2 Arabic letter 2 0 2 2 2 English A English B Vertical 8 dots Horizontal 5 dots Inter character space Character size 5 8 Inter character space 2 dots Relationship between character and inter character space User pat...

Page 90: ... 3 27 9 8 9 7 9 7 23 7 10 7 1 25 10 12 10 6 22 11 11 11 5 21 12 16 12 4 20 18 24 18 6 14 24 32 24 8 8 30 40 30 18 18 36 48 36 12 12 5 3 chimney 5 0 27 5 5 chimney 5 0 27 7 5 chimney 7 0 25 1 2 Inter character space can be set in character units using the Adjustment char cond Select the character column where the inter character space will be set using Start and End input the inter character space ...

Page 91: ...et Up to a maximum of 4 DM Data Matrix code 128 QR code Micro QR and GS1 DataBar can be set respectively QR code and Micro QR can be collectively set up to 4 Since the number of horizontal dots is uniquely determined for bar codes an inter character space cannot be set A bar code can be set even for print items with a calendar and count set However when calendar substitution zero suppression or an...

Page 92: ...ame 1 DM 16x16 00 12x16 Dot matrix Print spec Edit message Column 1 To Overall Add Col Insert C Delete C 0 1st line Inter char space MAX 4 Line spacing MAX 0 Back HOME Startup Manual Makeup Ink 2 lines 3 lines 1 line 2 Examples Example of EAN 13 Example of Data Matrix 1 2 Sets barcode type Sets Disable or character size of identification code when EAN 13 EAN 8 UPC A UPC E EAN 13 Add On 5 or GS1 Da...

Page 93: ...ee layout UX D E only 4 8 1 Select the print items to be edited Set and change the print format including the character size for the print item to be edited There are 2 methods of selecting the print item to be edited Methods of selecting the print item to be edited Type Features Directly touching the print item The touched item becomes the editing objective Previous item next item The previous it...

Page 94: ...Function Set the horizontal X coordinate and vertical Y coordinate of the selected item at the bottom left The total number of vertical dots and limit of the coordinate are as follows Total vertical dots and limit of coordinate Model type Total vertical dots Horizontal X coordinate Vertical Y coordinate UX D E 32 dots 0 to 31999 0 to 31 Horizontal X coord 0 Vertical Y coord 0 Horizontal X coord 42...

Page 95: ... methods of setting the horizontal X coordinate and vertical Y coordinate The horizontal X coordinate and vertical Y coordinate cannot be set over the range of Table of 1 Methods of setting the horizontal X coordinate and vertical Y coordinate Type Features Directly touching the screen The print item to be edited can be moved by directly touching the screen within the limit of vertical dots Set th...

Page 96: ...ge range Hor 60 Vert 16 Adjustment char cond Print spec Edit message Apply HOME Startup Manual Makeup Ink 3 Set the coordinate of all print items All print items can be moved collectively Press Overall item move and move all items All print items can be moved dot by dot by means of buttons The horizontal X coordinate and vertical Y coordinate cannot be set over the range of Table of item 1 Cursor ...

Page 97: ...ds of adding and deleting print items Type Features Insert item Add the print item at the selected position Delete item Delete the print item to be edited A print item can be created by directly touching the print layout screen Press Insert item and touch the print layout screen then the print item character size is 5 7 or 5 8 will be created When the print item is created if the horizontal X coor...

Page 98: ...ve with button or touch on screen Horizontal X Vertical Y 01 00144 OK Cancel Overall item move Individual item move Delete item Insert item Item 1 Usage range Hor 60 Vert 16 Adjustment char cond Print spec Edit message Apply HOME Startup Manual Makeup Ink A print item character size is 5 7 or 5 8 will be created The method of setting the horizontal X coordinate and vertical Y coordinate is as same...

Page 99: ... character space etc the top right coordinate of the print item can be over the limit of coordinate Should the top right of the print item go beyond the limit of horizontal X coordinate it will be automatically adjusted to horizontal X coordinate 31999 Should the top right of the print item go beyond limit of vertical Y coordinate it will be automatically adjusted to vertical Y coordinate 29 3 lin...

Page 100: ...code Each bar code is handled as an independent bar codes Char size 12 16 Bar code none When changing the bar code the top right coordinate of the print item can go over the limit of coordinate Should the top right of the print item go beyond the limit of horizontal X coordinate it will be automatically adjusted to horizontal X coordinate 31999 Char size 12 16 Bar code Code39 Horizontal X coordina...

Page 101: ... appropriate inter character space depending on the kind of character See 4 7 4 Set dot matrix inter character space and other parameters There is an Insert mode and an Overwrite mode when inputting Duplicate by selecting the start and end of the character string and Paste at an arbitrary position are possible The characters which can be set as dedicated characters are shown below For dedicated ch...

Page 102: ...age editing Prev Item and Next Item may also be pressed The print description of the selected print item is displayed at the print description edit area 1 Touch the position at which input in the print description edit area is to begin and move the cursor The cursor button may also be pressed The cursor is displayed at the selected position 2 Press the input mode button The kind of keyboard is cha...

Page 103: ... of the selected print item is displayed at the print description edit area 2 Touch the position at which input in the print description edit area is to begin and move the cursor The cursor button or the scroll button may also be pressed The cursor is displayed at the selected position 3 Press the input mode button or the shift button The kind of keyboard is changed 4 Left Characters counted Right...

Page 104: ...ber of digits which can be input Substitution rules Reference Year Y 4 Yes Month M 3 Yes Day D 3 Yes Hour h 2 Yes Minute m 2 Yes Second s 2 Total number of days T 3 4 10 1 2 Week No W 3 Yes 4 10 1 4 Day of week 7 3 Yes 4 10 1 5 Shift code 1 E 10 4 11 Time count 1 F 3 4 12 JAN FEB Month 3 digits 3 4 10 1 3 A group of calendar characters is called Calendar block 1 Optional on UX S Maximum Calendar b...

Page 105: ...on For printing in other than English it is defined by the month 3 digits Substitution rules screen When month 3 digits are corresponded to new substitution rules the English representations shown below are set beforehand English representation JAN FEB MAR APR MAY JUN JUL AUG SEP OCT NOV DEC Edit message 2015 07 07 12 45 Com 0 Stop Message name Print spec Print format Column 1 Item 1 Char count 12...

Page 106: ... Friday Saturday Sunday Week No December 21 22 23 24 25 26 27 52 28 29 30 31 53 January 1 2 3 53 4 5 6 7 8 9 10 1 11 12 13 14 15 16 17 2 5 Day of the week Use when representing and printing the day of the week using a 1 digit character One week begins on Monday and ends on Sunday When the calendar characters Day of week are input the numbers 1 to 7 are printed When printing other representations s...

Page 107: ...ssage 2015 07 07 12 45 Com 0 Stop Message name Column 1 Item 1 Char count 3 1000 1 10 20 Prev item abcde fghij klmno Next item abcde fghij klmno Year Month Day Hour Minu te Seco nd Total days Week num ber Day of week Shift code Time count Count Back space etc 123 Sign Logo ABC Delete Insert Over write Calendar count Cancel OK Print spec Print format Back Space Apply HOME Startup Manual Makeup Ink ...

Page 108: ...sage 2015 07 07 12 45 Com 0 Stop Message name Column 1 Item 1 Char count 3 1000 A B C D E F G H I J Back space K L M N O P Q R S T Dupli cate Paste U V W X Y Z Space etc Calendar count 123 Sign Logo Delete 1 10 20 Prev item abcde fghij klmno Next item abcde fghij klmno Change Change Insert YY MM DD Over write ABC Print spec Print format Back Cal cond Count cond Apply HOME Startup Manual Makeup Ink...

Page 109: ... Message name 1 10 20 Prev item abcde fghij klmno Next item abcde fghij klmno YY MM DD Column 1 Item 1 Char count 11 1000 Year Month Day Hour Minu te Seco nd Total days Week num ber Day of week Shift code Time count Count Back space etc 123 Sign Logo ABC Delete Insert Over write Calendar count Cancel OK Print spec Print format Back Space Apply HOME Startup Manual Makeup Ink Touch the print item to...

Page 110: ...2 1000 A B C D E F G H I J Back space K L M N O P Q R S T Dupli cate Paste U V W X Y Z Space etc Calendar count 123 Sign Logo Delete 1 10 20 Prev item abcde fghij klmno Next item abcde fghij klmno Change Change Insert YY MM DD h Over write ABC Print spec Print format Back Cal cond Count cond Apply HOME Startup Manual Makeup Ink Apply Input the calendar characters The calendar characters are displa...

Page 111: ...8 2015 02 28 2015 03 27 2015 03 28 2015 03 28 2015 03 29 2015 03 01 2015 03 31 2015 04 01 2015 04 01 2015 04 02 2016 01 28 2016 02 27 2016 02 28 2016 02 28 2016 02 29 2016 01 29 2016 02 28 2016 02 29 2016 02 29 2016 03 01 2016 01 30 2016 02 29 2016 02 29 2016 02 29 2016 03 01 2016 01 31 2016 02 29 2016 02 29 2016 02 29 2016 03 01 2016 02 01 2016 02 29 2016 03 01 2016 03 01 2016 03 02 2016 02 02 20...

Page 112: ... Column 1 Item 1 Back 1 10 20 Prev Next YY MM DD h Offset Substitution rules Zero suppression Year Month Day Hour Minute Disable 1st screen 2nd screen Substitution rules No 01 Disable Enable Disable Enable Disable Enable 0000 0000 0000 0000 0000 Calendar blocks 1 2 Disable Disable HOME Startup Manual Makeup Ink 2 Operation Set offset of 1 month at the YY MM DD calendar block The Edit message scree...

Page 113: ... screen Substitution rules No 01 Calendar blocks 1 2 Offset Substitution rules Zero suppression Year Month Day Hour Minute Disable Enable Disable Enable Disable Enable 0000 0001 0000 0000 0000 Disable Disable Disable HOME Startup Manual Makeup Ink Input 1 at offset Month The character string of the print description edit area is displayed at the print layout 3 Offset 1 month ...

Page 114: ...space Maximum Substitution rule count Model type Maximum Substitution rule count UX B 48 UX D 48 Option Up to 99 UX E 99 Kana alphanumeric and user pattern can be set as substitution characters The substitution character for year is 25 years from the year of the calendar time Note The substitution character for year omits the substitution character of the previous year each time one year elapses A...

Page 115: ...8 S 19 T 20 U 21 V 22 W 23 X Back space Delete Insert Duplicate Back A B C D E F G H I J K L M N O P Q R S T U V W X Y Z Space 123 Sign Logo Change Change Over write ABC Hour etc Apply Startup Manual 3 Operation Set the substitution rule for the Hour calendar character The Edit message screen is displayed Press Cal Cond The Calendar conditions screen is displayed 1 Press Previous or Next and chang...

Page 116: ... set at only one place in one message Up to a maximum of 10 digits can be input Shift code rules are set at the Shift code setup screen For work shift the start time is specified in hour minute units Up to a maximum of 48 shifts can be specified One shift code rule is held for each message To input the same shift code at another message use the Duplicate and Paste function Input the shift code rul...

Page 117: ...bcde fghij klmno Next item abcde fghij klmno ABC Column 1 Item 1 Char count 6 1000 Year Month Day Hour Minu te Seco nd Total days Week num ber Day of week Shift code Time count Count Back space etc 123 Sign Logo ABC Delete Insert Over write Calendar count Cancel OK EE Print spec Print format Back Space Apply HOME Startup Manual Makeup Ink 2 Operation The Edit message screen is displayed Press Cale...

Page 118: ... Shift code Column 1 Item 1 Back 1 10 20 EEBC 1st screen 2nd screen Calendar blocks 1 1 Offset Substitution rules Zero suppression Year Month Day Hour Minute 0000 0000 0000 0000 0000 HOME Startup Manual Makeup Ink Press OK The calendar characters are displayed in the print contents edit area 3 Touch the print item to input The character string of the print contents edit area is displayed in the pr...

Page 119: ...etup 2015 07 07 12 45 Com 0 Stop Input time in ascending order 2 A1 A2 A3 Insert line Delete line Duplicate 00 30 08 15 1 08 14 16 44 3 16 45 00 29 4 00 00 00 00 Back Apply HOME Startup Manual Makeup Ink Prev Dsp Next Dsp Back Press Shift code The Shift code setup screen is displayed The last line is for addition 7 Input the start time and print contents for each shift When start time is input the...

Page 120: ... another message use the Duplicate and Paste functions Input the time count conditions memorize them by pressing Duplicate and press Paste at the Time count conditions screen of the other message The time count characters cannot be input at the same count block as another count Time Value 00 00 FD 00 30 FE 01 00 FF 01 30 FG 02 00 GA 02 30 GB 03 00 GC 03 30 GD Example Range AA to GG renewal period ...

Page 121: ... 1 10 20 Prev item abcde fghij klmno Next item abcde fghij klmno ABC Column 1 Item 1 Char count 6 1000 Year Month Day Hour Minu te Seco nd Total days Week num ber Day of week Shift code Time count Count Back space etc 123 Sign Logo ABC Delete Insert Over write Calendar count Cancel OK FF Print spec Print format Back Space Apply HOME Startup Manual Makeup Ink 2 Operation The Edit message screen is ...

Page 122: ...Stop Message name Time count Column 1 Item 1 Back 1 10 20 FFBC 1st screen 2nd screen Calendar blocks 1 1 Offset Substitution rules Zero suppression Year Month Day Hour Minute 0000 0000 0000 0000 0000 HOME Startup Manual Makeup Ink Press OK The calendar characters are displayed at the print contents edit area 3 Touch the print item to input The character string of the print contents edit area is di...

Page 123: ... Back 1 10 20 FFBC Range Reset Reset time hour 00 minute Renewal period 00 99 00 00 15 minutes HOME Startup Manual Makeup Ink Press Time count The Time count conditions screen is displayed 7 Input the range reset value reset time and renewal period 8 Press Back Returns to the Calendar conditions screen 9 Back Back Time count conditions ...

Page 124: ... from the next count value is made the Jump to Reset When Count reset of the Print description screen is pressed the count value is changed to the specified value Count skip Set capital alphabetical characters small alphabetical characters or user patterns to skip in count block Zero suppression Selects whether or not leading 0 except the rightmost end is to be replaced by a space Multiplier The v...

Page 125: ...creen Count blocks 1 2 CCC CC 000 000 000 00000 00001 HOME Startup Manual Makeup Ink A range button is not displayed at the Count conditions screen corresponding to a print item with bar code set When a jump digit was set at the right side of a count digit and jump occurred the count of the digit at the left of the jump digit is updated Count block Count block is displayed in a blue frame ...

Page 126: ...n Multiplier Enable Disable Value Range 001 001 999 2 Count conditions setting examples Number by 1 from 000 to 999 1 Count result 000 001 002 998 999 Note Range is set for each digit When range is set to 001 to 999 since it means setting with 0 excluded at the 1 position the count result becomes as follows Count result 001 002 003 008 009 011 012 013 018 019 021 ...

Page 127: ...unt skip 99 01 01 down up Direction Zero suppression Multiplier Enable Disable Number by 1 from A01 to Z99 2 Count result A01 A02 A03 A98 A99 B01 B02 B03 B98 B99 Z01 Z02 Z03 Z98 Z99 Note Since the count value skips in increments when an increment is input always choose a count value for jump setting which is not skipped ...

Page 128: ...rn is defined as follows User pattern code 00 01 02 03 04 05 06 07 Definition pattern 3 1 2 4 4 3 2 1 When printing one way 4 times and backwards 4 times by both ways printing the same column can be printed by the same numbers to The count result becomes as shown below 1 4 The user pattern which can be used in count are 48 kinds up to code 47 Always use from top 00 Numeric and save characters can ...

Page 129: ...alue 0 255 Change message Select message Overwrite message Adjust print parameters Operation management Message name Count reset Inter laced Print count reset Shutdown Manual Makeup Ink Print description 2015 07 07 12 45 SETTINGS LOGIN EDIT ADJUST SAVE OPEN HOME Operating Time Count Reset 100 h Print Count 1 000 Makeup Ink TEST START PRINTING STARTUP 100 OFFLINE STOP ID User2 Reset the count value...

Page 130: ...uppression Multiplier Disable Enable Print by replacing 0 of the count value with a space 5 0 at the leading digit of the count character is replaced by a space and printed using the zero suppression function Count value 12 print comparison Count conditions Print result Zero suppression disabled 0012 Zero suppression enabled 12 Zero suppression Enable is set ...

Page 131: ...5 07 07 12 45 Com 0 Stop Message name 1 10 20 Prev item abcde fghij klmno Next item abcde fghij klmno Column 1 Item 2 Char count 3 1000 Year Month Day Hour Minu te Seco nd Total days Week num ber Day of week Shift code Time count Count Back space etc 123 Sign Logo ABC Delete Insert Over write Calendar count Cancel OK Print spec Print format Back Space HOME Startup Manual Makeup Ink 3 Operation The...

Page 132: ... Ink Edit message 2015 07 07 12 45 Com 0 Stop Message name Column 1 Item 2 Char count 3 1000 A B C D E F G H I J Back space K L M N O P Q R S T Dupli cate Paste U V W X Y Z Space etc Calendar count 123 Sign Logo Delete 1 10 20 Prev item abcde fghij klmno Next item abcde fghij klmno Change Change Insert CCC Over write ABC Print spec Print format Back Cal cond Count cond Apply HOME Startup Manual Ma...

Page 133: ...Over write ABC Print spec Print format Back Cal cond Count cond HOME Startup Manual Makeup Ink Press Count cond The Count conditions screen is displayed 5 Press Previous or Next and change the objective calendar block 6 Press 1st screen 2nd screen or 3rd screen and switch the count conditions screen 7 Count conditions 2015 07 07 12 45 Com 0 Stop Message name Column 1 Item 2 Back 1 10 20 Prev Next ...

Page 134: ...from to Reset 01 down up Direction Prev Next HOME Startup Manual Makeup Ink 2nd screen Count conditions 2015 07 07 12 45 Com 0 Stop Message name Column 1 Item 2 Back 1 10 20 3rd screen 1st screen 2nd screen Count blocks 1 1 CCC Zero suppression Multiplier Enable Disable Prev Next Makeup Ink Apply HOME Startup Manual 3rd screen Press Back 8 Back Count conditions screen switching Count conditions sc...

Page 135: ...eft justified Matches the decimal part of the product to the number of count digits by rounding off Enables zero suppression setting for the last 0 after the decimal point Example 1 230 1 23 When the number of digits of the integer part of the product exceeds the number of digits of the input count character a Count Overflow error is generated When an integer value is set for the count multiplier ...

Page 136: ...em abcde fghij klmno Next item abcde fghij klmno Change Change Insert CCC Over write ABC Print spec Print format Back Cal cond Count cond HOME Startup Manual Makeup Ink 2 Operation Shows the operation sequence when 0 3048 is set for the count multiplier and feet meter converter 1 foot 0 3048 m is performed and the result is printed Input Count C 1 Press Count cond The Count conditions screen is di...

Page 137: ...3 3 5 2 8 3 3 5 2 8 3 2 8 0 8 2 9 9 9 9 9 3 9 3 6 9 9 9 9 9 Digits which cannot be printed are rounded off 3 2 8 0 8 3 9 9 9 9 9 6 9 8 4 1 0 0 0 0 0 Digits which cannot be printed are rounded off 9 9 9 9 9 8 3 0 4 7 9 9 3 9 0 4 3 0 4 7 9 9 Digits which cannot be printed are rounded off 9 9 9 9 9 9 3 0 4 7 9 9 6 9 5 2 3 0 4 8 0 0 Digits which cannot be printed are rounded off Printing example of co...

Page 138: ...nt Count skip 1 Function Skip the character which was set and move to the next count value to print Count skip characters is either one kind of capital alphabetical character small alphabetical character or user pattern Up to 5 characters can be input as Count skip characters The range of each digit to which count character is input may vary however the Count skip character may not exceed the rang...

Page 139: ...pace K L M N O P Q R S T Dupli cate Paste U V W X Y Z Space etc Calendar count 123 Sign Logo Delete 1 10 20 Prev item abcde fghij klmno Next item abcde fghij klmno Change Change Insert CCC Over write ABC Print spec Print format Back Cal cond Count cond HOME Startup Manual Makeup Ink Press Count cond The Count conditions screen is displayed 2 Press Previous or Next and change the objective conut bl...

Page 140: ...tions screen switching Count skip Skip the characters inputted to Count skip then print the next count value See the figure below for print example 6 When the Count character is added overwritten or deleted the confirmation message Changed skip condition shows up on the screen and Count skip character becomes invalid As to Range maximum input either one kind of capital alphabetical character small...

Page 141: ...ntage Sets the ratio of drops used in printing For example ink drop use 1 3 prints at a ratio of 1 in 3 ink drops The 2 ink drops are recovered from the gutter 2 Setting range of ink drop use percentage Model type 1 line 2 lines 3 lines 4 lines 5 lines 6 lines Notes UX B 1 3 to 1 16 1 3 to 1 16 1 4 to 1 16 UX D 1 2 to 1 16 1 2 to 1 16 1 2 to 1 16 1 3 to 1 16 1 3 to 1 16 1 3 to 1 16 Option Up to 1 ...

Page 142: ... B C 1 2 3 A B C 1 2 3 A B C 1 2 3 Direction of transport Example of setting 0 ABC and Direction of transport a a b Printing method Two printing methods are selectable single scan interlaced and mixed A printing method will be automatically selected in accordance with the print format setup and the ink drop charge rule 5 When making interlaced prints perform the following setup i Ensure that the s...

Page 143: ... value of the print start delay can be adjusted so that the time until printing starts will not change When a product speed matching function is provided if the pulse rate division actor is changed the set value of the print start delay can be adjusted so that the time until printing starts will not change Sensor c Direction of transport Print target b Nozzle center a 0 0 2 3 Sensor c Direction of...

Page 144: ...te division Factor that determines the intervals at which the encoder signal is to be recognized The selectable setting ranges from 1 1 to 1 999 When a setting of 1 1 is selected no pulse rate division Factor is effected This feature cannot be activated if the product speed matching feature is disabled Speed compensation UX D E Set to prevent changes in the print position Cannot be set when a Prod...

Page 145: ...screen Disable Enable 0060 None Auto Encoder 0030 HOME Startup Manual Makeup Ink 12 Print Target width Enter Print Target width in mm for Auto Input the length of the place over which the print target is detected The Print Target width setting range is from 0 to 9999 If Print Target width is not entered the print is made with the same interval as when the Speed match ing function is not used Actua...

Page 146: ...t sensor filter Until end of printing can not be used when setting Auto on Product speed matching 15 16 Ink drop charge rule UX D E only There are three rules of Standard Mixed single scan and interlaced and Dot mixed interlaced in the Ink Drop Charge Rule With this function print quality will be better than the case that dot mixture data is printed by the single scan especially when ink drop use ...

Page 147: ...ured only with the condition 2 1 When number of line is two or more All fonts of items in each column are the same 2 When number of line is one The font of items is 12 16 or 18 24 4 Ink drop use is from 1 1 to 1 4 The High speed print mode is not applicable Column 1 Column 2 Column 3 5 8 7 10 5 8 18 24 7 10 5 8 Interlaced 1 line columns with 12 16 or 18 24 font at Dot mixed interlaced will be spli...

Page 148: ...and Second line width of the leading print character The number of unprinted characters that can be inserted is 0 to 32 Necessary conditions for leading character width control No Item Conditions 1 Product speed matching Set to None or Enhance 2 The number of lines Print format Individual setup Overall setup Set the number of rows to 1 row or 2 rows Print format Free layout Not special setting 3 I...

Page 149: ...te character size Leading character width control recommended values Leading character width control Ink drop use 1 1 Ink drop use 1 2 First row width Second row width First row width Second row width 1 6 3 3 2 2 6 3 3 2 3 6 3 3 2 4 5 2 3 2 5 4 2 2 1 6 4 2 2 1 7 4 2 2 1 8 4 2 2 1 9 3 1 1 0 10 3 1 1 0 11 2 1 0 0 12 2 1 0 0 13 2 1 0 0 14 2 1 0 0 15 2 1 0 0 16 2 1 0 0 17 1 0 0 0 18 1 0 0 0 19 1 0 0 0...

Page 150: ...th increase setting Trailing character correction value inter character space character width increase setting 1 Example Print target size 64 mm all digit print width 25 mm number of digits 6 character size 5 7 dots inter character space 2 dots On an individual scan basis 5 2 1 6 2 1 1 64 25 99 84 100 On an individual character basis 6 64 25 15 36 15 Round off the calculation results to the neares...

Page 151: ...ing shows conditions to execute DIN print Conditions for DIN print No Condition 1 All print items are a 1 line setting 2 The character size of all the print items is the same 3 No barcode item 4 No Calendar item 5 Format setup is not free layout Line direction A B C A B C A B C Printing 1 Printing 2 Printing 3 Work DIN printing example Various print setup 2015 07 07 12 45 Com 0 Stop Message name C...

Page 152: ... ink a yellow bar is created Reverse The barcode dot data will be reversed and printed The work color will become the color of the bar The ink color will be that of background When the country code is changed at the Print format screen the country code for all the bar code items in that message is changed to the same value For UPC A input 11 digits including the prefix code at the edit message scr...

Page 153: ...e div Factor settings are easily set Since changes to the set value are immediately reflected in the printing the changes be easily confirmed while printing After setting in character units or mm units fine adjust in scan units When you want to input in mm units input Line speed in the print specifications screen a Previous HMI Adjust print parameters screen Reverse scan printing UX D E only Selec...

Page 154: ...art Delay Scanning Unit Forward Direction Reverse Direction 0 SC 0 SC Scanning Unit SETTINGS LOGIN EDIT ADJUST SAVE OPEN HOME SAMPLE 1 Note If various settings are changed when the printing is performed frequently the faults such as Print Overlap fault Print Data Changeover In Progress V or Invalid Print Start Timing may occur b New HMI Press menu ADJUST The Adjust print parameters screen will be ...

Page 155: ...21 Serial Number Variable 20 Alphanumeric ASCII symbols 30 Variable Count Variable 8 Numeric 91 Company Internal Information Variable 30 Alphanumeric ASCII symbols 310 Net Weight Kilograms Trade Fixed 6 Numeric characters 320 Net Weight Pounds Trade Fixed 6 Numeric characters No Data length Condition 1 Fixed Number of input characters does not match the data length 2 A character other than an inpu...

Page 156: ...keup Ink Com 0 Column 1 Item 1 Char count 0 1000 1 10 20 Next item abcde fghij klmno Back Edit message Stop Message name 2015 07 07 12 45 A B C D E F G H I J Back space K L M N O P Q R S T U V W X Y Z 123 Sign AI Delete Change Change ABC FNC1 Code B Code C Calendar count Dupli cate Paste Space Insert Over write Cal cond Count cond 01 GTIN 10 Batch or Lot Number 11 Production Date 15 Best before Da...

Page 157: ... Change Change ABC FNC1 Code B Code C Calendar count Dupli cate Paste Space Insert Over write Cal cond Count cond Edit message Stop Message name 2015 07 07 12 45 Print spec Print format Apply HOME Startup Manual Makeup Ink Select 11 Production Date from the AI code list 11 YYMMDD is automatically input at the barcode item 2 Press Apply The character string of the print content edit area is display...

Page 158: ...d print quality Technical Manual 6 10 View alarm history Displays the generation status of error and alarm messages 9 3 Circulation control Controls the ink and makeup circulation system Technical Manual 6 2 View software version Displays the name of the registered software 5 4 Comm monitor Displays the description of the serial communications between an external device and the IJ printer Technica...

Page 159: ...e Unit information 1 Functions Displays the unit TYPE FORM serial number login information and ink type Item Description TYPE FORM Displays the TYPE FORM of the unit Serial number Displays the serial number of the unit Ink type Displays the type of ink used Upgrade UX D E only The Upgrade condition can be confirmed by pressing Upgrade 2 Operation Press Unit information in the Maintenance menu 1 ...

Page 160: ...age Displays the deflection voltage in the Ready state Excitation V ref Displays the set excitation V ref value Excitation frequency Displays the nozzle excitation frequency Operation management 2015 07 07 12 45 Back Com 0 Ready Ink operating time Ink alarm time Cumulative op time Print count Ink makeup 1067K S100 A Ink viscosity 100 standard value 100 Ink pressure 0 250 MPa standard value 0 250 A...

Page 161: ...255 MPa Ink Pressure Standard Value 0 255 5 7 kV Deflection Voltage 11 Excitation V ref Range 0 19 68 9 kHz Excitation Frequency 20 Ambient Temperature Correct Range 0 45 0 Print Count Calibrate touch screen coordinates SETTINGS LOGIN EDIT ADJUST SAVE OPEN HOME b New HMI Press menu SETTINGS The Operation management screen is displayed 1 For details of Calibrate touch screen coordinates refer to 7 ...

Page 162: ...e performed by pressing Start printing from the manual control menu when in print ready status In New HMI screens print can also be performed by pressing START PRINTING in print description screen New HMI when in print ready status 2 Operation Verify that the printer is in Standby state Press Test print in the Maintenance menu 1 Press Start printing Printing starts 2 Note Prints repeatedly when th...

Page 163: ... software Controller software Print controller software M Print controller software S English 01 00 01 00 01 00 01 00 01 00 Software name Version Shutdown HOME Manual Makeup Ink 5 4 Confirm the registered software 1 Functions Displays the name and version of the registered software 2 Operation Press View software version in the Maintenance menu 1 ...

Page 164: ...Calendar conditions Substitution rules setting Count conditions Select message Select message Save message Save message Print specifications Print specifications Various print setup Adjust print parameters Print format Print format Adjust inter character space Maintenance Auxiliary functions Manage messages group Create user pattern Calibrate touch screen coordinates Copy data IJP USB Copy data US...

Page 165: ...ications Print format Maintenance Password setup Back access protect access protect access protect access protect access protect access protect access protect HOME Startup Manual Makeup Ink 2 Operation Press Password protection in the maintenance menu The Password protection screen is displayed 1 The yellow items are the setting contents ...

Page 166: ... print values 6 1 Date time setup Sets the current time calendar time and other time information 6 2 Communication environment setup Sets the serial communication values between external device and IJ printer Technical Manual 5 2 Touch screen setup Sets the touch screen values 6 3 Login management Changes the user and sets the password for each user 6 4 6 5 2 Operation Press Environment setup menu...

Page 167: ...e Sets the conditions that print the specified number of times at the specified interval Disabled when Repeat count is 0 Change Character orientation switching signal mode Optional on UX B Sets the forward and reverse character orientation method when performing reverse direction printing The Change mode selection menu is different depending on the Change Character Orientation set value Example As...

Page 168: ...ion along the right margin when printing line 2 and subsequent lines The print position is different for character orientation settings 0 and 2 left justified Aligns the print position along the left margin when printing line 2 and subsequent lines The print position is the same for character orientation settings 0 and 2 3 Reverse print Set for the print position at character orientation 1 and 3 s...

Page 169: ...be set to Enable 2 All print items are 1 line setting 3 The character size of all the print items is the same 4 No count item 5 No bar code item 6 Bold 1 to 4 is set 7 Format setup is not free layout When printing midway through the print contents when any of the following occurred printing is repeated from the first character of the print contents Conditions which return the character to be print...

Page 170: ...p 2nd screen Normal 180 degree rotation HOME Startup Manual Makeup Ink HOME Startup Manual Makeup Ink 2 Operation Press User environment setup in the environment setup menu 1 Change mode Character orientation Reciprocative printing signal OFF ON OFF forward 0 ABC 1 ABC 2 3 OFF reverse 0 ABC 1 ABC 2 3 3 Change character orientation Change mode supplement The character orientation at reciprocative p...

Page 171: ... ABC ABC ABC Reciprocative printing signal and Character orientation When Change Character Orientation Normal and inverted Reciprocative printing signal and Character orientation When Change Character Orientation Character orientation 0 or 3 Order of printing Order of printing Order of printing Order of printing Order of printing Order of printing Order of printing Order of printing Order of print...

Page 172: ...printing signal OFF Reciprocative printing signal ON Reciprocative printing signal OFF order of printing order of printing order of printing order of printing order of printing order of printing A B C A B C A B C A B C A B C A B C Direction of transport Direction of transport Reciprocative printing signal OFF Reciprocative printing signal ON Reciprocative printing signal OFF A B C A B C A B C A B ...

Page 173: ...control is clock stop Clock system Sets 24 hour clock or 12 hour clock 24 hour clock same as current time Makes the time of Clock displayed at the upper right hand corner of the screen the calendar time clock stop Makes an arbitrarily set time the calendar time The Clock current time at the upper right hand corner of the screen is not stopped A time ahead of the current time cannot be set 24 hour ...

Page 174: ...15 year 07 month 07 day 12 hour 45 minute 45 second year OK 07 month day 12 45 45 hour minute second 12 hour clock Press OK to apply the date time setup The current time affects the clock display only when changes are made Calendar character will be printed based on calendar time Cancel Apply HOME Startup Manual Makeup Ink 2 Operation Press Date time setup in the environment setup menu 1 ...

Page 175: ...s set However a confirmation message is never displayed even if the Start Printing button in the Manual Control menu is pressed Display Arabic input method Sets the direction of cursor movement when in Arabic input mode To the left Startup Shutdown M Manual 6 3 Set up the touch screen 1 Functions Sets the touch screen environment values OFF in 3 min Touch screen is turned off if there is no panel ...

Page 176: ...y Keyboard layout ICON Display Clock display format Confirmation window for Manual Control Menu Arabic input method OFF in 3 min ABC QWERTY YYYY MM DD Non display Display Back Disable Enable to the right to the left 2 Operation Press Touch screen setup in the environment setup menu 1 ...

Page 177: ... protection setting in advance The password protection setting can be changed for each user beforehand See the Technical Manual When the administrator sets the login procedure necessary at power on the login user is selected at power on The login history for the last 30 times is displayed on the login history screen 2 Operation a Previous HMI Press Login management in the environment setup menu Th...

Page 178: ...06 09 10 2015 07 05 10 05 2015 07 04 08 15 user2 user9 user2 admin user9 2 9 2 1 9 user name Date time Back Prev Dsp Next Dsp HOME Startup Manual Makeup Ink Enter Press user name user2 A password input window opens 3 Enter the password of user name user2 and press Enter Logs in again using user name user2 and the touch screen returns to the Login management menu 4 Press Login history in the Login ...

Page 179: ...W E R T Y U I O P 4 7 8 9 5 6 1 0 2 3 Enter Password Current User ID user9 SETTINGS LOGIN EDIT ADJUST SAVE OPEN HOME Enter b New HMI Press menu LOGIN The Select login user screen is displayed 1 This icon shows Administrator This icon shows User Press user name user2 A password input window opens 2 The password input window opens Enter The window will close Back space Cursor Shift Enter the passwor...

Page 180: ...ssword setting is protected the password change screen is not displayed A password must be entered when logging in Make the password 12 characters or less 2 Operation Press Login management in the environment setup menu The Login management menu is displayed 1 Press Password setup The Password setup screen is displayed 2 Enter Old password New password and New password reentry 3 Press OK 4 Display...

Page 181: ... group deletion and group number change of group which classifies and manages mes sages 7 2 Create user pattern Creates and edits user patterns saved characters 7 3 Calibrate touch screen coordinates Corrects touch screen and screen coordinate position offset 7 4 Copy data IJP USB Backs up message and user pattern to USB 7 5 Copy data USB IJP Copies backed up data to IJ printer 7 5 Edit standard p...

Page 182: ...ange message number or Change group The screen of each function is displayed Group Sort Switches the message selection method Search conditions Select page Display All Details or Simple list Manage group Message management functions input Message management functions Item Contents Reference Change message name Changes the message name of stored messages 7 1 2 Delete Stored message Deletes stored m...

Page 183: ...earch condition No Message name No Message name SAMPLE01 SAMPLE02 SAMPLE03 SAMPLE04 1 2 3 4 Nor mal Multi ple Area Delete Sto red message Change group Manage group Select page 1 1 De tails Back HOME Startup Manual Makeup Ink Normal See the previous item for a screen example Multiple Area 3 Message selection method 1 3 2 Multiple The message of an arbitrary position can be selected The Delete Store...

Page 184: ...ssage name 2015 07 07 12 45 OK Com 0 Stop Current message name New message name S AMP L E 0 1 Cancel S AMP L E 0 1 HOME Startup Manual Makeup Ink Enter 7 1 2 Changing the message name 1 Functions Changes the message name of a saved message 2 Operation The Manage messages screen is displayed 1 Set Normal selection mode and select the message 2 Press Change message name The Change message name scree...

Page 185: ...oup Manage group Select page 1 1 Dis play ALL De tails Back HOME Startup Manual Makeup Ink Delete Stored Message Confirmation Print data SAMPLE01 will be deleted OK Cancel 7 1 3 Deleting stored messages 1 Functions Deletes stored messages 2 Operation The Manage messages screen is displayed 1 Select the message 2 Press Delete Stored message A Delete Saved Message Confirmation message is displayed 3...

Page 186: ...mber Change group Manage group Select page 1 1 Dis play All De tails Back HOME Startup Manual Makeup Ink 7 1 4 Changing message number 1 Functions Changes the stored number of a stored message Specifies two messages and exchanges stored numbers Group number is assigned to a message name 2 Operation The Manage messages screen is displayed 1 Set Normal selection mode and select the message name Norm...

Page 187: ...r Message name Group No Group name Select the move destination 00 Search condition No Message name No Message name Select page 1 100 Free number De tails SAMPLE01 SAMPLE02 SAMPLE03 SAMPLE04 1 2 3 4 5 6 7 8 9 10 11 12 13 14 15 16 17 18 19 20 Nor mal Prev Dsp Next Dsp Cancel HOME Startup Manual Makeup Ink Select the first message and press Change message number The screen that selects the 2nd messag...

Page 188: ...r Cancel HOME Startup Manual Makeup Ink Manage messages 2015 07 07 12 45 Com 0 Stop Message name Group No Group name 00 Search condition No Message name No Message name SAMPLE03 SAMPLE02 SAMPLE01 SAMPLE04 1 2 3 4 Multi ple Area Nor mal Change mes sage name Delete Sto red message Change mes sage number Change group Manage group Select page 1 1 Dis play All De tails Back HOME Startup Manual Makeup I...

Page 189: ...Ink Group Group name OK undefined GROUP001 GROUP002 GROUP003 GROUP004 GROUP005 GROUP006 GROUP007 GROUP008 GROUP009 0 1 2 3 4 5 6 7 8 9 Prev Dsp Next Dsp Cancel 7 1 5 Changing the group to which a message belongs 1 Functions Changes the group to which a stored message belongs 2 Operation The Manage messages screen is displayed 1 Select the message 2 Press Change group A group list window opens 3 Sp...

Page 190: ...3 4 No ニックネーム No ニッ クネーム Cancel Preview Select message Stop Message name Group No Group name 00 Search condition 2015 07 07 12 45 Change mes sage name Delete Sto red message Change mes sage number Change group Manage group HOME Startup Manual Makeup Ink 7 1 6 Checking the print image of registered print data UX D E only 1 Functions The print image of registered print data can be checked The print ...

Page 191: ...etes a group and the messages belonging to that group 7 2 3 Change group number Changes the group number At messages belonging to that group the group number is changed and the group name is not changed 7 2 4 Group selection methods Item Contents Normal One group can be selected Multiple Multiple groups can be selected Area Two items of the group list can be specified and the groups within that ar...

Page 192: ...Next Dsp HOME Startup Manual Makeup Ink Manage group 2015 07 07 12 45 OK Com 0 Stop Current group name New group name G R OU P 0 0 1 S AMP L E 0 1 Cancel G R OU P 0 0 1 HOME Startup Manual Makeup Ink Enter 7 2 2 Change group name 1 Functions Changes a group name Inputs a new group name 2 Operation The Manage group screen is displayed 1 Set the Normal selection mode and select the group 2 Press Cha...

Page 193: ...ssages Select page 1 5 Back Prev Dsp Next Dsp Multi ple Area Nor mal HOME Startup Manual Makeup Ink Delete Stored Group Confirmation Group GROUP001 will be deleted Also all messages that belong to the group will be deleted O K Cancel 7 2 3 Delete a stored group 1 Functions Deletes a group and the messages belonging to that group 2 Operation The Manage group screen is displayed 1 Select a group 2 P...

Page 194: ...GROUP005 GROUP006 GROUP007 GROUP008 GROUP009 GROUP010 1 2 3 4 5 6 7 8 9 10 GROUP011 GROUP012 GROUP013 GROUP014 GROUP015 GROUP016 GROUP017 GROUP018 GROUP019 GROUP020 11 12 13 14 15 16 17 18 19 20 Nor mal Prev Dsp Next Dsp Select the move destination Change group number Cancel HOME Startup Manual Makeup Ink 7 2 4 Change group number 1 Functions Changes a group number Specifies 2 groups and exchanges...

Page 195: ...oup number Cancel HOME Startup Manual Makeup Ink Manage group 2015 07 07 12 45 Com 0 Stop Message name No Group name No Group name GROUP003 GROUP002 GROUP001 GROUP004 GROUP005 GROUP006 GROUP007 GROUP008 GROUP009 GROUP010 1 2 3 4 5 6 7 8 9 10 GROUP011 GROUP012 GROUP013 GROUP014 GROUP015 GROUP016 GROUP017 GROUP018 GROUP019 GROUP020 11 12 13 14 15 16 17 18 19 20 Change create group name Delete group ...

Page 196: ...ording to the dot matrix Free size allows creation of an arbitrarily sized pattern within horizontal 320 dots x vertical 32 dots Shows the number of characters which can be created UX B UX D E Fixed size 50 messages each dot matrix 200 messages each dot matrix Free size 50 messages 1 Press Create user pattern in the auxiliary functions menu The Create user pattern screen is displayed The 2 red fra...

Page 197: ... Manual Create user pattern 2015 07 07 12 45 Com 0 Stop Pattern Pattern size Hor 16 Vert 16 Cursor position Hor 1 Vert 1 Zoom 1 Clear Back Select Save Dupli cate Paste Move Clear area Invert Rec tangle Rec tangle fill HOME Startup Manual Set the dot matrix and inter character space 3 Press Create Edit The Create Edit screen is displayed Create Edit Changes the display magnification X1 X2 X4 ...

Page 198: ...te Paste Move Clear area Invert Rec tangle Rec tangle fill HOME Startup Manual Set Zoom and change the display magnification of the dot pattern creation area The display magnification of the dot pattern creation area changes 5 Create a pattern at the dot pattern creation area When touched directly the dot shading is reversed Scroll up 8 dots 1 dot Scroll down 1 dot 8 dots Clears the pattern dots Sa...

Page 199: ...n pattern 000 OK Change Change Logo Page count 1 6 Cancel HOME Startup Manual Press Save The save screen is displayed 7 Press OK The pattern is saved When the save destination is specified the saved destination code and pattern are displayed Touch the position on the keyboard to be saved Press to display the next screen OK ...

Page 200: ... A B C D E F G H I J K L M N O P Q R S T U V W X Y Z Space etc 123 Sign Logo Change Change ABC Cancel HOME Startup Manual 7 3 2 Selecting a user pattern 1 Functions Selects a saved user pattern at the Create user pattern screen 2 Operation The Create user pattern screen or Create edit screen is displayed 1 Press Select The select screen is displayed 2 Select the character from user pattern letters...

Page 201: ...ttern of the selected area Invert Inverts the pattern of the selected area Rectangle Draws a rectangle at the selected position Rectangle fill Draws a rectangle at the selected positions and fills its interior Paste pattern When editing free size Duplicates the user pattern pattern of alphabetic numeric or symbol and pastes it to an arbitrary position 2 Operation The Create Edit screen is displaye...

Page 202: ...45 Com 0 Stop Pattern Pattern size Hor 16 Vert 16 Cursor position Hor 16 Vert 16 Zoom 2 Decide the position and press End Dupli cate Paste Move Clear area Invert Rec tangle Rec tangle fill End Cancel HOME Startup Manual Touch the point at which drawing of the rectangle is to end The X mark moves to the touched position 5 Press End The Area of the rectangle with the start position and end position a...

Page 203: ... 2015 07 07 12 45 Com 0 Stop Pattern Pattern size Hor 16 Vert 16 Cursor position Hor 16 Vert 16 Zoom 2 Clear Back Select Save Dupli cate Paste Move Clear area Invert Rec tangle Rec tangle fill HOME Startup Manual Press Apply A rectangle pattern is drawn ...

Page 204: ...2 Create Edit Back Select Save HOME Startup Manual 7 3 4 Creating a user pattern of a free size 1 Functions Creates a user pattern of an arbitrary size The maximum size is horizontal 320 dots x vertical 32 dots 2 Operation The Create user pattern screen is displayed 1 Select Horizontal dot Free A free size Create user pattern screen is displayed 2 Input the vertical dot size and horizontal dot siz...

Page 205: ...al Create a pattern at the dot pattern creation area When touched directly the dot is inverted 5 Press Save The save screen is displayed 6 Press OK The pattern is saved Scroll up 8 dots 1 dot Scroll down 1 dot 8 dots Clears the dots of the pattern Save When a dot was reversed by touching it directly make the display magnification quadruple Scroll rigth 1 dot 8 dots Draws a graphic See 7 3 3 Scroll...

Page 206: ... pattern being edited Use the following conditions to create the bitmap file 1 pixel in the bitmap corresponds to 1 dot in the user pattern In the case of the UX D and UX E the height is up to 48 pixels 2 Operation Conditions of bit map file Item Essential conditions Size Width 1 320 pixels x Height 1 32 pixels Color Monochrome Monochrome bitmap File name bmp must be within 8 digit alphanumeric or...

Page 207: ...ME Startup Manual Create user pattern 2015 07 07 12 45 Com 0 Stop Pattern Dot matrix 5x8 Select bitmap data OK Q W E R T Y U I O P A S D F G H J K L Z X C V B N Space etc 123 Sign Logo Change Change ABC Cancel M HOME Startup Manual Press Select bitmap data OK Select a file from the list of bitmap file 5 Select any file name from the list of bitmap file on the screen Press OK Maximum of 30 file nam...

Page 208: ...e correction 1 Functions Corrects touch screen and screen coordinate position offset 2 Operation a Previous HMI 1 Press Calibrate touch screen coordinates in the auxiliary functions menu The Touch screen coord screen is displayed 2 Press the at the top left and bottom right of the screen until the Touch Screen Coordinate Correction message is displayed The Touch Screen Coordinate Correction messag...

Page 209: ...Correct Range 0 45 0 Print Count Calibrate touch screen coordinates SETTINGS LOGIN EDIT ADJUST SAVE OPEN HOME b New HMI Press menu SETTINGS The Operation management screen is displayed 1 Calibrate touch screen coordinates Press Calibrate touch screen coordinates The Touch screen coord screen is displayed 2 Press the at the top left and bottom right of the screen until the Touch Screen Coordinate C...

Page 210: ... patterns start the copy data function in the stopped state 7 5 Backing up data to USB memory 7 5 1 Copy data all at once 1 Functions Backs up print data and user patterns to USB memory Backed up data can be copied to an IJ printer When copying to an IJ printer the type of data can be selected Data type Contents Print data Includes the print description print format and print specifications set co...

Page 211: ...en is displayed and the data is written to USB memory After backup is complete the screen returns to the auxiliary function menu 3 Remove the USB memory Aux function menu 2015 07 07 12 45 Back Com 0 Stop Manage messages Group Create user pattern Calibrate touch screen coordinates Copy data IJP USB Copy data USB IJP Edit Standard pattern Edit substitution rule Select Languages HOME Startup Manual M...

Page 212: ...older to be copied 99999999 Data type Copy data Print data 0 20 Standard pattern 0 15 User pattern 0 4 Proc Status 0 39 Enable Enable Enable Disable Disable Disable HOME Accessing to USB memory Don t remove USB memory Makeup Ink Press Copy data USB IJP The copy data screen is displayed 3 Select the folder serial number to be copied 4 Select the type of data to be copied 5 Press OK A copying in pro...

Page 213: ...eated in 1 above In case of RX RX2 create a new folder RX 3 KX Create a new folder and change its name to 8 digits serial number under KX folder created in 2 above Create a IJPDATA folder under the folder saved as the 8 digits serial number and copy every backup data file to IJP DATA folder PB Copy the backup serial number folder which is created on PB and rename it as 8 digits number under the PB...

Page 214: ...rs by models when folder to be copied is selected Data to be copied Display color of the serial number KX Blue PX Light green PB Magenta PXR Orange RX RX2 Brown PH Cyan PHC Dark green UX Black 3 PH PHC Copy the backup serial number folder which is created on PH or PHC under the PH or PHC folder created in 2 USB memory UXDAT PH 00000005 00000006 PHC ...

Page 215: ...ied into 3 different classifications as described in Table 2 Table 2 Classifications of Print data No Classifications Display color of Message name on Select message screen 1 Print data created on the upper model can be used as is on the lower model Black 2 Print data created on the upper model can be used on the lower model by correcting a part of Print data setting Brown 3 Print data CANNOT be u...

Page 216: ...ct message correct and confirm the Print data And then please overwrite and use it for printing Display color of Message name on Select message screen changes from Brown to Black Detailed explanation of Classification No 3 Table 2 The conditions of Print data which can NOT be used are described in Table 4 below Table 4 Conditions with which display color of Message name changes to Red on Select me...

Page 217: ...re in consecutive numbers In case Multiple or Area is selected Copy data to any number is NOT available When the plural print data are added to the end and the number of data goes beyond the maximum The empty data space is searched from the first number and the data will be copied there If there is NO space available the data will NOT be copied When the print data with the message name which is th...

Page 218: ... destination Copy method Free space Add column to end Overwrite Normal Multipe Area Message name AABBCC CALEN SHIFT COMMON 1 2 3 4 No USB Message name AABBCC CALEN SHIFT COMMON AABBCC COMMON 1 2 3 4 5 6 No IJP Cancel User pattern HOME Start copy Copying in progress Makeup Ink Press Individual copy Copy individual print data screen is displayed Select Copy method Print data in USB memory Select how...

Page 219: ...a 2015 07 07 12 45 Com 0 Stop Select the copy print data and the copy destination Copy method Free space Add column to end Overwrite Normal Multipe Area Message name AABBCC CALEN SHIFT COMMON 1 2 3 4 No USB Message name AABBCC CALEN SHIFT COMMON AABBCC COMMON 1 2 3 4 5 6 No IJP Cancel User pattern HOME Start copy Makeup Ink 3 Individual Copy data operation for User pattern 1 Insert USB memory into...

Page 220: ...age No 1 6 Horizonal dot Copy method Dot matrix Add column to end Overwrite Normal Multipe Area Copy individual user pattern 2015 07 07 12 45 Stop Fixed Free Shift V Shift V Copying in progress Makeup Ink Press User pattern Copy individual user pattern screen is displayed Select Copy method User pattern in USB memory Select how you select User pattern Start copy 6 Select Copy method and press how ...

Page 221: ...on is the same as the user pattern creation function Pattern edited characters are displayed in blue on the keyboard Create patterns while printing with the user pattern creation function After applying the pattern design use the edit standard character pattern function The original pattern before the change can be recovered 2 Operation 1 Press Edit standard pattern in the auxiliary function menu ...

Page 222: ... E HOME Press OK The pattern is selected 5 Create a pattern at the dot pattern creation area When directly touched the shading of the dot is reversed When a dot was reversed by touching it directly make the display magnification quadruple 6 Press Save The save message screen is displayed Restores the pattern before the change Save Edit ...

Page 223: ...umber Minute Year 2 Insert Over write Space etc Startup Manual 7 7 Editing Substitution Rules 1 Functions Selects the substitution rule Year Month Day Hour Minute Week number and Day of week and inputs and edits the selected substitution rule Inputs and changes the name of the selected substitution rules See 4 10 3 Print by substituting a different character for the date substitution rule 2 Operat...

Page 224: ... screen language from English to another language 2 Operation The Auxiliary function menu screen is displayed Input mode Set value Contents Default You can input Accent marks Greek Russian and Arabic characters Local Language You can input Chinese characters Language1 English Thai Vietnamese only 1 Press Select languages in the auxiliary functions menu The Select language screen is displayed 2 Sel...

Page 225: ...connect the beaker to a ground In addition be sure that the print head is not inserted into the beaker Since the ink particles used in printing are electrically charged if the beaker is not connected to a ground the charge load will gradually increase and cause a fire 8 INK AND MAKEUP REPLENISHMENT Never pour the ink and makeup waste into a sewer etc Have the ink and makeup drainage processed by a...

Page 226: ...ottle avoid strong shock and electromagnetic waves and liquid wetting CAUTION Over cap Ink cartridge bottle When the ink cap was loosened set it after tightening firmly Otherwise the ink may spill when setting the cartridge bottle After removing the over cap do not allow your finger foreign matter or dirt to get into the hole of the ink cap Doing so could cause ink leakage and equipment failure Do...

Page 227: ... mm If there is still ink remaining in the Cartridge bottle do not replace it even if the Remaining Ink Icon indicates replacement This could be due to malfunction on the parts Contact your nearest service station The part may be broken contact your nearest service station If there is no reaction when you hold the cartridge bottle over the reader of the printer the IC tag of the cartridge may be d...

Page 228: ...TDOWN 100 OFFLINE STOP ID User2 Print description 2015 07 07 12 45 Menu Com 0 Stop Ink operating time 100 hours Cumulative op time 100 hours Print count 1000 prints Ink pressure 0 000 MPa standard value 0 255 Change message Select message Overwrite message Adjust print parameters Operation management Message name Current user ID user2 Inter laced Print count reset Startup Manual Makeup Ink Change ...

Page 229: ... so could cause ink to splatter Do not turn the cartridge bottle with the cartridge bottle set in the IJP The ink cap could become loosened and ink may overflow Do not put waste solution in used cartridge bottles Waste solution could spill You should note that used cartridge bottles are not hermetically sealed even when the over cap is mounted If used cartridge bottles are filled with ink or makeu...

Page 230: ...e ink supply port 5 Ink side Pipe Boss If ink has accumulated on the pipe surface wipe it up using wiping paper dampened with makeup CAUTION Set a new cartridge bottle Ink supply port Boss guide Set the boss to the guide If a foreign object such as a screw is found or gets in the ink supply port remove it Be careful not to damage the pipe surface ...

Page 231: ...ever handle Be careful not to get your hand or fingers pinched when pushing down the lever handle See the figure below CAUTION Lever handle The cartridge replacement ink refill is now completed Press OK at the IJ printer guidance screen Pressing OK confirms that ink refill is complete 7 Lever handle Lever handle Push ...

Page 232: ... bottle The cartridge bottle could be dropped Since an IC chip is built into the cartridge bottle avoid strong shock and electromagnetic waves and liquid wetting CAUTION NOTE If the color of icon is Green the makeup cartridge bottle can t be replaced Please set an unopened makeup cartridge bottle or an opened makeup cartridge bottle still has more than half of its content Before makeup cartridge b...

Page 233: ...the ink cap of the ink cartridge bottle or makeup cap of the makeup cartridge bottle Ink or makeup could spill CAUTION If there is still makeup remaining in the Cartridge bottle do not replace it even if the Remaining Ink Icon indicates replacement This could be due to malfunction on the parts Contact your nearest service station The part may be broken contact your nearest service station If the m...

Page 234: ...up Manual Makeup Ink STOP Makeup ID entry 2015 07 07 12 45 Com 0 Enter the Makeup ID of the Makeup cartridge into the entry field below BACK Cancel Enter 1 2 3 4 5 6 7 8 9 0 Q W E R T Y U I O P Z X C V B N Change M A S D F G H J K L Change 補力液ID Makeup ID 開封期限 Expiration date 部品コー ド Parts Code 型 式 ロッ ト LOT Scan here When IC tag reader is not supported Icon Icon If the ID cannot be read because it i...

Page 235: ...d cause ink to splatter Do not put waste solution in used cartridge bottles Waste solution could spill You should note that used cartridge bottles are not hermetically sealed even when the over cap is mounted If used cartridge bottles are filled with ink or makeup and reused ink or makeup could spill CAUTION Tilt the lever handle toward yourself lift and remove the cartridge bottle 4 1 2 3 If the ...

Page 236: ...d position Set the boss provided on the cartridge bottle to the boss guide of the makeup supply port 5 Makeup side Boss If a foreign object such as a screw is found or gets in the makeup supply port remove it CAUTION Set a new cartridge bottle Makeup supply port Boss guide ...

Page 237: ... handle The cartridge replacement makeup refill is now completed Press OK at the IJ printer guidance screen Pressing OK confirms that makeup refill is complete 7 Lever handle Lever handle The IJ printer on which the Makeup Level Sensor Broken 1 Fault appeared the Makeup Cartridge can NOT be replaced until Makeup Low Warning appears CAUTION Full Empty Remaining Makeup Icon Replaceable Makeup level ...

Page 238: ...ing judgment is prompted a confirmation message is displayed When a Fault state which hinders printing was generated while the liquid crystal screen backlighting was off or when a Warning state which does not hinder printing but requires maintenance was generated a fault message or warning message is displayed in a window 1 When a fault was generated a Previous HMI 9 1 Display when warning or faul...

Page 239: ... reservoir is faulty Solution 1 Replace the Ink Cartridge within 60 minutes 2 Check the Low Level sensor No 081 WARNING CLOSE When Close is pressed the warning window is closed but the warning state is not cleared The warning name is displayed in the warning display area see the figure above If the warning state is cleared the warning display is automatically closed 2 When warning was generated a ...

Page 240: ... the main ink tank is faulty Solution 1 Drain proper amount of ink in the main ink tank 2 Check the High Level sensor 3 Contact your local distributor Reset Close HELP Ink Jet Startup Confirmation The ink jet will be turned ON Solution 1 To change the printer status to Ready press Ready 2 To change the printer status to Standby press Eject ink No 050 CONFIRMATION Ready Cancel Eject ink 3 When a mi...

Page 241: ...nu Com 0 Stop Ink operating time 100 hours Cumulative op time 100 hours Print count 1000 prints Ink pressure 0 000 MPa standard value 0 250 Change message Select message Overwrite message Adjust print parameters Operation management Message name Current user ID user2 Inter laced Print count reset Startup Manual Makeup Ink 1 Drain proper amount of ink in the main ink tank Back If the message prompt...

Page 242: ...OFF and then back ON after 10 seconds 7 System operation error M Unexpected error occurred Turn the power OFF and then back ON after 10 seconds 8 System operation error S Unexpected error occurred Turn the power OFF and then back ON after 10 seconds 9 Deflection Voltage Leakage The deflection electrode voltage is too low Clean and dry the deflection electrode and nearby parts 10 Makeup replenishme...

Page 243: ... has a fault Execute system setup 19 Memory Fault op The memory of the option board EZJ130 has a fault Contact your nearest local distributor 20 Memory Fault M The memory data has a fault Contact your nearest local distributor 21 Ink Drop Charge Error Charge control on ink drops has a fault No print or disordered print may occurs Contact your nearest local distributor 22 Internal Communication Err...

Page 244: ...eservoir does not work properly IJ printer will stop the ink jet Contact your nearest local distributor 251 Circulation Route Pressure Is High Circulation route pressure is getting high Contact your nearest local distributor 2 Faults that do not invoke ink stoppage No Message Meaning of message Remedy 35 Model key fault Model key recognition failed Contact your nearest local distributor 37 Languag...

Page 245: ...g A print operation was requested while the print data was being changed Change of either data change or print start 47 Invalid Count Data Change Timing A print operation was requested while the print data was being changed Change of either data change or print start 48 Invalid Print Start Timing The print target detection signal for the next target arrived during the data was being changed Change...

Page 246: ... either print data change or print start 59 Print Data Changeover In Progress V A print operation was requested while the video data was being changed Adjust either the encoder frequency or the pulse rate division factor Change timing of either print data change or print start 60 Communication Buffer Fault The print contents are not in the communication buffer Adjust the print and communication ti...

Page 247: ...print data and operating information may not be saved Contact your nearest local distributor Replace the internal battery in engine section and set the data time 6 2 72 Calendar Content Inaccurate Calendar content is inaccurate due to mal function of the clock Contact your nearest local distributor Set the date time 6 2 External Communication Error nnn The serial communication port had a date erro...

Page 248: ...Failure Language key recognition failed Contact your nearest local distributor 131 Upgrade key Fault Upgrade key recognition failed Contact your nearest local distributor 135 Circulation System Cooling Fan Fault The cooling fan of the circulation system area is faulty Contact your nearest local distributor 136 Inside Temperature Too High The temperature inside the printer is increasing Prease conf...

Page 249: ... 2 3 Other messages No Message Meaning of message Remedy 187 Ink Temperature Correction Notice The selected setup does not allow ink temperature corrections to be made P1 4 Contact your nearest local distributor 200 No Ink Concentration Control The current settings have made ink concentration control unavailable P1 5 Contact your nearest local distributor 201 Print Data Settings Notice Recent chan...

Page 250: ...al Makeup Ink 9 3 When checking the warning and fault generation status 1 Functions The warning or fault message generation time and contents can be viewed A maximum of 90 messages can be displayed When 90 messages are exceeded the messages are closed from the oldest message 2 Operation 1 Press View alarm history in the Manage messages screen The Fault warning screen is displayed Sorted from gener...

Page 251: ...kwash the nozzle 6 4 1 The character height setting is too great Decrease the character height setting 4 14 1 The ink pressure is too low Adjust the ink pressure for the standard value 6 9 1 The ink has deteriorated Replace the ink 6 3 1 3 Varying character height The clearance between the print head and print target has changed Adjust the clearance between the print head and print target Ink and ...

Page 252: ...e prints with the print target clear of deposits The ink pressure has changed Adjust the ink pressure for the standard value 6 9 1 Ink and foreign matter are stuck to the charge and deflection electrodes Clean the charge and deflection electrodes 3 1 2 The flow within the nozzle is restricted Backwash the nozzle 6 4 1 The ink has deteriorated Replace the ink 6 3 1 The excitation V ref value is imp...

Page 253: ...ejection sequence by pressing the Shut down See the Technical Manual 6 4 How to correct ink stream bending and nozzle clogging and correct the problem Check if the print head are dirty See 1 3 Print head cleaning and perform the operation Print overlap fault occurs frequently See 9 When Warning or Fault was generated A fault message is displayed Residual image of characters etc remains on the scre...

Page 254: ...If the emergency lasts for 5 minutes or longer open the print head cover and clean the orifice plate and its surrounding parts and gutter section by pouring makeup over them When resuming operation thoroughly clean the orifice plate and its surrounding parts and gutter section by pouring makeup over them and then initiating ink ejection If the power supply is shut off by a power failure perform th...

Page 255: ...sage storage capacity 2 000 messages depends on data content 300 messages Op Up to 2000 messages depends on data content 150 messages Input signal Print target detection Rotary encoder pulse OP Printing stop Reciprocative printing Remote control Run Stop High voltage ON OFF Reset NPN PNP Selectable Print target detection Rotary encoder pulse NPN PNP Selectable OP Printing stop Reciprocative printi...

Page 256: ...nge message number 7 2 7 6 7 7 Change mode 6 2 6 5 6 6 6 7 Change create group name 7 11 7 12 Character height 3 32 4 78 4 90 9 14 12 1 Character orientation 4 78 4 79 6 2 6 3 6 4 6 5 6 6 6 7 Character width 4 78 4 80 4 81 4 85 4 87 4 90 Chimney 4 25 4 27 4 85 Circulation control 3 21 3 26 5 1 5 7 Clock display format 6 10 Comm Monitor 3 21 5 1 Communication environment setup 3 21 5 7 6 1 6 3 Copy...

Page 257: ...stitution rules 3 21 5 7 7 1 Excitation V update Nozzle test 3 21 3 30 5 1 5 7 6 3 Excitation V ref Warning 6 4 F Fault state 3 26 9 1 Free layout 4 5 4 7 4 9 4 14 4 30 4 37 4 78 4 79 4 85 4 86 4 88 6 3 6 4 7 35 7 36 9 7 Free space 4 16 G Group 3 21 4 7 4 8 4 9 4 11 4 14 4 15 4 16 5 7 7 1 7 2 7 3 7 6 7 9 7 11 7 12 7 13 7 14 7 15 H Handling the nozzle rubber seal 3 17 I ICON Display 6 10 8 2 8 8 In...

Page 258: ... 3 28 4 1 4 12 4 13 4 19 P Password protection 3 12 3 21 5 1 5 8 6 12 Password setup 5 7 6 15 Paste 4 38 4 40 4 53 4 57 7 21 7 26 Print characters one by one 6 4 Print data changeover 4 91 6 3 9 7 9 9 Print Data Settings Notice 9 12 Print format 3 19 3 20 3 35 4 5 4 6 4 7 4 9 4 14 4 20 4 27 4 30 4 79 4 84 4 85 4 86 4 89 5 7 6 3 7 30 7 36 9 9 Print item 4 5 4 20 4 21 4 22 4 23 4 24 4 28 4 30 4 31 4...

Page 259: ...3 21 5 1 5 7 Sort 4 7 4 8 4 9 4 11 4 14 4 15 6 13 7 2 7 43 9 13 Speed compensation 4 81 6 3 Speed compensation fine control 4 81 6 3 Standby state 3 9 3 10 3 11 3 26 5 5 Standby state Ready state switching 3 11 Starting state 3 26 Stop state 1 6 3 26 Stop switch 2 1 3 1 3 13 3 16 Stopping state 3 26 Substitution rule 3 21 4 41 4 42 4 43 4 51 4 52 5 7 6 8 7 1 7 36 7 37 7 43 T Target sensor filter 4...

Page 260: ...13 5 Appendix V Various print setup 3 20 4 6 4 88 5 7 6 2 View alarm history 3 21 5 1 9 13 View software version 3 21 5 1 5 6 W Week No 4 41 4 43 Z Zero suppression 4 42 4 51 4 61 4 67 4 72 4 74 ...

Page 261: ......

Page 262: ...2 L6267 2B ...

Reviews: