background image

User Manual

Model: HILS75204

Interactive Flat Panel Display

75

˝

(74.52˝)

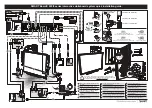
Summary of Contents for HILS75204

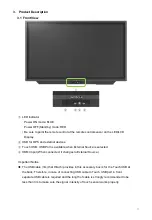
Page 1: ...User Manual Model HILS75204 Interactive Flat Panel Display 75 74 52 ...

Page 2: ...onnection 4 Remote Controller 5 Home Menu Description 5 1 Menu Overview 5 2 OPS 5 3 External Source 5 4 File Manager 5 5 Mirroring 5 6 Drawing 6 Setup Menu Description 7 Product Specification 8 Product Dimensions 9 Troubleshooting 9 1 Product Self Diagnosis 9 2 Before Requesting Service 2 3 5 9 10 11 11 12 15 17 19 19 22 23 24 25 30 42 49 51 52 52 52 ...

Page 3: ...bility of accident or death CAUTION means If you ignore the caution message you may be slightly injured or the product may be damaged NOTE means The note helps you understand and use the product safely Please read the note carefully before using the product 3 This device complies with part 15 of the FCC Rules Operation is subject to the following two conditions 1 This device may not cause harmful ...

Page 4: ...uct when you grab the bottom of the product Recycling Policy For USA Dispose of this product in accordance with applicable environmental laws For product recycling and disposal information contact your local government agency or www eRecycle org in California the TIA at www ecyclingcentral com in the US or the Electronic Product Stewardship Canada at www epsc ca in Canada For more information call...

Page 5: ...erating It may damage the product due to electric shock Only a power cord specified by product manufacturer are recommended Do not use the power cord from other devices It may cause electric shock or fire Hold the plug itself when unplugging the power plug from the wall socket If not there is risk of electric shock or fire Before moving or installing this product be sure to turn off the power and ...

Page 6: ...children to climb on or play on the product or the furniture and stands on which the product is placed Caution Do not allow an impact shock or any objects to fall into the product and do not drop anything onto the screen Make sure the product is turned off unplugged and all cables have been removed It may take more than 4 people to than carry Do not press or put stress on the front panel of the pr...

Page 7: ...sture or other liquids Do not touch the product with wet hands Do not install this product near flammable objects such as gasoline or candles or expose to direct air conditioning NEVER allow children to climb on or play on the product or the furniture on which it is placed It may cause severe injury to children Use only with a cart stand tripod bracket or table specified by the manufacturer or sol...

Page 8: ...al and upright position when moving Hold the top and bottom of the frame firmly Handles are only for the supporting purpose When attaching the stand to the set place the screen facing down on a cushioned table or flat surface to protect the screen from scratches by more than 2 people Make sure that the screws are fastened tightly If they are not fastened securely enough it may tilt forward after b...

Page 9: ...ving mode or screen saver when not in use Due to technological constraints of the Panel manufacturer the images generated by this product may appear either brighter or darker than normal by appr 1ppm parts per million pixel The number of sub pixels of a panel by size The number of Sub Pixels Max Horizontal Resolution x Max Vertical Resolution x 3 For example if the maximum resolution is 1920 x 108...

Page 10: ...ssories contact the local dealer where you purchased your product The illustrations in this manual may differ from the actual product and item Accessory User Manual Warranty Card Pen Tray HDMI Cable USB Cable for TOUCH Power Cable Remote Controller Battery 1 5 V AAA Pen X 2 LCD LED Display 10 ...

Page 11: ...vailable when External Source is selected HDMI Input When connected it changes to External Source Important Notice The USB cable 3m that Hitachi provides in this accessory box is for the Touch USB at the back Therefore in case of connecting USB cable to Touch USB port in front separate USB cable is required and the length of cable is strongly recommended to be less than 3m to make sure the signal ...

Page 12: ...creen menu 3 VGA OPS EXTERNAL HDMI 1 HDMI 2 HDMI 3 DP 4 Volume Up Right 5 Volume Down Left 6 Move Up 7 Move Down 1 Power Switch ON OFF 2 AC IN 100V 240V 50 60Hz 3 HDMI 3 Input 4 HDMI 2 Input 5 HDMI 1 Input 6 Display Port 7 HDMI Output 8 USB For Touch 9 RJ45 LAN 12 Note HDMI 1 has separate USB for Touch located on ...

Page 13: ...SB 2 0 Supports USB cam or camera function 6 USB 3 0 Supports USB cam or camera function 7 LAN OUT 8 LAN IN 9 PC RGB IN 10 PC AUDIO IN 11 SPDIF 12 LINE OUT 9 13 VGA IN L 8Ω RS232C RS232C RJ45 USB FOR TOUCH HDMI 1 ONLY SPEAKER OUT R 8Ω USB 2 0 USB 3 0 PC AUDIO IN SPDIF LINE OUT LAN IN LAN OUT AETSTI005200 10 11 12 ...

Page 14: ...ing you may use the cable holder if necessary SCREW 4x11 Installing an OPS PC There is a slot on for OPS PC When you need to install an OPS PC remove screws and existing cover first and screw up again after mounting OPS PC in the slot AC cord holder ...

Page 15: ...ice to the screen connect the external device and the product with the VGA cable and to transmit an audio signal connect an audio cable in PC AUDIO IN port separately Note 1 Refer to page 23 for how to select the external input source 2 In case of No Signal it might be changed to power saving mode after 10minutes Standard is Off and available to set 10min 15min 3 Speaker Connection To utilize an o...

Page 16: ...232C and LAN standard Simultaneous connection of two standards is not supported Please select RS232C cable or LAN connection The RS232C port will not work once RJ45 is being used Setting Advance Setting RS232C RJ45 select Note How to select RS232C On Off switch RS232C RJ45 ...

Page 17: ...ce Navigates down menu in main OSD menu Navigates input source Navigates to next menu in main OSD menu Navigates to previous menu in main OSD menu OK Select the highlighted menu option MENU Activates main OSD menu EXIT Closes main OSD menu FREEZE Allows you to capture and freeze an image from a moving image that you are watching VOL Volume UP VOL Volume Down MUTE Toggles sound status of speaker 17...

Page 18: ...ix different types of batteries together e g Alkaline Carbon zinc or Rechargeable or old batteries with fresh ones If the device is not to be used for a long period of time remove the batteries to prevent damage or injury from possible battery leakage Do not try to recharge batteries not intended to be recharged they can overheat and rupture Follow battery manufacturer s directions Please use caut...

Page 19: ...een External Source Go to the External Source screen which is connected through the HDMI Port in front File Manager Run move copy or delete folders and files Mirroring Select this button to connect with your smart device Drawing Select the button to use the Drawing writing application equipped on Interactive flat panel display Time Date 19 ...

Page 20: ...Home Menu If you drag the bottom of the screen upwards the hidden Home Menu pops up With the Home Menu you can go to Brightness Volume Back Home Source Setup Swipe up 20 ...

Page 21: ...Bar UI Description Brightness Adjust the brightness Volume Adjust the volume Back Move to the previous screen step Home Go to the home screen Source Call the external input window Setting Go to the Setup 21 ...

Page 22: ... available for adding computing capability to Flat Panel Display Computing modules in the OPS format are available on Intel and ARM based CPUs running operating systems including Microsoft Windows and Google Android 22 Double Tap 5 2 OPS Open Pluggable Specification ...

Page 23: ...External Source Double tap to choose a source 23 5 3 External Source Double Tap ...

Page 24: ...24 5 4 File Manager Create open copy delete and view folders and files Browse by types All files Double Tap ...

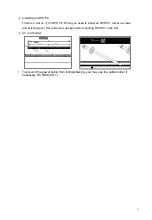
Page 25: ...25 5 5 Mirroring Synchronize screens with smart devices Double Tap ...

Page 26: ...To interwork the devices should be in the same network Download the OS executable file from the following site http d eshare tech 1 Smart phone setting 1 Open PlayStore 2 Search EShare App 3 Download and install EShare App 4 Execute EShare App ...

Page 27: ...Connect ID Storage Contents category Directory Image Music Video Document Remote mode TV Mirror mode Mirroring mode Camera mode 2 Remote mode 1 Remote Screen Mouse pad Virtual touch mode Virtual key mode App mode Volume Control Move Main screen Back Keyboard activation Motion mode ...

Page 28: ...mote button Virtual mouse mode Virtual touch mode App mode Volume Control Move Main screen back Keyboard activation Haptic mode 4 Camera mode 1 2 3 4 5 6 7 8 9 1 2 3 4 5 1 Camera Screen Zoom state Mic Mute Flash Front Back Camera selection Shutter ...

Page 29: ...hare Client exe 3 Share Notebook screen 4 Allows you to control your notebook screen with an interactive LED LCD 5 5 2 Eshare PC users Precondition To interwork the devices should be in the same network Download the OS executable file from the following site http d eshare tech ...

Page 30: ...5 6 Drawing Allows the user to write on screen Can be used for lectures and presentations 30 Double Tap ...

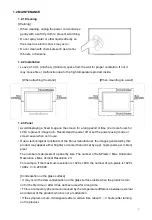
Page 31: ...31 Gestures 1 1 point draw 2 2 point zoom in out adjust the size ...

Page 32: ...e page or choose precision eraser Line Line with customizable and figure Pointer Selects a certain content Undo Undo the most recent action Redo Redo the most recent action Add content Add images saved on the device Previous page Move to the previous page Next page Move to the next page Page Current page Total page Icons on the main screen ...

Page 33: ...saved Save Save the content on the page By default the content is saved in zip format This file can be opened only in Drawing Export Export as Image file png E mail Send to E mail Share QR scan provide images Background Choose the background About View information about the program Exit Close the program ...

Page 34: ...lor Choose one the 9 available colors red white black purple dark blue sky blue green yellow orange Pen The pen can be used immediately with preset line weight and color Preview You can preview the changes as you re making them Marker Pen The marker pen can be used immediately with preset line weight and color Pen ...

Page 35: ...35 Option Description Eraser Erases the content you touch Object Eraser Select the object and remove Sliding Screen Remove all contents by sliding Eraser ...

Page 36: ... preview the changes as you re making them Shape Choose one of the preset shapes circle triangle square octagon You can choose between shape outline or filled solid shape Also 2 line options available solid and dotted Color Choose one of the 9 colors red white black purple dark blue sky blue green yellow orange Line ...

Page 37: ...37 Operation issues 1 Handwriting is too thick Click the pen icon and move the slider to reduce line weight 2 Can t load a file Check if the file extension is zip ...

Page 38: ...38 Gestures 1 2 point long touch Execute the floating annotation ...

Page 39: ...ard Switch to drawing program Capture Screen Capture Make bmp file Eraser Delete selected object All Clear Delete All Pen Switch to Pen Menu Zoom in out Screen Zoom In and Zoom out 100 400 Exit Close Annotation Floating Annotation ...

Page 40: ...itch pen color to black Red color Switch pen color to Red Blue color Switch pen color to Blue thin Line Switch line thickness to thin Middle Line Switch line thickness to middle Thick Line Switch line thickness to thick Back Return to Annotation Menu ...

Page 41: ...41 Zoom Menu Icon Name Description Back Return to Floating annotation menu Zoom in Screen Zoom in maximum 400 Zoom out Screen Zoom out minimum 100 Zoom 100 Screen Zoom 100 Return to normal size ...

Page 42: ...6 Setup Menu Description 6 1 Menu Overview Go to the Setup Menu through one of the following ways Tap Double Tap 42 ...

Page 43: ...e Backlight mode Sound to setup the sound features Lock settings to setup the lock style unlock password Advanced to setup Power option and background image Restore to reset the system System info to check the system information Upgrade to upgrade system F W 43 ...

Page 44: ...There are Standard Energy saver Auto and Custom Mode Users can adjust each value in Custom Mode Backlight less 0 to 100 more of the Backlight Ethernet Setting Set up detailed features of Ethernet WiFi Setting Set up detailed features of WiFi Network State Show network status ...

Page 45: ...eble sound These values can be changed in all modes Balance left 0 to 100 right of the speaker volume balance Volume less 0 to 100 more of the volume 6 4 Sound Lock Style Through selecting the photo you want you can configure the lock screen Unlock password You can set a 4 digit password Automatic locking You can set the time for the locked screen No 10min 15min 30min 45min user defined 6 5 Lock S...

Page 46: ...sic Music 1 Music 2 Boot Channel User can set the start screen when the system powers on Home Force Input Source Remember Input Source Source when select the Force Input Source user can change the Source VGA OPS EXTERNAL HDMI 1 2 3 DP AV YPBPR Boot OPS User can set up whether the OPS automatically powers on when the IFPD powers on System Time User can set up System time and date time zone etc Wall...

Page 47: ...6 7 Restore Restore To reset the system Restore user Setting to reset to user setting Restore Default to reset to factory setting 47 ...

Page 48: ...check the system information CPU GPU Memory Storage Android Version and Software Version 6 9 Upgrade Local Update To upgrade F W insert the USB with the firmware on the back side Bracket for F W update and then select Local Update 48 ...

Page 49: ...ool Hand or other solid object except sharpness Accuracy 2mm Response Time 1 14point 10ms 15 20 point 10ms 20ms Available Touch Point 20 Points Windows 4 Points Mac with driver software 1 Point Mac without driver software Operating Systems Windows 7 8 10 Mac 10 10 10 12 PC Connector USB SIGNAL CONNECTIVITY Connector Front HDMI x1 USB B for touch x1 USB A 2 0ver x1 Rear HDMI 2 0ver x4 Rear x3 Insid...

Page 50: ...RICAL Power Requirement 100 240V AC 50 60 Hz Power Consumption 400W Power Consumption Standby 0 5W Speaker Output 20W 20W Stereo 8 ohms ENVIRONMENTAL Operating Temperature 0 40 ºC 32 104 Storage Temperature 20 60 ºC 4 140 Operating Humidity 20 to 80 RH no condensation OSD FUNCTIONS OSD Language Function English Français Deutsch Spanish Português Italiano Danish Swedish Norwegian Suomi Russian Poli...

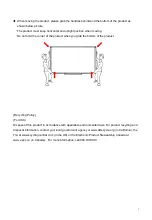
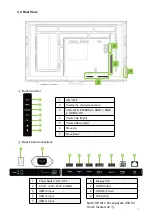
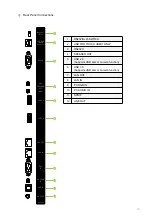
Page 51: ...8 Product Dimensions 51 ...

Page 52: ...ta in the Standard Signal Mode Table 3 Picture rolls vertically Check if the signal cable is securely connected Connect it again securely 4 Image is not clear Picture is blurred Run frequency Coarse and Fine tuning Turn on again after removing all accessories video extension cable etc Set resolution and frequency to the recommended ranges 5 The image is too light or too dark Adjust the Brightness ...

Page 53: ...Rev 001 HAUL ...

Reviews: