background image

1

English

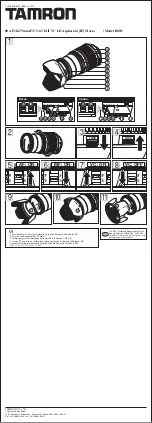
Optional Lens User’s Manual

Important Safety Instructions


 (Always follow these instructions)

Please read this section on important safety instructions before replacing the projector lens. 

To prevent accidents during lens replacement and ensure product safety after replacing the 

lens, be sure to follow the safety instructions described herein.

● These symbols indicate actions that can result in injury or damage if these operations are 

not followed correctly.

 Warning

This symbol indicates that there is a possibility of serious injury 

or even death if the operation is not followed correctly

 Caution

This symbol indicates that there is a possibility of physical 

injury or damage to equipment if the operation is not followed 

correctly.

● These symbols indicate the types of precautions that must followed.

This symbol indicates that 

caution must be taken.

This symbol warns of possible 

high heat.

This symbol warns of possible 

electrical shock.

This symbol indicates an action 

that must not be performed.

Do not look into the lens.

Do not block the projection light.

 Warning

■ Make sure to follow the procedure on lens installation and removal 

for your safety.

■ Please read this manual and manuals for the

projector to ensure correct usage through understanding.

Incorrect usage could result in fire, an injury or damage.

■ Do not subject the device any shock or impact.

Any shock or impact could result in an injury or damage. The lens projects 

out of the device. Take care not to strike it.

Summary of Contents for FL-701

Page 1: ...e is a possibility of physical injury or damage to equipment if the operation is not followed correctly These symbols indicate the types of precautions that must followed This symbol indicates that caution must be taken This symbol warns of possible high heat This symbol warns of possible electrical shock This symbol indicates an action that must not be performed Do not look into the lens Do not b...

Page 2: ...y cause some distortion of the image on the screen depending on the zoom position Distortion may appear on screen if the keystone correction trapezoidal distortion correction is overly adjusted Keystone correction trapezoidal distortion correction may be limited with some lenses Notice Take care of the lens When transporting the lens protect the lens by attaching the lens cap Do not touch the lens...

Page 3: ...When attaching take care so that dust does not enter inside or stick to the connector Continued use with dust inside may result in fire or electric shock If the projector is mounted on a ceiling ask the dealer to replace the lens This can cause injury Caution When replacing the lens do not touch the polarizing plates of the projector or subject them to shocks This can cause damage to the equipment...

Page 4: ...60 CP WU8461 CP X8800 CP WX8650 CP WX8750 CP WU8600 CP WU8700 Zoom Focus Motorized Motorized Lens shift position Vertical CP X8150 1 1 9 1 1 1 CP WX8240 1 1 5 1 1 1 CP X8160 CP X8170 CP SX8350 CP X8800 1 1 9 1 1 1 CP WX8255 CP WX8265 CP WU8440 CP WU8450 CP WU8451 CP WU8460 CP WU8461 CP WX8650 CP WX8750 CP WU8600 CP WU8700 1 1 10 0 1 1 Horizontal CP X8150 CP WX8240 1 1 10 0 0 10 CP X8160 CP X8170 C...

Page 5: ...50 CP WU8600 CP WU8700 Zoom Focus Motorized Motorized Motorized Lens shift position Vertical CP X8150 9 1 1 1 9 1 1 1 9 1 1 1 CP WX8240 5 1 1 1 5 1 1 1 5 1 1 1 CP X8160 CP X8170 CP SX8350 CP X8800 10 0 1 1 9 1 1 1 9 1 1 1 CP WX8255 CP WX8265 CP WU8440 CP WU8450 CP WU8451 CP WU8460 CP WU8461 CP WX8650 CP WX8750 CP WU8600 CP WU8700 10 1 1 1 10 0 1 1 10 0 1 1 Horizontal CP X8150 CP WX8240 10 0 0 10 1...

Page 6: ...ton while the dialog is displayed to execute the CENTERING feature which adjusts the lens to the center A message dialog is displayed for confirmation 3 Pressing the button performs CENTERING Note You can also perform CENTERING in the standby mode by pressing the FUNCTION and LENS SHIFT buttons on the control panel for 3 seconds at the same time 2 Turn off the projector Turn off and unplug the pro...

Page 7: ... the projector You can move the lever while the upper plate touches lower one Lens lock lever Caution Take care to avoid hitting the surface of the lens on the projector when removing the lens as this may lead to malfunction Do not touch the socket of the lens or subject it to impact as this may lead to malfunction ...

Page 8: ... when attaching the lens as this may lead to malfunction Do not touch the connector of the lens or subject it to impact as this may lead to malfunction 2 Support the lens and move the lens lock lever to the upside until the lens lock lever clicks into the locked position Lens lock lever Warning To prevent the lens from falling off after attaching the lens check that it is securely mounted and that...

Page 9: ...ctor body Front cover upper part Lens Installation and Removal Compatible Models For CP X8800 CP WX8650 CP WX8750 CP WU8600 CP WU8700 Lens Installation Procedure 1 Pull out the dust protector knobs to remove it Note Keep the dust protector for future use Dust protector ...

Page 10: ...t cover from the underside and remove the front cover from the projector 3 Install the lens 1 Remove the lens cap Then turn the product label of the lens upward and install the lens in the projector Lens Installation Procedure continued Front cover upper part Lens cap rear Product label ...

Page 11: ...en attaching the lens as this may lead to malfunction Do not touch the connector of the lens or subject it to impact as this may lead to malfunction Lens Installation Procedure continued 3 Install the lens continued 2 Support the lens and move the lens lock lever to the upside until the lens lock lever clicks into the locked position Lens lock lever ...

Page 12: ...Procedure continued Warning To prevent the lens from falling off after attaching the lens check that it is securely mounted and that the lens does not move If the projector falls or topples over it could result in injury or damage to the projector and the surrounding things Front cover lowwer part ...

Page 13: ... for confirmation 3 Pressing the button performs CENTERING Note You can also perform CENTERING in the standby mode by pressing the FUNCTION and LENS SHIFT buttons on the control panel for 3 seconds at the same time 2 Turn off the projector Turn off and unplug the projector and allow the projector to sufficiently cool down 3 Remove the front cover Move and slide the front cover up while pressing th...

Page 14: ... move the lever while the upper plate touches lower one Insert the dust protector to prevent any substance getting into the lens installation area Caution Avoid hitting the surface of the lens on the projector when removing the lens as this may lead to malfunction Do not touch the socket of the lens or subject it to impact as this may lead to malfunction Lens lock lever ...

Reviews: