background image

[SAME FEATURES AS THE CONVENTIONAL MODELS]

Equipped with lithium-ion battery
Flexibly changeable handle
Soft-grip handle
Manual tightening mechanism
21-stage clutch
Lock button
Blow-molded case

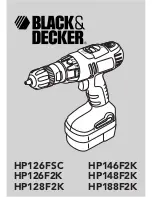
The Model DB 3DL2 is a cordless driver drill equipped with a 3.6 V lithium-ion battery. The Model DB 3DL2 has
the following main features:

(1) Built-in verdischarge protection circuit and overcurrent protection circuit
(2) Equipped with newly developed lithium-ion battery (3.6 V, 1.5 Ah) that can be fully charged in 30 minutes.
(3) Flexibly changeable handle between L shape and straight shape
(4) Lightweight and compact
(5) White LED light
(6) Manual tightening mechanism. Screws are easily tightened manually thanks to the comfortable handle shape

and soft grip.

We aim to expand our market share with the new Model DB 3DL2.

LIST No. H870
June 2010

PRODUCT NAME

Hitachi 3.6 V Cordless Driver Drill

Model


DB 3DL2

• 

Constructing electric facilities, assembling machines and servicing

• 

Tightening and loosening wood screws and machine screws

• 

Drilling into plastic and mild steel

MARKETING OBJECTIVE

APPLICATIONS

SELLING POINTS

[NEW FEATURES]

Built-in verdischarge protection circuit and
overcurrent protection circuit
Lightweight and compact
White LED light

International Sales Division

SPECIFICATIONS AND PARTS ARE SUBJECT TO CHANGE FOR IMPROVEMENT

D

Summary of Contents for DB3DL2

Page 1: ...and straight shape 4 Lightweight and compact 5 White LED light 6 Manual tightening mechanism Screws are easily tightened manually thanks to the comfortable handle shape and soft grip We aim to expand our market share with the new Model DB 3DL2 LIST No H870 June 2010 PRODUCT NAME Hitachi 3 6 V Cordless Driver Drill Model DB 3DL2 Constructing electric facilities assembling machines and servicing Tig...

Page 2: ...tachi koki com manual_view_export Throughout this TECHNICAL DATA AND SERVICE MANUAL a symbol s is are used in the place of company name s and model name s of our competitor s The symbol s utilized here is are as follows Competitors Symbols Utilized Company Name Model Name C DeWalt DC600KA ...

Page 3: ...rmance per Charge 6 PRECAUTIONS ON SALES PROMOTION 7 1 Safety Instructions 7 2 Inherent Drawbacks of Cordless Driver Drills Requiring Particular Attention during Sales Promotion 8 REPAIR GUIDE 10 1 Precautions on Disassembly and Reassembly 10 2 Precautions on Disassembly and Reassembly of the Battery Charger 18 STANDARD REPAIR TIME UNIT SCHEDULES 19 Assembly Diagram for DB 3DL2 ...

Page 4: ... to handle and convenient for operation in narrow spaces White LED light The Model DB 3DL2 is equipped with a white LED light at the tip This light can be used regardless of the handle shape L shape or straight shape Equipped with lithium ion battery The Type EBM 315 lithium ion battery 3 6 V 1 5 Ah can be fully charged by the Model UC 3SFL Battery Charger in just 30 minutes The minus terminal has...

Page 5: ...e for various applications Soft grip handle The handle is soft and slip resistant The end of the handle is also knobbed for a stable grip in manual tightening Manual tightening mechanism The Model DB 3DL2 can be used as a manual screwdriver If a screw cannot be completely tightened with the clutch setting power off the Model DB 3DL2 and use it as a manual screwdriver by simply turning its main bod...

Page 6: ...ANDLING INSTRUCTIONS To activate the main switch lock move the lock switch to the LOCK position see HANDLING INSTRUCTIONS 21 stage clutch The torque can be finely adjusted by the 21 stage clutch Lock button The lock button is provided to prevent inadvertent motor startup even if the switch is mistakenly turned on Blow molded case The compact blow molded case is convenient for carrying the tool ...

Page 7: ... Nominal life Charging discharging Approx 500 times Nominal capacity 1 5 Ah Charging time 30 minutes with standard accessory charger at ambient temperature of 20 C Battery Type EBM 315 Charging temperature 10 C to 40 C 50 F to 104 F Charger Model UC 3SFL Overcharge prevention circuit A thermostat monitors the battery surface temperature and when a rise in temperature is detected after the end of c...

Page 8: ...ated Spindle lock function Equipped Equipped Tool tip mounting system Driver chuck Driver chuck LED light Equipped Equipped Soft grip handle Equipped Equipped Battery type Li ion Ni Cd Nominal capacity 1 5 Ah 1 2 Ah Nominal voltage 3 6 V 3 6 V Battery Charging time 30 min Model UC 3SFL 60 min Overall length 268 mm 10 9 32 295 mm 11 39 64 Straight shape Overall height 45 mm 1 49 64 67 mm 2 41 64 Ov...

Page 9: ...I DB 3DL2 70 6 5 Low speed C 60 6 7 HITACHI DB 3DL2 1000 0 8 High speed C 760 0 8 Working Capacity Without Number of holes or fasteners per charge With Number of machine screws fastened per charge The above table shows an example of test data obtained using the standard battery for this tool As actually measured values listed in the above table may vary depending on sharpness of the drill bit work...

Page 10: ...ed generator will cause the charger to overheat and burn out 4 Do not use any voltage increasing equipment e g transformer between the power source and the charger Using the charger with voltage higher than that indicated on the unit will result in malfunction 5 Conduct battery charging at an ambient temperature range of 10 C to 40 C 50 F to 104 F Special temperature sensitive devices are employed...

Page 11: ...the USA and Canada 2 Inherent Drawbacks of Cordless Driver Drills Requiring Particular Attention during Sales Promotion The cordless driver drill offers many advantages it can be used in places where no power source is available the absence of a cord allows easy use etc However any cordless tool has certain inherent drawbacks Salespersons must be thoroughly familiar with these drawbacks in order t...

Page 12: ...er 6 Precautions on the use of HSS drill bits For example although the Model DB 3DL2 is designed for drilling capacities of 5 mm 13 64 in mild steel this capability is not as efficient as conventional electric power tools In particular the drill tends to become locked when the drill bit penetrates a material For this reason the customer should be cautioned to reduce the thrust on the main body of ...

Page 13: ...e are latches in Housing A B Set 33 it is hard to open Open Housing A B Set 33 from the Shift Knob 38 side After opening Housing A B Set 33 all internal parts of the drive unit can be removed Pull out the drive unit consisting of the gear unit Motor DC 3 6V 31 and power supply unit 3 Disassembly of the drive unit internal parts 1 Remove the Shift Arm 13 from the Gear Box Ass y 1 2 Pull up the Moto...

Page 14: ...r into the groove at an angle Fig 1 2 Press down Washer D 4 with the small flat blade screwdriver Fig 1 3 Slide the small flat blade screwdriver under one side of the gap of the Retaining Ring 3 Fig 1 4 Slowly raise the retaining ring using the end face of Guide Sleeve A 6 as a fulcrum 3 Disassembly of the clutch unit Remove the Clutch Dial 7 after removal of Guide Sleeve A 6 Turn the Nut 8 counte...

Page 15: ...hould be given to the following items 1 Reassembly of the power supply unit 2 Reassembly of the clutch unit 1 Mount Washer D 10 and the Spring 9 to the Gear Case 12 2 Mount the Nut 8 to the Gear Case 12 Align register mark i on the Nut 8 with the register mark on the Gear Case 12 Turn the Nut 8 about 1 1 12 turns clockwise so that register mark ii on the Nut 8 is aligned with the register mark on ...

Page 16: ... 16 is aligned with the concave portion of the Gear Case 12 At this time mount the Lock Ring 16 so that the stepped protrusion faces forward 2 Mount the Needle Roller Set 6 pcs 17 NOTE Do not apply grease to the Lock Ring 16 and Needle Roller Set 6 pcs 17 4 Reassembly of the deceleration mechanism 1 Apply a sufficient amount of grease Hitachi Motor Grease No 29 to the engaging portions of each gea...

Page 17: ...or DC 3 6V 31 and Switch W Lock 41 Insert the red marked terminal of the Motor DC 3 6V 31 into the terminal on the lock switch side of the Switch W Lock 41 At this time insert each terminal of the Motor DC 3 6V 31 between the terminal and the convex portion of the Switch W Lock 41 2 Mount the Motor Spacer 30 to the Motor DC 3 6V 31 with the two Machine Screw W Sp Washer M2 6 x 6 32 Do not mistake ...

Page 18: ...ear 25 Pay attention to the direction of the Gear Case 12 Do not mount the Shift Arm 13 facing downward 6 Mounting the Clutch Dial to the Gear Case The Nut 8 has three protrusions One of these protrusions is wider than the others The Clutch Dial 7 has three concave portions One of these concave portions is wider than the others Mount the Nut 8 to the Clutch Dial 7 by aligning the wider protrusion ...

Page 19: ...n the ribs of Housing A B Set 33 3 Mount the drive unit to Housing A B Set 33 Put the internal wires of the LED and Switch W Lock 41 through the rib of the housing 4 Close Housing A B Set 33 and mount the Handle Cover 39 Tighten the four Pan Hd Tapping Screw D3 x 8 34 5 Mount the two Click Plate 37 to Housing A B Set 33 and apply grease Hitachi Motor Grease No 29 ...

Page 20: ...g to step 2 Reassembly of the clutch unit 2 8 Reassembly of the handle unit Mount either of Handle A B Set 50 to Housing A B Set 33 Fit the Printed Circuit Board 45 Terminal 46 and Terminal Support 47 in the grooves of the handle Mount the Button 44 to the switch of the Printed Circuit Board 45 and close Handle A B Set 50 Tighten the Tapping Screw W Flange D4 x 20 Black 43 Mount the two Clip 49 to...

Page 21: ...ft Knob 38 according to step 5 Reassembly of the drive unit 3 3 Check that the LED goes on and off by pushing the Button 44 Although the LED cannot react when turned on off too quickly this is no failure 4 Check for flexible change of the handle between the L shape and straight shape Machine Screw W Sp Washer M2 6 x 6 32 0 1 to 0 29 N m 1 to 3 kgf cm Pan Hd Tapping Screw D3 x 8 34 0 49 to 0 64 N m...

Page 22: ...et Click Plate Guide Sleeve Set Motor Shift Knob Switch Gear Box Ass y Clutch Dial Nut Spring Gear Case Shift Arm Lock Ring Carrier Planet Gear C Set Ring Gear Pinion C Planet Gear B Set Slide Ring Gear Pinion B Planet Gear A Set First Ring Gear Housing A B Set STANDARD REPAIR TIME UNIT SCHEDULES ...

Page 23: ... 10 11 12 18 13 14 15 16 17 34 35 19 20 21 22 23 24 25 26 27 28 29 32 30 31 33 34 42 37 36 43 40 44 41 38 46 39 36 37 49 50 1 2 47 48 45 501 501 502 503 Model DB 3DL2 CORDLESS DRIVER DRILL LIST NO H870 E1 2010㨯6㨯14 ...

Page 24: ... 326 RING GEAR 1 22 326 328 WASHER B 2 23 332 768 PINION C 1 24 332 766 PLANET GEAR B SET 3 PCS 3 25 332 767 SLIDE RING GEAR 1 26 332 765 PINION B 1 27 326 335 PLANET GEAR A SET 3 PCS 3 28 326 334 FIRST RING GEAR 1 29 332 764 WASHER A 1 30 332 763 MOTOR SPACER 1 31 332 755 MOTOR DC 3 6V 1 32 330 755 MACHINE SCREW W SP WASHER M2 6 X 6 2 33 332 754 HOUSING A B SET 1 34 984 319 PAN HD TAPPING SCREW D...

Page 25: ...RIPTION REMARKS 48 326 263 BATTERY EBM 315 USA CAN 2 48 330 757 BATTERY EBM 315 CHN 2 49 326 318 CLIP 1 50 332 752 HANDLE A B SET GREEN 1 50 332 588 HANDLE A B SET BLACK 1 6 10 3 ALTERNATIVE PARTS NO USED CODE NO ITEM NO ...

Page 26: ...B NO 1 50L 1 603 992 672 DRIVER BIT B NO 3 50L 1 604 992 675 DRIVER BIT B 4MM X 50 1 605 992 676 DRIVER BIT B 5MM X 50 1 606 992 677 DRIVER BIT B 6MM X 50 1 607 321 823 DRILL CHUCK AND ADAPTER SET 1 INCLUD 608 609 608 307 543 CHUCK ADAPTER 1 609 987 575 CHUCK WRENCH FOR 10VLB D 10VLR D 1 4 Printed in Japan 6 10 100614N ALTERNATIVE PARTS STANDARD ACCESSORIES NO USED CODE NO ITEM NO NO USED CODE NO ...

Reviews: