background image

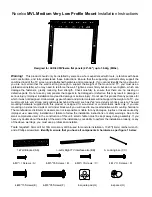
Parts Configuration Chart

Confirming the parts provided

Before assembly,

check to make sure that none of the parts provided are missing.

Hitachi Plasma Display Tabletop Stand

Model

CMPAD06

Installation Instructions

Thank you for purchasing the Hitachi Plasma Display Table top Stand.

To ensure correct usage, please read this instruction manual thoroughly. After reading, please store this

manual in a safe place for future reference.

This plasma display tabletop stand is for use only with the following model:

CMP5000WX

Request an installation specialist to install this unit.

This company assumes absolutely no responsibility for injuries and damages that may occur due to improper

installation and handling.

• Stand pipes

(left and right, interchangable) x 2

• Base cover x 1

• Hexagonal wrench x 1

• Screws (4 x 8) x 4

• Installation bolts 1

(M8 x 20) x 2

• Installation bolts 2

(M8 x 40) x 2

• Stabilization bolts x 2

Summary of Contents for CMPAD06

Page 1: ...roughly After reading please store this manual in a safe place for future reference This plasma display tabletop stand is for use only with the following model CMP5000WX Request an installation specialist to install this unit This company assumes absolutely no responsibility for injuries and damages that may occur due to improper installation and handling Stand pipes left and right interchangable ...

Page 2: ...quired general CAUTION WARNING Always use at least two people to perform the installation work Injury could result from dropping heavy objects Use the specified bolts and screws in the specified places and tighten firmly Failure to do this could cause injury if the plasma display falls Avoid installing in locations where the temperature and humidity are excessively high and where contact with wate...

Page 3: ...e plasma display housing At this point tighten these bolts 1 only until the threads are no longer visible when viewed from t he side you will be unable to attach the display if the bolts are screwed in completely Plasma display Installation bolt 1 M8 x 20 Holes a holes in center of plasma display Installation bolt 1 Plasma display housing Stop screwing down the bolt when the threads are no longer ...

Page 4: ...he stand so that the stand screw holes and the nuts that connect the main display line up correctly The display is a 50 model that weighs approximately 40 kilograms 88 lb and has little depth making the display very unstable For this reason at least two people are required for setup and installation Notes Stand attaching to the Plasma Display Installation bolts 2 M8 x 40 Step 3 Table top stand Sli...

Page 5: ...bilize the display by connecting to a wall or standing beam with a strong cord Repeat the same steps in the laterally direction to stabilize the assembly to the left and right Use cord and hooks that are available on the market sold separately 1 2 Installation coordinates for screws used to stabilize the stand to the floor When stabilizing the stand to the floor use M6 with a length above 20 mm 25...

Page 6: ...50 inch plasma display is attached Main material Surface treatment Steel sheet ABS Dimensions Diagram 774 150 220 339 508 566 1218 774 150 220 1368 566 1218 339 508 Normal use without optional speakers Optional speakers attached to both sides of display Speaker Speaker Digital Media Division 292 Yohida cho Totsuka ku Yokohama 244 0817 Japan 045 866 6302 ...

Reviews: