INSTALLATION AND OPERATION MANUAL
MANUAL DE INSTALACIÓN Y FUNCIONAMIENTO
INSTALLATIONS- UND BETRIEBSHANDBUCH
MANUEL D’INSTALLATION ET DE FUNCTIONNEMENT
MANUALE D’INSTALLAZIONE E D’USO
ENGLISH
ESPAÑOL
DEUTSCH
FRANÇAIS
ITALIANO
PORTUGUÊS
DANSK
NEDERLANDS
SVENSKA
MANUAL DE INSTALAÇÄO E DE FUNCIONAMENTO
BRUGER- OG MONTERINGSVEJLEDNING
INSTALLATIE- EN BEDIENINGSHANDLEIDING
HANDBOK FÖR INSTALLATION OCH ANVÄNDING
ΕΓΧΕΙΡΙΔΙΟΕΓΚΑΤΑΣΤΑΣΗΣΚΑΙΛΕΙΤΟΥΡΓΙΑΣ
- Read and understand this manual before performing any operation with the unit. Keep this manual for future reference.
Lea detenidamente este manual antes de realizar ninguna operación con la unidad. Guarde el manual para futuras consultas.
Lesen Sie dieses Handbuch gründlich durch, bevor Sie das Gerät in Betrieb nehmen. Bewahren Sie dieses Handbuch für in der Zukunft
eventuell auftretende Fragen oder Probleme auf.
Lisez avec attention le contenu de ce manuel avant de réaliser toute opération avec l'unité. Conservez-le afin de pouvoir vous y référer
ultérieurement.
Leggere e comprendere il presente manuale prima di eseguire eventuali operazioni con l'unità. Conservare il presente manuale per una
consultazione futura.
Leia e compreenda este manual antes de executar qualquer operação com a unidade. Guarde este manual para referência futura.
Læs denne vejledning grundigt igennem, inden du anvender enheden. Gem denne vejledning til fremtidig brug.
Lees deze handleiding zorgvuldig door voordat u een handeling uitvoert met het apparaat. Bewaar deze handleiding voor naslag.
Läs noga igenom den här handboken innan du börjar använda enheten. Spara handboken för framtida bruk.
.
.
-
-
-
-
-
-
-
-
-
Διαβάστε προσεκτικά αυτό το εγχειρίδιο πριν εκτελέσετε οποιαδήποτε λειτουργία με αυτήν την μονάδα Κρατήστε το εγχειρίδιο για μελλοντική
αναφορά
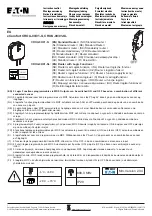
M
ODELS
:
CH-6.0N1
CH-10.0N1
E
HNIKA
VV
CH
-
UNIT