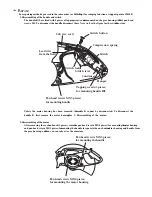
background image

CC 16SB

Cut-Off Machine
Tronzadora

Read through carefully and understand these instructions before use.
Leer cuidadosamente y comprender estas instrucciones antes del uso.

Handling instructions

Instrucciones de manejo

 001Cover_CC16SB_Eng_Spa

1/30/09, 9:56

3

Summary of Contents for CC 16SB

Page 1: ...onzadora Read through carefully and understand these instructions before use Leer cuidadosamente y comprender estas instrucciones antes del uso Handling instructions Instrucciones de manejo 001Cover_CC16SB_Eng_Spa 1 30 09 9 56 3 ...

Page 2: ...1 3 7 6 5 8 4 2 1 9 1 2 3 4 5 C D F G E 8 6 9 0 9 0 6 7 7 A B 00Table_CC16SB_Eng_Spa 1 30 09 9 57 1 ...

Page 3: ...erra Direction of A Dirección de A Direction of B Dirección de B When setting at an Al ajustar a un ángulo angle of 90 de 90 When setting at an Al ajustar a un ángulo angle of 60 de 60 When setting at an Al ajustar a un ángulo angle of 45 de 45 Stationary vise jaw Mordaza de tornillo fija M16 bolt Perno M16 M8 bolt Perno M8 M10 nut Tuerca M10 Nylon clip Clip de nylon Shaft Eje Leg Pata 00Table_CC1...

Page 4: ... lubrication and changing accessories Inspect tool cords periodically and if damaged have it repaired by authorized service center Inspect extension cords periodically and replace if damaged Keep handles dry clean and free from oil and grease 15 Disconnect tools When not in use before servicing and when changing accessories such as blades bits and cutters 16 Remove adjusting keys and wrenches Form...

Page 5: ...0 220 230 240 380 400 415 440 Full load current 2 2KW 9 9 8 9 8 5 8 0 4 9 4 6 4 8 4 4 4 8 4 3 50 60Hz 3 7KW 15 8 14 5 13 12 5 8 0 7 9 7 2 8 0 6 8 Cut off Type Reinforced resinoid cut off wheel wheel Dimensions Outer diameter 405 thickness 2 8 arbor hole diameter 25 4 mm Maximum working 3800 m min peripheral speed No load speed 2290 2730 min 50 60Hz 2430 2900 min 50 60Hz No load peripheral 2910 347...

Page 6: ...M16 bolt then mount the wheel by following the dismounting procedure in reverse order Always install the washers 2 After clamping the 16 mm clamping bolt is completed always mount the sub cover CUTTING PROCEDURES CAUTION It is dangerous to remove or install the workpiece while the cut off wheel turning 1 Grip the cutting material steady with a vise Should gripping be insufficient it will lead to t...

Page 7: ...ensure smooth shaft rotation Fig 9 Machine oil is suitable 8 Cleaning Occasionally use a cloth to wipe off chips and dust from the machine body 9 Service parts list CAUTION Repair modification and inspection of Hitachi Power Tools must be carried out by an Hitachi Authorized Service Center This Parts List will be helpful if presented with the tool to the Hitachi Authorized Service Center when requ...

Page 8: ...tener el cable alejado del calor aceite y bordes agudos 12 Asegurar la pieza de trabajo usando para ello abrazaderas o un tornillo Esto es más seguro que usar las manos además ambas manos quedan libres para operar la herramienta 13 No extenderse excesivamente para efectuar un trabajo Mantener en todo momento un buen balance y base de apoyo 14 Mantener cuidadosamente las herramientas Tenerlas siemp...

Page 9: ...rtando sólo cuando las revoluciones del motor alcancen plena velocidad 4 Cuando observe una anomalía desconecte el interruptor 5 Utilizar la rueda cortadora normal con su superficie de trabajo normal 6 Portegerse de las chispas Item Salida del motor 2 2 KW 3 7 KW Motor Tipo Motor de inducción trifásico Fuente eléctrica Corriente alterna trifásica 50 60Hz Tensión V 200 220 230 240 380 400 415 440 C...

Page 10: ...dora Aunque se ha apretado completamente en fábrica antes de su entrega vuelva a apretar los tornillos de instalación bien para su seguridad PRECAUCION Confirme que la cubierta protectora cubierta de la rueda está bien instalada 4 Confirmar la tensión de la correa Determinar que la tensión de la correa es adecuada PRECAUCION Una tensión excesiva dañará el motor y una tensión insuficiente hará que ...

Page 11: ...hacer esto provocaría un riesgo serio 3 La máquina de corte comienza a girar y a cortar inmediatamente cuando el interruptor se gira a ON encendido Aunque este diseño es práctico se producirán riesgos si se manipula erróneamente Desconecte siempre el cable eléctrico del receptáculo de línea tras su utilización Tras finalizar cada trabajo de cortado guarde la máquina en un lugar seco fuera del alca...

Page 12: ...11 03Back_CC16SB_Eng_Spa 1 30 09 9 57 11 ...

Page 13: ... B 1 49 SPRING WASHER M8 2 50 BOLT M8 16 2 51 SPRING WASHER M10 4 52 NUT M10 4 53 MOTOR COVER 1 54 NUT M4 2 55 BOLT M10 35 4 56 BOLT WASHER M10 6 57A ARM 1 58 BOLT WASHER M4 1 59 HEX SOCKET SET SCREW M8 20 1 60 SPRING 1 61 WHEEL COVER 1 62 FELT PACKING 1 63A HITACHI LABEL 1 64 SPRING WASHER M6 3 65 MACHINE SCREW M6 16 3 66 SUB COVER 1 67 WING BOLT M6 10 2 68 BOLT WASHER M16 1 69 SPRING WASHER M16 ...

Page 14: ...13 03Back_CC16SB_Eng_Spa 1 30 09 9 57 13 ...

Page 15: ...14 03Back_CC16SB_Eng_Spa 1 30 09 9 57 14 ...

Page 16: ...901 Code No H99299041 N Printed in Japan Hitachi Koki Co Ltd 03Back_CC16SB_Eng_Spa 1 30 09 9 57 15 ...

Reviews: