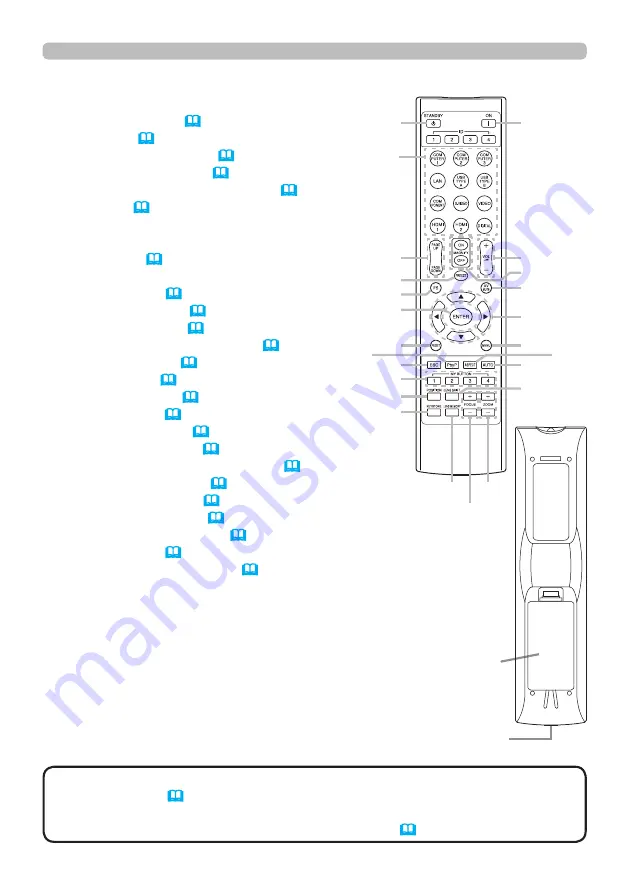
background image

1

Introduction

Part names 

• Any button marked with “*” is not supported on this projector 

(

User's 

Manual (detailed)

119

)

.

• Each time you press any button (except 

ID

 buttons), the 

ID

 button of current 

selected ID number will light 

(

User's Manual (detailed)

17

)

.

NOTE

Back of 

the remote control

Remote control 

(1) 

STANDBY

 button (

2

)

(2) 

ON

 button (

2

)

(3) 

ID - 1

 / 

2

 / 

3

 / 

4

 buttons (

3

)

(4) 

INPUT PORTS

 button (

3

(5)  

PAGE UP

 / 

PAGE DOWN

 buttons (

4

)

(6) 

F5

 button (

4

)

(7) 

ENTER

 button

(8) 

RESET

 button

(9) 

ESC

 button (

4

)

(10) ▲/▼/◄/►cursor buttons

(11) 

MENU

 button (

5

)

(12) 

VOL +

 / 

-

 buttons (

6

)

(13) 

AV MUTE

 button (

6

)

(14) 

MAGNIFY ON

 / 

OFF

 buttons (

7

)

(15) 

FREEZE

 button (

8

)

(16) 

PbyP

 button (

9

)

(17) 

ASPECT

 button (

10

)

(18) 

AUTO

 button (

11

)

(19) 

POSITION

 button (

11

)

(20) 

KEYSTONE

 button (

12

)

(21) 

MY BUTTON - 1

2

3

4

 buttons (

13

)

(22) 

FOCUS +

 / 

-

 buttons (

14

)

(23)

 ZOOM +

 / 

-

 buttons (

14

)

(24) 

LENS SHIFT

 button (

14

)

(25) 

LENS MEMORY

 button (

15

)

(26) Battery cover (

16

)     

(27) Wired remote control port (

17

)

(1)

(4)

(5)

(15)

(6)

(7)

(8)
(9)

(21)

(19)

(20)

(2)

(12)

(14)

(13)

(10)

(11)
(18)
(24)

(26)

(25)


(23) 

 (22) 

(16)

(17)

(27)

Summary of Contents for 8000 Series

Page 1: ... button 3 5 PAGE UP PAGE DOWN buttons 4 6 F5 button 4 7 ENTER button 8 RESET button 9 ESC button 4 10 cursor buttons 11 MENU button 5 12 VOL buttons 6 13 AV MUTE button 6 14 MAGNIFY ON OFF buttons 7 15 FREEZE button 8 16 PbyP button 9 17 ASPECT button 10 18 AUTO button 11 19 POSITION button 11 20 KEYSTONE button 12 21 MY BUTTON 1 2 3 4 buttons 13 22 FOCUS buttons 14 23 ZOOM buttons 14 24 LENS SHIF...

Page 2: ...y of the projector s openings Do not touch around the lamp cover and the exhaust vents during use or just after use since it is too hot WARNING 1 Press the STANDBY ON button on the projector or the STANDBY button on the remote control The message Power off will appear on the screen for about 5 seconds Turning off the power 2 Press the STANDBY ON or STANDBY button again while the message appears Th...

Page 3: ...will light To confirm the projector s current ID press any ID button for 3 seconds Its number will be shown on each screen regardless of set ID of projector NOTE ID buttons Selecting an input signal 1 Press COMPUTER 1 2 LAN USB TYPE A B HDMI 1 2 COMPONENT S VIDEO or VIDEO button on the remote control The port corresponding to each button is selected as below Button Ports COMPUTER 1 COMPUTER IN1 CO...

Page 4: ...on 2 PAGE DOWN key Press PAGE DOWN button 3 Mouse left button Press ENTER button 4 Move pointer Use the cursor buttons and 5 ESC key Press ESC button 6 Mouse right button Press RESET button 7 F5 key Press F5 button Improper use of the simple mouse keyboard function could damage your equipment While using this function please connect this product only to a computer Be sure to check your computer s ...

Page 5: ...ED MENU Each of these menus is operated using the same methods While the projector is displaying any menu the MENU button on the projector works as the cursor buttons The basic operations of these menus are as follows In the EASY MENU 1 Use the cursor buttons to select a menu If you want to change it to the EASY MENU select the EASY MENU The items in the menu appear on the right side 2 Press the c...

Page 6: ...s Manual detailed 58 1 Press AV MUTE button on the remote control The BLANK screen will be displayed instead of the screen of input signals and the sound from the AUDIO OUT port will be muted Please refer to the BLANK item in SCREEN menu about the BLANK screen User s Manual detailed 60 To exit from the AV MUTE mode and restore the screen and audio press AV MUTE button again If you wish to have a b...

Page 7: ...display magnification of the projector switches in order with every press of the MAGNIFY ON button For computer signals HDMITM RGB signals input signals from the LAN USB TYPE A or USB TYPE B ports 1 5 times 2 times 3 times 4 times 1 time For video signals s video signals component video signals or HDMITM Component signals 1 5 times 2 times 1 time While the triangles are displayed on the dialog use...

Page 8: ...hich the picture is frozen To exit the FREEZE mode and restore the screen to normal press the FREEZE button again Temporarily freezing the screen If you wish to have a blank screen while the projector s lamp is on use the lens shade function above or the AV MUTE function User s Manual detailed 25 Taking any other action may cause the damage on the projector CAUTION FREEZE button SHADE button The p...

Page 9: ... the PbyP button on the remote control This acctivates the PbyP mode Then press the PbyP button again The projector goes into PinP mode The screen displayed before the PbyP button was pressed will be displayed as the main area Most of operations are effective for the main area only Only outputs the audio input signal paired with the picture input signal for the main area To quit the PinP mode pres...

Page 10: ...om the LAN USB TYPE A or USB TYPE B ports or if there is no signal CP X8170 4 3 fixed CP WX8265 CP WU8460 16 10 fixed 1 Press ASPECT button on the remote control Each time you press the button the projector switches the mode for aspect ratio in turn For an HDMITM signal CP X8170 NORMAL 4 3 16 9 16 10 14 9 CP WX8265 CP WU8460 NORMAL 4 3 16 9 16 10 14 9 NATIVE ASPECT button ASPECT button does not wo...

Page 11: ...rtical position the horizontal position and the horizontal phase will be automatically adjusted Make sure that the application window is set to its maximum size prior to attempting to use this feature A dark picture may still be incorrectly adjusted Use a bright picture when adjusting For a video signal and s video signal The video format best suited for the respective input signal will be selecte...

Page 12: ...he screen corners and sides to correct the distortion To correct the distortion of projected screen you can select one of three options AUTO MANUAL and PERFECT FIT First press the KEYSTONE button to display the KEYSTONE menu and point at one of items with the buttons Correcting the distortion Then follow the procedure shown below for the item you selected KEYSTONE button KEYSTONE button Remote con...

Page 13: ...sed When no data is saved in memory the dialog No saved data appears When the current adjustment is not saved to memory the dialog as shown in the right appears If you want to keep the current adjustment please press the button to exit Otherwise loading a data will overwrite the current adjusted condition ACTIVE IRIS Changes the active iris mode User s Manual detailed 48 PICTURE MODE Changes the P...

Page 14: ... set to the center Press the LENS SHIFT button again to exit the LENS SHIFT function CENTERING Press the ENTER or INPUT button while the dialog is displayed to execute the CENTERING feature which adjusts the lens to the center A message dialog is dis played for confirmation Pressing the button performs CENTERING You can also perform CENTERING in the standby mode by pressing the FUNCTION and LENS S...

Page 15: ...o 3 number of the lens memory and press the or ENTER button Remember that the current data being stored of a memory will be lost by saving new data into the memory LOAD To recall stored adjustments select one of the LOAD options numbered 1 to 3 number of the lens memory and press the or ENTER button Remember that the current adjusted condition will be lost by loading data If you want to keep the c...

Page 16: ...h care and use them only as directed Improper use may result in battery explosion cracking or leakage which could result in fire injury and or pollution of the surrounding environment Be sure to use only the batteries specified Do not use batteries of different types at the same time Do not mix a new battery with used one Make sure the plus and minus terminals are correctly aligned when loading a ...

Page 17: ...rol You can utilize this projector as a remote control relay with the REMOTE CONROL IN and OUT ports To connect the wired remote control or another projector to the REMOTE CONTROL IN or OUT ports use audio cables with 3 5 mm diameter stereo mini plugs This function is useful when a wireless remote signal may not reliably reach the projector NOTE Speakers with an amplifier Wired Remote control Moni...

Reviews: