background image


Using the Hitachi 3400-N VP-SEM 

Before You Begin: 

Sign in on the Calendar


(we are pretty strict about this).


Wear gloves


when handling anything that goes in the chamber such as stubs, 

specimens, sample holders.


 Finger oils contaminate the machine and destroy image 

quality. 

Measure your sample’s diameter and height accurately:


Improper sample measurements will cause the sample to hit 

the detectors and create thousands of dollars of damage! 

Opening the Chamber to Load Specimens


(This may also be done later using the software)


1.


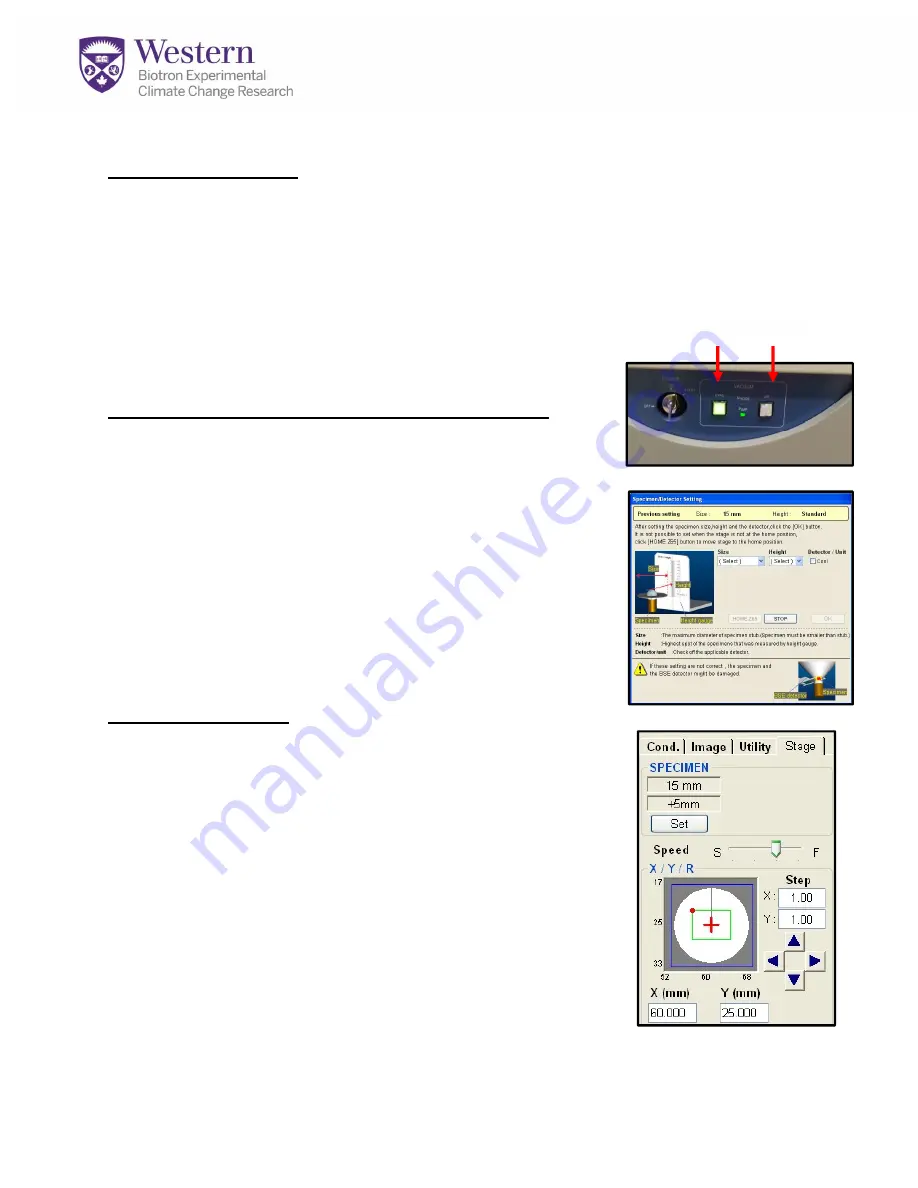
Click the “AIR” button on the front of the machine 

(push hard enough to hear vacuum change) 

(Fig. 1-A)

2.


Wait a few minutes until you hear the machine beep  

3.


Insert sample holder. **For multi-holder, insert with 

sample #1 facing blue pen mark in chamber** 

4.


Close the chamber and hold it shut with your hand. 

Press “EVAC” button on front of machine 

(Fig. 1-B)

. Let go 

of chamber door when vacuum engages it. 

Starting PC-SEM:


5.


Click the “PC-SEM” icon on the desktop.  There is no 

password.


6.


When the PC-SEM finishes booting, you will see the 

Specimen Dimensions window above 

(Fig. 2)

.  Select the 

correct 

Diameter/Size and Height 

(Fig. 2-A)

 for the 

sample. Click 

OK.


7.


On the right side of the screen are 4 overlapping control 

panels -Condition, Image, Utility and Stage 

(Fig. 3)

. The 

software will launch on the stage control panel as shown. 

8.


Check the other panels to be sure the last user left 

this in the modes you want to use or you’ll have 

difficulties and could damage your sample.


Figure 2. Specimen Size Setting 

-A 

Figure 3. Control Panels 

EVAC      AIR 

-A 

B- 


Figure 1. Front Panel Buttons 

Summary of Contents for 3400-N

Page 1: ...mple holder For multi holder insert with sample 1 facing blue pen mark in chamber 4 Close the chamber and hold it shut with your hand Press EVAC button on front of machine Fig 1 B Let go of chamber door when vacuum engages it Starting PC SEM 5 Click the PC SEM icon on the desktop There is no password 6 When the PC SEM finishes booting you will see the Specimen Dimensions window above Fig 2 Select ...

Page 2: ...o use this panel to a Rotate the sample Fig 5 C b Tilt the sample Fig 5 D c Move the stage by increments to find and centre your features of interest Fig 5 E 14 For Multi Holder ONLY If you are using the multi holder click the Memory button Fig 5 F in the lower right corner of the stage tab This Pop up will appear a The 6 positions are programmed in the pop up window Fig 6 Choose Page 1 then choos...

Page 3: ... to complete Fig 9 6 Click the AFS button Fig 8 E to auto saturate the filament so it emits a good electron flow It should deliver an emission current above 65 70uA Fig 8 F 7 Choose the Mechanical Aperture Fig 10 recommended for your sample and magnification see us You need a higher number smaller 3 4 for high magnification above 10 000 and a low number 1 2 for very low magnification below 2000 or...

Page 4: ...efer to Align the Instrument Appendix 1 If you need to align the instrument do it first between 2000 5000x then repeat again at 2x desired magnification 5 Focusing your sample is a multi step process a Increase magnification on dial Fig 12 A slowly to desired level If the image moves it isn t properly aligned yet repeat alignment Adjust focus Fig 12 B contrast Fig 12 C and brightness Fig 12 D as n...

Page 5: ...ge Fig 15 A 3 The Image window will display CAPT Fig 15 B in the upper left corner and the image is now frozen 4 To return to live viewing click Freeze RUN Fig 13 D and Fast again to reactivate the detector and move to a new spot Saving Images 1 Select the thumbnails of those images you wish to save see yellow Fig 15 A 2 Embed into image checkbox Fig 15 C will burn in annotations associated with i...

Page 6: ...Change specimens now or leave sample holder in drawer away from dust if you are finished 6 Close the Chamber door and click the EVAC button in the software Fig 16 B OR at the front of the machine Fig 20 A 7 When the system has fully evacuated begin imaging again as before You shouldn t need to realign the machine but you will need to re saturate the filament if you are continuing 8 IF YOU ARE FINI...

Page 7: ...llowing alignments Begin Beam Alignment Begin with a magnification of 1000x 5000x Once you complete the alignment at that zoom repeat this whole process a second time at twice your desired magnification Apply the KV and probe current settings desired for operation FIRST perform normal focus and stigmation operations without opening the align window The system must be relatively focused before atte...

Page 8: ...first Fig A1 Beam Alignment Select Beam Align Tilt Fig A4 B Turn X and then Y stigmation knobs until maximum brightness is achieved Repeat on Beam Align Shift Fig A4 C Stigma Alignment If the beam has been running for awhile you may need to Degauss Fig A5 A the image before beginning for best results Stigma Align X Fig A4 C Adjust BOTH X and Y stigmation dials Fig 21 X Y to minimize rocking moveme...

Page 9: ...to BSE mode now 5 Set vacuum to 30 50 Fig A6 Lower vacuum is more efficient at charge reduction as air molecules absorb some charge 6 NOW evacuate the chamber and switch to the test sample 7 Turn KV back ON You will need to focus on Slow 1 or Slow 2 mode Fast is too noisy to see anything 8 On the Image Tab adjust your BSE Gain setting Fig A7 to 3 or 4 until you see an image 9 COMP mode highlights ...

Reviews: