background image

SERVICE MANUAL

LED TV

Chassis

MSD3393

This service information is designed for experienced repair technicians only and is not designed for use by the general public. 
It does not contain warnings or cautions to advise non-technical individuals of potential dangers in attempting to service a product.
Products powered by electricity should be serviced or repaired only by experienced professional technicians. Any attempt to 
service or repair the product or products dealt with in this service information by anyone else could result in serious injury or death.

WARNING

24D3000

Model No.

Summary of Contents for 24D3000

Page 1: ...ngs or cautions to advise non technical individuals of potential dangers in attempting to service a product Products powered by electricity should be serviced or repaired only by experienced professional technicians Any attempt to service or repair the product or products dealt with in this service information by anyone else could result in serious injury or death WARNING 24D3000 Model No ...

Page 2: ...sassemble and Assemble 4 1 Remove the Pedestal 6 8 8 8 8 10 12 12 4 2 Remove the Back Cover 12 4 3 Remove the Adhesive Tape 12 4 4 Remove the Main Board 13 4 5 Remove the Speaker 13 4 6 Remove the Remote Control Board 14 5 Installation Instructions 15 5 1 External Equipment Connections 15 5 2 HDMI Connections 19 6 Operation Instructions 22 6 1 Front Panel Controls 6 2 Back Panel Controls 6 3 Unive...

Page 3: ...le shooting 38 9 1 Simple Check 38 9 2 Main Board Failure Check 9 3 Panel Failure 39 48 8 1 How to enter into the factory model 8 2 How to update software 35 36 8 Measurements and Adjustments 32 8 3 How to enter into the Hotel Model 37 ...

Page 4: ...instructions in the literture accompanying the appliance 1 3 2 Be careful to the electrical shock 7R SUHYHQW GDPDJH ZKLFK PLJKW UHVXOW LQ HOHFWULF VKRFN RU UH GR QRW H SRVH WKLV 79 VHW to rain or excessive moisture This TV must not be exposed to dripping or splashing water DQG REMHFWV OOHG ZLWK OLTXLG VXFK DV YDVHV PXVW QRW EH SODFHG RQ WRS RI RU DERYH WKH 79 1 3 3 Electro static discharge ESD Som...

Page 5: ... UHFHLYHU RQO WKH WHVW WXUHV VSHFL HG LQ WKLV VHUYLFH PDQXDO CAUTION R QRW FRQQHFW WKH WHVW WXUH JURXQG VWUDS WR DQ KHDW VLQN LQ WKLV UHFeiver 3 Do not spray chemicals on or near this receiver or any of its assemblies 4 Unless specified otherwise in this service manual clean electrical contacts only by applying the following mixture to the contacts with a pipe cleaner cotton tipped stick or compar...

Page 6: ... static electricity Such components commonly are called Electrostatically Sensitive ES Devices Examples of typical ES devices are integrated circuits and some field effect transistors and semiconductor chip components The following techniques should be used to help reduce the ncidence of component damage caused by static by static electricity 4 Use only an anti static type solder removal device So...

Page 7: ...ibed in the table below Note A note provides information that is not indispensable but may nevertheless be valuable to the reader such as tips and tricks Caution A caution is used when there is danger that the reader through incorrect manipulation may damage equipment loose data get an unexpected result or has to restart part of a procedure Warning A warning is used when there is danger of persona...

Page 8: ...ay 16 7M No of Preset Channels Cable 1 135 OSD Language English Color System NTSC Audio System DK BG I M L L Audio Output Power Built in W 3W 2 Audio Output Power outer W No Total Power Input W 40W Voltage Range V Power Frequency Hz 50 60Hz Net Weight KG 3 7 Gross Weight KG 4 9 Net Dimension MM 567 3 36 343 8mm Packaged Dimension MM 567 3 160 391 1mm AC 100 240V Air 2 69 ATV DTV ...

Page 9: ... 08 Service Manual Model No 3 Location of Controls and Components 3 1 Board Location No Description A Board Integration Mainboard 3 2 Main Board A Board ...

Page 10: ...ranslate into signal that panel can display RQQHFWRU GH QLWLRQ Main board connector Keypad andremote connector J2 3LQ QXPEHU 6LJQDO QDPH HVFULSWLRQ B5 03 5 B 03 5 1 5 5 027 21752 1 1 9 32 5 25 5 027 1 7 8 9 10 NC STANDBY Speaker connector J17 Pin number Signal name Description 1 RSPK RSPK 2 RSPK RSPK 3 LSPK LSPK 4 LSPK LSPK ...

Page 11: ...3 3 LED Panel 10 Service Manual Model No MTC236LED C09H CMO V236BJ1 P01 ...

Page 12: ... input Channel 1 16 RX1 Positive LVDS differential data input Channel 1 17 GND Ground 18 RX2 Negative LVDS differential data input Channel 2 19 RX2 Positive LVDS differential data input Channel 2 20 GND Ground 21 RXLCK Negative LVDS differential clock input 22 RXCLK Positive LVDS differential clock input 23 GND Ground 24 RX3 Negative LVDS differential data input Channel 3 25 RX3 Positive LVDS diff...

Page 13: ...UHDU FRYHU faces upward 5HPRYH WKH WKUHH VFUHZ IURP WKH UHDU FRYHU LQGLFDWHG ZLWK ż 7KHQ UHPRYH WKH SHGHVWDO 4 2Remove the Back Cover 5HPRYH WKH WKHVH VFUHZ LQGLFDWHG RQ JXUH DERYH E ż 7KHQ UHPRYH WKH EDFN FRYHU IURP WKH unit Service Manual Model No 12 4 1 Remove the Pedestal 4 3 Remove the adhesive tape ...

Page 14: ...4 4 Remove the Main board 5HPRYH WKH 0DLQ ERDUG Service Manual Model No 13 J2 CN800 LVFRQQHFWHG WKH FRXSOHU J1 4 5 Remove the speaker Take out the speaker J17 ...

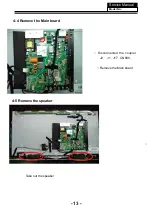
Page 15: ...4 6 Remove the remote control take out the remote controlboard Service Manual Model No 14 ...

Page 16: ...l cable not included to the ANT IN jack on the back of your TV DVD combo then connect the other end of the cable into the antenna or cable TV wall outlet To improve picture quality from an antenna in a poor signal area install a signal DPSOL HU If you need to split the antenna signal to connect two TVs install a two way splitter Service Manual Model No 15 ...

Page 17: ... 16 ...

Page 18: ... 17 ...

Page 19: ... 18 ...

Page 20: ... menu When the source device DVD player or Set Top Box supports DVI How To Connect 1 Connect the source device to HDMI port of this TV with a HDMI to DVI cable not supplied with this product 2 A separated audio connection is necessary 3 If the source device has an analog audio output connector connect the source device audio output to DVI Audio In port located on the PC port How To Use If the sour...

Page 21: ...Cable sample HDMI Cable not supplied with the product HDMI to DVI Cable not supplied with the product Analog Audio Cable Stereo to RCA type not supplied with the product Service Manual Model No 20 ...

Page 22: ... Use the attached power cord only Ŷ I WKH SRODUL HG FRUG GRHV QRW W LQWR D QRQ SRODUL HG RXWOHW GR QRW DWWHPSW WR OH RU FXW WKH EODGH W LV WKH XVHUCV UHVSRQVLELOLW WR KDYH DQ electrician replace the obsolete outlet Ŷ I RX FDXVH D VWDWLF GLVFKDUJH ZKHQ WRXFKLQJ WKH XQLW DQG WKH XQLW IDLOV WR IXQFWLRQ simply unplug the unit from the AC outlet and plug it back in The unit should return to normal oper...

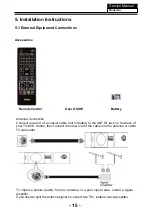
Page 23: ...Service Manual Model No 6 Operation Instructions Basal information 22 ...

Page 24: ...6 3 Setting Up Your Remote Control Service Manual Model No 23 ...

Page 25: ...STRICT SHENZHEN Custom 2 12 Monday January 07 2013 0 1 PWM IC AC100V 240V TRANSFORMER T102 Q807 12V EFD25 BLOCK DIAGRAM 0B2273 RT8296A DC DC U2 5VSTB 5VA 12VA PWR ON OFF PANEL_ON OFF PANEL_POWER OR 601 UD12 VGA AUDIO LINEIN_L0 R0 EUA2113 UD3 3 3V_TUNER AL0O AR0O L R 1 8VA DC DC 3 3VA MSD3393 128PIN DSP SPIDF OUTPUT COAXIAL TDA18273 ONBOARD RF IN FRONT PANEL SY8008B SPI FLASH SY8008B 1 15V DC DC VG...

Page 26: ...R R117 68R C167 2 2uF C167 2 2uF C275 2 2uF C275 2 2uF R103 68R R103 68R R127 0R R127 0R RD57 NC 0R RD57 NC 0R C123 2 2uF C123 2 2uF RD47 10R RD47 10R R146 27R R146 27R RD52 1K RD52 1K R137 100R R137 100R C164 47nF C164 47nF C111 47nF C111 47nF C147 0 1uF C147 0 1uF R201 4 7K R201 4 7K R155 220K R155 220K TF1 NC TP TF1 NC TP TF1 1 TF2 2 TF3 3 TF4 4 TF5 5 TF6 6 TF7 7 TF8 8 R232 100K R232 100K RD44 ...

Page 27: ...0 1uF Q2 AO3407 Q2 AO3407 RD146 100K RD146 100K RD62 270K RD62 270K LD25 600Ω 1 5A 0805 LD25 600Ω 1 5A 0805 RD145 100K RD145 100K C46 0 1uF C46 0 1uF CD103 100pF CD103 100pF RD143 47K RD143 47K CD53 0 1uF CD53 0 1uF CD101 10uF CD101 10uF R215 100K R215 100K RD141 330K RD141 330K LD23 4 7uH_2A LD23 4 7uH_2A R224 4 7K R224 4 7K CD96 10uF CD96 10uF Q4 3904 Q4 3904 1 2 3 LD22 4 7uH_2A LD22 4 7uH_2A CD...

Page 28: ... 120R RD69 120R CD28 1uF CD28 1uF CD26 0 22uF CD26 0 22uF RD105 10K RD105 10K CD162 0 1uF CD162 0 1uF RD147 NC 0R RD147 NC 0R 10R R706 10R R706 R905 0R R905 0R RD148 NC 0R RD148 NC 0R R705 NC 100K R705 NC 100K LD17 FB_11_OHM_500MA LD17 FB_11_OHM_500MA RD94 100R RD94 100R CD54 33pF CD54 33pF C28 10uF C28 10uF RD71 100R RD71 100R RD70 75R RD70 75R CD32 1uF CD32 1uF DD3 BAT54C DD3 BAT54C 1 2 3 RD118 ...

Page 29: ... 2nH 1000mA LD27 2 2nH 1000mA RD160 430R RD160 430R CD138 6 8nF CD138 6 8nF CD152 33pF CD152 33pF CD135 120pF CD135 120pF C137 0 1uF C137 0 1uF C138 0 1uF C138 0 1uF CD163 1nF CD163 1nF RD161 22R RD161 22R CD137 150pF CD137 150pF CD144 2 7nF CD144 2 7nF C148 NC 6 8nF C148 NC 6 8nF CD136 82pF CD136 82pF CD148 0 047uF CD148 0 047uF R145 0R R145 0R CD132 220nF CD132 220nF CD133 100nF CD133 100nF LD31...

Page 30: ...0 12V 7 GND 9 11 5V 3 3 2 2 1 1 6 6 5 5 5V 12 4 4 D807 RL207 2A 60A 1KV 1 0V D807 RL207 2A 60A 1KV 1 0V RD39 10K RD39 10K EC5 220uF 16V EC5 220uF 16V 1 2 FB7 10Ω FB7 10Ω C34 0 1uF 50V C34 0 1uF 50V C1051 1nF C1051 1nF D4 SS24 D4 SS24 2 1 R856 NC 1R 1206 R856 NC 1R 1206 R829 75K R829 75K R888 1M R888 1M R846 NC R846 NC R849 NC R849 NC QD4 3904 QD4 3904 3 2 1 R2297 10K R2297 10K R858 10K R858 10K C1...

Page 31: ...Connection wire Blacklight Service Manual Model No 7 3 Wiring Connection Diagram NO Name 1 2 3 4 5 Connection Wire For Keyboard and Remote Connection Wire For Speaker LVDS Wire 2 3 4 1 31 ...

Page 32: ...sound options Press to select press to adjust OK 3 In this menu you can adjust the Menu language Closed Caption Press to select press to adjust SETUP menu adjust the sleep timer time zone Restore Default etc OK 3 1 Closed Caption Note 1 2 Audio language is available in ATSC TVmode only Auto volume is available only when the input signal volume is too large or there is distortion TV Picture Lock Me...

Page 33: ...ish Switching the English rating control level EXEMPT C C8 G PG 14 18 OK MPAA TV US 4 LOCK MENU In this menu you can change the password and adjust the vchip settings Enter the password to enter the lock menu The factory default password is 0000 4 1 Change Password 1 Old password Input the old password 2 New password Input the new password 3 Confirm password Input the new password again 4 2 System...

Page 34: ...n Age E Exempt programming G General All ages and children contains minimal direct violence but may be integrated into the plot in a humorous or unrealistic manner 8ans General but inadvisable for young children May be viewed by a wide public audience but could contain scenes disturbing to children under 8 who cannot distinguish between imaginary and real situations Recommended for viewing with pa...

Page 35: ...nce of each signal source 4 SSC to adjust the spectrum for passing the EMC test 5 special set 1 2hour off for Aging test 2 WDT watch dog 3 white pattern set pure color output for the panel used at the checking and aging test for panel 4 reset 5 set the recorder 6 set power on screen display 6 QMAP adjust adjust color quality 7 PEQ set sound EQ 8 sw information to check the sofeware information 9 U...

Page 36: ...ow you should choose Yes TV begin to update You should reset TV after update Note When Upgrade on the process please don t Power Off Haier MSD3393 F W upgrade with USB SOP Step 1 Ready for F W Upgrade 1 1 Prepare a USB memory it from computer s USB port Step 2 F W Upgrade 2 1 AC ON 8 2 How to update software ...

Page 37: ...hannel 6 Start Menu Display 7 Input Source Change 8 Save to USB 9 Loaking 10 Volume Default Hotel mode switch Panel key lock Hotel mode can adjust the maximum volume Hotel mode locking TV signal source Hotel mode locking program channels Hotel Mode menu is displayed Hotel mode is to display the Source U disk data will be cloned into the machine TV related equipment will be copied to the system U d...

Page 38: ...Service Manual Model No 9 Trouble shooting 9 1 Simple check 38 ...

Page 39: ...e the QD6 Yes Check if there is 30V at C931 Yes No Check if U5 Pin2 0 72V ǃ Pin3 5V ǃPin4 12V ǃ Pin6 5 7V is normal Change LVDS wire No Check if Q103 ǃ D10 ǃ D9 ǃ Yes Replace Q103ǃ D10 ǃ D9 No Service Manual Model No No picture but h Replace U5 R700 is working 9 2 Main board failure check 39 ...

Page 40: ...here is input at Pin1 ǃPin9 of UD10 Check if there is signal at C710 and C745 No check the signal input circuit of C710 C745 Yes Change UD10 No Check the speakers Service Manual Model No 40 No Yes Check if there is 12V at Pin7 of UD10 Change LD3 Change CD109 CD110 Check if there is 5V at Pin3 Pin5 and Pin8 of U702 Change U702 Pin4 of J17 and check if there is output at Pin4 ǃ Pin6 of UD10 ...

Page 41: ...e voltage pressure of JP7 Pin2 is high voltage pressure More than 3V Yes Change U1 No sound No picture Change Mainboard No Yes Check if there is voltage pressure in the pad of the L806 12V ˈL2 5V CHANGE Q810 No 41 ...

Page 42: ... to the socket Check if there is voltage pressure in JP3 12V ଞ JP7 Pin1 5Vstb Replace Remote Control Board Yes Replace D806 or U2 Still having problems Change Mainboard Check if LD23ஂ1 15Vஃଞ LD21ஂ1 8VஃଞLD22ஂ 3 3Vஃଞ FB2ஂ3 3Vஃis working No Chang U1 Yes Chang UD9 or UD7 or UD8 or Q2 No 42 other can t control ...

Page 43: ...is correct Poor sound Change sound system No Update the software and make the reboot or change the Mainboard Still having problems For ease of use recommend that customer format the picture and sound settings in the automatic option 43 ...

Page 44: ...r to relative instructions in the Manual for color adjust No No Yes Yes Check out of picture and sound system of this channel Change the channel to the right sound system PAL M N NTSC M No color for some channel program black and white Still having problems Updata the software and make the reboot or change the maiboard 44 k and white ...

Page 45: ... Pin2 in JP7 Check JP3 voltage of 12V and JP8 of 5V No No Yes Yes Replace U1 How to know whether the Power board is broken Still having problems Check if Main board LVDS wire Panel are in good condition No Reconnect the power cord with the outlet to Power board Yes No Check if the break in the power circuit and U2 Replace Q806 or Q809 45 ...

Page 46: ...lly 2 Verify if the Mainboard output the right On Off signal to power board 3 Verify if the Mainboard output the LVDS singalto panel T con board 4 Verify if the software is the right version of this model 5 Change the LVDS wire to check if it s broken 46 3 Other problem Power board not work 1 Verify if the power cord connect well 2 check if the power supply if working normally check if the power s...

Page 47: ...or cracking Dim or L D TCP Sunken TCP lead cracking ACF bonding short Awful environment and something electric enter into LCD Mis align between TCP and Panel Panel failure TCP failure V Dim Vertal gray line V L D Vertical color line light or dark forever H B D Horizontal bar H Dim Horizontal gary line H L D H o r i z o n t a l line light or dark forever ...

Page 48: ...er Bubble Bladder in Polarizer Bladder between Polarizer and top glass Polarizer Scratch Polarizer Scratch Tine or rigidity arose F M i n s i d e Polarizer Eyewinker inside Polarizer Eyewinker inside Polarizer Circuit Abnormal Display Abnormal Display 1 Chip lose action 2 IC ahort or jointiog bad 3 Pannel and vsc connect bad Flashing B r i g h t a n d d a r k display alternately 49 ...

Page 49: ...display Maybe caused by surge current and EDS Black Screen B L normal only Black screen display FIIcker Crosstalk LCD Vcom imbalance Abnormal Color Only color abormal Capacitance improper bring crosstalk inside LCD pannel Abnormal Color Only color abnormal 1 Chip lose action 2 I C s h o r t o r jointion bad 3 Pannel and vsc connect bad ...

Page 50: ...ss between wire and electrode B L dark B L brightness darker than normal Connect badnessShort between wire and electrode B L wire damaged B L wire damaged Operation abnormal or systemic noise B L wire open Without backlight Operation abnormal or systemic noise B L shut down B L shutdown in sometime Short bitween lamp housing and wire Because consume power too much F M F M inB L white balck Rotundi...

Page 51: ...ription Phenomena Failure cause Mechanlcal or B L Light leakage Brightness at bottom of LCM brighter than normal B L unit badness Uniformity B L brightness asymmetric Sheet in B L unit is uneven Mount hole Lack screw or screw damage Lack screw Screw damage ...

Page 52: ...Sincere Forever Haier Group Haier Industrial Park No 1 Haier Road 266101 Qingdao China http www haier com Printed in China ...

Reviews: