background image

GE


Grid Solutions

GE Information

Multilin

TM

 G500

Substation Gateway 

Instruction Manual

994-0152

Version 1.00 Revision 1

Summary of Contents for G500

Page 1: ...GE Grid Solutions GE Information MultilinTM G500 Substation Gateway Instruction Manual 994 0152 Version 1 00 Revision 1 ...

Page 2: ...cuments in whole or in part without the prior written permission of General Electric Company The information contained in this online publication is proprietary and subject to change without notice The software described in this online publication is supplied under license and may be used or copied only in accor dance with the terms of such license Trademark Notices GE Multilin and are trademarks ...

Page 3: ...s 8 ABOUT THIS DOCUMENT Purpose 9 Intended audience 9 Additional documentation 9 How to use this guide 10 Safety words and definitions 10 1 INTRODUCTION Safety precautions 11 Warning symbols 12 Hardware overview 12 Order code 14 MCP Spares and Accessories 15 2 UNPACKING AND INSPECTION Electro Static Discharge ESD 17 Initial inspection 18 Unpacking 18 3 INSTALLING THE G500 Installation 19 Mounting ...

Page 4: ...set Button 40 USB 3 0 40 SD Card 41 USB 2 0 41 Display Port 41 Alarm 42 IRIG IN 43 IRIG OUT 43 Serial Ports 44 Ethernet Ports 53 Internal Interfaces 54 Opening cover 54 Closing cover 57 M 2 SSD 59 PCIe Slots 61 USB 2 dongle slot 63 5 INDICATORS Front Indicators 65 Ethernet 66 Ethernet Port SFP LEDs 66 Serial Port LEDs 67 IRIG B input 68 IRIG B output 68 CPU 69 TEMP 69 SSD 69 STATUS 70 Power 70 OLE...

Page 5: ...orque Values for Screws 79 Storage recommendations 79 Storage conditions 79 7 REMOVING THE G500 FROM SERVICE Remove configuration data and sensitive information from the G500 81 Removing configuration data on a PC 82 A STANDARDS COMPLIANCE Compliance Standards 83 B CUL C WARRANTY Warranty 87 D LIST OF ACRONYMS Acronym Definitions 89 REVISION HISTORY Revision history 91 ...

Page 6: ...6 GE INFORMATION G500 SUBSTATION GATEWAY INSTRUCTION MANUAL TABLE OF CONTENTS ...

Page 7: ...nical information such as manuals release notes and knowledge base topics Visit us on the Web at http www gegridsolutions com Search GE Grid Solutions technical support library This site serves as a document repository for post sales requests To get access to the Technical Support Web site go to Visit us on the Web at http sc ge com SASTechSupport Contact GE Grid Solutions technical support GE Gri...

Page 8: ...ur reference GE Grid Solutions address The GE Grid Solutions company address is GE Grid Solutions 650 Markland Street Markham Ontario Canada L6C 0M1 Product returns A Return Merchandise Authorization RMA number must accompany all equipment being returned for repair servicing or for any other reason Before you return a product please contact GE s Grid Solutions to obtain an RMA number and instructi...

Page 9: ...the installation wiring and maintenance of SCADA equipment This guide assumes that the user is experienced in Electrical utility applications Electrical wiring and safety procedures Related other manufacturers products such as protective relays and communications equipment Additional documentation For further information about the G500 refer to the following documents G500 Online Help Module layou...

Page 10: ...our G500 see See Order code on page 14 Safety words and definitions Before attempting to install or use the device review all safety indicators in this document to help prevent injury equipment damage or downtime The following safety and equipment symbols are used in this document Indicates a hazardous situation which if not avoided result in death or serious injury Indicates a hazardous situation...

Page 11: ...ssociated with electrical equipment Never work alone Before performing visual inspections tests or maintenance on this equipment isolate or disconnect all hazardous live circuits and sources of electric power Assume that all circuits are live until they have been completely de energized tested and tagged Pay particular attention to the design of the power system Consider all sources of power inclu...

Page 12: ...ing current Caution Refer to the documentation for important operation and maintenance instructions Failure to take or avoid specified actions could result in loss of data or physical damage Warning Dangerous voltage constituting risk of electric shock is present within the unit Failure to take or avoid specified actions could result in physical harm to the user Earth Ground Terminal Protective Gr...

Page 13: ...munication media types through a choice of input output I 0 Serial 8 factory installed ports expandable up to 20 ports RS 232 and RS 485 are accessible via individual RJ45 connectors Ethernet Six Ethernet interfaces available through SFP cages Each cage supports 100 1000BaseT 100BaseFX or 1000BaseSX Figure 1 G500 ...

Page 14: ...age option A is only available with CPU option A and storage option B is only available with CPU option B Visit the online store for application licenses ordering codes For latest configuration and options please visit the online store http www gegridsolutions com app ViewFiles aspx prod G500 type 3 ...

Page 15: ...SFP Transceiver B SFP Module 1000BASE SX LC TRANSCEIVER OPTICAL MULTI MODE 1310nm 40 TO 85C 580 3785 C SFP Module 100 1000BASE T RJ45 TRANSCEIVER COPPER 40 TO 85C W WO RX_LOS 580 3786 Power Supply Options H MCP PSU HV 90 264 VAC 88 330VDC 528 2001LF CC These options are only available when Spare type is Power Supply L MCP PSU LV 18 60VDC 528 2002LF CC UART Card options S MCP PCIe UART CARD 4x PORT...

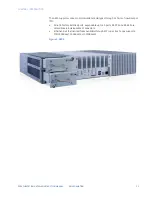
Page 16: ...16 GE INFORMATION G500 SUBSTATION GATEWAY INSTRUCTION MANUAL CHAPTER 1 INTRODUCTION ...

Page 17: ...or ESD is a major cause of electronic component failure The Industrial Computer has been packed in a static safe bag which protects it from ESD while it is in the bag Before removing the Boards or any other electronic product from its static safe bag be prepared to handle it in a static safe environment You should wear a properly functioning anti static strap and ensure you are fully grounded Any ...

Page 18: ... introduce a fire or shock hazard Unpacking Please read the manual carefully before unpacking the board or module or fitting the device into your system Also adhere to the following Observe all precautions for electrostatic sensitive modules Do not place the board on conductive surfaces anti static plastic or sponge which can cause shocks and lead to board trace damage Do not exceed the specified ...

Page 19: ...ter and initial power on operations Before you install and operate the G500 read and follow the safety guidelines and instructions in Safety precautions on page 11 Installation Mounting instructions The G500 is mounted in 3U slot of a 19 rack by use of 6 screws compliant to IEC60297 3 with STD hole Pattern Screws Use screws with a shaft diameter close to 5mm For example M5 or UNF 10 32 screws ...

Page 20: ...00 Mounting Diagram 1 Mount the brackets on the unit NOTE For screw torque specification refer to General Torque Values for Screws on page 79 2 Install 2 of the screws at the same height in the 19 rack The screws should be screwed in to a distance of about 3 mm between screw head and rack ...

Page 21: ...ing the two screws with the keyhole mounting points of the brackets 4 Once aligned set down the unit and then tighten the screws The recommended tool torque settings for zinc plated mounting screws are 10 32 UNF screws use 22 2 in lb 2 50 Nm 12 24 UNC screws use 31 0 in lb 3 51 Nm M5x0 45 screws use 18 1 in lb 2 04 Nm ...

Page 22: ...ient air circulation the specified spacing above below to the sides in front and behind the G500 must be met or exceeded The thermal impact on devices next to each other is negligible 1 C with the mounting spaces below assuming the adjacent devices are also G500s or devices dissipating a similar amount of power The minimum specified spacing to the front and behind the G500 is 5cm 2 Other spacing r...

Page 23: ...emoving any board please ensure that the system power and external supplies as well as power to devices connected to the ALARM Relay output have been turned off and or are unplugged from the device Grounding It is required to connect the chassis to ground using at minimum the M5 ground connection screw in point located near the G500 power supply The second screw in point can also be connected to g...

Page 24: ...r supply faceplate The recommended torque setting for the screws on the power supplies are 5 3 in lb 0 6 Nm High Voltage Power Supply The High Voltage Power Supply handles both AC and DC input The AC input voltage range is 100 to 240V 50 to 60 Hz The PSU tolerates a 10 variation in these values 90 to 265V 47 to 63Hz With AC input the PSU has a maximum current consumption of 2 1A The DC input volta...

Page 25: ...it A 16A IEC or 20A USA Canada breaker circuit is required as a pre fuse Disconnect Device A readily accessible disconnect device shall be incorporated external to the unit Overcurrent protection The overcurrent protection function interrupts an uncontrolled fault current or overcurrent before serious damage can occur such as overheating of the equipment The PSU included fuse is rated for 6 3A con...

Page 26: ... 10 variation in these values 18 to 60V The PSU has a maximum current consumption of 10 2A Connect the and wires according to the following figure The GND wire is optional Wires The conductor size is from 16 AWG to 12 AWG and Strip Length is 7mm After plugging cable lines into the mating connector plug the mating connector to the product and secure the plug with the two screws Breaker circuit A 20...

Page 27: ...ristor should only be replaced by GE personnel Power On Self Test POST Each time the G500 boots up it must pass the POST Power On Self Test The following tests make up the POST CPU must exit the reset status and be able to execute instructions SPI Flash ROM and NVRAM is accessible Checksum must be valid CMOS is readable CMOS checksum must be valid CPU must be able to access all forms of memory suc...

Page 28: ...upply to power the RS232 switch panel Input 85 264 VAC or 90 350 VDC 580 0046 Watchdog Cable Assembly Connects G500 A to the RS232 switch panel 977 0540 977 0556 Connects G500 B to the RS232 switch panel 977 0541 977 0556 Ping Cable Assembly Links both G500 units to facilitate a heartbeat message that determines the status of the active unit 977 0559 LLL G500 RJ45 to RS232 Serial Cable Connects th...

Page 29: ...G500 Connections from the switch panel to both G500 units should be made in the same order For example if P2 is connected to port 3 on the first G500 P10 should also be connected to port 3 on the second G500 8 Connect field devices to J2 through J8 on the RS232 switch panel To set up a redundant system with two RS232 switch panels In cases where more than 7 serial connection ports are required a s...

Page 30: ...t B active The CCU A CCU B LED indicator indicates which unit has been activated Redundancy wiring diagrams The following diagrams illustrate how to wire the G500 units and RS232 switch panels to enable system redundancy Redundancy Wiring Single RS232 Switch Panel see Redundancy Wiring Single RS232 Switch Panel on page 31 Redundancy Wiring Dual RS232 Switch Panel The wiring drawing is provided in ...

Page 31: ... WR 9 WR 9 DEOH DVVHPEO SDUW QXPEHU DQG UHHQ KLWH HOORZ DEOH SDUW QXPEHU DEOH SDUW QXPEHU 1RW XVHG HYLFH 6HULDO 3RUW HYLFH 6HULDO 3RUW 7 DEOH SDUW QXPEHU UHHQ HOORZ 1 7R 3LQJ 3RUW 7R 3LQJ 3RUW 56 3LQJ DEOH DVVHPEO SDUW QXPEHU 7R 6 V DLO 7 50 12 DEOH SDUW QXPEHU 3RZHU 6XSSO 2SWLRQDO SDUW QXPEHU WR 9 RU WR 9 WR 9 7R RQWURO 3RUW 56 DEOH DVVHPEO SDUW QXPEHU DQG UHHQ KLWH HOORZ RP RP 7 6HW 5HVHW 7 1RW ...

Page 32: ... WR 9 RU WR 9 WR 9 DEOH DVVHPEO SDUW QXPEHU UHHQ KLWH HOORZ DEOH SDUW QX PEHU DEOH SDUW QXPEHU 1RW XVHG HYLFH 6HULDO 3RUW HYLFH 6HULDO 3RUW 7 DEOH SDUW QXPEHU UHHQ HOORZ 1 7R 3LQJ 3RUW 7R 3LQJ 3RUW 56 3LQJ DEOH DVVHPEO SDUW QXPEHU 7R 6 V DLO 7 50 12 DEOH SDUW QXPEHU 3RZHU 6XSSO 2SWLRQDO SDUW QXPEHU WR 9 RU WR 9 9 7R RQWURO 3RUW 56 DEOH DVVHPEO SDUW QXPEHU DQG UHHQ KLWH HOORZ RP RP 7 1A 2A DEOH SDU...

Page 33: ...6RXUFH 6HW Q 6HW 2XW 6HW 6HW 6WDWXV 6HW 5HVHW 7 7 6HW 5HVHW 3RZHU 6XSSO 2SWLRQDO SDUW QXPEHU WR 9 RU WR 9 WR 9 DEOH SDUW QXPEHU 5HPRYH MXPSHUV DEOH SDUW QXPEHU 7 DEOH SDUW QXPEHU UHHQ HOORZ 1 HYLFH 6HULDO 3RUW HYLFH 6HULDO 3RUW HYLFH 6HULDO 3RUW 7R 6HULDO 3RUW 7R 6HULDO 3RUW 7R 6HULDO 3RUW 7R 6HULDO 3RUW 7R 6HULDO 3RUW 7R 6HULDO 3RUW 3 3 3 3 3 3 3RZHU 6XSSO SDUW QXPEHU WR 9 RU WR 9 WR 9 1A 2A RP R...

Page 34: ...FH 9 6RXUFH 6HW Q 6HW 2XW 6HW 6HW 6WDWXV 7 6HW 5HVHW 3 3 7R RQWURO 3RUW 56 7R 6 V DLO 7 3RZHU 6XSSO SDUW QXPEHU WR 9 RU WR 9 WR 9 DEOH DVVHPEO SDUW QXPEHU DQG DEOH SDUW QXPEHU UHHQ KLWH HOORZ DEOH SDUW QXPEHU DEOH SDUW QXPEHU 1RW XVHG HYLFH 3ULPDU 6HULDO 3RUW HYLFH 3ULPDU 6HULDO 3RUW 7R 6HULDO 3RUW 3 7 DEOH SDUW QR UHHQ HOORZ 1 DEOH DVVHPEO SDUW QXPEHU DEOH SDUW QXPEHU 1B 4B 3B 2B RP RP 7 6HW 5HVH...

Page 35: ... 3 7R RQWURO 3RUW 56 3 7R 6 V DLO 7 50 12 3RZHU 6XSSO SDUW QXPEHU WR 9 RU WR 9 WR 9 DEOH DVVHPEO SDUW QXPEHU DQG DEOH SDUW QXPEHU 5HPRYH MXPSHUV UHHQ KLWH HOORZ DEOH SDUW QXPEHU DEOH SDUW QXPEHU 7 DEOH SDUW QXPEHU UHHQ HOORZ 1 1RW XVHG HYLFH 6HFRQGDU 6HULDO 3RUW HYLFH 6HFRQGDU 6HULDO 3RUW 7R 3LQJ 3RUW 7R 3LQJ 3RUW 56 3LQJ DEOH DVVHPEO SDUW QXPEHU DEOH SDUW QXPEHU 3B 4B 1B 2B RP RP 7 7R 6HULDO 3RUW...

Page 36: ...36 GE INFORMATION G500 SUBSTATION GATEWAY INSTRUCTION MANUAL CHAPTER 3 INSTALLING THE G500 ...

Page 37: ...y Chapter 4 Interfaces Interfaces This chapter covers the interfaces of the MultilinTM G500 Substation Gateway First look at the G500 Front panel The front panel of the G500 provides easy access to the status indicators user connections and power supply units Figure 1 G500 front panel ...

Page 38: ...wiring connections and power connections Figure 2 G500 rear panel The G500 contains serial 8 factory installed and expandable to 20 through PCIe expandable cards ports for the communication cards The communication cards are powered from the G500 The types of communication cards included in your G500 depend on what was ordered for your substation application ...

Page 39: ...meters as the G500 The USB serial port can when enabled in UEFI Setup redirect the UEFI Setup screen This is useful in cases where no display is available or the Display Port is disabled The USB serial port default settings are 115 kBaud 8 data bits no parity and 1 stop bit abbreviated as 115000 8N1 Ethernet Port The front of the unit includes a single RJ45 Ethernet connector used to connect the m...

Page 40: ...sers time to disconnect power from the G500 A press and hold 5 second of the reset button will abruptly shutdown the G500 and remain off for 120 seconds the front CPU LED will be orange for this duration After 120 seconds the G500 will automatically restart and the front CPU LED will turn green USB 3 0 The front of the unit includes two USB 3 0 A connectors mainly used to enable maintenance person...

Page 41: ...ated Main purpose of these connectors is to enable installation personnel to connect Mouse Keyboard and equivalent equipment for initial configuration of the device Each USB 2 0 A connector is fused separately For normal operation don t exceed 0 9 A per connector The cumulative current draw of all four ports is limited to 1A due to thermal and power budget restrictions The maximum cable length for...

Page 42: ...orts is limited to 0 5A due to Thermal and power budget restrictions Alarm At the rear of the unit an Alarm output connector is located This connector has three contacts NO C and NC This are the contacts of a solid state relay controlled by the watchdog and software The relay voltage should be Limited to switching up to 48VAC or 75VDC with maximum 100mA to comply with IEC 61850 3 If 61850 3 Compli...

Page 43: ...2 the INPUT LED will show Orange when valid IRIG signal is present When configured as B006 the clock requires a corresponding configuration where the year and quality are included in the IRIG B signal If the clock is not configured to provide the year the G500 will show the year 2000 The supported levels are compliant to TTL This Port is isolated from the rest of system with an isolation voltage o...

Page 44: ...OTE G500 v1 0 does not support IRIG OUT Serial Ports The G500 has 8 Built in Serial ports available as RJ45 connectors on the rear of the unit and an additional 4 8 or 12 can be configured through the PCIe Expansion slots The physical communication ports are shown in the figure below and the corresponding configuration tool references in the table below The Ports are isolated from the rest of the ...

Page 45: ...e signal output on the rear of the system This output can be used to synchronize external equipment or other units to this unit The supported levels are compliant to TTL by a load of 120Ohm or higher It is current limited and protected against damage by short to GND Pin 4 For interconnection of 2 G500 in 485 2W mode a standard 1 1 patch cable can be used For all other modes a standard crossover is...

Page 46: ... technicians only The built in Serial UART modules are field replaceable It is not allowed to increase or decrease number of Serial UART ports by this method 1 Power down system gracefully 2 Disconnect all hazardous live circuits and sources of electrical power 3 Remove both power supplies 4 Remove screws and push lid to the rear until markings on lid and chassis align ...

Page 47: ...CHAPTER 4 INTERFACES G500 SUBSTATION GATEWAY INSTRUCTION MANUAL GE INFORMATION 47 5 Pull lid to outside until second marking aligns 6 Lift lid to remove ...

Page 48: ...48 GE INFORMATION G500 SUBSTATION GATEWAY INSTRUCTION MANUAL CHAPTER 4 INTERFACES 7 Remove attachment screws 8 Pull UART package out of slots be careful do not to damage ESD gasket at the rear ...

Page 49: ...0 SUBSTATION GATEWAY INSTRUCTION MANUAL GE INFORMATION 49 9 Exchange the UART module 10 Check that the thermal connector pads on the PCB are still in place If the thermal pads are damaged or missing contact GE for replacements ...

Page 50: ...APTER 4 INTERFACES 11 Insert the UART module into slots and attach the UART module by re installing the screws from the power supply bay NOTE Be careful do not damage the EMI gasket on the rear of the unit Otherwise since damage may result in reduced ESD protection ...

Page 51: ...CHAPTER 4 INTERFACES G500 SUBSTATION GATEWAY INSTRUCTION MANUAL GE INFORMATION 51 12 Attach the lid a little to the rear and out of position In the right position both lid and chassis markings align ...

Page 52: ... SUBSTATION GATEWAY INSTRUCTION MANUAL CHAPTER 4 INTERFACES 13 Push the lid inwards 14 Push the lid to the front and attach all screws NOTE For screw torque specification refer to General Torque Values for Screws on page 79 ...

Page 53: ...0 580 3784 SFP Module 100BASE FX LC TRANSCEIVER OPTICAL AVAGO HFBR 57E0APZ FINISAR FTLF1217P2BTL 580 3785 SFP Module 1000BASE SX LC TRANSCEIVER OPTICAL AVAGO AFCT 5715ALZ FINISAR FTLF8519P3BTL 580 3786 SFP Module 100 1000BASE T RJ45 TRANSCEIVER COPPER FINISAR FCLF8522P2BTL FOXCONN ABCU 5730ARZ FOXCONN ABCU 5731ARZ General cable requirements The cables required to make physical connections to the G...

Page 54: ...for three M 2 SSD s three PCIe Cards and a USB Dongle Slot Electric shock can cause injury and may be fatal The ALARM connector and the both power supply connectors have to be disconnected before housing is opened Opening cover To change or add the cards open the chassis by performing following steps 1 Undo the PCIe heat sink screws if tightened ...

Page 55: ...CHAPTER 4 INTERFACES G500 SUBSTATION GATEWAY INSTRUCTION MANUAL GE INFORMATION 55 2 Remove the screws and push the cover to the rear until markings on the lid and chassis align ...

Page 56: ...56 GE INFORMATION G500 SUBSTATION GATEWAY INSTRUCTION MANUAL CHAPTER 4 INTERFACES 3 Pull the cover outwards until the second markings on the lid and chassis align 4 Lift the lid to remove ...

Page 57: ...onnector can be connected to voltages up to 300V and its contacts are accessible if chassis is open The dangerous area is marked with the electric hazard symbol This Unit is to be serviced by trained personnel only Closing cover 1 Attach the lid a little to the rear and out of position In the right Position both lid and chassis markings align ...

Page 58: ...0 SUBSTATION GATEWAY INSTRUCTION MANUAL CHAPTER 4 INTERFACES 2 Then push lid inwards 3 Push the lid to the front and attach all screws NOTE For screw torque specification refer to General Torque Values for Screws on page 79 ...

Page 59: ...talled For normal operation don t exceed 1 A per slot due to Thermal and power budget restrictions Installation of M 2 device Open the cover by following the steps from Opening cover on page 54 1 Loosen the M 2 heat sink screws pull heat sink up until the keyholes allow removal of the heat sink 2 Unscrew the M 2 module and remove the module ...

Page 60: ...ON MANUAL CHAPTER 4 INTERFACES 3 Attach the piggyback gap pads on the top of the new module Use an M2 5 screw to fasten the M 2 module in the empty G500 slot 4 Align the heat sink keyholes with the screws and push the heat sink keyholes over the screws ...

Page 61: ...r and may cause permanent damage to the equipment For normal operation do not exceed 10W per slot OR 25W in one slot with the other slots empty due to thermal and power budget restrictions SLOT 1 GEN2 by 4 PCIe Slot 1 is the upper slot and can carry a length full height PCIe Card It is possible to insert cards with up to 16 lanes but only 4 lanes are supported with PCIe Generation 2 speed SLOT 2 G...

Page 62: ...the appropriate PCIe slot and fasten in place using the PCIe faceplate screws 2 If no further changes are required install the G500 cover following the steps from Closing cover on page 57 3 After closing the G500 cover tighten all heat contact screws that now correspond to occupied PCIe slots NOTE For screw torque specification refer to General Torque Values for Screws on page 79 ...

Page 63: ...ed 0 5 A in this slot due to power budget restrictions The dongle must be capable of operating at an ambient temperature of 85 C Installation of USB dongle For the mounting position of a USB dongle maximum dimensions 53mmx22mmx13mm see the figure below NOTE In order to withstand standard shock and vibration levels the dongle must be tie wrapped to the pre installed mounting structure as shown abov...

Page 64: ...64 GE INFORMATION G500 SUBSTATION GATEWAY INSTRUCTION MANUAL CHAPTER 4 INTERFACES ...

Page 65: ...CTION MANUAL GE INFORMATION 65 G500 Substation Gateway Chapter 5 Indicators Indicators The G500 includes LED indicators for communication interfaces as well as additional indicators for different operational states Front Indicators ...

Page 66: ...te the status of the Ethernet link 1000 MBit with activity Green blinking Ethernet Port SFP LEDs There are six LEDs located on the front of the unit indicate the status of the corresponding rear SFP links STATUS INDICATIOR No Link Off 100 MBit no activity Orange 100 MBit with activity Orange blinking 1000 MBit no activity Green STATUS INDICATIOR No Link Off 100 MBit no activity Orange ...

Page 67: ...LEDs located on the front of the unit indicate the status of the corresponding rear UART ports 100 MBit with activity Orange blinking 1000 MBit no activity Green 1000 MBit with activity Green blinking STATUS INDICATIOR STATUS INDICATIOR No traffic Off Transmitting Green Receiving Red Transmitting and receiving Orange ...

Page 68: ...NDICATIOR A valid IRIG B signal is present at input Green No IRIG B signal is present at input Off A valid IRIG B signal is present at input but the flag indicating out of synch is set or the G500 is configured as B002 with valid signal present Orange IRIG B input watchdog signal Red STATUS INDICATIOR IRIG B output is present and the internal clock is synch ed from an external source Green ...

Page 69: ...d Off Time synchronization for selected input is lost and there is IRIG B output present Orange STATUS INDICATIOR STATUS INDICATIOR All power rails OK CPU running Green All power rails OK CPU standby off Orange One or more power rails has failed Red STATUS INDICATIOR No thermal alert Off Application controlled temperature warning Orange Critical temperature Red ...

Page 70: ... OLED Display The G500 provides a monochrome white OLED display The OLED display will show the model number G500 when any button is pressed for five minutes and then will turn off The OLED display incorporates four buttons which are not supported in the G500 v1 00 release STATUS INDICATIOR 1 INDICATIOR 2 Application controlled Watchdog has triggered Red ...

Page 71: ...DICATORS G500 SUBSTATION GATEWAY INSTRUCTION MANUAL GE INFORMATION 71 Rear indicators If PCIe cards are installed which support indicator lights the lights are visible through the holes at the rear of the G500 unit ...

Page 72: ...72 GE INFORMATION G500 SUBSTATION GATEWAY INSTRUCTION MANUAL CHAPTER 5 INDICATORS ...

Page 73: ...rnet port indicators 8X Serial port indicators Power Supplies Power on Green Physical Presence The physical presence button recessed on front of the unit and optionally configured password shall be required to enter UEFI mode Ethernet connections 6 Rear Ethernet ports accessible via SFP modules 100 1000BASE T RJ45 copper medium 100BASE FX LC fiber multimode 1000BASE SX LC fiber multimode Serial co...

Page 74: ...ach port Up to QHD 2560x1440 for multi stream connected displays Audio Output 3 5 mm audio jack for substation alarms Built in high 90dB pitch audio buzzer USB Ports 2x USB 3 0 Type A male on front of the unit 4x USB 2 0 Type A male on rear of the unit 1x USB 2 0 Type A internal for software license keys SD Card SD SDHC and SDXC SD Cards according to Version 1 0 Version 2 0 and Version 3 0 Windows...

Page 75: ...falling vertically or which may accumulate on the top surface of the chassis Mean Time Between Failure NOTE G500 System 2 Core 8GB 8 serial ports without PSU has slightly higher MTBF Altitude Temperature de rating 2500m 5 C 3000m 10 C Part GE Part Number Failure In Time FIT MTBF in hours 40 C MCP Core System G500 System 4 Core 16GB 8 Serial ports w o PSU 528 0002LF 528 0001LF 15779 6 63373 Power S...

Page 76: ...TION MANUAL CHAPTER 6 SPECIFICATIONS Mechanical Specifications Weight Dimensions All dimensions in mm inch Part Weight in kg G500 0 serial ports without PSU 9 1 G500 4 serial ports 9 3 G500 8 serial ports 9 5 Mounting bracket 1 6 HV PSU 1 0 LV PSU 0 9 ...

Page 77: ...CHAPTER 6 SPECIFICATIONS G500 SUBSTATION GATEWAY INSTRUCTION MANUAL GE INFORMATION 77 ...

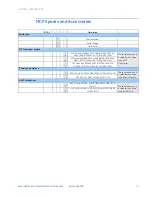
Page 78: ...78 GE INFORMATION G500 SUBSTATION GATEWAY INSTRUCTION MANUAL CHAPTER 6 SPECIFICATIONS ...

Page 79: ...Always store the G500 in an environment compatible with operating conditions Recommended environmental conditions for storage are Temperature 40 C to 85 C Relative humidity 5 to 95 non condensing Exposure to excessive temperature or other extreme environmental conditions might cause damage and or unreliable operation To avoid deterioration and early failure of electrolytic capacitors power up unit...

Page 80: ...80 GE INFORMATION G500 SUBSTATION GATEWAY INSTRUCTION MANUAL CHAPTER 6 SPECIFICATIONS ...

Page 81: ...eturned for maintenance i e RMA this chapter provides the data removal procedure To remove configuration data and sensitive information from the G500 1 For an RMA Remove the Solid State Drive SSD from the G500 using the reverse of the SSD installation procedure found earlier in this manual send the G500 unit to GE and safekeep the drive If the drive is faulty GE recommends destroying the old drive...

Page 82: ...s on the data storage media e g hard drives memory cards etc of the PC running the configuration application The G500 configuration data can be removed from the PC by either Recommended Physically removing and destroying the data storage media or Using a program to securely wipe that is completely erase the data storage media that is not just reformat or remove the names of the files from the file...

Page 83: ...100kHz 1Mhz 2 5kV CM 1kV DM Electrostatic Discharge IEC 61000 4 2 Level 4 RF immunity IEC 61000 4 3 Level 3 Fast Transient Disturbance IEC 61000 4 4 Level 4 Surge Immunity IEC 61000 4 5 Level 3 4 Conducted RF Immunity IEC 61000 4 6 Level 3 Radiated Conducted Emissions CISPR22 CISPR32 Class A Sinusoidal Vibration IEC 60255 21 1 Class 1 Shock Bump IEC 60255 21 2 Class 1 Seismic IEC 60255 21 3 Class ...

Page 84: ...ory IEEE ANSI C37 90 1 2 5kV 1MHz CM DM RF Immunity IEEE ANSI C37 90 2 20V m 80 1GHz Spot Freqs ESD IEEE ANSI C37 90 3 8kV CD 15kV AD IEEE Standard Environmental and Testing Requirements for Communications Networking Devices Installed in Electric Power Substations IEEE 1613 2009 Per Standard Communication Networks and systems for power Utility Automation Part 3 IEC 61850 3 2013 Per Standard SAFETY...

Page 85: ...G500 SUBSTATION GATEWAY INSTRUCTION MANUAL GE INFORMATION 85 G500 Substation Gateway Appendix B cUL cUL ...

Page 86: ...86 GE INFORMATION G500 SUBSTATION GATEWAY INSTRUCTION MANUAL APPENDIX B CUL ...

Page 87: ...arranty Warranty Warranty For products shipped as of October 1st 2013 G500 warrants most of its GE manufactured products for 10 years For warranty details including any limitations and disclaimers see the GE Grid Solutions Terms and Conditions at https www gegridsolutions com multilin warranty htm ...

Page 88: ...88 GE INFORMATION G500 SUBSTATION GATEWAY INSTRUCTION MANUAL APPENDIX C WARRANTY ...

Page 89: ...mentary Metal Oxide Semiconductor COMe Computer On Module express CPU Central Processing Unit DC Direct Current DoC Declaration of Conformity DP Display Port EC ACPI Embedded Controller ECC Error Correction Checking ECCN Export Control Classification Number EMI Electro Magnetic Interference ESD Electro Static Discharge ft foot FCC Federal Communication Commission USA GE General Electric GND Ground...

Page 90: ...tate Performance states of CPU PCI Peripheral Component Interconnect PCIe Peripheral Component Interconnect Express POST Power On Self Test PSU Power Supply Unit PTP Precision Time Protocol PRP Parallel Redundancy Protocol RAM Random Access Memory ROM Read Only Memory RMA Return Material Authorization RoHS Restriction of hazardous substances directive RTC Real Time Clock SATA Serial Advanced Techn...

Page 91: ...L GE INFORMATION 91 G500 Substation Gateway Revision History RevisionHistory Revision history 1 00 0 March 25 2019 Document created 1 April 02 2019 Order Code and Redundancy wiring drawings are updated Version Revision Date Change Description ...

Page 92: ...92 GE INFORMATION G500 SUBSTATION GATEWAY INSTRUCTION MANUAL REVISION HISTORY ...

Reviews: