background image

GE Healthcare

eBike III  basic
eBike III  comfort

with and without NIBP

Service Manual

2018111-336 Revision B

Summary of Contents for eBike III basic Series
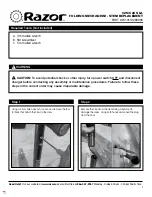
Page 1: ...GE Healthcare eBike III basic eBike III comfort with and without NIBP Service Manual 2018111 336 Revision B ...

Page 2: ......

Page 3: ...perating instructions are provided in the operator s manual of the instrument This manual is in conformity with the instrument at printing date The Service Manual eBike III is valid for the following devices 2017911 301 EBIKE III BASIC 2017911 303 EBIKE III BASIC WITH NIBP 2017911 305 EBIKE III COMFORT 2017911 307 EBIKE III COMFORT WITH NIBP Software Version GF 1 x and optional with Module NIBP an...

Page 4: ...ation Technologies change order service The revision code a letter that follows the document part number changes with every update of the manual The initial version of the manual has the letter B Part No Revision Code Date Comment 2018111 336 Rev A 2016 03 Engineering Release 2018111 336 Rev B 2016 04 Initial Release ...

Page 5: ...mbly group 20 Block diagrams bike ergometer electronics eBike III 21 Wiring diagrams bike ergometer eBike III 25 Control units 29 DTU Control unit 29 DTU Patient display 30 DTU Connectors 30 Load regulation and interface 31 LIU Load regulation and interface board 31 NIBP blood pressure unit 32 Assembly 32 Placement of pressure tubes schematic 33 Block diagram of cabling of the bloodpressure unit 3...

Page 6: ...og Calibration 68 Alignment Calibration 72 Dynamic Load Calibration 72 Calibration of Blood pressure unit 75 NIBP Test 76 NIBP Calibration 77 Software update 78 Connectivity and installation eBike III to GE ECG devices 81 eBike III to CASE 81 eBike III to CARDIOSOFT CS 83 USB interface driver installation 83 eBike III to MAC 2000 87 eBike III to MAC 5500 MAC 5000 ST 89 Installation of ther COM Int...

Page 7: ...ergometers are protection class II equipment no connection to protective ground The necessary electrical safety tests for these devices together with the limit values are listed in the chapter titled eBike III basic comfort Preventive maintenance Technical Safety Inspections and Inspections of the Measuring Systems The load unit is recommended to be inspected to the approved regional standards at ...

Page 8: ... wear detected Pass Fail Note eBike III basic comfort is a protection class II device no connection to protective ground Preventive maintenance is recommended to be performed every 2 years Warning Hazard Equipment Damage When work at the bottom of the eBike III is required e g access to electronic moduls exchange of load unit or installation of COM module the eBike III should be carefully placed o...

Page 9: ...ges refer to Turning the System On on page 60 check the software version in the service menu for correct version GF 1 x refer to Software update on page 78 check the error log file in service menu refer to Error log on page 67 Expected result Device powers on without errors FW is correct version no errors logged Pass Fail 5 Check speed indication rpm is displayed on LCD and the additional speed in...

Page 10: ...A 3 Ground open Forward Polarity N A 4 Ground open Reverse Polarity N A 5 Neutral open Reverse Polarity SFC __________ μA Pass Fail 500 μA 6 Reverse Polarity NC __________ μA Pass Fail 100 μA Patient Leakage Current to Ground 3 1 Forward Polarity NC __________ μA Pass Fail 100 μA 2 Neutral open Forward Polarity SFC __________ μA Pass Fail 5000 μA 3 Ground open Forward Polarity N A 4 Ground open Re...

Page 11: ...c cover parts 2018111 300 2018111 303 2018111 304 2018111 326 2018111 327 2018111 328 1 2 3 5 6 24 42 Saddle 2018111 022 1 11 12 15 16 Saddle clamp lever 2018111 148 1 11 12 15 16 Saddle tube 2018111 144 2018111 310 1 2 3 5 6 11 12 1718 19 20 42 Saddle guidance tube 2018111 332 1 2 3 5 6 12 17 18 19 20 24 40 42 Saddle motor 2018111 337 1 2 3 5 6 8 10 12 1718 19 20 24 40 42 Leg leveler s 2018111 02...

Page 12: ...1 316 2018111 317 2018111 318 1 2 3 8 9 10 21 22 24 26 30 31 32 33 34 35 36 37 38 42 Terminal cuff connector 2018111 323 1 2 3 4 8 10 24 26 32 33 34 36 37 38 42 Control terminal w o NIBP 2018111 321 1 4 8 21 22 24 25 26 27 29 35 42 Control terminal with NIBP 2018111 320 1 4 8 21 22 24 25 26 27 29 30 31 32 33 34 35 36 37 38 42 Repair Functional Checkout Procedure Details Electrical safety checks So...

Page 13: ...Check if saddle tube moves tightly and without any mechanical wobble in saddle tube guidance pass fail 21 Check software firmware is at correct version GF 1 x refer to Software update on page 78 pass fail 22 Check and clear the error log file in service menu refer to Error log on page 67 pass fail 23 Check stable position on floor check leveler adjustment pass fail Operational Checks 24 Power up s...

Page 14: ...lectrical saddle adjustment adjust minimum and maximum saddle height refer to Saddle Calibration on page 64 pass fail 41 Check torque values for screws pass fail Electrical Safety Checks 42 Current leakage and ground continuity test results meet requirements Perform electrical safety checks when indicated refer to Electrical Safety on page 10 All indicated electrical safetychecks require a pass fa...

Page 15: ...RPM test protocol 1 Apply a load of 100 W to the eBike III either by command of the test software or manually on the eBike III see Manual Load on page 66 2 Perform the following RPM tests step by step Note the results in the table or use the printed protocol of the calibration device to document the test Step Target RPM Actual RPM Deviation max Pass Fail 1 30 1 rpm 2 40 1 rpm 3 50 1 rpm 4 100 1 rp...

Page 16: ...lly on the eBike III see Manual Load on page 66 step by step 2 The actual load is measured and displayed by the calibration device software Note the results in the table or use the printed protocol of the calibration device to document the test Step RPM set Target Load Actual Load Deviation max Pass Fail 1 40 25 3 Watt 2 40 50 3 Watt 3 40 100 5 Watt 4 70 200 10 Watt 5 90 300 15 Watt 6 100 500 25 W...

Page 17: ... table below to the eBike III cuff connector wait until the pressure in the system has stabilized approx 5 sec 2 Check the actual pressure displayed on the eBike III display and note the value in the table Note A calibrated NIBP measure instrument set is needed to perfom the following test procedures Please refer to the operator manual of the used device Note Unless regulatory requirements of the ...

Page 18: ... 1 pc PH 3 1 pc 8 mm straight and elbow 1 pc extension for Allen key 8 mm drive unit exchange Fork wrenches Socket wrenches 1 pc 10 mm 1 pc 10 mm 1 pc 13 mm 1 pc 13 mm 1 pc 14 mm 1 pc 14 mm 1 pc 17 mm 1 pc TORX T30 1 pc 19 mm Pliers 1 pc side cutter 1 pc flat nose pliers Special tools 1 pc crank extractor P N 2005737 001 1 pc round pin max 3 mm minimum length 15 mm 1 pc torque wrench 10 100 Nm 1 p...

Page 19: ...used in the automotive industry The connection between different modules is made by direct adaptation of the different PCBs or by use of standard shielded CAT 5 patch cables The direct connectors and cables carry the power lines 24 volt and the CAN bus signal lines abbreviations Electronic modules PCBs DTU Display terminal unit LIU Load regulation and interface unit BPU Bloodpressure unit SMU Sadd...

Page 20: ...rab the eBike at handlebar and saddle and carefully lay it sideways on one side 2 Remove six screws see picture and flip the carrier plate carefully aside 3 Remove the connecting cables from the corresponding boards 4 The PCBs are mounted on spacers screwed from outside of the metal sheet carrier 5 After removing these screws the PCBs can be removed 6 After replacing a board installation is perfor...

Page 21: ...LIU DTU power supply unit switch Control unit Brake unit interface eddy current brake power cable rpm sensor RS 232 USB NIBP key patient rpm Power supply strain gauge module keys for saddlemotor service menu 24 V eBike III basic RJ 45 Patchcable PCB connector direct Microfone cable Connecting tube cuff ...

Page 22: ...nt brake Bloodpressure module power cable rpm sensor microphone connector cuff connector pressure RS 232 USB pump valves etc Power supply strain gauge module NIBP key patient rpm keys for saddlemotor service menu 24 V eBike III basic with bloodpressure unit RJ 45 Patchcable PCB connector direct Microfone cable Connecting tube cuff ...

Page 23: ...t interface eddy current brake power cable rpm sensor strain gauge module Power supply motor saddle height Motor saddle height position sensor Control unit NIBP key patient rpm keys for saddlemotor service menu 24 V eBike III comfort RJ 45 Patchcable PCB connector direct Microfone cable Connecting tube cuff ...

Page 24: ...or strain gauge module Power supply Bloodpressure module microphone connector cuff connector pressure motor saddle height Motor saddle height position sensor pump valves etc Control unit NIBP key patient rpm keys for saddlemotor service menu 24 V eBike III comfort with bloodpressure unit RJ 45 Patchcable PCB connector direct Microfone cable Connecting tube cuff ...

Page 25: ... Brake unit Control unit red blue Main switch white black white brown Power supply Eddy current brake RJ 45 X 8 Patch cable X 2 Load regulation interface rpm module X 19 X 11 X 14 X 13 LIU PCB RS 232 USB Wiring diagrams bike ergometer eBike III eBike III basic ...

Page 26: ...ng LIU Platine RS 232 USB X 5 2 pol zum Motor X10 3 pol zum Sensor J 9 Mikrofon Kabel BPU Platine J4 zu Pumpe J6 zu Ventil Pumpe Ventil weiß braun Torque module Brake unit red blue Main switch white black Power supply Eddy current brake X 8 Patch cable X 2 Load regulation interface rpm module X 19 X 11 X 14 X 13 LIU PCB RS 232 USB Control unit RJ 45 Bloodpressure module BPU PCB Microphone cable Di...

Page 27: ...Main switch white black Power supply Eddy current brake X 2 Load regulation interface rpm module X 19 X 11 X 14 X 13 LIU PCB RS 232 USB RJ 45 X 8 Patch cable Saddle motor SMU PCB Direct PCB connector X 5 2 pol to motor X10 3 pol to sensor Control unit white brown eBike III comfort ...

Page 28: ...ation interface rpm module X 19 X 11 X 14 X 13 LIU PCB RS 232 USB RJ 45 X 8 Patch cable Saddle motor SMU PCB Direct PCB connector X 5 2 pol to motor X10 3 pol to sensor Patch cable Bloodpressure module J 9 Direct PCB connector Microphone cable BPU PCB J4 to pump J6 to valve pump valve Control unit white brown eBike III comfort with bloodpressure unit ...

Page 29: ... the mainboard of the eBike III electronics The DTU together with the LCD is mounted inside the housing of the control unit DTU with LCD Control unit DTU board top view with patient rpm display Note The housing of the control unit CANNOT be opened For repairs upgrades the complete control unit has to be replaced ...

Page 30: ...uttons for service menu control are internally connected by a flat cable and screwed into the housing DTU Connectors DTU patient display buttons for saddle height 1 LED for rpm zones 2 Display for rpm 3 Push buttons for saddle height eBike III comfort and service menu control DTU 1 RJ 45 connector patch cable to LIU ...

Page 31: ...232 and USB are galvanically isolated opto couplers The LIU board is mounted directly on the electronic carrier plate in the bottom of the ergometer The power supply 24 Volt is connected to the LIU and fed into the bus system The connection between DTU control unit M and LIU is made by a patch cable RJ 45 jacks the other boards are connected to the LIU by direct connectors LIU board 1 direct conne...

Page 32: ... are placed on a separate sound and vibration absorbing foam carrier When replacing the measuring valve the silicon tube has to be connected with the upper hose nipple of the valve and the cable bended to a loop The carefully slip the valve back into the foam carrier Foam carrier for measuring valve 1 and pump 2 with compensating container 3 BPU Measuring electronic board BPU Measuring electronic ...

Page 33: ...sure sensor 2 deflating valve compensating container measuring valve pump check valve sound absorber filter foam carrier deflating valve measuring valve pump BPU electronic board microphone connector in control unit 2 2 J 9 J 6 J 4 Placement of pressure tubes schematic Block diagram of cabling of the bloodpressure unit ...

Page 34: ...cture A redundant surveillance system with two pressure sensors 2 continously monitors the actual cuff pressure and the pump time The BPU board is connected to other PCBs by use of the direct bus connector 3 The measuring valve is connected to J6 4 and the pump to J4 5 BDE blood pressure measuring board Ergometer blood pressure unit complete Note The BPU is ALWAYS the last module last module place...

Page 35: ...e control of the saddle motor is performed by the SMU board The SMU has one connector for the motor 1 and another coded connector 2 for the position sensor actual motor position Motor and sensor are connected with special cables The SMU board is connected directly to the LIU 3 or BPU SMU board top view ...

Page 36: ...oors 8 Sockets for power cord and connection cables underside of ergometer 9 Power switch toggle switch I 0 10 Saddle adjustment with clamping lever 1 Control unit 2 Speed readout for patient keys for saddle height motor adjustment 3 Connectors for blood pressure cuff 4 Adjustment of handlebar angle 5 Castors 6 Baseplate large 7 Leveling feet to adjust the ergometer to uneven floors 8 Sockets for ...

Page 37: ... screws 4 Close the lever and check if the handlebar is secure 5 The force of the lever can be adjusted by turning the screw inside the lever 6 Open the handlebar lever 7 Turn the screw clockwise a quarter turn using a flat screwdriver 8 Close the lever and check if the handlebar is secure Handlebar Dismounting mounting 1 Open the handlebar lever and turn the handlebar downwards 2 Remove the allen...

Page 38: ...er by turning the screw counterclockwise 4 Unscrew the lever out of the terminal adapter by turning the lever counterclockwise 5 Remove the washer 6 Remove the two allen screws and remove the rear part of the terminal adapter 7 The handlebar can be changed 8 Follow the steps in reverse order to secure the handlebar ...

Page 39: ...ent caps used The different caps are marked with small slots from cap type 0 no slot up to cap type 4 4 slots see picture The caps can only be removed by destroying them Before removing plastic parts of the housing be sure to have spare plastic caps available PN 2018111 335 Plastic cap with marking slots type 4 cap type 0 handlebar housing cap type 1 eBike III basic eBike III comfort cap type 2 eB...

Page 40: ...ar pole housing 2 Using a small screwdriver cut into the plastic caps covering the screws and remove the caps the caps will later be replaced by spare ones P N 2018111 335 3 Remove the screws with an allen key tool 4 The two parts of the handlebar pole housing can be carefully removed 5 Follow the steps in reverse order to reassemble the handlebar pole housing ...

Page 41: ... the screw of the crank 3 Loosen the screw with a wrench 17 mm 4 Remove the screw and the lock washer When mounting the cranks after repair use a torque wrench to tighten the screw with a torque of 40 Nm 5 Turn the crank extractor and securely tighten the screw completely into the winding of the crank screw 6 Use a wrench 17 mm to remove the crank by screwing the bolt onto the axis ...

Page 42: ...orque of 25 Nm 2 Remove the lever for saddle height by turning it counterclockwise 3 Remove the two plastic caps cap type 4 on both sides 4 Using a small screwdriver cut into the plastic caps covering the screws and remove the caps the caps will later be replaced by spare ones P N 2018111 335 5 Remove the two allen screws underneath the plastic caps 6 Remove the allen screw at the rear side of the...

Page 43: ... lifted and carefully removed Remove inlays 1 Using a small flat screwdriver lift the inlay panel and carefully release the panel 2 Continue to carefully loosen the remaining tabs until the panel can be removed completely Note Avoid scratching the main plastic housing ...

Page 44: ...remove the six caps 3 on each side the caps will later be replaced by spare ones P N 2018111 335 see picture items A 2 Remove the three allen screws in the main side parts see picture items A and the two allen screws under the removed inlays picture items B on both sides 3 Unlock the metal bracket connecting both sides covers of the housing by lifting it with a flat screwdriver ...

Page 45: ... side covers of the housing can be removed by lifting up the panels from the aluminum bottom plate see detail 5 The drive unit saddle mechanics and power supply are accessible 6 Follow the steps in reverse order to assemble the eBike III basic housing ...

Page 46: ... allen screw from the front part of the top cover Using a small screwdriver cut into the plastic cap cap type 3 covering the screw and remove the cap on both sides the caps will later be replaced by spare ones P N 2018111 335 2 Using two allen keys remove the long screw securing the top cover to the housing brackets ...

Page 47: ...into the two plastic caps top cap type 2 bottom cap type 1 covering the screws and remove the caps on both sides The caps will later be replaced by spare ones P N 2018111 335 Note The top plastic cap cap type 2 is not symmetric when reassembling the bracket housing the indication mark of this cap two notches has to be positioned at the top ...

Page 48: ... a round 3 mm pin into the small holes front and rear of bracket top to unlock the housing 3 Remove the two metal brackets connecting the two sides of the housing brackets 4 Starting at the bottom release the housing panels from the brackets in the side housing covers and remove ...

Page 49: ...curing the housing panels to the metal chassis 2 Lift the housing covers to release the covers from the brackets in the aluminium base and remove 3 The drive unit saddle mechanics and power supply are accessible 4 Follow the steps in reverse order to assemble the eBike III comfort housing side panels ...

Page 50: ...ve housing of the eBike III basic on page 42 2 Loosen the limiting screw for the saddle pillar with an Allen key 3 Remove the lever 4 Loosen the Philips screw 5 Remove the clamping plate and the threaded plate 6 The saddle pillar can be pulled out 7 Follow the steps in reverse order to assemble the saddle pillar ...

Page 51: ...remove the bottom fixation of the saddle motor screw and nut are accessible via a hole at the bottom Use a socket wrench and an Allen key from the counter side to dismount the screw 5 Unscrew the four screws of the saddle guide tube with a fork wrench 13mm Start by removing screws 1 to 3 see picture Loosen screw 4 and move the guide backwards until the screw releases and can be removed Note Try to...

Page 52: ...it from the ergometer 7 Loose both TORX screws at the top 8 Push the saddle motor inside the saddle tube to allow the cylindrical pin to be removed from the saddle shaft 9 Pull the saddle motor out of the saddle guide tube 10 Follow the steps in reverse order to install the new motor ...

Page 53: ... the cable 3 Remove the two allen screws securing the strain gauge module 4 Remove the strain gauge module 1 and the heat sink 2 and carefully pull the cable through the hole in the bottom plate 5 When installing the new module carefully allign the module and the heat sink in parallel to the eddy current brake 6 When securing the module in place carefully tighten the two screws excessive force may...

Page 54: ...g is located underneath the bottom plate 3 Use a long flexible magnetic Allen key to remove the two Allen screws securing the RPM module from the bottom plate 4 Carefully remove the RPM module through the hole in the bottom plate 5 Insert the new RPM module carefully through the hole in the bottom plate into the load unit 6 From the top of the load unit carefully tighten the two Allen screws 7 Con...

Page 55: ...ys on one side 2 Disconnect all cables from the electronic boards 3 The load unit is secured with six Allen key screws on the ergometer chassis Brace the load unit from falling over and then using a socket wrench loosen the screws Use a torque wrench to tighten the screws of the new load unit with a torque of 25 Nm Assembly of the load unit 1 Galvanized steel housing 2 Precision bearings 3 Calibra...

Page 56: ...switch If the cable between switch and LIU board has to be replaced open the electronic carrier underneath the eBike disconnect the power cable from the LIU board and replace it with the spare cable included in the package 4 Secure the cables with a cable strap When reassembling the housing 5 Slide the plastic cover of the power switch in the appropriate slot in one side part of the housing 6 Duri...

Page 57: ...ket again 4 Remove the power supply cable from the main switch and connect the cable of the new power supply accordingly 5 Secure the cables with a cable strap When reassembling the housing 6 Slide the plastic cover of the power switch in the appropriate slot in one side part of the housing 7 During assembly of the side parts take care that the plastic cover of the main switch fits into the corres...

Page 58: ...trol terminal 2 Remove the control terminal from the support 3 Disconnect the patch cable 1 from the DTU board eBike III with blood pressure measurement Disconnect microphone cable 2 and cuff hose 3 see following instructions and pictures Note The housing of the control unit CANNOT be opened For repairs upgrades the complete control unit has to be replaced ...

Page 59: ... disconnect the microphone connector the cable will be damaged 1 4 Disconnect the microphone cable at the 3 pole connector see picture Press the small clip downwards 1 and pull out the connector carefully 2 with clip pressed downwards 5 Disconnect the blue hose at the hose connector see picture ...

Page 60: ...otely by a host device for example CASE CardioSoft No setup is required by the user All configuring is done through the service menu only Note Instruct the patient not to pedal while the ergometer is powering and during the self test Apply the blood pressure cuff to the patient AFTER the ergometer has been powered on and the self test com pleted If an error message appears displays after the self ...

Page 61: ...P mmHg kPa NIBP Beep Baudrate 8N2 Analog Calibration Software Update Dynamic Load Calibration Saddle Calibration NIBP Calibration NIBP Test System Config Error log Manual load Reset DMS values Navigate through the menus by using the arrow keys saddle height to position the cursor bar Confirm the selection by pressing NIBP to the right of the LCD Select the desired parameter using the arrow keys an...

Page 62: ... communication modes Digital default The communication with the ergo meter is entirely controlled with digital commands Analog Digital optional An analog voltage controls the load blood pressure measurements can be initiated with digital commands To use the Analog Digital communication mode the eBike III ergometers have to be equipped with the optional COM Modul PN 201118 340 Select the communicat...

Page 63: ...Hg kPa NIBP Beep The tone signal for the systolic pulse during NIBP measurement can be set to on or off Select the desired setting and confirm by pressing NIBP NIBP mmHg kPa The units for the NIBP values displayed can be changed Select the desired units and confirm by pressing NIBP Beep during BP measurements ...

Page 64: ...re update of the ergometer firmware see the session Software update on page 78 Baudrate 8N2 The baudrate can be selected between 1200 Baud and 115000 Baud Default value for standard ergometers is 4800 Baud Select the desired parameter using the arrow keys and confirm by pressing NIBP Saddle Calibration eBike III comfort only This parameter is used to adjust the electrical saddle motor display scal...

Page 65: ...ight 5 Saddle Calibration SET TOP Position SET BOTTOM Position EXIT Select SET BOTTOM Position and confirm by pressing NIBP Use the arrow keys to move the saddle to the desired bottom position 69 cm 0 5 cm above bottom plate see picture and confirm SET by pessing NIBP Select EXIT and confirm by pressing NIBP to return to the service menu Calibration of saddle height BOTOM Position ...

Page 66: ... to the service menu System Config The hardware configuration of the ergometer is defined in this setup Select the module option and change the setting to I if the module is integrated in the actual ergometer The last selection EXIT returns to the service menu Settting of ergometer configuration Note Analog Interface is set to I only if a MAC5500 is connected to the eBike III In conjunction with t...

Page 67: ...ges can be checked and cleared in this menu To display the stored error messages select Show Error Logs and confirm with by pressing NIBP The first error message is displayed Source The unit generating the error Err Code Corresponding error code of the software Quantity Number of occurences of this error Using the arrow keys the following error messages can be displayed Press the NIBP Exit to clos...

Page 68: ... fixed to the chassis with a plastic velcro tape In addition a jummper connector has to be installed on the LIU board The COM module handles one analog input and five analog output signals from to external devices Select the analog signal to be aligned and confirm by pressing the NIBP key Alignment of analog input output signals Note To align the analog load signals the corresponding ECG recorder ...

Page 69: ...ressing NIBP Use the arrow keys to set the load value to the ECG recorder vaue for example 20 Watt and confirm by pressing NIBP The setting is stored in the ergometer Set the ECG recorder output to a high load value for example300 Watt The corresponding voltage is displayed IN Volt Wait until the voltage has settled Select GAIN and confirm by pressing NIBP Use the arrow keys set the load value to ...

Page 70: ...keys to set the load value and confirm by pressing NIBP Setting range GAIN voltage 20 mV to 10000 mV in steps of 2 mV GAIN load 20 to 999 Watt in steps of 10 Watt Alignment Output Analog Heartrate The output voltage representing a special heart rate is defined with this setting It is possible to adjust the voltage and or the heartrate value The setting is performed as described previously under Al...

Page 71: ...mmHg in 5 mmHg steps Alignment Output Analog Diastole The output voltage representing the diastolic value is defined with this setting It is possible to adjust the voltage and or the diastolic value The setting is performed as described previously under Alignment Ouput Analog Load value Setting range GAIN voltage 500 to 2000 mV in 2 mV steps GAIN diastole 50 to 250 mmHg in 5 mmHg steps Alignment O...

Page 72: ...att at 50 rotations min 50 Watt at 110 rotations min 400 Watt at 110 rotations min To activate the service menu the ergometer has to be switched off and on again As soon as the self test appears on the ergometer display press the two softkeys synchronously To prevent settings from being changed by chance the service menu is protected by a password Select 999 with the arrow keys and confirm with NI...

Page 73: ...with NIBP The line DMS shows stored DMS value actual DMS value By pressing NIBP START the actual value is averaged for 5 sec and stored Press NIBP START to start calibration step 1 The eBike III automatically sets the load to 50 Watt Set the calibrator unit to 50 rpm The line RPM shows the measured rotations min issued by the calibrator unit the value P is not used in the eBike III The line Load s...

Page 74: ...using the arrow keys input the actual value of the calibrator e g 50 8 Watt at the ergometer Store the value with SET The eBike III automatically sets the load to 400 Watt Wait approx 20 seconds until the load display is stable By using the arrow keys input the actual value of the calibrator e g 403 2 Watt at the ergometer Store the value with SET The successfull completion of the dynamic load cal...

Page 75: ...ponents Calibrated pressure measuring device mmHg manometer Compensating container with 500 ml volume min Hand pump Adapter for eBike cuff connector Connecting tubes with t adaptors Calibrated pressure measuring device mmHg Compensating container example Hand pump Adapter for eBike cuff connector ...

Page 76: ... by pressing NIBP Use the hand pump to apply a fixed pressure to the system The actual pressure value is displayed Compare the displayed ergometer value with the value of the manometer The maximum allowed deviation is 3mmHg Select EXIT and confirm by pressing NIBP to return to the service menu M compensating container 500 ml manometer hand pump Connecting tubes Control unit Calibration setup NIBP ...

Page 77: ...f connector with a short tube 3 The actual pressure value is displayed 4 Select SET and confirm by pressing NIBP 5 The zero value is averaged and stored Calibration with 200 mmHg Connect the complete measurement system hand pump manometer and compensating container as described in NIBP test 6 Using the hand pump apply a fixed pressure of 200 mmHg to the system control by the external manometer 7 W...

Page 78: ...in the service menu To activate the service menu the ergometer has to be powered off and on again As soon as the self test displays on the ergometer LCD press the two arrow keys simultaneously To prevent settings from being changed in error the service menu is protected with a password Select 999 with the arrow keys and confirm by pressing NIBP The complete handling of the menues is done using the...

Page 79: ...layed Select Show Software Rev and confirm by pressing NIBP to display the installed software versions of the different electronic modules Grp name of the module Ap SW current installed version if 0 no connection to module X XCUT of software version always 0 S No serial number of PCB if electronically available Press the NIBP key again to display the installed bootloader versions of the different ...

Page 80: ...M Port used for the connection with the ergometer 4 Click CONNECT to establish the software connection As soon as the connection is established the START button becomes active or an error message displays Initiate the update by pressing START The update progress is displayed on the ergometer LCD and on the PC After the update is performed the ergometer has to be powered off and on again Software U...

Page 81: ... CASE eBike DSUB 9 male CASE DSUB 9 female cable 22336203 Connectivity and installation eBike III to GE ECG devices eBike III to CASE Connections cable 22336203 eBike PORT 1 RS 232 CASE COM 1 or COM 2 Cable PIN settings Pin 2 Pin 3 Pin 3 Pin 2 Pin 5 Pin 5 ...

Page 82: ...ys simultaneously To prevent settings from being changed in error the service menu is protected with a password Select 999 with the arrow keys and confirm by pressing NIBP Select ECG type by using the arrow keys and confirm by pressing NIBP To prevent settings from being changed in error the ECG type menu is protected with a password Using the arrow keys enter 003 and confirm the entry by pressing...

Page 83: ...SOFT CS USB USB interface driver installation To use the communication via USB a driver to generate a virtual COM port has to be installed in the PC The driver for the used operating system is available on the CD delivered with the eBike III system If the driver CD is not available it can be downloaded from GE InfoCenter or you can contact GE technical support ...

Page 84: ...ike power switch in the ON position eBike is automatically recognized by WINDOWS and the driver is loaded Silicon Labs CP 210x 8 Follow the instructions given on the screen 9 Remove the CD from the drive unit Check USB interface 1 The eBike has to be connected to the PC via USB cable and power switch in the ON position 2 Start the WINDOWS Device manager 3 Double click COM LPT to display all connec...

Page 85: ...Port Number and select an unused COM port between COM1 and COM4 6 For CardioSoft CS V6 73 and above Click onto COM Port Number and select an unused COM port between COM1 and COM32 7 Confirm by clicking OK 8 Close all open windows eBike III software setting To activate the service menu the ergometer has to be powered off and on again As soon as the self test displays on the ergometer LCD press the ...

Page 86: ...g the arrow keys and confirm by pressing NIBP To prevent settings from being changed in error the ECG type menu is protected with a password Using the arrow keys enter 003 and confirm the entry by pressing NIBP Select the ECG type Digital and confirm the selection by pressing NIBP Power off the ergometer to leave the service menu CARDIOSOFT CS software settings Please refer to the manual of the CA...

Page 87: ...c comfort 87 eBike III MAC 2000 eBike DSUB 9 male MAC 2000 DSUB 9 male cable 2006795 001 eBike III to MAC 2000 Connections cable 2006795 001 eBike PORT 1 RS 232 MAC 2000 RS 232 B Cable PIN settings Pin 2 Pin 3 Pin 3 Pin 2 Pin 5 Pin 5 ...

Page 88: ... simultaneously To prevent settings from being changed in error the service menu is protected with a password Select 999 with the arrow keys and confirm by pressing NIBP Select ECG type by using the arrow keys and confirm by pressing NIBP To prevent settings from being changed in error the ECG type menu is protected with a password Using the arrow keys enter 003 and confirm the entry by pressing N...

Page 89: ...nalog cable 2 2008114 001 RS 232 eBike COM module MAC 5500 eBike III to MAC 5500 MAC 5000 ST Connections 2 cables cable 1 2008110 001 cable 2 2008114 001 eBike ANALOG at COM module eBike PORT 3 RS 232 at COM module MAC 5500 ANA TTL MAC 5500 Jack 2 P5 Cable PIN settings Pin 1 Pin 2 Case Pin 5 Pin 1 Pin 8 Pin 2 Pin 4 Pin 5 Pin 6 ...

Page 90: ...III is by default only equipped with a digital interface To connect an eBike III with a MAC 5000 ST 5500 a special adapter COM module PN 2018111 340 has to be installed to add an analogue interface to the eBike III A jumper adapter has to be placed onto the LIU board to connect all required signals to the DSUB connector 1 Open the electronic carrier housing located in the bottom plate of the eBike...

Page 91: ...rgometer chassis again 4 The COM module is connected with a short cable plugged onto the 9 pole DSUB connector PORT 1 5 Use the plastic velcro tape to fix the COM module to the housing of the eBike Insert the appropriate digital and analog connecting cables The analog adapter has to be activated in the eBike III software as follows COM module mounted on eBike III COM module connectors COM module c...

Page 92: ...ometer LCD press the two arrow keys simultaneously To prevent settings from being changed in error the service menu is protected with a password Select 999 with the arrow keys and confirm by pressing NIBP Select System config by using the arrow keys and confirm by pressing NIBP Select Analog Interface by using the arrow keys and change the setting to I by pressing NIBP Then select EXIT and return ...

Page 93: ... again Select service code 999 with the arrow keys and confirm by pressing NIBP Select ECG type by using the arrow keys and confirm by pressing NIBP To prevent settings from being changed in error the ECG type menu is protected with a password Using the arrow keys enter 003 and confirm the entry by pressing NIBP Select the ECG type Analog Digital and confirm the selection by pressing NIBP Power of...

Page 94: ...r bits set Bit 3 LCD communication error Bit 4 24V out of range Error code bits DTU Control terminal PCB Bit Error Reaction Display Info Troubleshooting 0 Illegal program jump Safety shut down restart eBike OFF ON if error persists replace control terminal 1 Wrong SW configuration Warning perform software update 2 not used 3 LCD communication error Safety shut down check LCD connection if error pe...

Page 95: ...n gauge module 4 24V out of range Internal error check power supply check connections power supply to switch to LIU cable DTU LIU 5 5V out of range Safety shut down restart eBike OFF ON if error persists replace LIU 6 Brake not released Safety shut down check connections LIU brake LIU strain gauge module perform static calibration if error persists reset DMS default values 7 Safety state mode Safe...

Page 96: ... SMU check cable motor SMU if error persists replace seat motor 2 Wrong cabling Module is switched off Internal error check cable sensor SMU check cable motor SMU replace cables 3 not used 4 24V out of range Warning check power supply check connections power supply to LIU replace SMU 5 not used 6 not used 7 Safety state mode Module is switched off Internal error restart eBike OFF ON if error persi...

Page 97: ...unit 4 Errror Calibration Module is switched off Internal error perform NIBP test perform NIBP calibration replace BPU PCB 5 Error offset Module is switched off Internal error perform NIBP test perform NIBP calibration replace BPU PCB 6 not used 7 not used 8 Safety state mode Module is switched off Internal error restart eBike OFF ON if error persists replace BPU 9 Setup not ready Module is switch...

Page 98: ...IU replace COM 5 not used 6 not used 7 Safety state mode Module is switched off Internal error restart eBike OFF ON check mounting of COM DSUB connector check jumper on LIU if error persists replace COM 8 Setup not ready Module is switched off Internal error check mounting of COM DSUB connector check jumper on LIU restart eBike OFF ON if error persists replace COM 9 CAN zykl Timeout Module is swit...

Page 99: ...side panel eBike III basic right with silk screened GE logo 10x screw M4x10 4x screw M4x16 1x screw M4x12 2x washer 6x plastic cap type 4 2x plastic cap type 1 1x metal bracket SPARE EBIKE III BASIC COVER SET R L Service Kit cover set eBike III basic kit 2018111 148 1x threaded plate 34x35x8 mm 1x clamping sheet 30x26x5 mm 1x clamping lever M10x 40 1x screw M6x20 1x screw M5x16 1x high performance...

Page 100: ...x35x 8 mm 1x clamping sheet galvanized 1 x screw M6x20 1x setscrew M5x16 1x clamping lever M10x 40 for clamping of saddle handlebar 1 x compensating sheet 0 5 mm 1x high performance lubricant white approx 5 g SPARE EBIKE II III BASIC SADDLE TUBE Service Kit Assembled saddle tube w o motor for eBike II III basic 2018111 022 SPARE EBIKE SADDLE STANDARD Bicycle saddle standard 2018111 021 2x levellin...

Page 101: ...rew M5x18 Li Kr SPARE EBIKE STRAIN RELIEF SET Service Kit Strain relief kit 2018111 302 1x pedal large left and right SPARE EBIKE III PEDAL SET R L LARGE Pedal set 2018111 301 1x crank left square 170 mm 1x crank right square 170 mm 1x pedals large left and right 2x combi slotted screw M8x1x18 2x lock washer 2x cap for crank thread SPARE EBIKE III CRANK PEDAL SET R L Pedal set left and right crank...

Page 102: ... handlebar eBike III SPARE EBIKE III HANDLE BAR 2018111 322 1x clamp lever 1x screw M5x20 1x washer plastic special 1x washer metal special SPARE EBIKE III CLAMP LEVER FOR HANDLEBAR Service Kit Clamp lever for handlebar 2018111 319 2x cover R L short 2x screw M4x16 allen key 2x plastic cap type 0 SPARE EBIKE III COVER SET Service Kit Cover for handlebar pole Spare parts eBike III BASIC Pedal eBike...

Page 103: ...sher 8 4x15x0 8 SPARE EBIKE III DRIVE UNIT NEW WITH STRAIN GAUGE Service Kit drive unit new for eBike III 2018111 307 1x drive unit eBike III replacement assembled 6x screw M8x20 6x star washer 8 4x15x0 8 SPARE EBIKE III DRIVE UNIT EXCHANGE WITH STRAIN GAUGE Service Kit drive unit replacement for eBike III 2018111 308 1x strain gauge module for drive unit eBike III with cable 2x screw M5x40 allen ...

Page 104: ...ervice Kit power supply module for eBike II and eBike III Basic kit 2018111 305 1x power switch with cover pre assembled for eBike III basic 1x cable connecting the power supply to the PCB LIU SPARE EBIKE III BASIC POWER SWITCH Service Kit power switch with panel and cable for eBike III Basic kit 2017911 140 POWER CORD C EURO EBIKE II III power cord EURO for eBike II basic comfort eBike III basic ...

Page 105: ...E II III power cord US for eBike II basic comfort eBike III basic comfort 2017911 144 POWER CORD M2 SOUTH AFRICA EBIKE II III power cord SOUTH AFRICA for eBike II basic comfort eBike III basic comfort 2017911 145 POWER CORD I2 AUSTRALIA EBIKE II III power cord AUSTRALIA for eBike II basic comfort eBike III basic comfort Spare parts eBike III BASIC Power supply eBike III ...

Page 106: ...II 2018111 313 1x PCB BPU SPARE EBIKE III PWA BPU PCB BPU for eBike III 2018111 314 1x PCB SMU SPARE EBIKE III PWA SMU PCB SMU for eBike III 2018111 315 1x blood pressure pump incl cable 1x input filter unit 1x check valve SPARE EBIKE III NIBP PUMP WITH CABLE Service Kit blood pressure pump unit for eBike III Spare parts eBike III BASIC PCBs eBike III ...

Page 107: ...sound absorber 1x input filter SPARE EBIKE III PUMP TUBING COMPLETE Service Kit NIBP tube kit 2018111 318 1x NIBP air compensation container SPARE EBIKE III AIR COMPENSATION CONTAINER 2018111 320 1x control terminal eBike III new with NIBP GE 2x screw M4x10 combi slotted SPARE EBIKE III CONTROL TERMINAL COMPLETE WITH NIBP Spare parts eBike III BASIC Control Terminal eBike III ...

Page 108: ...with rectus connector 1x microfone connector with nut 2x shrinking tubes SPARE EBIKE III CUFF CONNECTOR SET Service kit cuff connector set eBike III 2018111 334 all screws for eBike III basic comfort SPARE EBIKE III SCREW SET Service Kit screw set kit 2018111 335 all plastic caps and metal brackets for eBike III basic comfort SPARE EBIKE III PLASTIC CAP SET Service Kit plastic caps kit Spare parts...

Page 109: ...ey 2x plastic cap type 4 2x plastic cap type 2 1x plastic cap large SPARE EBIKE III COMFORT HOUSING BRACKET housing bracket R L for eBike basic III comfort 2018111 328 1x side panel left 1x side panel right 4x screw M4x16 allen key SPARE EBIKE III COMFORT SIDE PANEL L R housing side panel R L for eBike basic III comfort 2018111 337 1x saddle motor eBike III pre assembled 1x screw M10x25 special 1x...

Page 110: ...dle guide for eBike III comfort with saddle tube 2018111 022 SPARE EBIKE SADDLE STANDARD Bicycle saddle standard 2018111 311 2x plastic wheel preassembled 8x screw M6x12 SPARE EBIKE III WHEEL SET Service Kit Plastic wheels kit 2018111 021 2x levelling device M10x30 SPARE EBIKE LEG LEVELLERS Service Kit Levelling device kit Spare parts eBike III COMFORT Housing Basic Unit eBike III ...

Page 111: ... PEDAL SET R L LARGE Pedal set 2018111 301 1x crank left square 170 mm 1x crank right square 170 mm 1x pedals large left and right 2x combi slotted screw M8x1x18 2x lock washer 2x cap for crank thread SPARE EBIKE III CRANK PEDAL SET R L Pedal set left and right cranks and large pedals 2018111 029 2x combi slotted screw M8x1x18 2x lock washer 2x cap for crank thread SPARE EBIKE SCREW SET FOR CRANKS...

Page 112: ...e Kit Clamp lever for handlebar 2018111 319 2x cover R L short 2x screw M4x16 allen key 2x plastic cap type 0 SPARE EBIKE III COVER SET Service Kit Cover for handlebar pole 2018111 325 1x handlebar pole cpl preassembled with 1x terminal mounting adapter 1x NIBP tube 1x microphone cable 1x patch cable 1x lever for handlebar 4x screws M10x25 allen key SPARE EBIKE III HANDLEBAR POLE COMPLETE Spare pa...

Page 113: ... M8x20 6x star washer 8 4x15x0 8 SPARE EBIKE III DRIVE UNIT EXCHANGE WITH STRAIN GAUGE Service Kit drive unit replacement for eBike III 2018111 308 1x strain gauge module for drive unit eBike III with cable 2x screw M5x40 allen key SPARE EBIKE III STRAIN GAUGE Service Kit Strain gauge module eBike III 2018111 309 1x RPM sensor preassembled 2x screw M4x8 1x special Allen key SPARE EBIKE III RPM SEN...

Page 114: ...for eBike III comfort 1x cable connecting the power supply to the PCB LIU SPARE EBIKE III COMFORT POWER SWITCH Service Kit power switch with panel and cable for eBike III comfort kit 2017911 140 POWER CORD C EURO EBIKE II III power cord EURO for eBike II basic comfort eBike III basic comfort 2017911 141 POWER CORD G2 UK EBIKE II III power cord UK for eBike II basic comfort eBike III basic comfort ...

Page 115: ...A EBIKE II III power cord SOUTH AFRICA for eBike II basic comfort eBike III basic comfort 2017911 145 POWER CORD I2 AUSTRALIA EBIKE II III power cord AUSTRALIA for eBike II basic comfort eBike III basic comfort 2018111 312 1x LIU PCB pre assembled with back panel 3x mounting bolts SPARE EBIKE III PWA LIU PCB LIU kit for eBike III Spare parts eBike III COMFORT PCBs eBike III ...

Page 116: ...A SMU PCB SMU for eBike III 2018111 315 1x blood pressure pump incl cable 1x input filter unit 1x check valve SPARE EBIKE III NIBP PUMP WITH CABLE Service Kit blood pressure pump unit for eBike III 2018111 316 1x measuring valve incl Cable SPARE EBIKE III MEASURE VALVE Measuring valve for eBike III Spare parts eBike III COMFORT PCBs eBike III ...

Page 117: ...nsation container SPARE EBIKE III AIR COMPENSATION CONTAINER 2018111 320 1x control terminal eBike III new with NIBP GE 2x screw M4x10 combi slotted SPARE EBIKE III CONTROL TERMINAL COMPLETE WITH NIBP 2018111 321 1x control terminal eBike III new w o NIBP GE 2x screw M4x10 combi slotted SPARE EBIKE III CONTROL TERMINAL COMPLETE WITHOUT NIBP Spare parts eBike III COMFORT Control Terminal eBike III ...

Page 118: ...TOR SET Service kit cuff connector set eBike III 2018111 334 all screws for eBike III basic comfort SPARE EBIKE III SCREW SET Service Kit screw set kit 2018111 335 all plastic caps and metal brackets for eBike III basic comfort SPARE EBIKE III PLASTIC CAP SET Service Kit plastic caps kit 2017911 131 USB CABLE 5 M EBIKE II III TO CARDIOSOFT PC Spare parts eBike III COMFORT Control Terminal eBike II...

Page 119: ... I II III TO CASE PC 2006795 001 CABLE RS232 INTERFACE EBIKE I II III TO MAC1200 1600 2000 2008114 001 CABLE RS232 INTERFACE EBIKE I II III TO MAC5500ST 2008110 001 CABLE ANALOG INTERFACE EBIKE I II III TO MAC5500ST Spare parts eBike III Interface cables to ECG devices ...

Page 120: ...connecting cable COM module to eBike III 1x jumper adapter 2x plastic velcro tape COM MODULE EBIKE III Interface box to MAC 5500 analogue 2005737 001 SERVICE TOOL EBIKE PEDAL PULLER Pedal puller for all eBikes Spare parts eBike III Interface cables to ECG devices ...

Page 121: ...eviation of Measured Load according to DIN VDE 0750 0238 25 60 watt 3 watt 60 400 watt 5 according to manufacturer 6 60 watt 3 watt 60 999 watt 5 Load Increments remote controlled Permitted Patient Weight eBike III basic 160 kg 352 lbs max eBike III comfort 200 kg 440 lbs max Saddle Height Adjustment continuous for patients between 120 cm and 210 cm 47 83 in patient height eBike III basic manual a...

Page 122: ...n height 1140 mm to 1400 mm 45 55 in weight eBike III basic approx 66 kg 145 lbs eBike III comfort approx 70 kg 154 lbs Safety Standards DIN EN 60601 1 DIN EN 60601 1 2 DIN VDE 0750 238 Protection Class Degree of Protection II B to DIN EN 60601 1 MDD Classification class IIa to 93 42 EEC RF Emission class B to DIN EN 55011 5 0 DIN EN 60601 1 2 Environment operation temperature 10 to 40 C 50 to 104...

Page 123: ...nt Error pressure readout error 3 mmHg readout resolution 1 mmHg Inflation Pressure 300 mmHg max during inflation the inflation pressure automatically adapts to patient s BP Inflation Rate between approx 6 seconds to 140 mmHg and approx 18 seconds to 300 mmHg Max Cuff Pressure 300 mmHg Cuff Deflation Method pulse dependent deflation rate approx 3 mmHg beat or approx 3 mmHg s Calibration calibratio...

Page 124: ...w gehealthcare com GE Medical Systems Information Technologies GmbH Munzinger Straße 5 79111 Freiburg GERMANY Tel 49 761 4543 0 Fax 49 761 4543 233 Asia Headquarters GE China Co Ltd No1 Huatua Road Zhangjiang Hi tech Park Pudong Shanghai P R China 201203 Tel 86 21 38777 888 Fax 86 21 38777 402 ergoline GmbH Lindenstrasse 5 D 72475 Bitz GERMANY Tel 49 7431 9894 0 Fax 49 7431 9894 128 ...

Reviews: