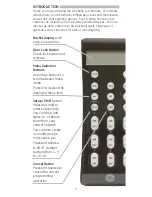
background image

GE SmartHome

Wireless Lighting Control
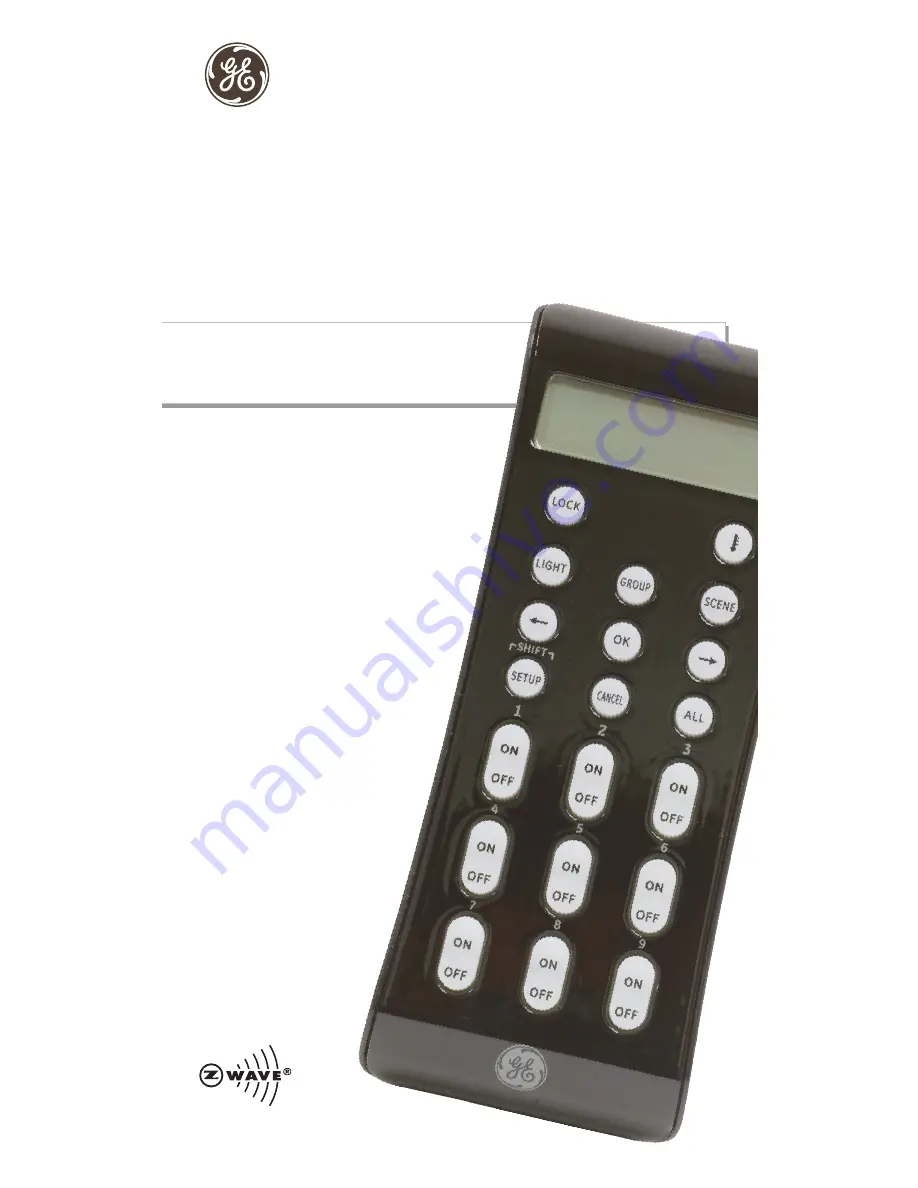
Advanced Remote

 Individual Z-Wave devices

 Groups*

 Lighting scenes**

18

CONT

RO

L

Control up to 232 Z-Wave enabled devices.

*A group turns multiple lights on/off at the same time.
**A scene dims or brightens lights in multiple areas
to suit your mood.

Works with any Z-wave 
certified lighting module

Summary of Contents for 45633

Page 1: ...ual Z Wave devices Groups Lighting scenes 18 CONTROL Control up to 232 Z Wave enabled devices A group turns multiple lights on off at the same time A scene dims or brightens lights in multiple areas to suit your mood Works with any Z wave certified lighting module ...

Page 2: ...ecific Number Key 11 12 Controlling Individual Lights 12 Turning a Light On or Off 12 Setting a Dimmer s Brightness Level 12 Removing an Individual Light From A Number Key 12 13 Deleting a Light From Your Network 13 GROUPS 13 Creating or Adding a Light to a Group 13 Controlling a Group 13 14 Removing a Light from a Group 14 Deleting a Group 14 SCENES 14 Adding a Light to a Scene 15 Controlling a S...

Page 3: ... Advanced Configuration Settings 23 ASSOCIATION 23 To Create an Association 24 To Remove an Association 24 REPLICATION copying information to another remote 24 CREATE SECONDARY CONTROLLER 24 Copying Information to this Remote 25 PRIMARY CONTROLLER SHIFT TRANSFER 25 Transferring Primary Controller Information 25 RESETTING YOUR NETWORK 25 To Reset The Network 26 RECOVERING NETWORK INFORMATION 26 FUN...

Page 4: ... 18 scenes for task or mood lighting Backlit display with easy to use menu Door Lock Button Check lock status and activate Menu Selection Buttons Use arrow buttons to scroll between menu items Press OK to select the displayed menu item Setup Shift Button Press and hold to enter setup mode You can then add lights to or delete them from your control network You can also create or modify groups and s...

Page 5: ...rtified thermostat LIGHT Use to program and or control individual lights GROUP Use to program and or turn multiple lights ON or OFF with one button SCENE Use to program and or control multiple lights at preset brightness levels The same light may be included in multiple scenes All Button Use to turn ON or OFF all Z Wave lighting at the same time Press ALL and then any number button Number Buttons ...

Page 6: ...ent is something you want to happen at a specific time and day This could be everyday a specific day of the week Monday through Friday Saturday Sunday only or a one time occurrence Events can be set up to control an individual light a group or a scene Group Groups can also be thought of as an area or zone Multiple Z Wave devices can be turned ON or OFF with a single com mand when they are placed i...

Page 7: ...ent route to use when transmitting commands to devices that are out of direct range Scene Scenes are normally activity based lighting schemes A scene lets you establish preset brightness levels for multiple Z Wave controlled lights and control them with one command This is ideal for mood or task lighting Scene 1 could be the family room lights set to dim for watching TV Scene 2 could have the same...

Page 8: ...he Z Wave device may be in a different room than the controlled appliance also an unintentional activation may occur if the wrong button on the remote is pressed Z Wave devices may automatically be powered on due to timed event programming Depending upon the appliance these unattended or unintentional operations could possibly result in a hazardous condition For these reasons we recommend the foll...

Page 9: ...a large part of the RF signal Effects of Home Construction on Wireless Range Between Z Wave Enabled Devices Note The distances shown in the table below are typical exam ples Actual performance in your home will vary From the Remote or repeating Z Wave module to destination device For Plug in Modules or In Wall Devices Installed in Plastic Junction Boxes Line of Sight No Obstructions Please Note Z ...

Page 10: ...e the Off key to actually turn it off Operational Note Regarding These Instructions The following instructions direct you to press various buttons or keys on the remote Unless otherwise noted the word press means press and release The instructions will specifically state press and hold if this is required Setup Menus Press and hold SETUP button until display changes to LGHT SETUP Use either arrow ...

Page 11: ...o network Adding A Device To Your Home Network Without Assigning It To A Specific Number Key 1 Enter SETUP and select LGHT SETUP 2 Press OK The screen will display ADD 3 Press OK The screen will display TO NETWORK 4 Press OK The screen will display WAITING in the lower right corner 5 Press and release the button on the device so that it communi cates with the remote 6 The screen will display SUCCE...

Page 12: ...ts 10 through 18 Turning a Light On or Off To turn a light on press the ON key for less than one second The screen will display the selected LIGHT and ON To turn a light off press the OFF key for less than one second The screen will display the selected LIGHT and OFF Setting a Dimmer s Brightness Level To make a light brighter press and hold the ON key for more than one second The screen will disp...

Page 13: ...e displayed in the lower right corner of the screen 4 Press the button on the device to be deleted so that it communi cates with the remote 5 When the screen displays SUCCESS you have successfully deleted the light from your network GROUPS Groups are a collection of lights that you can control with one but ton You can set up a maximum of 18 groups Creating or Adding a Light to a Group 1 Enter SETU...

Page 14: ...T 4 Press a number 1 9 for the group you wish to remove the de vice from Press SHIFT and the number 1 9 if you are removing a device from groups 10 through 18 5 Press OK The screen will display GROUP X and WAITING 6 Press the button on the device you wish to remove 7 When the screen displays SUCCESS you have successfully removed the device Deleting a Group This only deletes the specific group All ...

Page 15: ...ou have successfully added the device to a scene Please note Non dimmable On Off only lighting devices can be added to scenes in either On or Off mode so as an example the same light could be ON in scene 1 and Off in scene 2 Step 7 above is skipped when adding an On Off only device to a scene Controlling a Scene 1 Press SCENE once to put the remote in SCENE Mode The re mote will stay in this mode ...

Page 16: ... or SCN SETUP 2 Press OK The screen will display ADD 3 Use either Arrow key to select LABEL 4 Press OK The screen will display SEL DIGIT 5 Press the number key 1 9 for the LIGHT GROUP or SCENE you wish to rename Press SHIFT and the number 1 9 if you are re naming 10 through 18 6 The screen will display the selected LIGHT GROUP or SCENE 7 Press OK and then use the 1 On Off key to scroll through the...

Page 17: ...de from both 3 Use either Arrow key to select the desired option 4 Press OK The screen will display the selected option and WAIT ING 5 Press the button on the device that you wish to change 6 The screen will display SUCCESS DATE TIME and DAY SETUP The date time and day must be setup before programming timed events Please Note You will need to reprogram the Time Date and Day if the batteries are re...

Page 18: ... week 5 Press OK The screen will display SUCCESS EVENTS This remote allows you to program up to 9 automated events such as turning on or off your lights at a preset time and day You must set the time date and day before programming an Event Adding an EVENT 1 Enter SETUP and select EVENTS 2 Press OK The Screen will display ADD 3 Press OK The Screen will display EVERY DAY Use Either Arrow key to cha...

Page 19: ...1 Enter SETUP and select EVENTS 2 Press OK The screen will display ADD 3 Use either arrow key to select ON OFF 4 Press OK The screen will display SEL DIGIT 5 Press the number key for the event you want to disable re enable 6 Press OK Reviewing EVENTS 1 Enter SETUP and select EVENTS 2 Press OK The Screen will display ADD 3 Use either arrow key to select REVIEW 4 Press OK The screen will display SEL...

Page 20: ...r lock or enter the proper code on the lock s Z Wave interface 5 When the screen displays SUCCESS you have successfully added the Door Lock to your control network 6 Repeat steps 1 6 for any additional door locks Controlling a Door Lock 1 Press the LOCK button on the remote to enter that mode The remote will remain in LOCK mode until a different mode is selected 2 Press the number key associated w...

Page 21: ...lly shift to the lower number control buttons Example Four locks are pro grammed and you delete the one associated to button 2 locks 3 and 4 will shift to buttons 2 3 and button 4 will no longer be associated with a lock The setup process for door locks varies by lock manufacturer Please refer to your lock s documentation for detailed instructions THERMOSTATS This remote allows you to program and ...

Page 22: ...e done through the Delete option in the Light Setup Menu Please note Some thermostats report that they are in the OFF mode when first added to a network Make sure that you have changed the mode setting to Heat or Cool before trying to check the room temperature and or adjust the setpoint desired temperature Controlling a Thermostat The features and functions that can be remotely controlled vary by...

Page 23: ...immer is activated manually via a normal Z Wave Dim command or via an All On or All Off Z Wave command Please refer to the instructions of your Z Wave device for avail able options and specific instructions on changing its advanced configuration To Change Advanced Configuration Settings 1 Enter SETUP and select ADV CONFIG 2 Press OK The screen will display PARAM 0 3 Use either Arrow key to scroll ...

Page 24: ...roup 1 It would then transmit On Off commands to the switch when it is activated To a controller in group 2 to send battery level status or alarm tamper alerts To Create an Association 1 Enter SETUP and select ASSOCIATE 2 Press OK The screen will display ADD 3 Press OK The screen will display GROUP 1 Refer to the source device instructions for supported groups and functions 4 Use the arrow keys to...

Page 25: ...ondary remote for pro gramming information See the following section on Copying Network Device Information if the target remote is a GE 45633 remote Put the target secondary remote into programming mode so that it communicates with the primary remote and receives the network data The primary remote then copies the network and device information to the new secondary remote 7 When screen displays SU...

Page 26: ...te from a network You can reset your network to clear all device and Z Wave net work information from the remote This does not reset the Z Wave devices to their factory default Each device still needs to be deleted in order to reset them Please refer to the section on Deleting a Device from Your Network for details If you intend to still have an operational network make sure the remote you are exc...

Page 27: ...Class Controller Replication Command Class Encryption Command Class Lock Command Class Manufacturer Specific Command Class Multi level Switch Version 1 Command Class Thermostat Command Class Version Command Class When using the Basic Command Class to control devices the con troller will either transmit a value of 0 OFF or 255 ON depending on the button pressed KEEPING THE CONTROLLER AWAKE Under no...

Page 28: ... to turn on to their last used bright ness level Lowering the brightness level of a GE dimmer to its minimum setting does not turn the device off even though it looks like it is off Check the Z Wave FAQs in the Support section of our website for additional information http www jascoproducts com z wave GE Z Wave Support asp If the unit has no respond or locked up when the battery is in good conditi...

Page 29: ...from manufac turing defects for a period of two years from the original date of consumer purchase This warranty is limited to the repair or replacement of this product only and does not extend to conse quential or incidental damage to other products that may be used with this product This warranty is in lieu of all other warranties expressed or implied Some states do not allow limitations on how l...

Page 30: ...30 ...

Page 31: ...31 ...

Page 32: ...eral Electric Company and is used under license by Jasco Products Company LLC 10 E Memorial Rd Oklahoma City OK 73114 MADE IN CHINA 2014 JASCO Products Z Wave is a registered US trademark of Sigma Designs 45633 Ver 3 rev 01 06 14 ...

Reviews: