

Three-Way Calling
Regular Method:
For use with 2 handsets and an external landline call
During a landline call with a handset, the other registered
handset(s) display
Landline Busy
. To have a second
handset join the call;
1. Press
.
2. Press
ress
to connect. The original handset will hear a
beep to indicate another handset has joined the call.
NOTE: The above procedure will only work for
a Landline Call. For three way calling with an
external Skype call, use the “Invite Handset”
method.
“Invite Handset” Method:
For use with 2 handsets and a Skype Call or landline call
1. During an external call, press
to put the call on
Hold.
2. Press to select
OPTIONS
.
3. Press
and
to select
Invite Handset
.
4. Press
and
to select from any available
registered handset or
Internal Call to All
.
The receiving
handset(s) is paged and emits a tone. Wait for the
person at the receiving handset to press
to
connect the call.
5. Press on the originating handset to select
OPTIONS
.
6. Press
and
to select
Join in Conference
.
7. To end conference call,
both handsets must press
.
Transferring External Calls to Other
Handsets
1. Follow steps 1 - 6 for Three Way Calling Invite Handset
Method.
2. After conference is established, press
on
originating handset. External call is connected to the
second handset.
Changing the Battery
CAUTION: To reduce the risk of fire or
personal injury, use only the Thomson
Inc. approved model BYD NiMH H-AAA
900mAh 1.2V, rechargeable Nickel-
metal Hydride AAA batteries, which is
compatible with this unit.
1. Make sure handset is
OFF
(not in TALK mode) before
you replace battery.
2. Remove the battery compartment door.
3. Remove the batteries from the handset.
4. Insert the new batteries.
5. Put the battery compartment door back on.
6. Place handset in the base or handset charge cradle to
charge.
Allow the handset battery to properly charge
(for 16 hours) prior to first use or when you install a
new battery pack. If you do not properly charge the
phone, battery performance will be compromised.
Installing the Handset
Battery
NOTE: You must install the handset
batteries before using the cordless
handset.
CAUTION: To reduce the risk of fire or
personal injury, use only the Thomson
Inc. approved model BYD NiMH H-AAA
900mAh 1.2V, rechargeable Nickel-
metal Hydride AAA batteries, which are
compatible with this unit.
1. Locate batteries and battery door which are packaged
together inside a plastic bag and are separate from the
handset.
2. Locate the battery
compartment on
the back of the
handset.
3. Insert the batteries.
4. Close the battery
compartment by
pushing the door
up until it snaps
into place.
5. Plug the AC power
adaptor of the
charge cradle into
an electrical outlet.
6. Place the handset
in the charge
cradle. The CHARGE
indicator turns on,
verifying the battery
is charging.
Allow handset to charge for 16 hours prior to first use.
If you do not properly charge the handset, battery
performance is compromised.
Registration
YOU MUST REGISTER THE HANDSET BEFORE USE!
After the optional handset has charged for 16 hours.
Screen displays
Press reset button on base station and
insert handset in charger
. Handset will automatically
register to base.
NOTE: Once a handset has completed
registration successfully,
HANDSET X
shows on the handset’s display, X stands
for handset number, you can rename your
handset.
NOTE: The maximum number of handsets
which can be registered to the system is 4.
NOTE: The new handset will be
automatically UPDATED or DOWNGRADED
to the actual software version of the base.
Handset Name
This menu allows you to enter a name for the handset,
which displays on the top banner of the idle screen.
1. From the
idle screen
, press to enter the main
menu.
2. Press
and
to select
Settings
.
3. Press
and
to select
Cordless settings
.
4. Press
and
to select
Handset name
.
5. Enter the handset name (up to 12 characters).
6. Press
to save your selection.
NOTE: If you make a mistake, use the
button to backspace and delete one
character at a time or press and hold to
delete all.
SEE MARKING ON BOTTOM / BACK OF PRODUCT
RISK OF ELECTRIC SHOCK
DO NOT OPEN
WARNING: TO
PREVENT FIRE OR
ELECTRICAL SHOCK
HAZARD, DO NOT
EXPOSE THIS
PRODUCT TO RAIN
OR MOISTURE.
THE LIGHTNING
FLASH AND ARROW
HEAD WITHIN THE
TRIANGLE IS A
WARNING SIGN
ALERTING YOU OF
“DANGEROUS
VOLTAGE” INSIDE
THE PRODUCT.
CAUTION: TO REDUCE THE
RISK OF ELECTRIC SHOCK, DO
NOT REMOVE COVER (OR
BACK). NO USER
SERVICEABLE PARTS INSIDE.
REFER SERVICING TO
QUALIFIED SERVICE
PERSONNEL.
THE EXCLAMATION
POINT WITHIN THE
TRIANGLE IS A
WARNING SIGN
ALERTING YOU OF
IMPORTANT
INSTRUCTIONS
ACCOMPANYING
THE PRODUCT.
CAUTION:
Important Information
NOTICE
: This product meets the applicable Industry
Canada technical specifications.
Operation is subject to the following two conditions: (1)
This device may not cause interference, and (2) This device
must accept any interference, including interference that
may cause undesired operation of the device.
The equipment must be installed using an acceptable
method of connection. The customer should be aware
that compliance with the above conditions may not
prevent degradation of service in some situations.
Repairs to certified equipment should be made by an
authorized Canadian maintenance facility designated by
the supplier. Any repairs or alterations made by the user
to this equipment, or equipment malfunctions, may give
the telecommunications company cause to request the
user to disconnect the equipment.
Users should ensure for their own protection that the
electrical ground connections of the power utility,
telephone lines and internal metallic water pipe systems,
if present, are connected together. This precaution may
be particularly important in rural areas.
CAUTION:
Users should not attempt to make such
connections themselves, but should contact the
appropriate electric inspection authority, or electrician, as
appropriate.
NOTES:
This equipment may not be used on coin service
provided by the telephone company.
for use with Model 28310
2 in 1 - Skype Internet
& Standard Phone
Model 28311
00019158 (Rev. 0 CAN E/F)
07-21
Printed in Malaysia
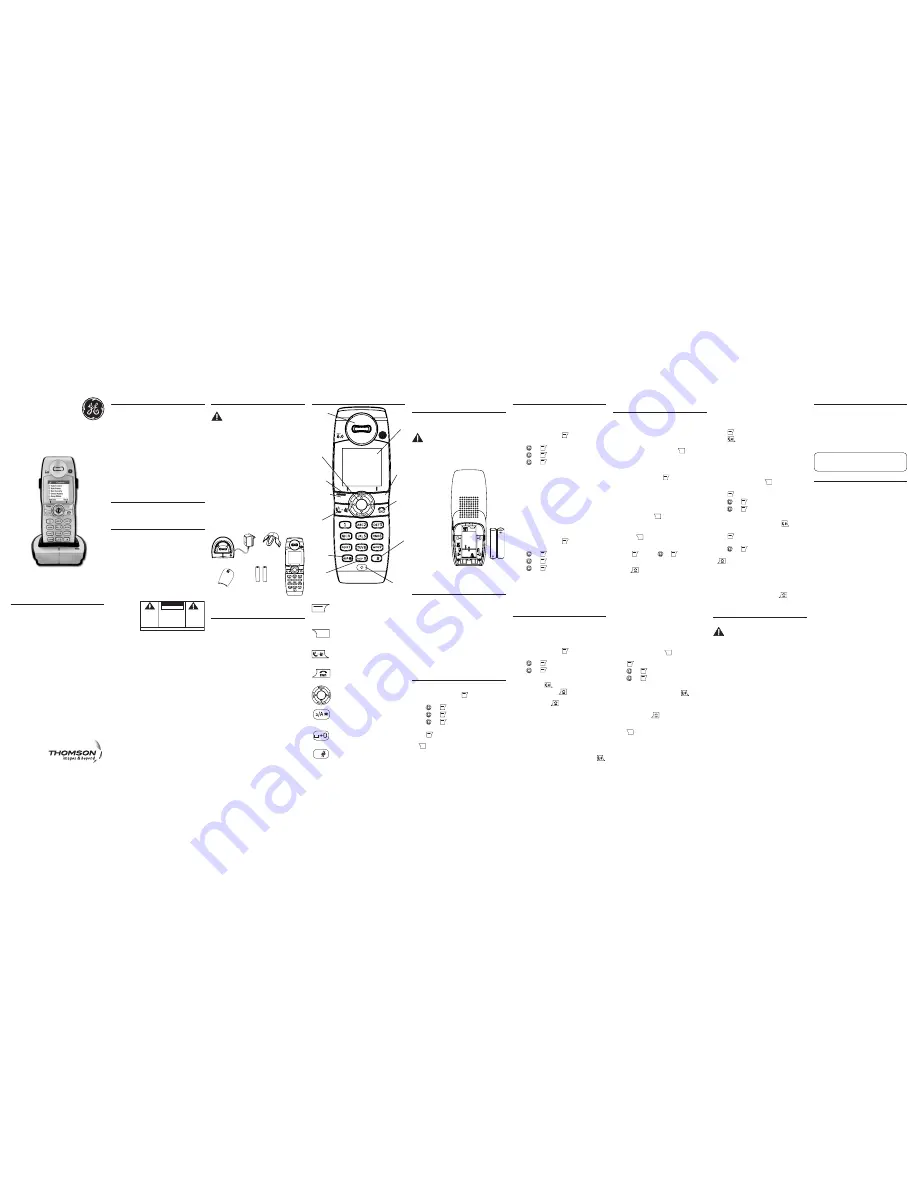
Handset
Belt
clip
Battery
compartment
cover
Charge Cradle
2 AAA
Nickel-metal
Hydride batteries
Interference Information
This equipment generates and uses radio frequency
energy which may interfere with residential radio and
television reception if not properly installed and used in
accordance with instructions contained in this manual.
Reasonable protection against such interference is
ensured, although there is no guarantee this will not occur
in a given installation. If interference is suspected and
verified by switching this equipment on and off, the user
is encouraged to try to correct the interference by one
or more of the following measures: Reorient the radio/
television receiver’s antenna, relocate the equipment
with respect to the receiver, plug the equipment and
receiver into separate circuit outlets. The user may also
wish to consult a qualified radio/television technician for
additional suggestions. This equipment has been fully
tested and complies with all limits for Class B computing
devices pursuant to part 15 FCC Rules and Regulations.
Hearing Aid Compatibility
(HAC)
This telephone system meets FCC/Industry Canada
standards for Hearing Aid Compatibility.
FCC RF Radiation Exposure
Statement
This equipment complies with FCC RF radiation exposure
limits set forth for an uncontrolled environment. This
equipment should be installed and operated with a
minimum distance of 20 centimeters between the
radiator and your body. This transmitter must not be
co-located or operated in conjunction with any other
antenna or transmitter.”
For body worn operation, this phone has been tested
and meets the FCC RF exposure guidelines when used
with the belt clip supplied with this product. Use of other
accessories may not ensure compliance with FCC RF
exposure guidelines..
Left soft
(button)
display
# (button)
Space/zero
(button)
a/A *
(button)
LED alert
(indicator)
earpiece
End/Skype
status
(button)
Right soft
(button)
microphone
Call/
Speaker
(button)
Navigational/
selection
(button)
Left soft button
Selects the current menu item or confirms a
setting, depending on the current screen. LED light
indicator alerts to Voicemail Waiting and Skype
Authorization requests.
Right soft button
Cancels the last action or returns to the previous
screen, depending on the current screen.
Call/Speaker button
Initiates or answers a call. During a call, activates
speaker.
End/Skype status
When in a call, ends the call. From idle, provides
access to Skype status menu with a short press.
Navigational/Selection button
Press the outer ring to navigate up, down, left,
or right. Press the round button in the center to
select/confirm a setting.
Upper/Lower case and numeric button
When in text editor, changes to lower-case, upper-
case, or numeric entry.
Space and Zero button
When in text editor, allows entry of a space, plus
sign, or zero.
# button
When in text editor, it provides a symbol table.
Handset Layout
NOTE: The RBRC seal on the battery used in your Thomson Inc. product
indicates that we are participating in a program to collect and recycle the
rechargeable battery (or batteries).
For more information go to the RBRC web site at www.rbrc.org
or call 1-800-8-BATTERY or contact a local recycling center.
Quick Set-Up Guide
for Optional/
Additional
Model 28311
2 in 1 - Skype
Cordless Handset
Introduction
CAUTION: When using telephone
equipment, there are basic safety
instructions that should always be
followed. Refer to the IMPORTANT
SAFETY INSTRUCTIONS provided with
this product and save them for future
reference.
IMPORTANT: Because cordless phones
operate on electricity, you should have at
least one phone in your home that isn’t
cordless, in case the power in your home
goes out.
If you have purchased an extra handset
apart from your original purchased unit
you may find a detailed description of its
functions in the User’s Guide provided with
your original purchased unit.
If you have purchased an extra handset
that is not of the same type as your
original handset you may still use the
original User’s Guide to help explain the
new handsets basic functions and options.
Parts Checklist
Make sure your package includes the items shown here.
Button Descriptions
De-Registration
This feature allows you to remove a registered handset
from connection to base. During the de-registration
process, keep the handset near the base.
Use the
Deregister
function to deregister your handset
from a base station.
1. From the
idle screen
, press
to enter the main
menu.
2. Press
and
to select
Settings
.
3. Press
and
to select
Cordless settings
.
4. Press
and
to select
Deregister handset
.
WARNING: It is not recommended that a
handset be de-registered unless absolutely
necessary because once a handset is
de-registered, that handset’s telephone
features cannot be used until the handset is
re-registered.
5. Select
NO
, if you do not want to de-register.
6. If you select
YES
, then screen will display
Your handset
is not registered to base station any more!
.
Re-Register Your Handset
Use the
Register
function whenever you need to register
your handset with a base station, for instance when
registering the handset with a base station other than the
one you are already registered to.
1. From the
idle screen
, press
to enter the main
menu.
2. Press
and
to select
Settings
.
3. Press
and
to select
Cordless settings
.
4. Press
and
to select
Register handset
.
5. Screen displays
Press reset button on base and insert
hand-set in charger
. Handset will automatically register
to base.
NOTE: To make registration possible, make
sure that the base station has registration
mode enabled. This is done by pressing
Reset on the back of the base station.
Intercom Operation
The intercom feature allows you to have a conversation
with another registered handset without tying up the
telephone line, allowing you to still receive incoming calls.
Making an Intercom Call
(Handset to Handset Intercom Call)
1. From the
idle screen
, press to enter the main
menu.
2. Press
and
to select
INTERCOM
.
3. Press
and
to select from any available
registered handset or
Internal Call to All
.
The receiving
handset(s) rings. Wait for the person at the receiving
handset to press
to connect the call.
NOTE: To cancel, press
on the sending
handset.
4. When finished, press
on either handset to
deactivate the intercom.
NOTE: When 4 handsets are registered, the
system can handle 2 separate intercom
operations at once, for example, 1st
handset intercoms with 2nd handset while
3rd handset intercoms with 4th handset.
Receiving an Intercom Call
When you receive an intercom call, your handset rings
with the selected melody and the Handset ID of sending
phone shows in the display. To answer the call press
.
Advanced Intercom
Features
Receiving an Incoming Call
During an Intercom Call
If you receive an external telephone call (landline or Skype)
during an intercom call, both parties on the intercom call
will receive a double beep in the earpiece. The handset
displays the Caller’s ID (if available) and
Answer call?
.
a) To ignore the incoming call, press
.
NOTE: If a 3rd handset is registered to the
system, the external call can be answered
by this handset and the intercom call can
continue at the same time.
b) To answer the call, press
.
Selecting
Yes
will
connect your handset to the external call and will
place the intercom call on hold.
You may now
switch
between the intercom call and the
external call or
conference
the other handset to the
external call.
a) To switch between the external call and the
intercom call:
Press
, (Swap calls). This puts the
external call on Hold. The external caller will hear
a double beep every 10 seconds to indicate they
are on Hold. You can return to the intercom call by
pressing
again.
b) To conference the other handset to the external
call:
Press
, then press
ress
and
to select
Join in
Conference.
c) To end the conference call,
both
handsets must
press
.
NOTE: The current status of each handset
shows at the top of the handset display.
i.e. Intercom, Landline Call, Skype Call or
Confererence Call as you progress through
the steps above.
Using Intercom w/External Phone
Calls
During a telephone call, you may use the intercom
function to page another handset and have an off line,
private (two-way) intercom conversation. You may also
have a three-way conversation between the external
caller and the handsets, or you may transfer the external
telephone call to another handset.
Two-Way Calling
1. During an external call, press
to put the call on
Hold.
2. Press to select
OPTIONS
.
3. Press
and
to select
Invite Handset
.
4. Press
and
to select from any available
registered handset or
Internal Call to All
.
The receiving
handset(s) is paged and emits a tone. Wait for the
person at the receiving handset to press
to
connect the call. Both intercom users may now speak
privately. The external caller will not hear the intercom
conversation.
5. When finished, press
on either handset to
deactivate the intercom. The originating handset
displays
Landline Call
and
On Hold
.
6. Press
to re-connect to the external call.
Battery Safety Precautions
• Do not burn, disassemble, mutilate, or puncture.
Batteries of this type could release toxic materials
which can cause injury.
• To reduce the risk of fire or personal injury, use only
the
Nickel-metal Hydride
battery listed in the User’s
Guide.
• Keep batteries out of the reach of children.
• Remove batteries if storing over 30 days.
Thomson Digital Technologies Ltd.
© 2007 Thomson Digital Technologies Ltd.
Trademark(s) ® Registered
Marque(s) déposée(s)
Installation
Digital Security System
Your cordless phone uses a digital security system to
protect against false ringing, unauthorized access, and
charges to your phone line.
INSTALLATION NOTE: This product
operates at a frequency of 1.9GHz. to
provide communication with minimal
interference from other electronic devices.
To further minimize the possibility of
interference, the base of the cordless
telephone should not be placed near or
on top of a TV, microwave oven, or VCR. If
interference continues, move the cordless
telephone further away from these
appliances.
Important Installation
Guidelines
• Avoid sources of noise and heat, such as motors,
fluorescent lighting, microwave ovens, heating
appliances and direct sunlight.
• Avoid areas of excessive dust, moisture and low
temperature.
• Avoid other cordless telephones.
• Never install telephone wiring during a lightning storm.
• Never install telephone jacks in wet locations unless the
jack is specifically designed for wet locations.
• Never touch non-insulated telephone wires or
terminals, unless the telephone line has been
disconnected at the network interface.
• Use caution when installing or modifying telephone
lines.
NOTE: The handset display will turn off
after 60 seconds of inactivity to save
battery life. Lift from cradle to activate or
if handset was not on the charge cradle,
press the END key to toggle between the
Change Status and Idle Screen.
Service
— www.GE.com/phones —
Thomson Digital Technologies Ltd., warrants to the
purchaser or gift recipient that if any manufacturing
defect becomes apparent in this product within 1 year
from the original date of purchase, it will be replaced free
of charge, including return transportation.
This warranty does not include damage to the product
resulting from accidents, misuse or leaking batteries.
Should your product not perform properly during the
warranty period, either:
1. Return it to the selling dealer with proof of purchase for
replacement,
OR
2. Remove the batteries (where applicable), and pack
product complete with accessories in the original
carton (or equivalent).
— Mail prepaid (with proof of purchase) and insured to:
Thomson Digital Technologies Ltd.
6200 Edwards Boulevard
Mississauga, Ontario
Canada L5T 2V7
The provisions of this written warranty are in addition
to and not a modification of or subtraction from the
statutory warranties and other rights and remedies
contained in any applicable legislation, and to the extent
that any such provisions purport to disclaim, exclude
or limit any such statutory warranties and other rights
and remedies, such provisions shall be deemed to be
amended to the extent necessary to comply therewith.
If you are unable to find a qualified servicer for out of
warranty service, you may write to:
Thomson Digital Technologies Ltd.
c/o Thomson Inc.
P.O. Box 0944
Indianapolis, Indiana, U.S.A., 46206-0944
Attach your sales receipt to this booklet for future
reference. This information is required if service is needed
during the warranty period.
PURCHASE DATE:__________________________________
NAME OF STORE:__________________________________


