
Model 28032 Series
5.8GHz DECT Multi-handset
Speakerphone/Answering System
User’s Guide
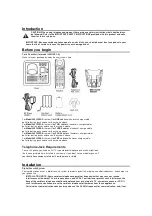
Your new GE telephone system is EXPANDABLE up to a total of 6 handsets (by purchase of
optional Model 28002 handset with charge cradle)
Equipment Approval Information
Your telephone equipment is approved for connection to the Public Switched Telephone Network and is in compliance with
parts 15 and 68, FCC Rules and Regulations and the Technical Requirements for Telephone Terminal Equipment
published by ACTA.
1 Notification to the Local Telephone Company
On the bottom of this equipment is a label indicating, among other information, the US number and Ringer Equivalence
Number (REN) for the equipment. You must, upon request, provide this information to your telephone company.
The REN is useful in determining the number of devices you may connect to your telephone line and still have all of
these devices ring when your telephone number is called. In most (but not all) areas, the sum of the RENs of all devices
connected to one line should not exceed 5. To be certain of the number of devices you may connect to your line as
determined by the REN, you should contact your local telephone company.
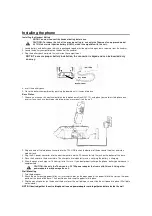
A plug and jack used to connect this equipment to the premises wiring and telephone network must comply with the
applicable FCC Part 68 rules and requirements adopted by the ACTA. A compliant telephone cord and modular plug is
provided with this product. It is designed to be connected to a compatible modular jack that is also compliant. See
installation instructions for details.
Notes
• This equipment may not be used on coin service provided by the telephone company.
• Party lines are subject to state tariffs, and therefore, you may not be able to use your own telephone equipment if you
are on a party line. Check with your local telephone company.
• Notice must be given to the telephone company upon permanent disconnection of your telephone from your line.
• If your home has specially wired alarm equipment connected to the telephone line, ensure the installation of this
product does not disable your alarm equipment. If you have questions about what will disable alarm equipment, consult
your telephone company or a qualified installer.
US Number is located on the cabinet bottom.
REN Number is located on the cabinet bottom.
Model 28032
XXXXXXXX
xx-xx
Printed in China


