

SERVIS
TM
IP-KVM
FW-D1008NP Quick Start Guide
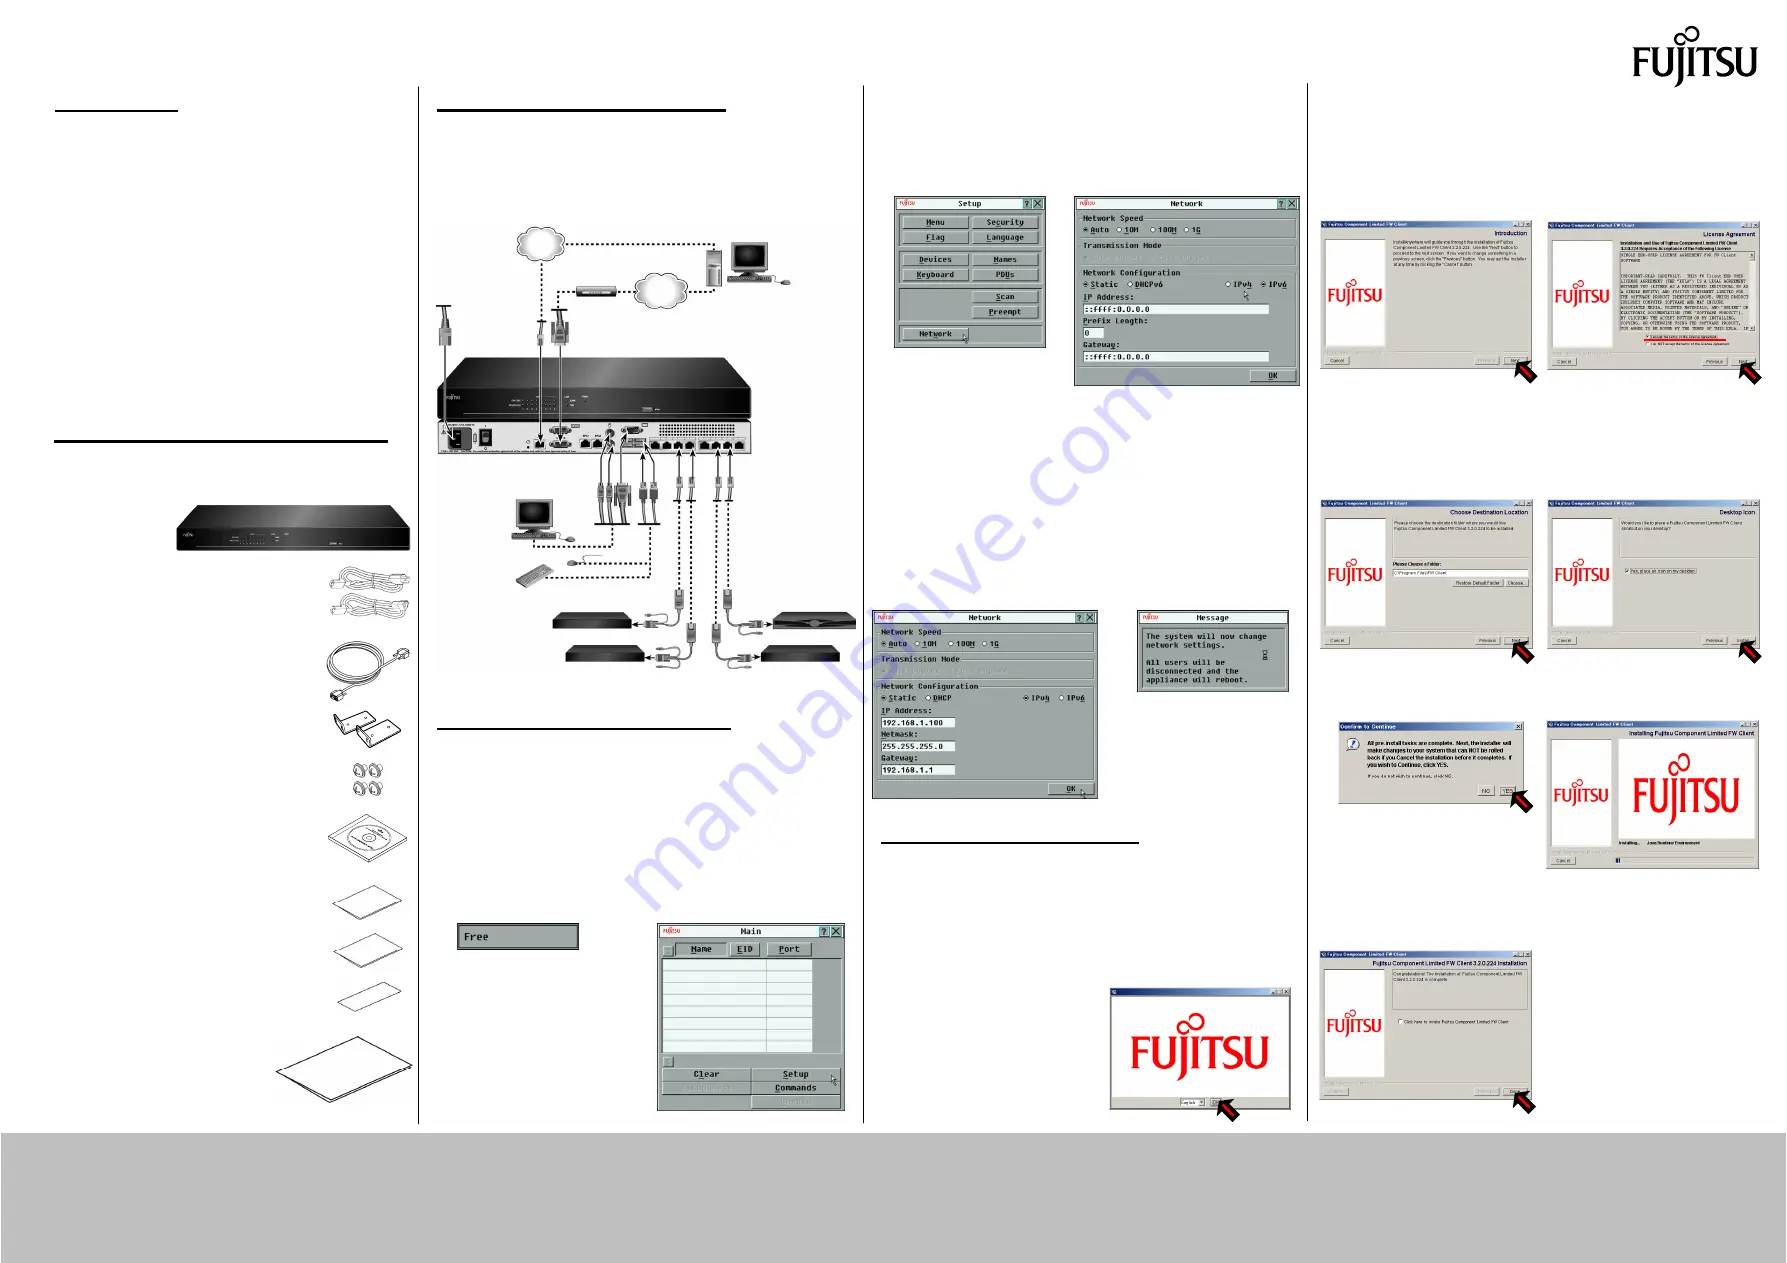
Step2 Connecting the Device
NC14013-0922RS-02
<Inquiry about our products>
FUJITSU COMPONENT LIMITED Marketing Group
TEL: 81-3-5449-7006
E-mail: [email protected] URL: http://www.fcl.fujitsu.com/en/
Check that the following items are contained in the
packaging.
- The device
- Power cables
3 pin plug-IEC320 socket (AC100V)…1
IEC320 plug-IEC320 (AC200V)…1
- Serial Cable … 1
- Flanges … 2
- Screws for flange …4
- CD-ROM …1
Installer/User Guide
FW-Client Software
- Warranty certificate … 1
* This warranty is valid in Japan.
- License information … 1
- China RoHS guide …1
- Quick Start Guide
(Japanese, English) … 1 each
Introduction
Ethernet
1. Connect the device as shown below.
2. When you have connected the device, turn on each
connected server first, and then the device.
4. On the following dialog box, if
you agree with the statement,
select the corresponding option,
and click [Next].
3. The following dialog box
appears. Click [Next].
- Thank you for purchasing this product. This "Quick Start
Guide" describes the items contained in the packaging,
and explains the initial setup and procedures for basic
operations. Make sure to read this manual when using
the device.
- Read the "Safety Precautions" in the CD-ROM provided
with the device in advance for its correct use. The
"Safety Precautions" includes indications to obviate any
chance of accident or damage to you and people near
you, and your property.
- For details on operations, refer to the Installer/User
Guide provided with the device.
3. The following Setup window
appears. Click [Network].
4. The following Network
window appears. Specify the
IP address here.
Power
Source
Remote User
FW-D1008NP
Server
Server
Server
Server
Local Connection
Modem
Telephone
Network
5. The contents of the dialog
box are shown as below.
Select the install destination,
and click [Next].
6. The contents of the dialog box
are shown as below. To set an
icon on the desktop, select the
check box and click [Install].
6. The following message
appears, and the device
restarts. If the [Free] tag is
shown 1 minute later, the
network setup is complete.
5. When you specify a fixed
IPv4 address, click the
"Static" and the "IPv4" radio
button, enter values in the IP
address, Netmask and
Gateway fields, and click the
[OK] button. (For DHCP,
select the corresponding
Opion.)
Step 1 Checking the Components
7. The following dialog box
appears. Click [YES].
8. The following dialog box is
shown, and installation starts.
Step3 Setting Up the Network
For the initial settings of the device, set the IP address by a local
operation.
1. The device starts operating
about 1 minute after it is
turned on, and the [Free] tag
appears in the monitor for
local connection.
2. Press the [PrintScreen] key
on the local keyboard once,
then the following Main
window appears. Click
[Setup].
Step4 Installing FW-Client
9. When the contents of the
dialog box are shown as
below, the installation is
complete. Click [Done].
By using the device, install "FW-Client" – a tool for managing the
target device – into the remote client’s PC. The following explains
how to install into a Windows computer.
2. The following dialog box
appears. Click [OK].
1. Launch
Setup.exe,
contained in the CD-ROM
provided with the device.
(Continued to the reverse side)


