background image


PLEASE READ 
 

This manual is provided as a free service 
by Projector.com. 
 
We are in no way responsible for the 
contents of the manual. We do not guarantee 
its accuracy and we do not make any claim 
of copyright. The copyright remains the 
property of their respective owners. 


ABOUT PROJECTOR.COM 

 
Projector.com (

http://www.projector.com

) is 

your review and buying guide resource for 
DLP and LCD video projectors.  
 
Visit the site to read the latest projector 
news and reviews, read and comment on 
projector specifications, download user 
manuals and much more.
 

Summary of Contents for SCENICVIEW XP70

Page 1: ...e do not make any claim of copyright The copyright remains the property of their respective owners ABOUT PROJECTOR COM Projector com http www projector com is your review and buying guide resource for DLP and LCD video projectors Visit the site to read the latest projector news and reviews read and comment on projector specifications download user manuals and much more ...

Page 2: ...delivery 6 Preparing remove control 7 Setting up the projector 7 Connecting the projector to a computer 7 Connecting the projector to the mains voltage 9 Operating the projector 10 Switching the projector on and off 11 Changing projector settings 13 Changing the OSD settings 14 Technical data 24 VESA DDC compatible DVI interface 25 Preset resolutions 25 DVI M1 D A projector connection 26 Trouble s...

Page 3: ...w n l o a d e d f r o m P r o j e c t o r c o ...

Page 4: ...ility plug play capability power management for reducing power consumption when the connected computer is not in use This operating manual contains important information you require to start up and run your projector A graphics card screen controller with VGA or DVI interface is required to control the projector The projector processes the data supplied to it by the graphics card The screen contro...

Page 5: ...ime read this operating manual carefully Never open the unit The projector contains no user replaceable parts Any repairs should only be performed by a qualified repair shop If the device is brought into the installation site from a cold environment condensation can form Before operating the device wait until it is absolutely dry and has reached approximately the same temperature as the installati...

Page 6: ...o the lens while the projector is running To avoid injuries always place the projector on a solid surface and use only the approved cover mount You may set only those resolutions and refresh rates specified in the Technical data chapter Allow the projector to cool down before you pack it up or transport it Keep this operating manual together with your device If you pass on the device to third part...

Page 7: ...installation In this case the user is encouraged to perform appropriate measures to correct the interference FCC Class A Compliance Statement The following statement applies to the products covered in this manual unless otherwise specified herein The statement for other products will appear in the accompanying documentation NOTE This equipment has been tested and found to comply with the limits fo...

Page 8: ...d recycling This device has been manufactured to the highest possible degree from materials which can be recycled or disposed of in a manner that is not environmentally damaging The device may be taken back after use to be recycled provided that it is returned in a condition that is the result of normal use Any components not reclaimed will be disposed of in an environmentally acceptable manner If...

Page 9: ...her the delivery agrees with the details in the delivery note Unpack all the individual parts Check the delivery for damage incurred during transportation Make sure that the following components are included 1 2 3 4 5 1 Projector 2 Remote control with batteries 3 SCART adapter 4 Carrying case 5 Operating manual 1 2 3 4 1 Power cable 2 Data cable DVI VGA M1 A with USB Data cable DVI DVI M1 D with U...

Page 10: ...feel it click into place Replacing batteries When the batteries are used up indicator no longer lights up replace them with two batteries of the same type LR03 AAA 1 5 V Do not throw batteries or accumulators into the household waste Setting up the projector We recommend that you place your projector on a surface with good anti slip qualities In view of the multitude of different finishes and varn...

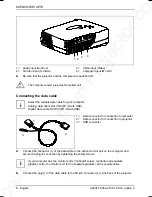
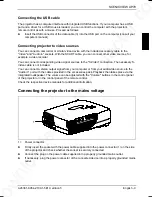
Page 11: ...log data cable DVI VGA M1 A with USB Digital data cable DVI DVI M1 D with USB 1 2 3 1 Data connector for connection to computer 2 Data connector for connection to projector 3 USB connector Connect the connector 1 of the data cable to the active monitor port on the computer and secure the plug in connection by tightening the safety screws i If your computer has two monitor ports onboard screen cont...

Page 12: ...nnect corresponding video signal sources to the S Video connection The necessary S Video cable is not included You can connect a stereo output signal from your computer or from your audio video source to the Audio in port with the cables provided in the accessories pack Playback then takes place via the integrated loudspeaker The volume can be adjusted with the Volume buttons in the control panel ...

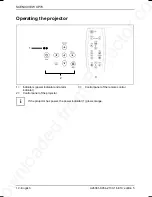
Page 13: ...70 10 English A26361 K954 Z100 1 5E19 edition 5 Operating the projector 1 2 3 1 Indicators power indicator and alarm indicator 2 Control panel of the projector 3 Control panel of the remote control i If the projector has power the power indicator 1 glows orange ...

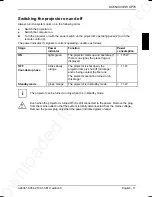
Page 14: ...ON lights green The projector starts up and operates If there is no signal the preset logo is displayed 175 W OFF Cool down phase blinks slowly orange The projector is shut down the projector lamp is shut off no image and is being cooled the fan runs The projector cannot be turned on in this stage 11 W Standby mode glows orange The projector is in standby mode 11 W i The projector can be turned on...

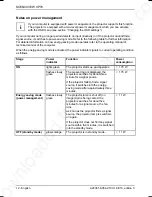
Page 15: ...saving mode is activated the power indicator signals to current operating condition as follows Stage Power indicator Function Power consumption ON lights green The projector starts up and operates 175 W flashes slowly green The present logo is displayed the projector searches for about three minute for a signal source If the projector fails to find a signal source it switches into the energy savin...

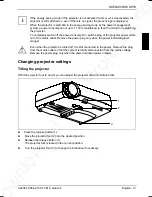
Page 16: ...g of the projector power cable out of the mains outlet Remove the power plug only when the power indicated glows orange Even when the projector is turned off it is still connected to the power Remove the plug from the mains outlet so that the system is totally disconnected from the mains voltage Remove the power plug only when the power indicated glows orange Changing projector settings Tilting th...

Page 17: ...accessible via the OSD menu see section Changing the OSD settings Press and hold the or button until the projected picture no longer looks distorted Other settings During operation you can adjust the volume with the Volume button on the projector s operator panel or on the remote control switch between the signal sources with the Source Select button on the projector s operator panel or with the C...

Page 18: ...orrect If the function can only be activated or deactivated Select the desired function and activate it by pressing the Source Select button Saving setting and terminating OSD menu Press the Menu button on the projector i If you do not make a selection for about 40 seconds the OSD menu closes and the set value is stored Returning to the higher level menu If you want to return to the higher level m...

Page 19: ...on and activate it by pressing the Select button Saving setting and terminating OSD menu Press the Menu button on the projector i If you do not make a selection for about 40 seconds the OSD menu closes and the set value is stored Returning to the higher level menu If you want to return to the higher level menu select the symbol and confirm your selection with the Select button Basic menu When you ...

Page 20: ... can set the white level The default values are 100 for signal sources from the computer and 20 for video signal sources The changes are saved for each source when the projector is switched off 0 Keystone You can adjust the keystone correction in the range from 63 to 64 Setup The possible adjustments are described in the following Reset The projector adjustments are synchronised for the active sou...

Page 21: ...ormat 4 3 computer conventional TV and Native original format Colour temperature You can select between different colour temperatures Color Space Color space this option relates to computer sources It allows you to select a color space that has been specially optimized for the video input signal Auto Standard settings are activated automatically Deactivate Auto to select other settings Then select...

Page 22: ...he range from 0 to 100 and thus fine tune analogue computer output if the automatic adjustment Reset or basic settings in the basic menu is unsatisfactory Width You can set the horizontal frequency to optimise the picture width for analogue computer output if the automatic adjustment Reset or basic settings in the basic menu is unsatisfactory Position You can adjust the picture position for analog...

Page 23: ...looks for a signal source computer or video Hide OSD If you activate this function the menu functions are no longer displayed over the projected image for example when you adjust the volume or change the signal source This function is useful if you have to adjust the volume during a presentation DPMS enable This function activates the DPMS Display Power Management Signaling When the projector rece...

Page 24: ...ified until you press the Effect button again Set the magnification factor with the or buttons Freeze Freezes and displays the current picture until you press Effect again Mask The projected image is blacked out until you press the Effect button again Mute Mutes the sound until you press the Effect button again works only with a video signal source 16 9 The picture is shown in the 16 9 format PIP ...

Page 25: ...re version operating hours settings etc Reset lamptimer After replacing the lamp set the lamp timer back to 0 Follow the instructions on the OSD menu Service code This function contains additional information that is only available to service personnel Userlogo menu In the user logo menu you can select what the projector should display if it cannot find a signal source Default If the projector doe...

Page 26: ...ogo by moving the displayed frame with the or buttons over the logo If necessary adjust the frame to the logo size with the Volume buttons and confirm the selection with the Select button Select the picture quality High 18bit Low 4bit and confirm with the Select button The projector confirms that the capture was successful or reports an error Restart the projector PiP menu Picture in Picture In th...

Page 27: ...tal Light Processing Resolution 1024 x 768 Brightness Max 1400 ANSI lumen Contrast Typ 1100 1 Colour 16 7 mio Projector lamp 120 W UHP life 4000 h Optical properties Lens 1 85 2 35 1 Picture size 80 cm to 530 cm diagonal Distance to projection screen 1 5 m 10 0 m Keystone correction 12 electronic Compatibility Projector Computer digital or analogue PC MAC 1280 x 1024 max Horizontal frequency 15 kH...

Page 28: ...h a VESA DDC compatible DVI interface VESA DDC Video Electronics Standard Association Display Data Channel is used as the communications interface between the projector and the computer If your computer is equipped with a VESA DDC compatible DVI or VGA interface it can automatically read the data for ensuring optimum operation from your projector and select the appropriate settings Preset resoluti...

Page 29: ...a 2 14 5 V Power 3 TMDS Data 2 4 Shield 15 Ground 4 not used 16 Hot Plug Detect 5 not used 17 TMDS Data 0 6 DDC Clock 18 TMDS Data 0 7 DDC Data 19 TMDS Data 0 5 Shield 8 Analogue Vertical Sync 20 not used 9 TMDS Data 1 21 not used 10 TMDS Data 1 22 TMDS Clock Shield 11 TMDS Data 1 3 Shield 23 TMDS Clock 12 not used 24 TMDS Clock C1 Analogue Red C4 Analogue Horizontal Sync C2 Analogue Green C5 Anal...

Page 30: ...icator lights up red Replace the projector lamp Alarm indicator blinks red rapidly The projector has overheated Turn the projector off and let it cool down Alarm indicator blinks red in intervals The projector is being shut down due to overheating The remote control does not work Batteries may be empty Change the batteries see Replacing batteries Problems with the projected picture No display powe...

Page 31: ... Setup menu see Changing the OSD settings select the Picture menu and the Tune function Adjust the projected image From the Setup menu see Changing the OSD settings select the Picture menu and the Width function Adjust the projected picture width Unstable pixels or pixels that are constantly light or dark The standard of production techniques today cannot guarantee an absolutely fault free project...

Page 32: ...red Please only use lamps of the same type and strength Switch off the projector and disconnect the power cable Wait for around 60 minutes before opening the lamp housing The lamp housing is intended to protect you from glass fragments in case the projector lamp explodes Please therefore take special care when you open the lamp housing Remove the three screws Open the lamp housing with a screw dri...

Page 33: ...1 5E19 edition 5 Carefully remove the lamp housing and dispose of it in an environmentally friendly way Insert the new lamp housing Fasten the three screws again After replacing the lamp set the lamp timer back to 0 Follow the instructions on the OSD menu see chapter Operating the projector ...

Page 34: ...e do not make any claim of copyright The copyright remains the property of their respective owners ABOUT PROJECTOR COM Projector com http www projector com is your review and buying guide resource for DLP and LCD video projectors Visit the site to read the latest projector news and reviews read and comment on projector specifications download user manuals and much more ...

Reviews: