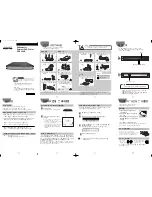
3. Discharge static electricity. Touch one of the connectors on the back of your computer and ground
yourself on a metal object to discharge any static electricity from your body.
IMPORTANT: If you do not discharge static electricity from your body before touching the disk drive,
damage to the drive could result.
DynaMO Quick Install Card
1
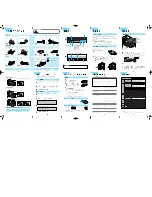
Unpacking Your DynaMO kits:
1 MCM3xxxAP/SS or 1 MCJ3xxxAP/SS Drive
1 frame kit with brackets, bezel and retaining clip
(PLEASE USE ONLY THE 8 METRIC SIZED SCREWS, THIN TREAD, INCLUDED)
1 Magneto-Optical Media; capacity depends on drive model.
1 IDE cable or 1 SCSI cable
1 Power cable
1 DynaMO CD-ROM with installation software and drivers
1 each Limited Warranty Guide, Summary Card and Registration Card
2 “Get MO For Less” Labels
Troubleshooting:
The computer does not recognize the DynaMO drive.
Is the busy indicator on?
Is the IDE or SCSI cable connected properly?
Is the jumper setting selected correctly for IDE drive?
Is the SCSI ID selected properly for SCSI drive?
Is the device driver installed?
Is the MO disk inserted correctly?
Is the MO disk formatted correctly?
You cannot insert the MO disk.
Is the disk being inserted in the correct direction?
Has another MO disk already been inserted?
You cannot eject the MO disk.
Is the busy indicator lit (disk in use)?
Is software preventing the disk from being ejected?
You cannot record data on the MO disk.
Are the cables properly attached?
Is the MO disk write protected?
Is the MO disk formatted?
Is the device driver installed?
Do’s and Don’ts:
• Never disassemble your DynaMO under any circumstances
• Make sure the system power is off before disconnecting any cables
• Remove the MO disk before transporting your DynaMO
• Never insert a floppy disk into the DynaMO
• Do not insert foreign objects into the DynaMO
• Do not use your DynaMO in areas where dust, dirt, extreme temperatures or moisture is present
• Never force a disk into the drive or insert a disk upside down as this may damage the drive
• Always ensure that the busy indicator light is off before turning the system power off
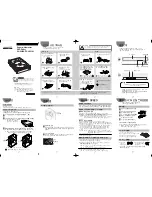
How to Use the DynaMO Optical Disk Drive:
1. Insert disk, label side up. If disk will not go in, do not force. Check to see that the spring-load
bezel door is open before installing the disk.
2. LED should blink during access. Refer to T roubleshooting section if you encounter problems.
EMERGENCY EJECT
: If disk will not eject using the proper methods, insert the straightened end
of a paper clip into to hole just below the shutter door and push gently but firmly until the MO
disk is ejected.
Technical Support Contact Information:
Please call (800) 626-4686, option 2 for assistance
between the hours of 5:00 am – 7:00 pm PST Monday through Friday
or between 7:00 am – 3:00 pm PST on Saturday.
© 2002 Fujitsu Computer Products of America, Inc. All rights reserved. All statements herein are valid only in the
U.S. for U.S. residents, are based on normal operating conditions, are provided for informational purposes only,
and are not intended to create any implied warranty of merchantability or fitness for a particular purpose. Fujitsu
Computer Products of America, Inc. reserves the right to modify at any time without prior notice these statements,
our products, their performance specifications, availability, price, and warranty and post-warranty programs. Fujitsu
and the Fujitsu logo are registered trademarks of Fujitsu Ltd. DynaMO is a registered trademark and a trademark of
Fujitsu Computer Products of America, Inc. All other trademarks are the property of their respective owners.
P/N CG00000-695601 Rev. B
2
Getting Started:
1. Turn off computer.
IMPORTANT: Be sure to unplug your computer from the power source before removing the cover.
Failure to do so could result in an electrical shock hazard to you.
2. Remove the system cover or casing.