Setting Guide
Thank you for buying the ARROWS Tab FJT21 (simply called the "FJT21").
In this guide, settings to start using this product and basic usage are described.
For other settings or operations, refer to the Basic Manual.
Basic operations
Describes the basic operations.
STEP1 au Easy Settings
Describes au ID settings etc.
STEP2 ARROWS Getting started
Describes Google account settings etc.
E-mail initial settings
Make initial settings for E-mail (@ezweb.ne.jp).
●
●
●
●
Wireless LAN (Wi-Fi
®
) setting
Describes how to connect Wi-Fi
®
network.
Importing/Exporting contacts
Restore/back up contacts data.
Backing up E-mails
Back up E-mail to microSD card.
Data transfer to microSD card
Back up data to microSD card.
●
●
●
●
* Explanations of this manual (wallpaper, icons, etc.) are based on the case when the Set Family use is set to
"Standard mode".
* Explanations of this guide are based on the case when entering characters in "NX!input".
* All company names and product names are trademarks or registered trademarks of respective companies
referred to in this guide.
* The
TM
and ® marks may be omitted in this guide.
* In this guide, "microSD™ memory card (commercially available)", "microSDHC™ memory card (commercially
available)" and "microSDXC™ memory card (commercially available)" are abbreviated as "microSD card".
Using keys
P
Power key
Press and hold
to power on,
set/cancel
manner mode
or power off,
etc.
Task
Display list of recently
used applications.
Back
Go back to the
previous screen.
Home
Return to the
home screen.
Menu
Display the option
menu.
Capture memo
Easily capture the
displayed screen.
Fingerprint sensor
Use to cancel
screen lock etc.
Lock screen operation
Lock screen prevents from erroneous
operation.
It appears when turning the power on etc.
Pressing
P
during operation goes into
sleep mode and the screen lock is set.
Drag to the desired direction or slide
your finger over the fingerprint sensor to
unlock the screen.
Tap a keyboard you want to use
Numeric keypad
(10キー)
QWERTY keypad
(QWERTY)
Keyboard with common order
of keys on cell phone and
handwriting input area
Keyboard with common
order of keys on
computer keyboard
Japanese syllabic keyboard
(50音)
Handwriting input
(手書き)
Keyboard with alphabetical/
Japanese syllabic order of keys
Keyboard input by
handwriting
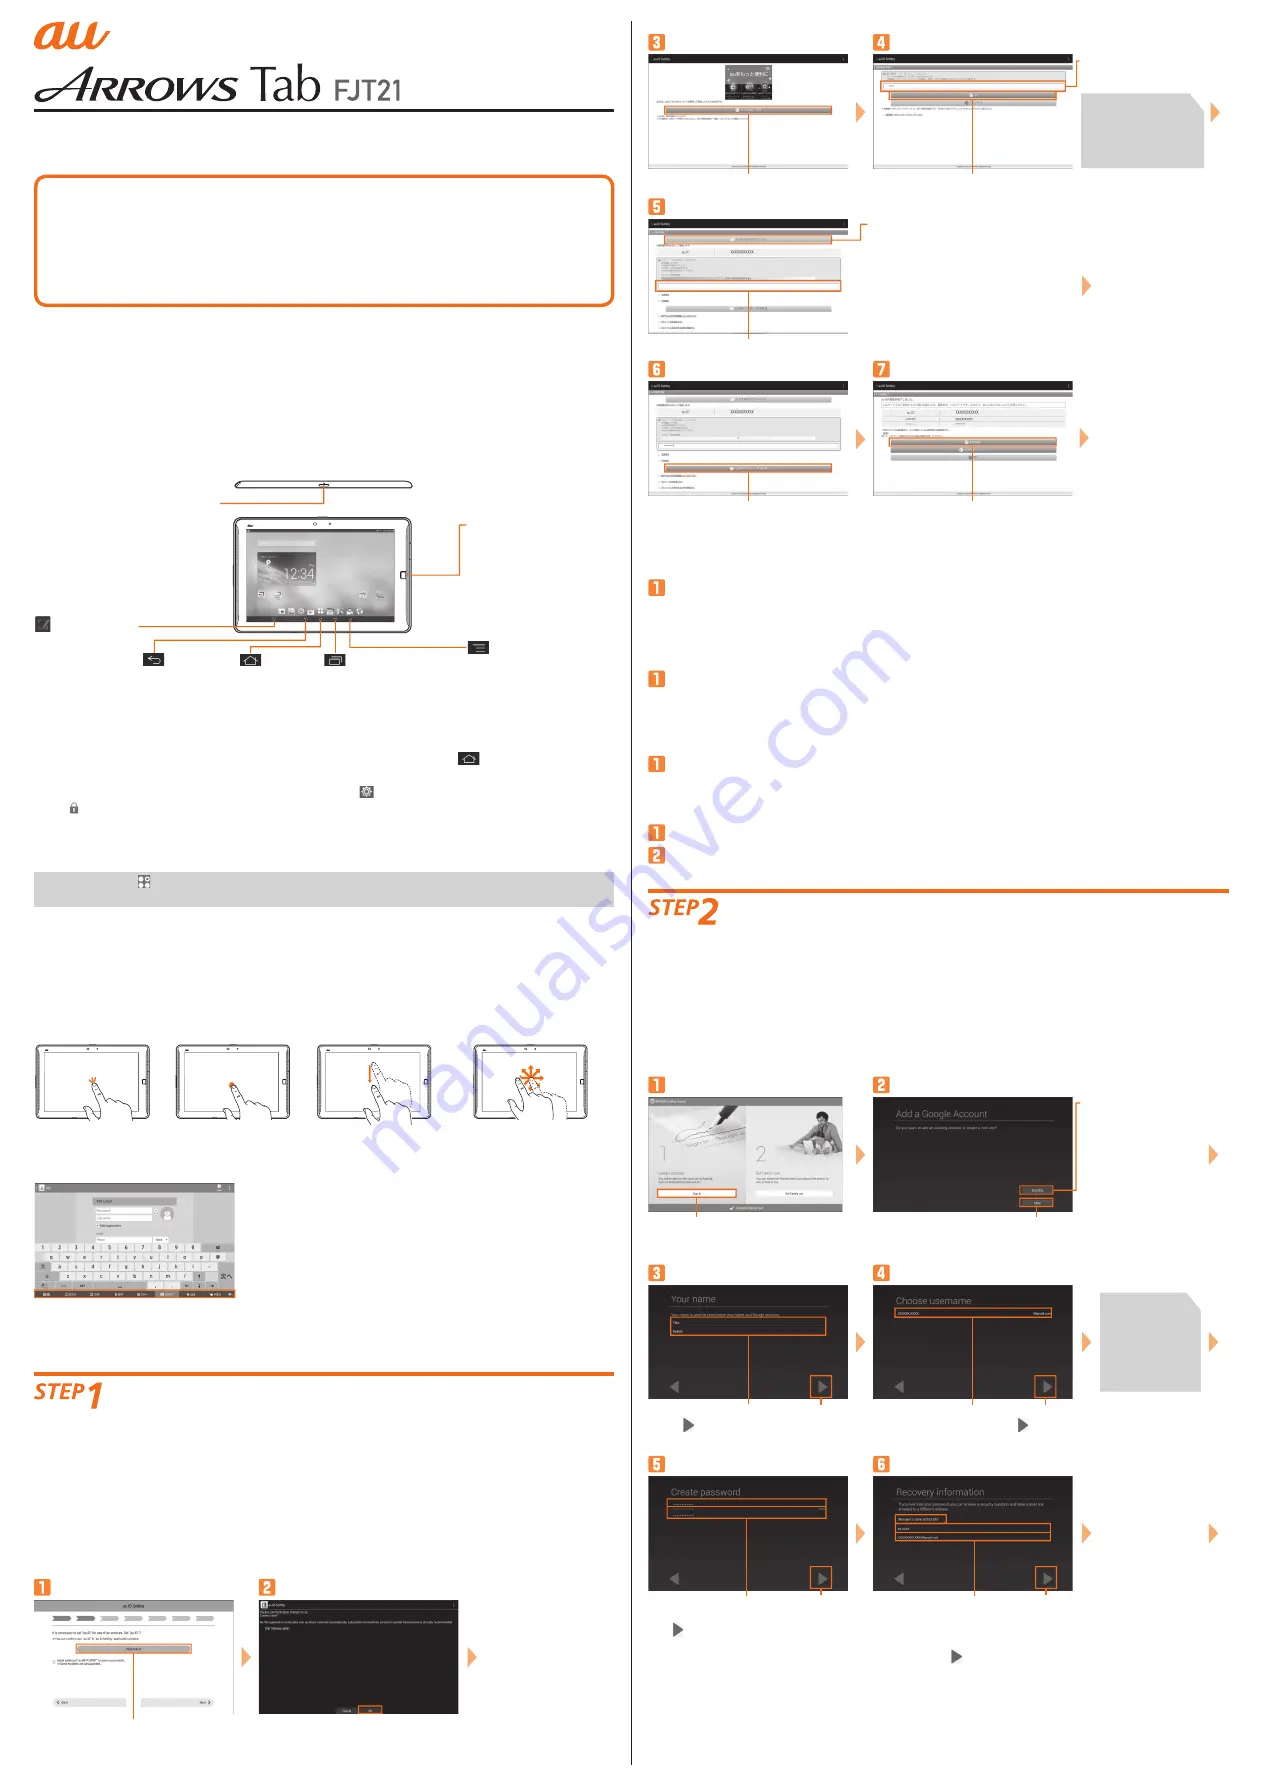
au Easy Settings
After switching the display language to English, turn the power off and on again. "Welcome to
au" screen appears. Follow the onscreen instructions to make settings.
1-1
Setting au ID
By setting au ID, you can use various services provided by au such as "au Simple Payment
Service" which allows you to purchase applications from the au Market or Google Play.
● au ID which is already used by another user cannot be set.
● When au ID is newly created, your own phone number will be registered as au ID. Register a
password. You can change your au ID.
● Even if au ID is created on other than FJT21, the au ID is available on FJT21.
On the "Welcome to au" screen, tap
"Next"→On au ID Setting screen, tap
"Registration"
Check the contents→Tap "OK"
Tap "au IDの設定・保存 (Set/save au ID)"
Tap to enter a
security code (security
password by default)
Tap "OK"
Tap to enter a password
* For customer registering new au ID
except phone number, tap "お好きな
au IDを新規登録したい方はこちら (New
registration of au ID)".
* If you already have au ID, tap "au
IDをお持ちの方はこちら (For au ID
holders, here)".
Tap "利用規約に同意して新規登録
(Agree Terms of Use and register)"
Tap "設定画面へ (To setting screen)"
Register information
necessary for re-
issue of password.
Enter "生年月日 (Date
of birth)", "秘密の質問
(Secret question)", "答え
(Answer)"→Tap "入力完了
(Done)"→"設定 (Set)" to
complete registration.
In au ID setting menu,
tap "終了 (Exit)".
Security code is
a four digit number
chosen by the
customer and noted
on the application
form.
1-2
Setting of data handover
Set data handover.
Set "Setting of data handover"→Tap "Next"
* When there is data to transfer, set up and tap "Agree, and next".
1-3
Setting of backup
Back up contacts data.
Confirm the Terms of Service/Outline of Service→Mark an item to set→Tap "Agree, and next"
1-4
au Widget Settings
au Widget is convenient and useful widget which delivers the latest information at the
perfect time.
Confirm the Terms of Service/Outline of Service→Mark service to use→Tap "Agree, and next"
1-5
Setup for emergency
Make the necessary settings in case of disaster, theft, loss or malfunction of the FJT21.
Confirm the Terms of Service/Outline of Service→Mark service to use→Tap "Agree, and next"
Tap "Finish"
* Mark "Don't show again" not to show the screen from the next time.
● When you tap for the first time, an explanation screen about how to select applications/
widgets appears. Confirm the content and tap "Close" to display the main menu.
Using the display (Touch panel)
Tap
Lightly tap an item
or icon on the
screen to select.
Long-touch
Keep touching an item
or icon on the screen
with your finger. Use
for displaying pop-up
menu etc.
Drag
Keep touching and
move an item or
icon on the screen
with your finger.
Slide
If items cannot be displayed
in one screen such as
setting menu, keep touching
the screen and move your
finger to display.
Switching keyboards
While entering the characters in "NX!input", switch keyboards as follows.
ARROWS Getting started
When you finish au Easy Setting, ARROWS initial setting screen appears.
2-1
Setting up Google account
● If you have created Google account on other than FJT21, the account can be used on
FJT21.
● When you create Google account on FJT21, Gmail mail address "(user name)@gmail.com"
will be created and set "(user name)@gmail.com" as main mail address in Google account.
● In "Recovery email address", set a different mail address used for contact from Google in
case you forget your password etc. If you have no other mail, leave it as blank.
Tap to enter first name, last name
→Tap
On the "ARROWS Getting started"
screen, tap "Sign in" of Google account
Tap "New"
* If you have Google
account, tap
"Existing" and
follow the onscreen
instructions.
Tap to enter desired mail address
(part before @ mark)→Tap
A screen for
appears.
Tap "Not now" to
skip.
Tap to enter a password→Tap "次へ
(Next)" to re-enter the password→
Tap
Tap to select a displayed security
question in case of forgetting your
password→Tap to enter the answer
→Tap to enter a preparatory mail
address→Tap
The user name
availability is
checked. If it is
unavailable, an
entry screen
for prompting
another user
name appears.
Basic operations
Switching to English display
By default, FJT21 turns on in Japanese display.
To switch to English display, power on→Unlock
the screen lock→Press
to skip the Japanese
initial setting screen and then in the home
screen,
→"言語と入力 (Language & input)"
→"Language"→"English". After that, power off
and on again to make initial settings in English
display.
Introduction