background image

Frigidaire.com   USA 1-800-374-4432

Frigidaire.ca   Canada 1-800-265-8352

Introduction............................................................2
Important Safety Instructions .........................3
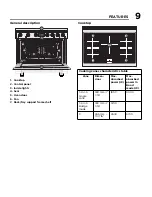
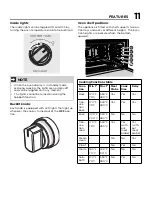
Features ...................................................................9
Before using the appliance............................. 13
Using the cooktop.............................................. 14

Using the oven.....................................................21
Cleaning and maintenance .............................41
Before you call....................................................49
Warranty ...............................................................52

914779732/A (Sept 2021)

Summary of Contents for PCFI3668AF

Page 1: ...idaire ca Canada 1 800 265 8352 Introduction 2 Important Safety Instructions 3 Features 9 Before using the appliance 13 Using the cooktop 14 Using the oven 21 Cleaning and maintenance 41 Before you call 49 Warranty 52 914779732 A Sept 2021 ...

Page 2: ... are here for you Visit our website chat with an agent or call us if you need help We may be able to help you avoid a service visit If you do need ser vice we can get that started for you Let s make it official Be sure to register your prod uct Keep your product info here so it s easy to find Model Number Serial Number Purchase Date Installation Checklist Doors Handles are secure and tight Door se...

Page 3: ...ttached to the appliance Do not remove model serial number plate Cold temperatures can damage the elec tronic control If this appliance has not been used for a long time make sure that it has been stored at temperatures above 32ºF 0ºC for at least 3 hours before turning on power to the appliance Never modify or alter the construction of the appliance by removing the leveling legs panels wire cover...

Page 4: ...r mance with all local codes and ordinances See the installation instructions provided with this appliance for complete installation and grounding instructions IMPORTANT INSTRUCTIONS FOR USING THE APPLIANCE WARNING Avoid fire hazard or electrical shock Failure to follow this warning may cause fire serious injury or death Avoid fire hazard or electrical shock Do not use an adapter plug an extension...

Page 5: ... The weight of a child on an open oven door may cause the appliance to tip resulting in serious burns or other injury An open drawer when hot may cause burns Stepping leaning or sitting on the door or drawers of this appliance can result in serious injuries and also cause damage to the appliance Never cover any slots holes or pas sages in the oven bottom or cover and entire rack with materials suc...

Page 6: ...r cooktop use Do not place metallic objects such as knives forks spoons and lids on the cook top surface since they can become hot Never leave surface elements unattended Boil overs may cause smoking and greasy spills that may ignite A pan that has boiled dry could be damaged and may damage the cooktop When you are flaming foods under a venti lating hood turn on the fan IMPORTANT INSTRUCTIONS FOR ...

Page 7: ...h a hot burner or ele ment in oven Use potholders and grasp the rack with both hands when repositioning it Remove all cookware and utensils before moving the rack Do not use a broiler pan without its insert Broiler pans and inserts allow dripping fat to drain away from the high heat of the broiler Do not cover the broiler insert with aluminum foil exposed fat and grease could ignite Do not cook fo...

Page 8: ...replacing the bulb Important This appliance has been tested and found to comply with the limits for a class B digital device pursuant to Part 18 of the FCC rules United States and ICES 001 Canada These limits are designed to pro vide reasonable protection against harmful interference in a residential installation This unit uses and can radiate radio frequency energy that may interfere with radio c...

Page 9: ... door 6 Fan 7 Rack tray support frame shelf Cooktop Cooking zones characteristics table Zone Dimen sions Max absorbed power W Max absorbed power in Boost mode W 1 2 4 5 Single zone 180 mm 7 1 16 1850 3000 1 2 4 5 Bridge mode 180 mm 7 1 16 3700 3 265 mm 10 7 16 2600 3700 FEATURES ...

Page 10: ...ls For the Bridge and Heating Accelerator functions on every cooktop knob except knob no 4 and for the Cooktop Control Lock and Heating Accelerator functions on cooktop knob no 4 only Oven knobs 7 Oven mode knob 8 Oven temperature knob Cooling fan The fan cools the oven and comes into operation during cooking The fan causes a steady outflow of air that exits from the rear of the appliance which ma...

Page 11: ...NOTE When the oven display is in standby mode or during cooking the lights are normally off and can be toggled on in any moment The lights cannot be turned on during the Sabbath function Cooking Functions table Func tion Min T Max T Meat Probe Cook time Delay Bake 170 F 75 C 550 F 280 C Yes Yes Yes Con vec tion bake 170 F 75 C 550 F 280 C Yes Yes Yes Broil 400 F 200 C 550 F 280 C No No No Con vec ...

Page 12: ...is accessory is an extension of the backguard It is intended to be mounted over the included back guard as an extended duct for the heat dispersal openings located on the wall wards side of the range cooktop Side fillers These are aesthetic panels intended to cover the lateral spaces below the rear protruding part of the cooktop NOTE Some models are not provided with all accessories The accessorie...

Page 13: ...ance restores the settings and features set before the power loss event 2 A few minutes to hours The appliance does not save the previous settings and will have to be reprogrammed First power on When the range is first plugged in or when the power supply has been interrupted 12 00 PM will flash on the timer display It will stop flashing once the current time is set up as below Setting the display ...

Page 14: ... into the cookware will change immediately when you change the set ting of the cooking zone Even Heating Cookware will typically heat more evenly on an induction cooktop so you are less likely to have hot or cool spots in the cookware Cooler Cooktop An induction cooktop will be cooler when you remove the cookware than a con ventional electric cooktop would be Because the cooktop doesn t get as hot...

Page 15: ...he magnet test to check stainless steel cookware Cast Iron A slow heat conductor that retains heat very well Cooks evenly once cooking temperature is reached Porcelain enamel on metal Heating charac teristics will vary depending on the base material Porcelain enamel on a compatible metal will work on an induction cooktop Use the magnet test to check porcelain enamel cookware Cookware sold as induc...

Page 16: ... 1 2 4 5 In the 3 case the measurement refers to the length of a an elongated pan For the width of this pan keep a maximum of 180 mm 7 1 16 First power on When the range is first plugged in or when the power supply has been interrupted all the symbols on the cooktop display light up for one second Cooktop power management The cooktop is equipped with a power manage ment module which optimizes or l...

Page 17: ...e central cook ing zone display and all the other cooking zone dis plays briefly display 0 and then go off the example shows the front left cooking zone at level 3 Turning off the cooking zones To switch off a cooking zone simply turn the corre sponding knob to OFF All the cooking zone dis plays show flashing red dots at their lower right corner and the word ON below the central cook ing zone disp...

Page 18: ... clockwise to level 9 3 Turn clockwise again to position and hold until is shown on the corresponding cooking zone display a beep will be emitted 4 Release the knob To deactivate Boost mode simply bring the knob to the OFF position or select another power level Cooking zone power levels table Power level selected Suitable for Melt function Melting butter choco late or similar Keep Warm function Wa...

Page 19: ...tivate the Heating acceleration function simply bring the knob to the OFF position or select a lower power level Bridge function The bridge function allows you to control two cook ing zones simultaneously This function is useful when cooking with oblong cookware such as roast ing pans or fish kettles or when cooking with two pans at the same time To activate the Bridge function 1 Press and hold tu...

Page 20: ...w both cooking zone displays shows level 0 and flashing red dots appear on all displays The Bridge function is now activated 4 You can control both the linked zones using the front left or rear right cooking zone knobs To deactivate the Bridge function bring both knobs to the OFF position NOTE This function automatically distributes an equal amount of power over both the zones involved USING THE C...

Page 21: ...f the Control Lock is active or not simply try to turn on any cooking zone When you activate Control Lock if you turn and hold the central cooking zone knob for more than 30 seconds the flashing symbol will appear as an error message Release the knob to remove it CAUTION Remove all accessories materials and literature from the inside of the oven before performing this operation CAUTION Always use ...

Page 22: ...to the mechanical safety locks 2 Slightly lift it upwards and pull it all the way out Telescopic guides CAUTION Be careful to insert the rack in the correct spaces indicated by the dashed lines Part A of the rack must face towards the outside of the oven and part B must face upwards CAUTION Be careful to hook the telescopic guides in the correct spaces indicated by the dashed lines To avoid damagi...

Page 23: ...action Partial extraction Total extraction When using the guides extract the guides com pletely and gently place the rack on them Take care to position the rack on the guides as shown in the figure below To remove the telescopic guides follow the installa tion instructions in reverse CAUTION Ensure that the telescopic guides have been installed correctly and securely IMPORTANT To avoid damaging th...

Page 24: ... the appliance Only use the temperature probe provided or recommended by the manufacturer When the probe is not in use make sure that the protective cover is properly closed IMPORTANT Do not pull the cable to remove the probe from the socket or from the food Make sure that the probe or its cable do not get caught in the door No part of the probe should be allowed to come into contact with the wall...

Page 25: ...s by pressing the oven temperature knob Change the relative values by turning the oven temp knob left or right The temperature and the timing functions can be set or reset during cooking To cancel the timing functions simply set the relative values in minutes hours to zero While setting a function or when a function is in progress it always possible to go in standby mode by turning the oven mode k...

Page 26: ...mperature and the timing functions by pressing and turning the temperature knob even during the pause Preheating The bake convection bake and broil functions are always preceded by preheating during which the oven is heated to the set cooking temperature The temperature bar is shown on the right hand side of the display The icon and the bar seg ments flash to indicate that the oven temperature is ...

Page 27: ...knobs or open the door then the display switches to standby mode Cooking timer This timer mode acts as a stand alone timer during a function in progress 1 Set a manual cooking cycle See Manual cooking example is a 350 F Bake 2 Press the oven temperature knob until the display shows the and icons and the number 00 3 Set the time by turning the temperature knob 4 Keep pressing the temperature knob u...

Page 28: ...ows you to stop the cooking process after a preset time 1 Set a manual cooking cycle See Manual cooking Example is a 350 F Bake 2 Press the oven temperature knob until COOK TIME flashes on the display 3 Turn the temperature knob left or right to set the time 4 Press the temperature knob until the display shows the cooking settings screen with the cooking time just set and the word START flashing 5...

Page 29: ...nction see Timed cooking Example is 350 F Bake 2 Once the cooking duration has been set press the temperature knob until the following screen is displayed with the word DELAY flashing 3 Turn the temperature knob left or right to select a delay time 4 Press the temperature knob to switch to the cooking settings screen 5 Press the oven mode knob to start the delay countdown During this phase the dis...

Page 30: ...pause function You can change the temperature and the timing functions by pressing and turning the temperature knob even during the pause Close the door to resume function Turn the oven mode knob to the left and then release it to stop the function Steam clean This function is an assisted cleaning procedure that facilitates dirt removal This function allows the inside of the oven can be cleaned wi...

Page 31: ...nd duration of the function by pressing and turning the oven temp knob Open the door to pause function You can change the temperature and the timing functions by pressing and turning the temperature knob even during the pause Close the door to resume function Turn the oven mode knob to the left and then release it to stop the function End of Warm function At the end of the Warm function a buzzer s...

Page 32: ...de knob to the left Only the word SAb is shown on the display End of Sabbath function When the Sabbath cooking function has ended the display switches directly to standby mode Meat probe cooking Meat probe cooking Useful function for cooking various types of meat to perfection by measur ing the core temperature of the meat This is not a timed cooking function the cooking process ends when the prob...

Page 33: ...p knob to change the oven cavity temperature The display will show the default cavity temperature at the bottom with the flashing degree symbol The word disappears 4 Turn the oven temp knob to change the cavity temperature IMPORTANT Always insert the probe so that the tip is in the center of the thickest part of the meat Do not allow the probe to touch bone fat gristle or the pan Make sure that th...

Page 34: ...cooking will end when the probe reaches the set target temperature A buzzer will sound and the display will show Turn and release the oven mode button to stop the buzzer and the function The display goes into standby mode Oven cooking tips Air circulation in the oven If using 1 rack place it in center of oven If using multiple racks stagger cookware as shown in the following figures For optimum ai...

Page 35: ...and biscuits on multiple racks use positions 1 and 4 When baking cakes on multiple racks use positions 1 and 3 Cookies and biscuits should be baked on pans with no sides or very low side to allow heated air to circulate around the food Food baked on pans with a dark finish will cook faster When placing multiple food items in the oven allow at least 2 of space between them for proper air circulatio...

Page 36: ...k in position 2 next up from bottom Please refer to the Convection Roast function cooking table for temperature and time instructions when cooking with this function Do not cover foods when dry roasting this will prevent the meat from browning properly Meat probe cooking tips For some foods especially poultry and roasts testing the internal temperature is the most effective way of insuring that yo...

Page 37: ...een will show Press the knob to activate the child lock mode The display will return to the standby screen To deactivate the child lock mode turn the tem perature knob to the right The display will show and the icon starts to flash Now press the temperature knob for a few seconds to deactivate the child lock mode The display will return to the standby screen Demo mode After accessing the settings ...

Page 38: ...meter described above Temperature units After accessing the settings menu keep pressing the temperature knob until the display shows Turning the temperature knob to right causes the display to switch between C and F Press the knob to confirm the selection and exit from the user menu if you wish to do so Time format After accessing the settings menu keep pressing the temperature knob until the disp...

Page 39: ...placed on the rack Biscuits 1 4 Shiny pan with no sides very low sides placed on the rack White cake 1 3 8 inch diameter Broil function cooking table Food Rack position Oven T Cooking time 1st side min Cooking time 2nd side min Doneness Steak 4 550 F 280 C 6 6 Med Rare 5 550 F 280 C 6 4 Rare Chicken Breast bone in 4 450 F 230 C 20 20 Well Done Chicken Breast boneless 3 450 F 230 C 30 10 Well Done ...

Page 40: ...unction cooking table Meat type Weight lb Oven T Probe T Time lb min lb Rack position Standing Rib Roast med rare 5 7 350 F 175 C 145 F 60 C 15 2 Standing Rib Roast well done 5 7 350 F 175 C 170 F 75 C 24 2 Whole Ham bone in 10 15 325 F 160 C 24 2 Whole Turkey 10 15 325 F 160 C 12 2 Whole Turkey 15 20 325 F 160 C 10 2 Whole Chicken 4 6 375 F 190 C 180 F 80 C 19 2 Pork Shoulder Butt Roast 10 15 325...

Page 41: ...cannot be started Wait until the oven has cooled down If the inside temperature is below 167 F 75 C the display shows the following screen 5 Open the oven door The word FILL appears on the display to indicate that is possible to pour water into the oven cavity CAUTION Remove any food residues or large spills from previous cooking operations from the inside of the oven Only carry out this cleaning ...

Page 42: ...witches to the stand by screen 2 Open the door about 2 5 cm to let out most of the hot steam Be very careful to keep distance while the hot steam comes out 3 Open the door completely and wipe away the less stubborn dirt with a microfiber cloth Use an anti scratch sponge with brass filaments on tougher encrustations In case of grease residues use specific oven cleaning products 4 Remove all the wat...

Page 43: ...ins may occur during heating that cannot be removed Porcelain enamel oven cavity inside walls Gentle scouring with a soapy scouring pad will remove most spots Rinse with a 1 1 solution of clear water and ammonia If necessary cover difficult spots with an ammonia soaked paper towel for 30 to 40 minutes Rinse with clean water and a damp cloth then scrub with a soap filled scouring pad Rinse and wipe...

Page 44: ...hts 1 Turn the power off at the main source or unplug the appliance 2 Remove the bulb cover using a tool that cannot scratch the enamel surfaces e g a spoon 1 Slide out the light bulb and remove it 2 Install the new light bulb IMPORTANT This has to be done in order to replace the oven lights and enables you to clean the oven side walls Grasp the shelf supports firmly by both ends to prevent scratc...

Page 45: ...Do not spray or allow water or the cleaner to enter or drip down into the oven door vents First spray cleaner onto the cloth and then wipe the oven door clean Do not use strong oven cleaners powders or harsh abrasive cleaning materials on the out side of the oven door or glass Removing the oven door To remove the door proceed as follows 1 Open the door completely and insert two pins into the holes...

Page 46: ...ve it from the appliance The seal should be soft and elastic To clean the seal use a non abrasive sponge and wash with lukewarm water Removing the internal glass panes For easier cleaning the internal glass panes of the door can be disassembled 1 Remove the internal glass pane by pulling the rear part gently upwards following the movement indicated by the arrows 1 2 Then pull the front part upward...

Page 47: ... of pans with aluminum bases can be wiped off with a damp cloth soaked in vinegar If after cooking burnt residues remain remove them with water and dry thoroughly with a clean cloth Grains of sand which may end up on the cooktop while cleaning lettuce or potatoes can scratch the cooktop when you move pans around Therefore make sure that no grains of sand are left on the cooktop Changes in color do...

Page 48: ...he dirt remaining on the film and can be removed easily Just wipe the surface with a clean cloth Make sure that no detergent remains on the cooktop surface because it will react aggres sively when the cooktop is heated and can alter its structure Food stains or residues Do not use metallic sponges or sharp scrapers as they will damage the surfaces Use ordinary non abrasive products with the aid of...

Page 49: ...ition for bak ing needs Set oven temperature 25 F 12 C lower than recommended Cakes not done in the center Oven too hot Incorrect pan size Pan not centered in the oven Set oven temperature 25 F 12 C lower than recommended Use pan size suggested in recipe See the Air circulation in the oven section Cakes not level Range not level Pan too close to oven wall or rack overcrowded Pan warped Place a mar...

Page 50: ...eck the house lights to be sure Call your local electric company Short in cord plug Replace cord plug Controls are not set properly See instructions to set the con trols House fuse has blown or circuit breaker has tripped immedi ately following installation House fuse may not be fully engaged Check fuse and screw or engage circuit breaker securely Oven lights do not work Burned out or loose bulb F...

Page 51: ...flat evenly bal anced medium or heavyweight cookware Flat pans heat better than warped pans Cookware materials and weight of the mate rial affect heating Heavy and medium weight pans heat evenly Because lightweight pans heat unevenly foods may burn easily Control for power level setting not responding Wait 5 6 seconds without any pressing the control to allow it to reset Areas of discoloration wit...

Page 52: ...floors cabinets walls etc 13 Damages caused by services performed by unauthorized service companies use of parts other than genuine Electrolux parts or parts obtained from persons other than authorized service companies or external causes such as abuse misuse inadequate power supply accidents fires or acts of God DISCLAIMER OF IMPLIED WARRANTIES LIMITATION OF REMEDIES CUSTOMER S SOLE AND EXCLUSIVE...

Page 53: ......

Page 54: ......

Page 55: ......

Page 56: ......

Reviews: