background image

TA B L E   O F   C O N T E N T S

www.frigidaire.com   USA 1-800-944-9044            www.frigidaire.ca   Canada 1-800-265-8352


All about the

Use

 & 

Care


of your


Freezer

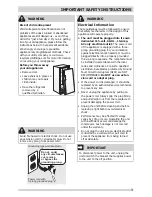
Important Safety Instructions..........................2

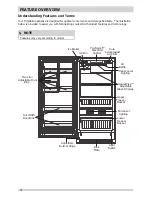
Feature Overview.............................................4

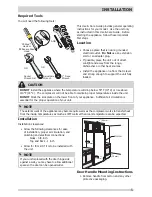
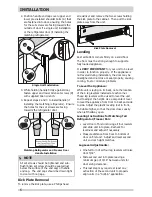
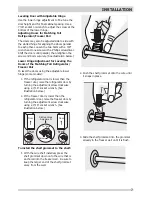
Installation.....................................................5

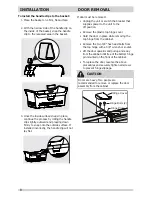
Door Removal..................................................8

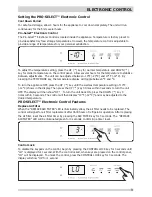
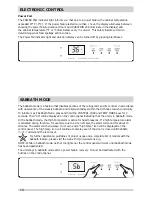
Electronic Control.............................................9

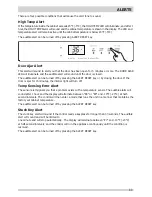
Sabbath Mode.................................................10

Alerts............................................................11

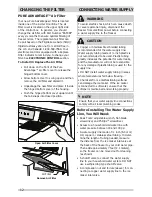
Changing The Filter.........................................12

A01060901 (A

ugust 2014)

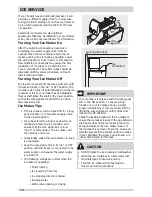
Connecting Water Supply................................12

Ice Service.....................................................14

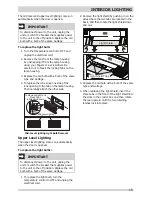
Interior Lighting.............................................15

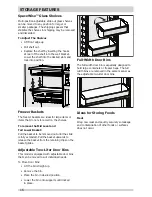
Storage Features.............................................16

Energy-Saving Tips.........................................17

Care & Cleaning.............................................17

Before you Call...............................................19

Major Appliance Warranty................................21

Summary of Contents for Freezer

Page 1: ...portant Safety Instructions 2 Feature Overview 4 Installation 5 Door Removal 8 Electronic Control 9 SabbathMode 10 Alerts 11 Changing The Filter 12 A01060901 August 2014 Connecting Water Supply 12 Ice Service 14 Interior Lighting 15 Storage Features 16 Energy Saving Tips 17 Care Cleaning 17 Before you Call 19 Major Appliance Warranty 21 ...

Page 2: ...zardous situation which if not avoided may result in minor or moderate injury IMPORTANT IMPORTANT indicates installation operation or maintenance information which is important but not hazard related WARNING Child Safety Destroy carton plastic bags and any exte rior wrapping material immediately after the unit is unpacked Children should never use these items for play Cartons covered with rugs bed...

Page 3: ...nding plug for your protection against electrical shock hazards It must be plugged directly into a properly grounded three prong receptacle The receptacle must be installed in accordance with the local codes and ordinances Consult a qualified electrician Receptacles protected by Ground Fault Circuit Interrupters GFCI are NOT RECOMMENDED Do NOT use an exten sion cord or adapter plug If the power co...

Page 4: ...iarizing yourself with product features and terminology NOTE Features may vary according to model Kick Plate Upper Level Lighting Two Liter Adjustable Door Bins Upper Freezer Basket Lower Freezer Basket Light Switch Pure Advantage Air Filter Adjustable Bottom Hinge Mid Level Lighting Pro Select Electronic Control Ice Maker SpaceWise Adjustable Glass Shelves Full Width Door Bins Ice Bin Air Baffle ...

Page 5: ...rature will drop below 55 F 13 C or rise above 110 F 43 C The compressor will not be able to maintain proper temperatures inside the unit DO NOT block the kick plate on the lower front of your appliance Sufficient air circulation is essential for the proper operation of your unit Installation Installation clearances Allow the following clearances for ease of installation proper air circulation and...

Page 6: ...he set screws are facing towards the refrigerator door Leveling Instructions for Matching Tall Refrigerator Freezer Pair Level door of first unit using all four levelers and slide unit into place Recheck for levelness and adjust if necessary Measure distance from floor to bottom of door on first unit Adjust and level second unit so door height matches Leg Level Adjustments One full turn of all fou...

Page 7: ...sing the adjustable lower hinge some models 1 If the refrigerator door is lower than the freezer door raise the refrigerator door by turning the adjustment screw clockwise using a 7 16 socket wrench See illustration below 2 If the freezer door is lower than the refrigerator door raise the freezer door by turning the adjustment screw clockwise using a 7 16 socket wrench See illustration below Door ...

Page 8: ...se the above procedures and securely tighten all screws to prevent hinge slippage CAUTION Doors are heavy Two people are recommended to remove or replace the door assembly from the cabinet 1 Place the basket on a firm flat surface 2 With the narrow side of the handle clip on the inside of the basket snap the handle clip to the recessed area in the basket To install the handle clips to the basket 3...

Page 9: ...econds confirming a timer reset F ELECTRONIC CONTROL To adjust the temperature setting press the UP key for warmer temperature and DOWN key for colder temperature on the control panel Allow several hours for the temperature to stabilize between adjustments The unit can be adjusted between 10 F 23 C and 10 F 12 C By pressing the TEMP MODE key the temperature display will toggle between F and C To t...

Page 10: ...losed until Sabbath mode is exited and the icon reset For further assistance guidelines of proper usage and a complete list of models with the Sabbath feature please visit the web at http www star k org NOTE While in Sabbath mode neither the lights nor the control panel will work until Sabbath mode has been deactivated The unit stays in Sabbath mode after a power failure recovery It must be deacti...

Page 11: ...the door If the door is ajar for 15 minutes the interior light will turn off F HI TEMP Temp Sensing Error Alert The sensor alert signals you that a problem exists with a temperature sensor The audible alarm will sound after 1 hour and the display will alternate between E8 or E9 and 10 F 23 C at half second intervals The control will then enter a mode that runs the unit in a manner that maintains t...

Page 12: ... before connecting a water supply line to the freezer CAUTION Copper or Stainless Steel braided tubing is recommended for the water supply line Water supply tubing made of inch plastic is not recommended to be used Plastic tubing greatly increases the potential for water leaks and the manufacturer will not be responsible for any damage if plastic tubing is used for the supply line DO NOT install w...

Page 13: ...erator out for cleaning Figure A Copper Water Line Connection Steel Clamp Stainless Steel water Line Water Valve Bracket Valve Inlet Water Valve 6 ft Stainless Steel water line from household water supply Plastic Water Tubing to Ice Maker Fill Tube Figure B Stainless Steel Water Line Connection 5 With steel clamp and screw secure water supply line copper tubing only to rear panel of freezer as sho...

Page 14: ...valve to the closed position Ice cubes stored too long may develop an odd flavor Empty the ice container and ensure that the wire signal arm is in its down or ON position The ice maker will then produce more ice Occasionally shake the ice container to keep ice separated Keep the wire signal arm in its up or OFF position until the freezer is connected to the water supply or whenever the water suppl...

Page 15: ...id Level Lighting Upper Level Lighting The upper level lighting comes on automatically when the door is opened To replace the light bulbs IMPORTANT To disconnect power to the unit unplug the unit or switch the breaker that supplies power to the unit to the off position Replace the old bulb with a bulb of the same wattage 1 To replace the light bulb turn the temperature control to OFF and unplug th...

Page 16: ...asket Pull the basket to be removed out until the slide is fully extended Pull the basket upwards to release the basket from the retaining clips on the basket glides STORAGE FEATURES Full Width Door Bins The full width door bin is especially designed to hold large containers or freezer bags The full width bins are removed in the same manner as the adjustable two liter door bins Ideas for Storing F...

Page 17: ... the wall outlet Remove foods then defrost and clean the appliance Secure all loose items such as base panel baskets and shelves by taping them securely in place to prevent damage In the moving vehicle secure unit in an upright position to prevent movement Also protect outside of the appliance with a blanket or similar item ENERGY SAVING TIPS Locate the appliance in the coolest part of the room ou...

Page 18: ...s steel Clean stainless steel front and handles with non abrasive soapy water and a dishcloth Rinse with clean water and a soft cloth Wipe stubborn spots with an ammonia soaked paper towel and rinse Use a non abrasive stainless steel cleaner These cleaners can be purchased at most home improvement or major department stores Always follow manufacturer s instruction NOTE Always clean wipe and dry wi...

Page 19: ...r setting Allow several hours for the temperature to stabilize Clean or change gasket See Care and Cleaning Chart Worn cracked or poorly fitting gaskets should be replaced APPLIANCE TEMPERATURES Interior ap pliance tem perature is too cold Temperature control is set too low Set control to a warmer setting Allow several hours for temperature to stabilize Temperature inside appli ance is too warm Te...

Page 20: ... wood or metal shims under part of the appliance Re level appliance or move appliance slightly Refer to Leveling in the INSTALLATION section WATER MOISTURE FROST INSIDE APPLIANCE Moisture forms on inside appliance walls Weather is hot and humid which increases internal rate of frost buildup Door is slightly open Door is kept open too long This is normal See DOOR PROBLEMS Open the door less often O...

Page 21: ... companies or external causes such as abuse misuse inadequate power supply accidents fires or acts of God DISCLAIMER OF IMPLIED WARRANTIES LIMITATION OF REMEDIES CUSTOMER S SOLE AND EXCLUSIVE REMEDY UNDER THIS LIMITED WARRANTY SHALL BE PRODUCT REPAIR OR REPLACEMENT AS PROVIDED HEREIN CLAIMS BASED ON IMPLIED WARRANTIES INCLUDING WARRANTIES OF MERCHANTABILITY OR FITNESS FOR A PARTICULAR PURPOSE ARE ...

Page 22: ......

Page 23: ......

Page 24: ......

Reviews: