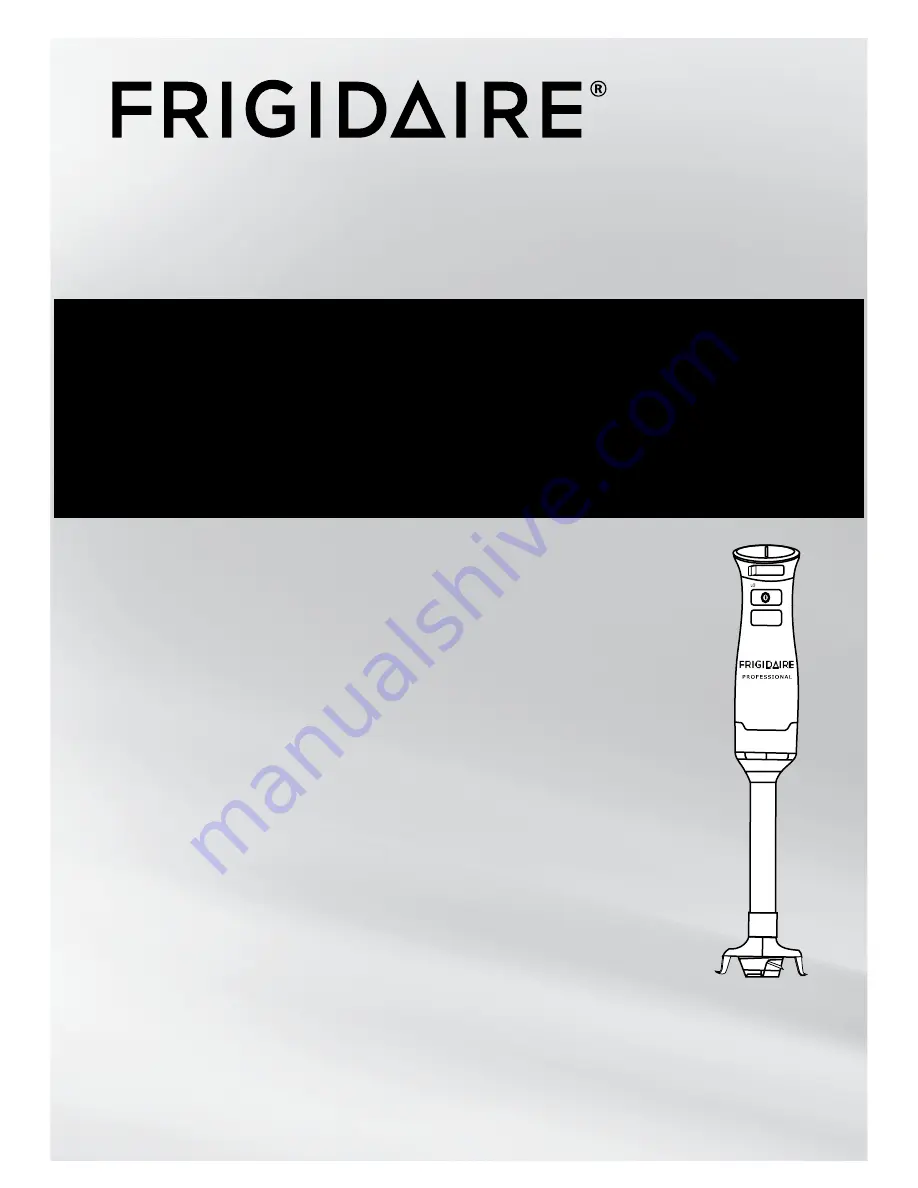
background image

All about the

Use Care

&

of your 

Immersion Blender

  USA  1-888-845-7330

900253211-UM (February

 2012

)

Important Safeguards……………………………….2

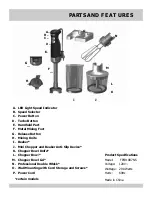
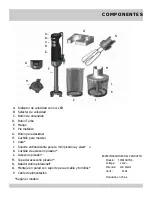
Parts and Features……………………………………3

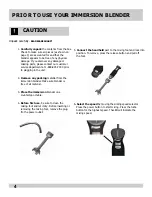
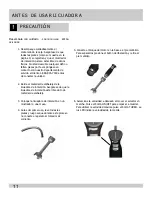
Prior to Using your Blender……………………….4

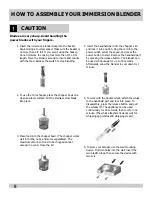
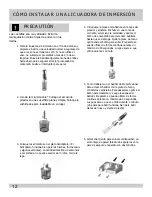
How to Assemble your Blender………………….5

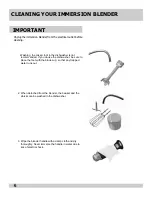
Cleaning your Blender………………… ..………….6

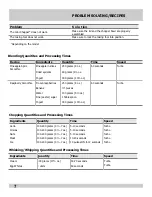
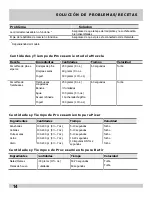
Problem Solving/Recipes………………..7

Warranty Information…………………….8

Spanish User’s Manual……………….9-15

TABLE OF  CONTENTS

French User’s Manual……………… 16-22


TURBO

HI

Summary of Contents for FPIB10B7NS

Page 1: ...1 UM February 2012 Important Safeguards 2 Parts and Features 3 Prior to Using your Blender 4 How to Assemble your Blender 5 Cleaning your Blender 6 Problem Solving Recipes 7 Warranty Information 8 Spanish User s Manual 9 15 TABLE OF CONTENTS French User s Manual 16 22 TURBO HI ...

Page 2: ...e injury to persons or damage the food chopper A scraper may be used but only when the food chopper is not running 16 Do not place the unit near any hot surface range or electrical burners or where it could touch any other source of heat 17 When mixing liquids especially hot liquids use a tall container or make small quantities at a time to reduce spillage Consumer Safety Information THIS UNIT IS ...

Page 3: ...e I Beaker J Mini Chopper and Beaker Anti Slip Device K Chopper Bowl Knife L Chopper Bowl M Chopper Bowl Lid N Professional Double Whisk O Wall Mounting with Cord Storage and Screws P Power Cord certain models A PARTS AND FEAT URES D E F G H I O N M L K J C Product Specifications Model FPIB10B7NS Voltage 120V Wattage 200 Watts Hertz 60Hz Made in China ...

Page 4: ...ing material from the immersion blender Make sure blender is free of all material 3 Place the immersion blender on a countertop or table 4 Before first use be sure to clean the mixing foot and let it dry Before inserting or removing the mixing foot remove the plug fro the power outlet 4 CAUTION 5 Connect the handheld part to the mixing foot and lock into position To remove press the release button...

Page 5: ... amount of food to be chopped cannot exceed pound Close the lid 5 4 Insert the handheld part into the chopper s lid and lock it into position Plug the cord into the power outlet select the speed and press the power button to start Remove the handheld part by pressing the release button The blender can be used continuously for up to 30 seconds Afterwards allow the blender to cool down for 1 minute ...

Page 6: ...h the blades up so that any trapped water runs out 2 When detached from the blender the beaker and the whisks can be washed in the dishwasher 3 Wipe the blender handle with a damp cloth and dry thoroughly Never immerse the handle in water due to risk of electric shock 6 IMPORTANT Unplug the immersion blender from the electrical outlet before cleaning ...

Page 7: ...Turbo Nuts 100 200 grams 3 7 oz 5 10 seconds Turbo Meat 100 200 grams 3 7 oz 10 20 seconds Turbo Ice 100 200 grams 3 7 oz 10 pulses ON for 2 seconds Turbo Whisking Whipping Quantities and Processing Times Ingredients Quantity Time Speed Cream 500 grams 17 oz 50 70 seconds Turbo Egg Whites 4 units 60 seconds Turbo 7 Recipe Ingredients Quantity Time Speed Pineapple Apric Smoothie Pineapple in slices...

Page 8: ...accordance with the provided instructions 8 Service calls to correct the installation of your appliance or to instruct you how to use your appliance 9 Expenses for making the appliance accessible for servicing such as removal of trim cupboards or knobs handles or other cosmetic parts 10 Surcharges including but not limited to any after hour weekend or holiday service calls tolls ferry trip charges...

Page 9: ...ersión 900253211 UM February 2012 Precauciones Importantes 9 Piezas y Funciones 10 Antes de Utilizar su Licuadora de Inmersi 11 Cómo instalar su Licuadora de Inmersi 12 Limpieza de su Licuadora de Inmersión 13 Solución de Problemas Recetas 14 Información sobre la Garantía 15 TURBO HI ón ón ...

Page 10: ...se podria tocar cualquier fuente de calor 17 Cuando se mezcla líquidos especialmente líquidos calientes utilizar un recipiente alto o una mezcla de pequeñas cantidades a la vez con el fin de reducir los derrames 9 contactos es más ancho que el otro Para reducir el riesgo de descargas eléctricas este enchufe encaja en un tomacorriente polarizado sólo de una manera Si el enchufe no encaja bien en el...

Page 11: ...a r a p e t n a z i l s e d i t n a e t r o p o S J K Cuchilla de accesorio picador L Accesorio picador M Tapa del accesorio picador N Batidor doble pr ofesional O Montaje en pared con soporte para el cable y tornillos P Cable de alimentación Según el modelo A B COMPONENTES E F G H I O N M L K J C ESPECIFICACIONES DEL PRODUCTO Modelo FPIB10B7NS Voltage 120V Potencia 200 Watts z H 0 6 z t r e H Pro...

Page 12: ... embalaje de la licuadora de inmersión Asegúrese de que la licuadora de inmersión este libre de todo material de embalaje 3 Coloque la licuadora de inmersión en un mostrador o una mesa 4 Antes del primer uso lave todas las piezas y luego seque durante este proceso no conecte el aparato al tomador de corriente 11 5 Conecte el bloque del motor en la base a el pie metálico Para separarlos presione el...

Page 13: ...dura en la tapa del picador y ajústela Enchufe en una toma de corriente seleccione la velocidad y oprima el botón de encendido para comenzar Suéltela hasta que se detenga Quite la pieza de mano oprimiendo el botón para soltar El aparato se puede utilizar de forma continua durante un máximo de 30 segundos Luego espere a que enfrié durante 1 minuto 5 Como trabajar con el batidor doble profesional Pa...

Page 14: ...hacia arriba para que permita escurrir el flujo de agua atrapada 2 El vaso y las varillas sin el soporte plástico pueden lavarse en el limpiador de vajillas 3 Desmonte el pie metálico limpie con un paño húmedo y seque bien Nunca sumerja en agua porque podría producir una descarga eléctrica 13 Desconecte la licuadora de inmisión de la toma eléctrica antes de la limpieza I MP O R T A N T E S ...

Page 15: ...3 7 oz 5 10 segundos Turbo Frutas secas 100 200 gr 3 7 oz 5 10 segundoe Turbo Carne 100 200 gr 3 7 oz 10 20 segundos Turbo Hielo ñ 10 impulsos ON for 2 segundos Turbo C a n t i d a d e s y T i e m p o s d e P r o c e s a m i e n t o p a r a B a t i r Ingredientes Cantidades Tiempo Velocidad Natas Cremas 500 grams 17 oz 50 70 segundos Turbo Claras de heuvo 4 unidades 60 segundos Turbo 14 Receta Ing...

Page 16: ...genuinas o piezas obtenidas de personas que no pertenezcan a compañías de servicio autorizadas o causas externas como abuso mal uso suministro de energía inadecuado accidentes incendios o casos de fuerza mayor DESCARGO DE RESPONSABILIDAD DE GARANTÍAS IMPLÍCITAS LIMITACIÓN DE COMPENSACIONES LA ÚNICA Y EXCLUSIVA COMPENSACIÓN PARA EL CLIENTE CONFORME A ESTA GARANTÍA LIMITADA SERÁ LA REPARACIÓN O REEM...

Page 17: ... utiliser votre mélangeur a immersion 18 Comment structurer votre mélangeur a immersion 19 Nettoyage de votre mélangeur a immersion 20 Dépannage Recettes 21 Garantie de gros Appareils 22 États Unis1 888 845 7330 TURBO HI L utilisation L entretien Et de votre mélangeur à immersion T A B L E D E S M A T I È R E S ...

Page 18: ...iques ou si elle pouvait toucher n importe quelle autre source de chaleur 17 Lorsque le mélange des liquides des liquides particulièrement chaud utilisez un récipient haut ou un mélange de petites quantités à la fois dans le but de réduire les déversements CONSERVEZ CES INSTRUCTIONS Information de Sécurité Pour le Consommate Cet appareil possède une fiche polarisée une broche est plus large que l ...

Page 19: ...ient gradue 800 ml J Dispositif antidérapant du mini hachoir et gobelet K Couteau L Bol hachoir M Couvercle du bol hachoir N Double fouet grade professionnel O Support mural avec rangement du cordon P Cordon d alimentation A B ELEMENTS 17 D E F G H I O N M L K J C Selon le modelé Spécifications du produit Modèle FPIB10B7NS Voltage 120V Wattage 200 Watts Hertz 60Hz Fabriqué en Chine ...

Page 20: ...e de l mélangeur à immersion Assurez vous que l mélangeur à immersion est exempt de toute matière 3 Placer le mélangeur à immersion sur un comptoir ou table 4 Avant la première utilisation veiller a nettoyé puis a laisser sécher le pied Mixeur débrancher l appareil de la prise de courant 18 P R U D E N C E 5 Connectez le bloc moteur au pied mixeur et verrouillez les Pour les séparer appuyez sur la...

Page 21: ...ns le bol du hachoir Ne tentez pas de hacher plus de 250g d aliments à la fois Fermez le couvercle 19 4 Connectez le bloc moteur et le couvercle du hachoir et verrouillez les Branchez l appareil sélectionne la vitesse appropriée et appuyez sur le bouton Marche Arrêt pour démarrer le hachage Relâchez la touche pour interrompre l opération Appuyez sur la touche de déverrouillage pour séparer le bloc...

Page 22: ...ames vers le haute afin de permettre écoulement de eau 2 Le verre doseur et les fouets détaches du support en plastique peuvent être laves au lave vaisselle 3 Retirer le bloc moteur L essuyer l aide d un chi on humide et le sécher soigneusement Ne jamais le plonger dans l eau risque de choc électrique 20 I M P O R T A N T S Débranchez le mélangeur à immersion de la prise électrique Avant nettoyage...

Page 23: ...z 10 20 seconds Turbo Glaçons 100 200 grams 3 7 oz 10 impulsions d une durée de 2 s Turbo Q u a n t i t é s o u e t t e r t u r é e s e o u e t t a g e Ingrédients Quantité Durée Vitesse Crème 500 grams 17 oz 50 70 seconds Turbo Les blancs d oeufs 4 unités 60 seconds Turbo 21 Recette Ingrédients Quantité Durée Vitesse Smoothie à l ananas et à l abricot Tranches d ananas 250 grams 9 oz 60 seconds T...

Page 24: ...trolux ou des pièces obtenues de personnes autres que les sociétés de service autorisées ou des causes extérieures comme abus mauvaise utilisation courant inadéquat accidents incendies ou force majeure DÉNÉGATION DES GARANTIES IMPLICITES LIMITATION DE RECOURS LE SEUL RECOURS EXCLUSIF DU CLIENT SOUS CETTE GARANTIE LIMITÉE SERA LA RÉPARATION OU LE REMPLACEMENT DU PRODUIT SELON CE QUI EST INDIQUÉ DAN...

Reviews: