background image

8

TROUBLESHOOTING

Before seeking repair or replacement, we recommend that you review the following:

LOUD NOISES:

 (Other than those during grinding of

small bones and fruit pits):  These are usually caused by

accidental entry of a spoon, bottle cap or other foreign

object.  To correct this, turn off electrical switch and water.

After disposer has stopped, remove *splash guard, remove

object with long handled tongs, and replace *splash guard.

UNIT DOES NOT START:

Unplug power cord or turn

either the wall switch or breaker box switch to “OFF”

position, depending on your model and wiring configuration.

Remove stopper and/or *splash guard.  Check to see if

turntable will rotate freely using a wooden broom handle.  If

turntable rotates freely, replace *splash guard and check re-

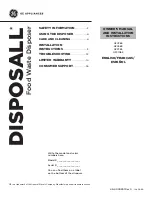
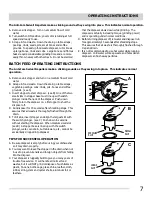
set button to see if it has been tripped.  Re-set button is red

and located opposite discharge elbow, near the bottom (see

8A).  Push button in until it clicks and remains depressed.

If re-set button has not been tripped, check for shorted or

broken wire connecting to disposer.  Check electrical power

switch, fuse box or circuit breaker.  If wiring and electrical

components are intact, the unit may have internal problems

that require service or replacement.

*Splash guard not used on Top Control/Batch Feed unit.

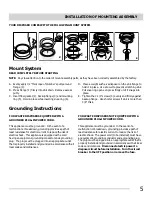
IF TURNTABLE DOES NOT ROTATE FREELY:

Turn off disposer, then check for any foreign object lodged

between the turntable and grind ring.  Dislodge object by

rotating table with a wooden broom handle and remove

object. (see 8B)  If no foreign object is present, there may

be internal problems.

LEAKS:

If the unit leaks at the top, it may be due to:

1.  Improper seating of sink flange (gasket centering, putty

     or tightening).

2.  Support ring not tightened properly.

3.  Defective or improperly installed cushion mount.

If unit leaks at the waste elbow, leak may be due to im-

proper tightening of elbow flange screws.

Call our toll free Help Line with any questions

800-944-9044

CLEANING AND MAINTENANCE

DO NOT ATTEMPT TO LUBRICATE YOUR DISPOSER!

The motor is permanently lubricated.  The disposer is self

cleaning and scours its internal parts with each use.

Mineral deposits from your water can form on the stainless

steel turntable, giving the appearance of rust.  DO NOT BE

ALARMED, the stainless steel turntables used will not

corrode.

NEVER put lye or chemical drain cleaners into the disposer,

as they cause serious corrosion of metal parts.  If used,

resulting damage can be easily detected an all warranties

are void.

8A

8B

560C525P02 REV A

Summary of Contents for FFDI331CMS

Page 1: ...he unit may have internal problems that require service or replacement Splash guard not used on Top Control Batch Feed unit IF TURNTABLE DOES NOT ROTATE FREELY Turn off disposer then check for any foreign object lodged between the turntable and grind ring Dislodge object by rotating table with a wooden broom handle and remove object see 8B If no foreign object is present there may be internal prob...

Page 2: ...4 www frigidaire ca Canada 1 800 265 8352 Food Waste Disposer 1 1 0 2 y l u J Product Registration 2 Important Safety Instructions 2 Removal of Old Unit 3 Installation of Mounting Assembly 4 5 Electrical Connections 6 Operating Instructions 7 Troubleshooting 8 Cleaning and Maintenance 8 ...

Page 3: ...ngers or hands into a waste disposer 4 Turn the power switch to the off position before at tempting to clear a jam or remove an object from the disposer 5 When attempting to loosen a jam in a waste disposer use a long wooden object such as a wooden spoon or the wooden handle of a broom or mop 6 When attempting to remove objects from a waste disposer use long handled tongs or pliers If the dis pose...

Page 4: ... is removed turn up side down and remove electrical cover plate see D D Use screwdriver to remove green ground wire Remove wire nuts from black and white power wires and separate disposer wires from power cable wires Loosen screws on cable clamp and separate cable from disposer E To remove remaining mount system from the sink loosen mount screws push mount ring up Under it is the snap ring Use scr...

Page 5: ...ning to make a good seal DO NOT move or rotate the sink flange once seated or the seal may be broken NOTE Pay close attention to the order of mount assembly parts as they have been correctly assembled by the factory D Take the remaining portion of the mount assembly as it was set aside and make sure that the rubber gasket is on top of the protector ring From under the sink while holding the sink f...

Page 6: ... This appliance must be grounded In the event of a malfunction or breakdown grounding provides a path of least resistance for electric current to reduce the risk of electric shock This appliance is equipped with a cord having an equipment groundingconductor and a grounding plug The plug must be plugged into an appropriate outlet that is properly installed and grounded in accordance with all local ...

Page 7: ...tem or an equipment grounding con ductor must be run with the circuit conductors and connected to the equipment grounding terminator or lead on the appliance A If you use BX cable 1 Install cable connector in hole 2 Connect white wire to white lead of disposer 3 Connect black 4 Connect bare ground If BX cable is not used provide a serpareate ground wire to nearest cold water metal pipe or other su...

Page 8: ...m flow of cold water B Scrape in food waste Down the drain go table scraps vegetable peelings cobs rinds pits bones and coffee grounds see A C Insert stopper to start disposer see B One of the two small slots in stopper base must line up with switch plunger inside the neck of the disposer Push down firmly to turn the disposer on Lift stopper to shut the disposer off D Run disposer for 15 seconds a...

Reviews: