background image

Basic Operation Guide

- for use without a computer -

Summary of Contents for Stylus Photo TX720WD

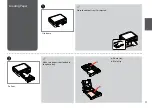
Page 1: ...Basic Operation Guide for use without a computer ...

Page 2: ...nting in Various Layouts 32 Printing on a CD DVD 34 Printing Photo Greeting Cards 37 Printing from an External USB Device 40 Print Photos Mode Menu List 41 Other Mode Printing Ruled Paper 44 Printing a Coloring Sheet 46 Scanning to a Memory Card 48 Scanning to a Computer 49 Backup to an External USB Device 50 Other Mode Menu List 51 Setup Mode Maintenance Checking the Ink Cartridge Status 54 Check...

Page 3: ...h Seiko Epson Corporation s operating and maintenance instructions Seiko Epson Corporation shall not be liable for any damages or problems arising from the use of any options or any consumable products other than those designated as Original Epson Products or Epson Approved Products by Seiko Epson Corporation Seiko Epson Corporation shall not be held liable for any damage resulting from electromag...

Page 4: ...that contain flammable gases inside or around the printer Doing so may cause fire Except as specifically explained in your documentation do not attempt to service the printer yourself Keep ink cartridges out of the reach of children and do not drink the ink Do not shake ink cartridges after opening their packages this can cause leakage If you remove an ink cartridge for later use protect the ink s...

Page 5: ... it with your nails Do not operate using sharp or pointed objects such as ball point pen sharp pencil stylus pen and so on The touchpad is a capacitive touch panel that only responds to direct finger touch The touchpad may not respond to touch from wet hands gloved hands or over the protective sheet or stickers ...

Page 6: ...On or Off R 7 f g h i j x l u r d OK y The status indicator light shows the printer status The LCD screen displays a preview of the selected images or displays settings Displays detailed settings for each mode Selects photos and menus Cancels returns to the previous menu Control panel design varies by area k l m n x y Sets the number of copies Starts copying printing Stops copying printing or rese...

Page 7: ...ton and changing View PhotoEnhance to On The actual screen display may differ slightly from those shown in this guide After 13 minutes of inactivity the screen turns black to save energy Touch the screen to return the screen to its previous state Q f When you have more than 999 photos on your memory card the LCD screen displays a message to let you select a group Images are sorted by the date they...

Page 8: ...ss to lower Using the optional rear cover If you do not want to use 2 sided printing remove the auto duplexer and replace with the supplied rear cover For more details see the online User s Guide Depending on the area the rear cover may not be supplied Q ...

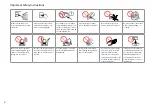
Page 9: ... Handling Media and Originals ...

Page 10: ...lity Ink Jet Paper Matte 100 Main e Epson Matte Paper Heavy weight Matte 20 Main f Epson Premium Glossy Photo Paper Prem Glossy 20 A4 Main Other than A4 Photo g Epson Premium Semigloss Photo Paper Prem Glossy h Epson Glossy Photo Paper Glossy i Epson Photo Paper Photo Paper j Epson Ultra Glossy Photo Paper Ultra Glossy k Epson Double Sided Matte Paper Matte 1 Main l Epson Photo Stickers Photo Stic...

Page 11: ...11 Loading Paper Flip down Pull out A B Make sure paper is not loaded in the photo tray Q Close the output tray if it is ejected Q a Photo tray b Main tray ...

Page 12: ...12 Slide and raise Pinch and slide to the sides C D Slide to the edges of paper F Slide to your paper size G Load printable side DOWN E R 10 ...

Page 13: ...aise N Align the edges of the paper before loading Q Slide to the edges of the paper Slide to your paper size K L Insert keeping the cassette flat M Close H Pinch and slide to the sides I Load printable side DOWN J R 10 ...

Page 14: ... Guide when using Legal size paper Q Do not pull out or insert the paper cassette while the printer is operating Q When loading a Photo Sticker sheet place it face DOWN as shown on the right Do not use the loading support sheet that came with the Photo Stickers Q ...

Page 15: ...ay C The CD DVD tray cannot be ejected or extended any further c When ejecting inserting the CD DVD tray make sure nothing is placed on the output tray c The CD DVD tray closes automatically after a certain period of time Press L to eject again Q To print on 8 cm CDs see the online User s Guide Q ...

Page 16: ...16 Place Do not pull the CD DVD tray D Close the CD DVD tray F Press gently E Removing a CD DVD Remove horizontally A Close the CD DVD tray B Lower C ...

Page 17: ...e the card all the way into the slot It should not be fully inserted c Inserting a Memory Card A B Insert one card at a time Check the light stays on Removing a memory card Check the light stays on A B Remove On Flashing Q ...

Page 18: ...Picture Card xD Picture Card Type M xD Picture Card Type M xD Picture Card Type H SD SDHC MultiMediaCard MMCplus MMCmobile MMCmicro miniSD miniSDHC microSD microSDHC Memory Stick Memory Stick PRO MagicGate Memory Stick Memory Stick Duo Memory Stick PRO Duo Memory Stick PRO HG Duo MagicGate Memory Stick Duo Memory Stick Micro CompactFlash Microdrive ...

Page 19: ...ls A Place face down horizontally B Slide to the corner Place photos 5 mm apart You can copy one photo or multiple photos of different sizes at the same time as long as they are larger than 30 40 mm Q Place in the center ...

Page 20: ...20 Place the first page Place the second page You can print two pages of a book on a single side of one sheet Select Book 2 up or Book 2 Sided as the layout and place the book as shown on the left ...

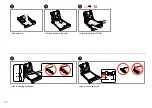
Page 21: ...21 Copy Mode ...

Page 22: ...22 Copying Documents A R 11 B R 19 C Load paper Place original horizontally Select Copy F G Set the density Enter the copy setting menu Set the number of copies D E Select a color mode ...

Page 23: ...gs Finish the settings Start copying I R 28 Select the appropriate copy settings Make sure you set the Paper Size and Paper Type Q When you want to copy double sided documents using the auto duplexer set 2 Sided Printing to On in step I Q ...

Page 24: ...24 Copy Restore Photos Load paper Place original horizontally Select Copy Select Copy Restore Photos Select On or Off Proceed Enter the copy setting menu A R 11 B R 19 C E F G D ...

Page 25: ... repeat step H for the second photo Q Make sure you set the Paper Size and Paper Type Q Set the number of copies Enter the copy setting menu K R 28 Select the appropriate print settings J Proceed L Finish the settings M Start copying ...

Page 26: ...26 Copying a CD DVD A R 19 B Place original Select Copy E F Proceed Set the printing area Enter copy menu C D Select Copy to CD DVD ...

Page 27: ...lect Test print on A4 paper Q I Select a color mode and proceed To adjust print position select Setup Printer Setup then CD DVD R 60 Q H R 15 Load a CD DVD If you print on the colored areas shown on the right the units are in mm the disk or CD DVD tray may be stained with ink Q ...

Page 28: ...ss Expansion Enhance Filter Copy to CD DVD Paper and Copy Settings Document Type Quality Copy Layout Wizard 2 Sided Printing Layout Paper Size Paper Type Binding Direction Maintenance R 60 Problem Solver 1 You can restore the faded photo by selecting On in the Color Restoration setting in this wizard 2 These items are not displayed when the auto duplexer is removed 3 If the ink on the front of the...

Page 29: ...29 Print Photos Mode ...

Page 30: ...inting Photos A R 11 B R 17 C Load photo paper Insert a memory card Select Print Photos F Set the number of copies Select View and Print Photos D E Select a photo To select more photos repeat steps E and F Q ...

Page 31: ...t settings After step F you can crop and enlarge your photo Press and make the settings Q Make sure you set the Paper Size and Paper Type Q G Enter the print setting menu J Start printing To adjust photos select Photo Adjustments and make the settings R 41 Q ...

Page 32: ...32 A R 11 B R 17 C E F G D Load paper Insert a memory card Select Print Photos Select a layout Select paper type and size Select Automatic layout Select Photo Layout Sheet Printing in Various Layouts ...

Page 33: ...select more photos repeat step H Q If you select Place photos manually place photos as shown in 1 or leave a blank as shown in 2 Q H J K I Select a photo Finish selecting photos Set the number of copies Print ...

Page 34: ...D DVD A R 17 B Insert a memory card Select Print Photos Select Print on CD DVD C D Select a layout E Select Automatic layout If you select Place photos manually place photos as shown in 1 or leave a blank as shown in 2 Q ...

Page 35: ...p F Q After step F you can crop and enlarge your photo Press and make the settings Q G Finish selecting photos H R 27 Set the printing area and proceed If you want to print a test sample on paper select Test print on A4 paper Q I Select Print on a CD DVD ...

Page 36: ... DVD jacket select in the Home menu Print Photos Photo Layout Sheet then Jewel Upper or Jewel Index as the layout Q To make optional print settings press x Q To adjust the print position see Copying a CD DVD R 27 Q J R 15 Load a CD DVD ...

Page 37: ...written messages by using an A4 template First print a template write your message and then scan the template to print your cards Insert a memory card Select Print Photos Select Print Photo Greeting Card Load photo A4 plain paper Printing Photo Greeting Cards ...

Page 38: ...38 G J Select a paper type and size Print E F H I Proceed Select the photo to print Select a layout Select a frame K Check u aligns with the corner of the sheet ...

Page 39: ...39 L M N O R 19 P Select the style of the text Select the type Write a message or drawing Place the template face down Select and proceed Q Set the number of copies R Start printing ...

Page 40: ...17 C D Load photo paper Remove Connect an external USB device Select Print Photos After step D follow the steps for memory card printing R 30 Q The supported photo file format is JPEG For external USB device specifications see the online User s Guide Q ...

Page 41: ...cted Select Off to turn off automatic cropping and leave white space at the edges of the photo 6 Select On to increase the print speed Select Off to improve the print quality 7 Select PhotoEnhance to adjust the brightness contrast and saturation of your photos automatically Select P I M to use your camera s PRINT Image Matching or Exif Print settings 8 Depending on the type of photo parts of the i...

Page 42: ...42 ...

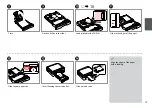
Page 43: ...43 Other Mode ...

Page 44: ...ct a type of format Load A4 size plain paper A R 11 C Select Print Ruled Papers Printing Ruled Paper You can print ruled paper or graph paper with or without a photo set as the background Insert a memory card B R 17 ...

Page 45: ...45 To rotate the frame press d Q E Select the photo to print F Proceed G Set the number of copies and print If you select a format without a background image go to G Q ...

Page 46: ...e paper A R 11 Only use the Coloring Book function for drawings and pictures that you created yourself When using copyrighted materials make sure you stay within the range of laws governing printing for personal use Q You can create a coloring sheet from your photos or line drawings ...

Page 47: ...ou are printing from a memory card press l r to select the photo you want to print then press OK Q F Start printing If you want to change the density of the outline or the density of the whole image press x then press Print Settings and select the appropriate settings after step F Q ...

Page 48: ... 17 B R 19 C D E R 51 F Insert a memory card Place original horizontally Select Scan Select Scan to Memory Card Select settings and scan Check the message on the screen If the edges of the photo are faint change the Scan Area E R 51 Q ...

Page 49: ...anning to a Computer Make sure you have installed software for this printer on your computer and connected following the instructions on the Start Here poster Q After selecting a PC your computer s scanning software automatically starts scanning For details see the online User s Guide Q ...

Page 50: ...t Select Back Up Data Select Back Up Memory Card Follow the on screen instructions To change the writing speed press x select Writing Speed and set Q A folder is automatically created for each backup You can print photos from the backup external USB device R 40 Q ...

Page 51: ...F Scan to PC Email uScan Mode Print Ruled Papers Mode A4 Notepad Paper Wide Rule A4 Notepad Paper Narrow Rule A4 Graph Paper A4 Stationery w o Lines A4 Stationery w Lines Back Up Data Mode Back Up Memory Card Other Mode Menu List Coloring Book Mode Photo or Drawing on the Scanner Photo on Memory Card A4 Plain Paper A4 Matte Print Settings Density Line Detection 1 This item is only displayed when P...

Page 52: ...52 ...

Page 53: ...53 Setup Mode Maintenance ...

Page 54: ...cartridges are installed the ink cartridge status may not be displayed Q If an ink cartridge is running low prepare a new ink cartridge Q Checking the Ink Cartridge Status C Finish Select Setup A B Select Ink Levels C Y LC BK M LM Cyan Yellow Light Cyan Black Magenta Light Magenta Ink is low ...

Page 55: ...ses some ink from all cartridges so clean the print head only if quality declines Q C Select Maintenance Load A4 size paper A R 11 B Select Setup Select Nozzle Check D E Start the nozzle check Checking Cleaning the Print Head ...

Page 56: ...H Finish head cleaning If quality does not improve after cleaning four times turn off the printer for at least six hours Then try cleaning the print head again If quality still does not improve contact Epson support Q F Check the pattern ...

Page 57: ...57 C Select Maintenance Load A4 size paper A R 11 B Select Setup F Select the most solid pattern Select Head Alignment D E Print patterns Aligning the Print Head ...

Page 58: ...58 H Repeat G for all patterns G Select the pattern number C Select External Device Setup Remove A B Select Setup Printing from a Digital Camera ...

Page 59: ...te print settings Compatibility PictBridge File Format JPEG Image size 80 80 pixels to 9200 9200 pixels Depending on the settings on this printer and the digital camera some combinations of paper type size and layout may not be supported Q Some of the settings on your digital camera may not be reflected in the output Q ...

Page 60: ...r online User s Guide for details External Device Setup Print Settings For details on the setting items see the Print Photos Mode Menu list R 41 Photo Adjustments Restore Default Settings Reset Network Settings Reset All except Network Settings Reset All Settings Setup Mode 1 If the printout is smeared set this function to On 2 You can select the LCD screen display format from 1 up with Info 1 up ...

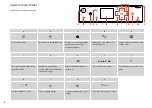
Page 61: ...61 Solving Problems ...

Page 62: ...ife When the ink pads are saturated the printer stops and Epson support is required to continue printing The printer s ink pads are at the end of their service life Please contact Epson Support Contact Epson support to replace ink pads Error in the data The document cannot be printed The data is not available because of a malfunction in the sending device See the documentation for the device trans...

Page 63: ... of non genuine ink is recorded for possible use in service support Make sure you have a new ink cartridge before you begin replacement Once you start replacing a cartridge you must complete all the steps in one session Leave the expended cartridge installed until you have obtained a replacement Otherwise the ink remaining in the print head nozzles may dry out Do not open the ink cartridge package...

Page 64: ...64 Be careful not to break the hooks on the side of the ink cartridge c A C D E Check the color to replace Open Pinch and remove Unpack new cartridge B Select Replace now ...

Page 65: ...to replace an ink cartridge during copying to ensure copy quality after ink charging is finished cancel the job that is copying and start again from placing the originals Q To replace an ink cartridge before it is expended follow the instructions from step C with the printer turned on Q ...

Page 66: ...ve the paper Paper out or paper jam in the main tray or paper size is incorrect Check paper size settings or clear the jam Paper jam Remove the Auto Duplexer Press OK to see how to remove it R 67 R 68 R 70 Never touch the buttons on the control panel while your hand is inside the printer w ...

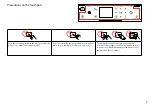
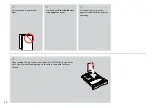
Page 67: ...67 A Operate the button as instructed on the LCD screen ...

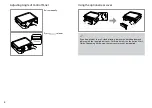
Page 68: ...68 If an error message cannot be cleared try the following steps Q B ...

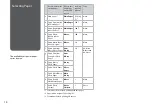
Page 69: ...69 Turn off ...

Page 70: ...70 C Do not turn off the printer c ...

Page 71: ...en make sure that no paper remains in the printer R 66 If the protective material is in its original position remove it and install it as shown on the right Finally turn the printer back on If the error message still appears contact Epson support ...

Page 72: ... User s Guide to align the print head F To clean the inside of the printer make a copy without placing a document on the document table For further information see your online User s Guide G For best results use up ink cartridge within six months of opening the package R 63 H Try to use genuine Epson ink cartridges and paper recommended by Epson I If a moiré cross hatch pattern appears on your cop...

Page 73: ...n the scanner unit is left open for a certain period of time the printer may stop printing halfway and the paper or CD DVD may be ejected If the scanner unit is open close it The printer may resume printing but if it does not try printing again ...

Page 74: ...the troubleshooting information contact Epson support services for assistance You can get the contact information for Epson support for your area in your online User s Guide or warranty card If it is not listed there contact the dealer where you purchased your product ...

Page 75: ...Card 37 I ink cartridge replacing 63 ink cartridge status 54 Ink levels 60 J Jams paper 66 L Language change 60 M Main tray 11 Memory Card 17 N Nozzle check 60 P P I M 28 41 Panel 6 7 8 Paper jams 66 PhotoEnhance 7 28 41 PhotoEnhance Preview 6 Photo Sticker 14 Photo tray 11 Print All Photos 41 Print Ruled Papers 51 Proof sheet Thumbnail 41 Q Quality 72 R rear cover 8 red eye correction 41 Restore ...

Page 76: ...o Epson Corporation All rights reserved Printed in XXXXXX Black Cyan Magenta Yellow Light Cyan Light Magenta Epson Stylus Photo TX720WD Artisan 725 82N 81N 82N 81N 82N 81N 82N 81N 82N 81N 82N 81N Getting more information ...

Reviews:

Related manuals for Stylus Photo TX720WD