Epson SF-710, Ios User'S Manual
The Epson SF-710 is a high-quality multifunctional printer that offers exceptional performance. Get the most out of your device by downloading the free iOS User's Manual from manualshive.com to explore its features and maximize efficiency. With this manual, you can easily navigate through the printer's functions and settings hassle-free.
Share
Download


Reviews:
No comments
Related manuals for SF-710

Sportiiiis
Brand: 4iiii Pages: 19

UP
Brand: Jawbone Pages: 3

Forerunner 225
Brand: Garmin Pages: 14

vivofit 3
Brand: Garmin Pages: 14

TRAINING MONITOR
Brand: OARTEC Pages: 7

PRO4700
Brand: Octane Fitness Pages: 8

ROX
Brand: A-Champs Pages: 19

G6496FB
Brand: BH FITNESS Pages: 68
G2465
Brand: BH FITNESS Pages: 45
Edge 520
Brand: Garmin Pages: 26

NU-G0018
Brand: NuTech Pages: 18

Run Profiler
Brand: Digitsole Pages: 9

Pulse HR
Brand: Withings Pages: 16
PHRM36
Brand: Pyle Pages: 1
FMPW11.0
Brand: Freemotion Pages: 30
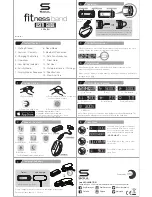
FITness band
Brand: Soul Pages: 2
foot pod
Brand: Suunto Pages: 8

Premium S5x
Brand: Matrix Pages: 12


