background image


One Blue Hill Plaza, 16

th

 Floor, PO Box 1546 

Pearl River, NY 10965 

1-800-PC-AMERICA, 1-800-722-6374 

(Voice) 845-920-0800 (Fax) 845-920-0880 


1 | 

P a g e


EPSON TM-P60 Receipt Printers 

Installation for Windows XP 


Summary of Contents for Mobilink TM-P60

Page 1: ...One Blue Hill Plaza 16 th Floor PO Box 1546 Pearl River NY 10965 1 800 PC AMERICA 1 800 722 6374 Voice 845 920 0800 Fax 845 920 0880 1 P a g e EPSON TM P60 Receipt Printers Installation for Windows XP ...

Page 2: ...eless Printer Resetting the Printer to Factory Default Creating an Ad Hoc Network to Configure the Printer Installing the Epson Ethernet Configuration Utility Configuring the TM P60 Installing the Epson Printer Driver Reverting to Original Network Additional Printer Configuration Configuration in CRE RPE ...

Page 3: ...orted with the use of the TM P60 Thermal Receipt Printer o WEP Encryption 64 bit and 128 bit o Open Networks without encryption WPA Encryption TKIP and AES is NOT supported 2 Information on the wireless network which you will be connecting the printer to SSID or network name Wireless Password Subnet mask of the network IP Address of the router Default Gateway 3 A laptop or PC with a wireless adapt...

Page 4: ...4 P a g e Setting Up the Wireless Printer 1 On the right side of the printer we will need to locate the battery door 2 Press the lever and open the door 3 Insert the battery into the compartment ...

Page 5: ...5 P a g e 4 Plug the power cable into the power brick and the other end of the power cable into a power source wall outlet ...

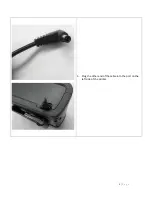
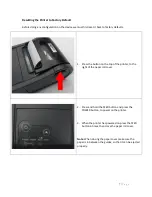
Page 6: ...6 P a g e 5 Plug the other end of the cable into the port on the left side of the printer ...

Page 7: ...ton on the top of the printer to the right of the paper roll cover 2 Press and hold the FEED button and press the POWER button to power on the printer 3 When the printer has powered on press the FEED button 6 times then close the paper roll cover Note When closing the paper cover make sure the paper is in between the guides so that it can be ejected properly ...

Page 8: ...er open the paper roll cover press the FEED button 1 time then close the paper roll cover 6 Initialize will then print on the receipt paper and the paper roll will then be cut This will start the factory reset process 7 The printer will restart after initialization has completed ...

Page 9: ...ng an Ad Hoc Network to Configure the Printer 1 Select Start 2 Select Control Panel 3 Select Network Connections 4 Right click the wireless adapter and select Properties 5 Select the Wireless Networks tab 6 Select Add ...

Page 10: ...eck Connect even if this network is not broadcasting For Network Authentication use the dropdown to select Open For Data encryption use the dropdown to select Disabled 8 The option This is a computer to computer ad hoc network wireless access points are not used MUST be checked 9 Select OK 10 Select the Advanced button ...

Page 11: ... P a g e 11 Select Computer to computer ad hoc networks only 12 Uncheck Automatically connect to non preferred networks 13 Select Close 14 Highlight Internet Protocol Version TCP IP and select Properties ...

Page 12: ...12 P a g e 15 Select Use the following IP address and enter the following information For IP address enter 192 168 192 169 For Subnet mask enter 255 255 255 0 16 Select OK 17 Select Close ...

Page 13: ...rnet configuration utility from the following link http download2 pcamerica com drivers Manufacturer Epson Wcfg340 zip Follow the installation steps which will install the Epson TMNet WinConfig Version 3 40 1 Select Next 2 Select I accept the terms of the license agreement 3 Select Next ...

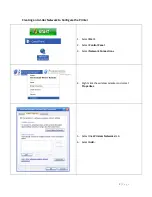
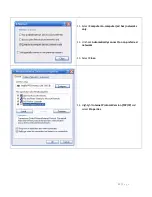
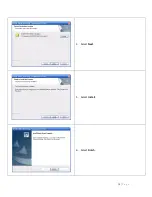
Page 14: ...14 P a g e 4 Select Next 5 Select Install 6 Select Finish ...

Page 15: ...s all printers have the same settings configured from factory 1 Select Start point to All Programs point to EPSON TMNet WinConfig then select EPSON TMNet WinConfig Ver 3 40 2 Select Wireless 3 Select the printer where you want to set the IP address and then select the Configuration button ...

Page 16: ...net Mask and the Default gateway to be set 7 Select OK 8 Select the Wireless tab 9 Select Infrastructure for the Communication Mode 10 For SSID enter the SSID for the network i e STORE 11 Under Security Settings select the network security type either None or WEP 12 If WEP is selected enter the following information Optionally select Input using hex Active WEP Key Use the dropdown to select the WE...

Page 17: ...e 14 Select Yes 15 Enter the password set in the print server then select OK If the password is not set just select OK without entering the password The information will then be sent to the printer 16 Select OK ...

Page 18: ...Epson Printer Driver The printer driver for the device can be downloaded from http download2 pcamerica com drivers Manufacturer Epson APD_413E zip 1 Select Next 2 Select I accept the terms of the license agreement 3 Select Next ...

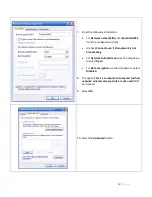
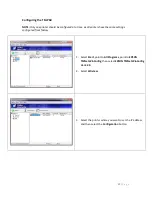
Page 19: ...19 P a g e 4 Select Standard 5 Select Next 6 Select Add ...

Page 20: ...ct the EPSON TM P60 Receipt 8 Optionally enter a Printer name 9 Use the dropdown next to Port Type to select Create an Ethernet port 10 Optionally select Set as Default Printer 11 Select Next 12 Enter the IP Address that was setup for the printer 13 Select Next ...

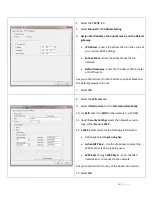
Page 21: ...21 P a g e 14 Select Next 15 Select Next 16 Select Finish ...

Page 22: ...rting to Original Network 1 Select Start 2 Select Control Panel 3 Select Network Connections 4 Right click the wireless adapter and select Properties 1 Highlight Internet Protocol Version TCP IP and select Properties ...

Page 23: ...dress automatically and Obtain DNS server address automatically 3 If you are using static IP addresses on your network then enter the information for this computer 4 Select OK 5 Select Close After closing this window please connect to your wireless network ...

Page 24: ...es Note You may need to select Start then Control Panel then Printers and Faxes 2 Right click on the printer that was just installed and select Properties Now you can print a test page to ensure that your printer is set up correctly 3 Select the General tab 4 Select Print Test Page ...

Page 25: ...ame Printer Properties window General tab 5 Select Preferences 6 Select the Document Settings tab 7 At the bottom of the window select Paper Conservation Then select Top Bottom 8 Select Paper Source 9 At the bottom of the window select Document NoFeed NoCut 10 Select OK ...

Page 26: ...on Enter Kitchen for your new printer name and Select Enter 4 Use the dropdown next to Current Modifying Station to select the station ID that is setup as the mobile station 5 Select Kitchen in the Select Friendly Printer list on the left 6 Select EPSON TM P60 Receipt in the Select local Windows printer list on the right 7 Select Epson TM P60 Mobilink Receipt Printer as the Printer Type 8 Check Cu...

Reviews: