background image

1

Start Here

MFC-J5910DW

Quick Setup Guide

ARL/ASA/NZ Version 0

Please read the Product Safety Guide first before you set up your machine. Then, please read this Quick Setup 
Guide for the correct setup and installation.

1

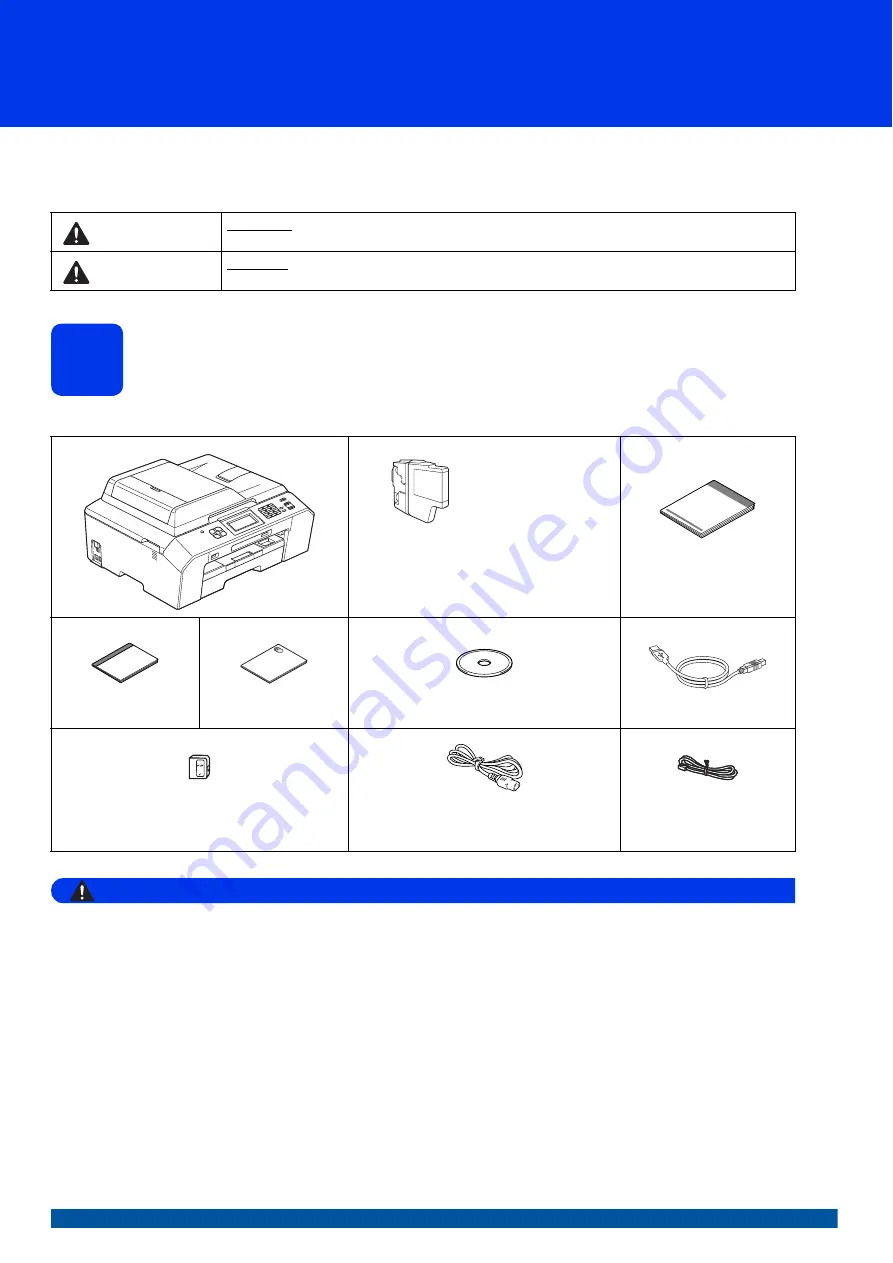
Unpack the machine and check the components

The components included in the box may differ depending on your country

.

WARNING

• Plastic bags are used in the packing of your machine. To avoid danger of suffocation, keep these 

plastic bags away from babies and children. Plastic bags are not toys.

• To ensure safe operation the supplied plug must be inserted only into a standard power outlet that is 

properly grounded through the standard electrical wiring. Non grounded equipment may cause an 
electrical shock hazard, and may cause excessive electrical noise radiation.

WARNING

WARNING indicates a potentially hazardous situation which, if not avoided, could result in death 
or serious injuries.

CAUTION

CAUTION indicates a potentially hazardous situation which, if not avoided, may result in minor 
or moderate injuries.

Starter Ink Cartridges

Black
Yellow
Cyan
Magenta

Quick Setup Guide

Basic User’s Guide

Product Safety Guide

CD-ROM

USB Interface Cable

Telephone Line Cord Adapter 

(Australia only)

Power Cord

Cables vary depending on countries.

Taiwan model is using the power cord attached 

on the machine.

Telephone Line Cord

Summary of Contents for MFC-J5910DW

Page 1: ...rted only into a standard power outlet that is properly grounded through the standard electrical wiring Non grounded equipment may cause an electrical shock hazard and may cause excessive electrical noise radiation WARNING WARNING indicates a potentially hazardous situation which if not avoided could result in death or serious injuries CAUTION CAUTION indicates a potentially hazardous situation wh...

Page 2: ...de down and top edge first Check that the paper is flat in the tray Note Save all packing materials and the box in case for any reason you must ship your machine For a network connection you will need to purchase a network interface cable Please use the supplied USB cable for a USB connection USB cable It is recommended to use a USB 2 0 cable Type A B that is no more than 2 metres long use cable t...

Page 3: ...be fitted with an earthed plug Since the machine is grounded through the power outlet you can protect yourself from potentially hazardous electrical conditions on the telephone network by keeping the power cord connected to your machine when you connect it to a telephone line Similarly you can protect yourself when you want to move your machine by disconnecting the telephone line first and then th...

Page 4: ...e will restart automatically After the restart the LCD shows Please Wait IMPORTANT The telephone line cord MUST be connected to the socket on the machine marked LINE Note If you are sharing one telephone line with an external telephone connect it as shown below 1 Extension telephone 2 External telephone Note If you are sharing one telephone line with an external telephone answering machine connect...

Page 5: ...e open position e Store the orange protective part in the holder inside the machine as shown Make sure that the two projections on the bottom of the orange protective part fit in the two slots in the holder f Lift the scanner cover to release the lock a Gently push the scanner cover support down b and close the scanner cover c using both hands Note Make sure you install the Starter Ink Cartridges ...

Page 6: ... the back of the ink cartridge marked PUSH until it clicks After all the ink cartridges are installed close the ink cartridge cover IMPORTANT DO NOT shake the ink cartridges If ink stains your skin or clothing wash with soap or detergent at once 1 1 1 IMPORTANT After initial installation of the ink cartridges the machine will start cleaning the ink tube system This cleaning process will last appro...

Page 7: ...ng an ink cartridge in the wrong position clean the print head several times after correcting the cartridge installation uuBasic User s Guide Cleaning the print head Once you open an ink cartridge install it in the machine and use it up within six months of installation Use unopened ink cartridges by the expiration date written on the cartridge package DO NOT dismantle or tamper with the ink cartr...

Page 8: ...ss OK f Press Stop Exit Do you want to use the telephone features of your machine if available or an external telephone or external telephone answering device connected on the same line as the machine Your machine automatically answers every call as a fax Your machine controls the line and automatically answers every call If the call is not a fax the telephone will ring for you to pick up the call...

Page 9: ...to enter text uuBasic User s Guide Entering Text a Press Menu b Press s or t to display Initial Setup Press Initial Setup c Press s or t to display Station ID Press Station ID d Enter your fax number up to 20 digits on the Touchscreen and then press OK e Enter your name up to 20 characters using the Touchscreen and then press OK f Press Stop Exit e g Enter 1 2 for 2012 Note Press to cycle between ...

Page 10: ...ling service If you have Pulse dialling service rotary you need to change the dialling mode a Press Menu b Press s or t to display Initial Setup Press Initial Setup c Press s or t to display Tone Pulse Press Tone Pulse d Press Pulse or Tone e Press Stop Exit 14 Set the telephone line compatibility VoIP If you are connecting the machine to a VoIP service over the Internet we recommend that you chan...

Page 11: ...d from your model s download page at http solutions brother com If your computer does not have a CD ROM drive you can download the latest drivers manuals and utilities for your model from the Brother Solutions Center at http solutions brother com Some software applications included on the CD ROM may not be available as a download For USB interface cable Windows go to page 12 Macintosh go to page 1...

Page 12: ...t The installation continues IMPORTANT DO NOT connect the USB cable yet If there are any programs running close them Note The screens may differ depending on your operating system The CD ROM includes ScanSoft PaperPort 12SE This software supports Windows XP Home SP3 or greater XP Professional SP3 or greater XP Professional x64 Edition SP2 or greater Windows Vista SP2 or greater and Windows 7 Updat...

Page 13: ...r computer d Lift the scanner cover to release the lock a Gently push the scanner cover support down b and close the scanner cover c using both hands e The installation will continue automatically The installation screens appear one after another USB IMPORTANT Make sure that the cable does not restrict the cover from closing or an error may occur IMPORTANT DO NOT cancel any of the screens during t...

Page 14: ...plications on page 40 Note If an error message appears during the software installation run the Installation Diagnostics located in Start All Programs Brother MFC JXXX where MFC JXXX is your model name Depending on your security settings a Windows Security or antivirus software window may appear when using the machine or its software Please allow or permit the window to continue Note Internet acce...

Page 15: ...cable to the USB port marked with a symbol You will find the USB port inside the machine on the right as shown below c Carefully guide the USB cable into the cable channel and out the back of the machine Connect the cable to your Macintosh Note For Mac OS X 10 4 0 to 10 4 10 users upgrade to Mac OS X 10 4 11 10 6 x IMPORTANT DO NOT connect the machine to a USB port on a keyboard or a non powered U...

Page 16: ... click the Start Here OSX icon to install c Choose Local Connection USB and then click Next Follow the on screen instructions d Please wait for the software to install After the installation the Brother software will search for the Brother device This will take a few moments to complete e Choose your machine from the list and then click OK f When this screen appears click Next The installation of ...

Page 17: ...ments using Presto PageManager a On the Brother Support screen click the Presto PageManager icon to go to the Presto PageManager download site and follow the on screen instructions Finish The installation is now complete Note To use Image Capture for scanning on Mac OS X 10 6 x please install the CUPS Printer Driver which can be downloaded from your model page on the Brother Solutions Center at ht...

Page 18: ...he CD ROM includes ScanSoft PaperPort 12SE This software supports Windows XP Home SP3 or greater XP Professional SP3 or greater XP Professional x64 Edition SP2 or greater Windows Vista SP2 or greater and Windows 7 Update to the latest Windows Service Pack before installing MFL Pro Suite For Hong Kong Taiwan users the CD ROM includes Presto PageManager instead of ScanSoft PaperPort 12SE If you have...

Page 19: ...pears choose your language b The CD ROM Top menu will appear Click Initial Installation c Click Install MFL Pro Suite and click Yes if you accept the license agreements Follow the on screen instructions IMPORTANT Make sure that the cable does not restrict the cover from closing or an error may occur Note If both the USB and the network cables are being used guide both cables through the cable chan...

Page 20: ...allation screens appear one after another g When the On Line Registration screen is displayed make your selection and follow the on screen instructions h If you do not want to set your machine as the Default printer uncheck Set as Default Printer and then click Next Note If there is more than one machine connected to the network choose your machine from the list and then click Next This window wil...

Page 21: ...r security settings a Windows Security or antivirus software window may appear when using the machine or its software Please allow or permit the window to continue Note Internet access is required for the firmware update and the Brother Product Research Support Program Note Network license Windows This product includes a PC license for up to 2 Users This license supports the installation of the MF...

Page 22: ... on the left as shown below Remove the protective cap and connect the network cable to the Ethernet port Note For Mac OS X 10 4 0 to 10 4 10 users upgrade to Mac OS X 10 4 11 10 6 x If you have previously set up your machine for a wireless network and then want to set it up on a wired network you should check that the machine s Network I F is set to Wired LAN The wireless network interface will be...

Page 23: ... Start Here OSX icon to install c Choose Wired Network Connection Ethernet and then click Next Follow the on screen instructions d Please wait for the software to install After the installation the Brother software will search for the Brother device This will take a few moments to complete e If the machine is configured for your network choose your machine from the list and then click OK IMPORTANT...

Page 24: ...f your machine is not found over the network confirm your network settings You can find your machine s MAC Address Ethernet Address and IP Address by printing out the Network Configuration Report uuNetwork User s Guide Printing the Network Configuration Report If this screen appears click OK Enter a name for your Macintosh in Display Name up to 15 characters long If you want to use the scan featur...

Page 25: ...e of the connection methods can be used at a time The following instructions are for infrastructure mode connected to a computer through an access point router Infrastructure Mode a Access point router b Wireless Network machine your machine c Wireless capable computer connected to the access point router d Wired computer connected to the access point router Please make sure the wireless network s...

Page 26: ...Please write down your wireless network settings in the area below Please do not contact Brother Customer Service for assistance without the wireless security information We cannot assist you in locating your network security settings Item Record the current wireless network settings SSID Network Name Network Key The Network Key may also be described as the Password Security Key or Encryption Key ...

Page 27: ...D Network Name Network Key The Network Key may also be described as the Password Security Key or Encryption Key Note If you do not know this information SSID and Network Key you cannot continue the wireless setup How can I find this information 1 You should see the documentation provided with your wireless access point router 2 The initial SSID could be the manufacturer s name or the model name 3 ...

Page 28: ...on and continue with the installation Recommended and click Next If you are using a firewall other than the Windows Firewall or the Windows Firewall is off this screen may appear See the instructions provided with your firewall software for information on how to add the following network ports For network scanning add UDP port 54925 For network PC Fax receiving add UDP port 54926 If you still have...

Page 29: ...ppears the wizard will search for wireless networks available to your machine Choose the SSID that you wrote down for your network in step 17 a on page 26 and then click Next Note If this screen appears read the Important Notice Check the box after you confirm the SSID and Network Key and then click Next Note If the list is blank check that the access point has power and is broadcasting the SSID a...

Page 30: ...r left of your machine s LCD will show the wireless signal strength of your access point router To install MFL Pro Suite continue to step 20 f on page 36 Now go to Page 36 Note If your network is not configured for Authentication and Encryption the following screen will appear To continue configuration click OK and go to l Note The settings will remain unchanged if you click Cancel If you want to ...

Page 31: ...7 b on page 27 using the Touchscreen The letters appear in this order lower case and then upper case Press to cycle between letters numbers and special characters The characters available may differ depending on your country To move the cursor to the right press c For more information see Entering Text for Wireless Settings on page 41 Press OK when you have entered all the characters then press Ye...

Page 32: ...the user s guide of your wireless access point router for instructions Then press OK and your machine will now automatically detect which mode WPS or AOSS your wireless access point router uses and try to connect to your wireless network e A connection result message appears for 60 seconds on the LCD and a WLAN report will automatically be printed If the connection failed check the error code on t...

Page 33: ... If a network cable is connected to your machine disconnect it and turn the wireless setting of your machine to ON On your machine press Menu Press s or t to display Network and then press Network Press s or t to display Network I F and then press Network I F Press WLAN Press Stop Exit TS 02 The wireless access point router cannot be detected 1 Check the following 4 points Make sure that the wirel...

Page 34: ...ormation SSID and Network Key on page 33 to confirm TS 06 The wireless security information Authentication method Encryption method Network Key is incorrect Reconfirm the wireless security information Authentication method Encryption method Network Key in the table of TS 04 If your router uses WEP encryption enter the key used as the first WEP key Your Brother machine supports the use of the first...

Page 35: ...ions d Choose Wireless Network Connection and then click Next IMPORTANT If there are any programs running close them Note The screens may differ depending on your operating system The CD ROM includes ScanSoft PaperPort 12SE This software supports Windows XP Home SP3 or greater XP Professional SP3 or greater XP Professional x64 Edition SP2 or greater Windows Vista SP2 or greater and Windows 7 Updat...

Page 36: ...lation screens appear one after another h When the On Line Registration screen is displayed make your selection and follow the on screen instructions i If you do not want to set your machine as the Default printer uncheck Set as Default Printer and then click Next Note If your machine is not found over the network confirm your settings by following the on screen instructions If you encounter this ...

Page 37: ...a Windows Security or antivirus software window may appear when using the machine or its software Please allow or permit the window to continue Note Internet access is required for the firmware update and the Brother Product Research Support Program Note Network license Windows This product includes a PC license for up to 2 Users This license supports the installation of the MFL Pro Suite includin...

Page 38: ...k Connection and then click Next d The Brother software will search for the Brother device in your wireless network If the machine is configured for your network choose the device you want to install and then click Next e Please wait for the software to install After the installation this window will appear Choose your machine from the list and then click OK Note For Mac OS X 10 4 0 to 10 4 10 use...

Page 39: ...r Go to step 19 on page 38 Note You can find your machine s MAC Address Ethernet Address and IP Address by printing out the Network Configuration Report uuNetwork User s Guide Printing the Network Configuration Report If this screen appears click OK Enter a name for your Macintosh in Display Name up to 15 characters long If you want to use the scan feature directly from your machine to scan over t...

Page 40: ...how to use FaceFilter Studio download and install FaceFilter Studio Help For Hong Kong Taiwan users the CD ROM includes FaceFilter Studio Help See Note below a To run FaceFilter Studio go to Start All Programs Reallusion FaceFilter Studio on your computer b Click Check for Updates on the screen or click the button on the upper right corner of the screen to go to the Reallusion update web page c Cl...

Page 41: ...art re connect the cables once this is complete Entering Text for Wireless Settings Up to four letters are assigned to each letter button on the Touchscreen By pressing the correct button repeatedly you can access the character you want Press to cycle between letters numbers and special characters The characters available may differ depending on your country Inserting spaces To enter a space press...

Page 42: ...es Compilation and Publication Under the supervision of Brother Industries Ltd this manual has been compiled and published covering the latest product descriptions and specifications The contents of this manual and the specifications of this product are subject to change without notice Brother reserves the right to make changes without notice in the specifications and materials contained herein an...

Reviews: