background image

Epson

®

 EpiqVision™ Ultra LS500 

Laser Projection TV Installation Guide

IMPORTANT:

 Before using this product, make sure you read these instructions and the safety instructions in the

ELPSC35/ELPSC36 Safety Guide

 and online 

User’s Guide

. Visit 

www.epson.com/support/LS500

 (U.S.) or 

www.epson.ca/support/LS500

 (Canada) to view online guides.

Required Supplies

Before you begin, make sure you have the following items:

Level

Note: 

We recommend a bubble level for leveling the furniture and projector, and a laser level for leveling the screen.

Tape measure

Electric drill

Wall bracket mounting screws

Note: 

You will need 8 screws to attach the supplied wall brackets. Use screws that are appropriate for the wall on which you will mount 

the screen.

Pencil

Computer with an HDMI output and an Internet connection

HDMI cable

Stud finder (if your installation location requires attaching to studs)

Note: 

We recommend that you use painter’s tape to avoid scratching your wall during installation. See “Mounting the Screen” for details.
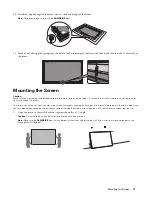
Box Contents

Your Epson EpiqVision Ultra LS500 Laser Projection TV box contains the following items:

Epson LS500 projector

Epson ELPSC35 100" or ELPSC36 120" screen

Cardboard jig for projector positioning

2 pairs of white gloves for carrying and mounting the screen

Video

Visit 

www.epson.com/support/LS500

 (U.S.) or 

www.epson.ca/support/LS500

 (Canada) to view the supplemental installation 

video.

Summary of Contents for EpiqVision Ultra LS500

Page 1: ... need 8 screws to attach the supplied wall brackets Use screws that are appropriate for the wall on which you will mount the screen Pencil Computer with an HDMI output and an Internet connection HDMI cable Stud finder if your installation location requires attaching to studs Note We recommend that you use painter s tape to avoid scratching your wall during installation See Mounting the Screen for ...

Page 2: ...r furniture has adjustable feet use them to level the furniture along both axes allow time for settling as needed Assembling the Jig To help you with projector positioning Epson has provided a cardboard jig that you can use to determine the required distance between your projector and the wall 1 Place the jig with the DO NOT DISCARD labels facing down then fold one of the larger flaps and its tab ...

Page 3: ...your furniture 2 Place the jig against the wall aligning the center of the jig with the expected center of your screen Note To make sure you ve correctly oriented the jig follow the instructions on the labels attached to it After positioning the jig leave it in place until you are instructed to remove it 3 Slide the projector until it touches the arms on the other end of the jig Wall ...

Page 4: ... Bracket Guide To help you identify drill hole locations for the wall brackets Epson has created a guide image that you can project onto your wall 1 Connect the free end of the HDMI cable to your computer then turn the computer on 2 Visit www epson com support LS500 U S or www epson ca support LS500 Canada and download the Wall Bracket Guide file for your screen size 3 Set your computer s resoluti...

Page 5: ...to turn the projector on The guide is projected onto your wall 6 Press the x menu button on the remote control select the Settings menu and choose Reset 7 Select the Settings menu select Zoom and make sure the image is at its maximum size If it isn t press the left arrow button repeatedly to enlarge it to the maximum size 8 Raise or lower the focus lever to sharpen the image Note For best results ...

Page 6: ...nd adjust the position of the projector as needed You can remove the jig If you need to move the projector closer to the wall to make the values match Attaching the Wall Brackets 1 Drill a hole in the Top screw line on the upper left side of the projected image Note If you are attaching the wall brackets to studs place the hole where the line intersects with the center of a stud Otherwise place th...

Page 7: ...s beforehand You will need an 88 50 floor space for a 100 screen or a 106 60 floor space for a 120 screen 2 Place the frame on the transparent sheet with the screw holes facing up Warning The frame pieces have sharp edges Handle them carefully to avoid injury 3 Insert the brackets into the shorter frame pieces 4 Connect the shorter frame pieces to the longer frame pieces ...

Page 8: ...ed image and make sure the arrow heads in the projected image extend to the outer edges of the frame Note If the image is not aligned slightly adjust the position of the projector as needed Attaching the Screen Material 1 Remove the screen material from the tube and unroll it on the transparent sheet The back of the screen should be facing you Caution Do not lift the screen until after you have at...

Page 9: ...nside of the frame Repeat this process for the other hole closest to the corner Warning To avoid injury attach the springs with the hooks and not your hands Caution You can touch the screen material near the holes but do not touch the screen material on the other side of the frame or you may damage the screen Note Hold the frame in place so that it does not move out of position while you are attac...

Page 10: ...n starting from the centers of the sides and moving outward 8 Attach the frame edges with the screw holes facing up and the corner guards Note One of the short frame edges has an Epson logo on it Install that frame edge on the side of the screen that has the DOWNSIDE label 9 Insert two of the supplied M5 15 mm screws in each corner Note Hold the frame tightly while tightening the screws so that th...

Page 11: ...ial with your bare hands you may damage the screen To avoid scratching the wall when you mount the screen we suggest covering the backsides of the frame s top corners with painter s tape Once you have properly positioned the screen you can remove the tape Be careful not to scratch the wall if you remove the screen from the wall 1 Carry the screen to the wall then lean it against the wall at a 15 a...

Page 12: ...gle adjustment screws on the back of the screen Move the projector but only in small increments 3 If you still see misalignment after trying the adjustment methods above you can use the projector s keystone correction Quick Corner or Blanking features for further correction See the projector s online User s Guide for instructions In some cases alignment issues may be caused by your installation lo...

Page 13: ... and USB cables to the included streaming device and fit the device securely inside the projector by arranging the cables as shown Caution Do not force the device into the projector you may damage the projector cables and or the device 6 Replace the storage space cover Note Make sure the cables are positioned as described in step 5 or they may block the cover from closing 7 Replace the front cover...

Page 14: ...rol shown on the screen EPSON is a registered trademark EPSON Exceed Your Vision is a registered logomark and EpiqVision is a trademark of Seiko Epson Corporation Android TV is a trademark of Google LLC General Notice Other product names used herein are for identification purposes only and may be trademarks of their respective owners Epson disclaims any and all rights in those marks This informati...

Reviews: