background image

Using Optional Equipment

Page 40

4

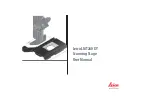
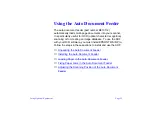
Using the Auto Document Feeder

 - B813162

The auto document feeder (part number B813162) automatically loads 
multiple-page documents into your scanner. It is particularly useful for 
OCR (optical character recognition) scanning or for creating an image 
database. Follow the steps in these sections to install and use the ADF:

Unpacking the Auto Document Feeder

Installing the Auto Document Feeder

Loading Paper in the Auto Document Feeder

Fixing Paper Jams in the Auto Document Feeder


If you have the Artist 
or Professional 
model and are using 
LaserSoft SilverFast 
4.0, you’ll find the 
electronic manual for 
that scanner 
software on the 
LaserSoft SilverFast 
CD-ROM.

Summary of Contents for B813162

Page 1: ...n scanning or for creating an image database Follow the steps in these sections to install and use the ADF Unpacking the Auto Document Feeder Installing the Auto Document Feeder Loading Paper in the Auto Document Feeder Fixing Paper Jams in the Auto Document Feeder If you have the Artist or Professional model and are using LaserSoft SilverFast 4 0 you ll find the electronic manual for that scanner...

Page 2: ...Equipment Page 41 Unpacking the Auto Document Feeder Make sure that the following items are included in the ADF box Contact your EPSON dealer if anything is missing or damaged installation screws auto document feeder ...

Page 3: ...the protective foam block from the ADF s mounting hardware until you ve finished installing it Follow the steps below to install the ADF on your scanner 1 Turn your scanner off and unplug the cables and power cord 2 Remove the document cover by grasping the back of the document cover as shown and easing the cover up To use the ADF you must install EPSON TWAIN Pro LaserSoft SilverFast Lite does not...

Page 4: ...il the two holes in front of these slots are aligned with the screw holes at the back of the scanner position the ADF s mounting slots over the two large screws on the scanner line up these holes with the screw holes on the scanner screw holes on scanner Do not remove the protective foam block until you ve finished tightening the ADF s installation screws see step 4 ...

Page 5: ... two installation screws that came with the ADF into the screw holes then tighten the screws with a coin 5 Remove the protective foam block from the ADF s mounting hardware and gently close the ADF foam block install the screws in the screw holes ...

Page 6: ...h the ADF s connector to the scanner s option interface Secure the connection by tightening the connector screws 7 Reattach all the scanner cables and turn on the scanner 0 1 2 3 4 5 6 7 SCSI ID OPTION TERMINATOR SW LOCK UNLOCK ON OFF OPTION ...

Page 7: ...ed that may damage the feeder Has no folds Is not a multipart form Is not bound Is not printed on photo quality or glossy paper Has no carbon coating Has no cut out areas Checks 3 5 inches 76 127 mm B5 7 17 10 1 inches 182 257 mm A4 8 27 11 69 inches 210 297 mm Letter 8 5 11 inches 215 9 279 4 mm Legal 8 5 14 inches 215 9 355 6 mm Do not feed photographic sheets or valuable original artwork into t...

Page 8: ...k of originals face up with the page you want to scan first on the top Insert the paper stack into the ADF until it meets resistance Make sure that the side you want to scan is facing up For checks move the left edge guide toward the center until it stops then place your checks in the tray Move the right edge guide flush against the checks ...

Page 9: ...DF and place the document on the document table Then close the ADF and scan the document as described in your electronic EPSON TWAIN Pro User s Guide located in the Manuals folder on your EPSON Expresssion 800 Scanning Tools CD ROM When scanning high quality color or halftone documents it is best to open the ADF and scan documents as described in Loading documents manually Don t open the ADF while...

Page 10: ...jam release lever forward and slowly pull the jammed paper out of the feeder mechanism After removing the jammed paper close the ADF cover and reset the scanner by turning it off and on again or pressing the RESET button Be careful not to pull too hard on the paper It may tear making it more difficult to remove pull forward on the jam release lever to release the paper ...

Reviews: