background image

Using Optional Equipment

Page 25

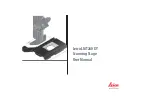
Using the Transparency Unit

The optional transparency unit (part number B813152) lets you scan full 
color transparencies, strips of negatives or positives, and slides. You can 
also scan normal opaque documents with the TPU installed.

Follow the steps in these sections to install and use the TPU:

Unpacking the Transparency Unit

Removing the Shipping Screw

Installing the Transparency Unit

Scanning Oversized Transparencies and Film

Using the Film Guides

Scanning Normal Documents with the Transparency Unit Installed

The transparency 
unit comes with the 
Professional model 
of the EPSON 
Expression 800 
scanner. It’s an 
option for the 
Executive and Artist 
models of the 
scanner.

Summary of Contents for B813152

Page 1: ... installed Follow the steps in these sections to install and use the TPU Unpacking the Transparency Unit Removing the Shipping Screw Installing the Transparency Unit Scanning Oversized Transparencies and Film Using the Film Guides Scanning Normal Documents with the Transparency Unit Installed The transparency unit comes with the Professional model of the EPSON Expression 800 scanner It s an option...

Page 2: ...is missing or damaged 35 mm slide transparency guide transparency unit reflective document mat 35 mm filmstrip guide installation screws 120 220 size medium format film guide 4 x 5 inch film guide You can store the film guides in the storage area built into the TPU However it is recommended that you do not store the small 120 220 size film guide in the storage area ...

Page 3: ...ly You must remove this screw before using the TPU 1 Turn the TPU so the glass side faces up 2 Use a Phillips head cross head screwdriver to remove the shipping screw from the hole labeled CLAMP as shown below 3 Install the screw in the storage hole labeled STOCK You may damage the TPU if you try to use it without removing the screw from the hole labeled CLAMP ...

Page 4: ...the Transparency Unit Follow the steps below to install the TPU 1 Make sure the scanner is turned off Then unplug the power cable from the scanner 2 Remove the document cover by grasping the back of the document cover as shown and easing the cover up If you can t insert the shipping screw in the hole labeled CLAMP when you prepare the scanner for transportation the TPU s lamp assembly may not be i...

Page 5: ... the back of the scanner Slide the TPU forward slightly until the two holes in front of these slots are aligned with the screw holes at the back of the scanner position the slots on the TPU s mounting bracket over the two large screws at the back of the scanner align these holes with the screw holes on the scanner screw holes on scanner ...

Page 6: ...g Optional Equipment Page 30 4 Insert the two installation screws that came with the TPU into the screw holes then tighten the screws with a coin 5 Gently close the TPU install the screws in the screw holes ...

Page 7: ...on connector at the back of the scanner To secure the TPU connector tighten the attached screws 7 Plug the scanner back in and turn it on Do not put heavy objects on the TPU doing so may damage the TPU 0 1 2 3 4 5 6 7 SCSI ID OPTION TERMINATOR SW LOCK UNLOCK ON OFF OPTION ...

Page 8: ...f your transparency or film is 8 5 11 7 inches 216 297 mm Close the TPU and scan according to the instructions in your electronic EPSON TWAIN Pro User s Guide or LaserSoft SilverFast Lite User s Guide You ll find both guides in the Manuals folder on your EPSON Expression 800 Scanning Tools CD ROM position the original against the upper right corner of the document table If you have the Artist or P...

Page 9: ...U to scan 35 mm slides strips of 35 mm negative or positive film 120 size or 220 size format film and 4 5 inch 102 127 mm film Follow the steps in these sections Loading 35 mm slides Loading strips of 35 mm negative or positive film Loading medium format size 120 or 220 size format film Loading 4 x 5 inch film ...

Page 10: ...ng down and the emulsion side is facing up 3 Close the TPU and scan the slides according to your electronic EPSON TWAIN Pro User s Guide or LaserSoft SilverFast Lite User s Guide You ll find both these guides in the Manuals directory on your EPSON Expression 800 Scanning Tools CD ROM you can line up two columns of 35 mm slides in the larger section of the guide If you have the Artist or Profession...

Page 11: ...strip guide 2 Place the filmstrip guide on the document table Make sure the glossy smooth side of the film is facing down and the emulsion side is facing up Align the upper and right edges of the guide with the ruled edges of the document table If your film strip is longer than the film guide it may affect the quality of the scan ...

Page 12: ... Loading medium format size 120 or 220 size format film 1 Place the 120 220 size film guide on the scanner s document table fitting one corner of the guide against the upper right corner of the document table If you have the Artist or Professional model and are using LaserSoft SilverFast 4 0 you ll find the electronic manual for that scanner software on the LaserSoft SilverFast CD ROM ...

Page 13: ...d be facing up 3 Close the TPU and scan the film according to the instructions in your electronic EPSON TWAIN Pro User s Guide or LaserSoft SilverFast Lite User s Guide You ll find both guides in the Manuals folder of your EPSON Expression 800 Scanning Tools CD ROM If you have the Artist or Professional model and are using LaserSoft SilverFast 4 0 you ll find the electronic manual for that scanner...

Page 14: ...e Make sure the smooth glossy side of your film is facing down and the emulsion side is facing up 3 Close the TPU Scan according to the instructions in your online EPSON TWAIN Pro User s Guide or LaserSoft SilverFast Lite User s Guide If you have the Artist or Professional model and are using LaserSoft SilverFast 4 0 you ll find the electronic manual for that scanner software on the LaserSoft Silv...

Page 15: ...the reflective document mat included with the TPU as described below 1 Open the TPU If there s a film guide on the document table remove it 2 Insert the tabs on the reflective document mat into the slots on the TPU and slide the mat down until the tabs are secure 3 Place your document on the document table and close the TPU reflective document mat tab ...

Page 16: ...pull it out of the TPU Using the Auto Document Feeder The auto document feeder part number B813162 automatically loads multiple page documents into your scanner It is particularly useful for OCR optical character recognition scanning or for creating an image database Follow the steps in these sections to install and use the ADF Unpacking the Auto Document Feeder Installing the Auto Document Feeder...

Reviews: