background image

PowerLite

®

 1810p

Multimedia Projector

User’s Guide

Summary of Contents for 1810p - PowerLite XGA LCD Projector

Page 1: ...PowerLite 1810p Multimedia Projector User sGuide ...

Page 2: ...th this Epson product Epson is not responsible for any use of this information as applied to other products Neither Seiko Epson Corporation nor its affiliates shall be liable to the purchaser of this product or third parties for damages losses costs or expenses incurred by purchaser or third parties as a result of accident misuse or abuse of this product or unauthorized modifications repairs or al...

Page 3: ...n Function 17 Shutting Down the Projector 18 Displaying an Image 18 Troubleshooting Display Problems 19 You Can t Project an Image 19 The Projector and Notebook Don t Display the Same Image 19 Adjusting the Image 21 Adjusting the Height of the Image 21 Focusing and Zooming the Image 22 Adjusting the Image Shape 22 Selecting the Color Mode 25 Resizing Video Images 26 Presenting with the Remote Cont...

Page 4: ...to the Computer Port 36 Connecting the Cable for Remote Mouse Control 37 Connecting to Video Equipment 38 Connecting a Composite Video Source 39 Connecting an S Video Source 40 Connecting a Component Video Source 41 Connecting an RGB Video Source 42 Connecting an External Monitor 43 Playing Sound Through the Projector 44 Connecting External Speakers 45 Fine Tuning the Projector 47 Using the Menu S...

Page 5: ...Lamp Usage 69 Replacing the Batteries 70 Transporting the Projector 71 Solving Problems 73 Using On Screen Help 74 Checking Projector Status 75 What To Do When the Lights Flash 75 Solving Projector Operation Problems 77 Solving Problems with the Image or Sound 77 Solving Problems with the Remote Control 83 Where To Get Help 83 Speak to a Support Representative 84 Projector Installation 87 Technica...

Page 6: ...6 ...

Page 7: ... Easy setup control and security 5 second startup time and Instant Off feature for fast setup and shut down Automatic digital keystone correction 1 6x optical zoom lens for flexible placement and positioning Security features include password user s logo and the ability to lock the projector buttons A V mute slide lens cover to block the lens and save lamp life when you want to temporarily stop pr...

Page 8: ... up and running if you are connecting to a notebook MacBook TM PowerBook or iBook computer Projector kit Includes this User s Guide your Quick Setup sheet warranty brochures and Epson PrivateLine Support card Keep the kit with your projector at all times Built in help system Provides assistance for common problems Available from the Help button on the projector or the remote control See page 74 fo...

Page 9: ...h confidence anywhere in the world For details see the warranty brochures included with your projector In addition for customers who register their projector Epson offers free Extra CareSM Road Service In the unlikely event of an equipment failure you won t have to wait for your unit to be repaired Instead Epson will ship you a replacement unit anywhere in the United States or Canada usually via o...

Page 10: ...r ordering information and page 71 for transportation instructions Additional Components Depending on how you plan to use the projector you may need additional components To receive an S video signal you ll need an S video cable To receive a component video signal from a VCR or other video device you ll need an HD15 to component video cable You can purchase these items from Epson See Optional Acce...

Page 11: ...H134A08 Universal ceiling mount False ceiling plate Security bracket cabling for gyro lock mounts Adjustable ceiling channel Suspension adapter ELPMBUNI ELPMBFCP ELPMBSEC ELPMBACC ELPMBAPL Kensington security lock ELPSL01 50 inch portable screen 4 3 aspect ratio 60 inch portable pop up screen 4 3 aspect ratio 80 inch portable pop up screen 4 3 aspect ratio 83 6 inch hanging pull down screen 4 3 as...

Page 12: ...12 Welcome ...

Page 13: ... computer or video equipment you need to follow some basic steps to display your image on the screen Follow the guidelines in this chapter for Positioning the projector Turning on and off the projector Displaying an image Troubleshooting display problems Adjusting the image ...

Page 14: ... size increases with distance but can vary depending on how you position the zoom ring and whether you ve adjusted the image with other settings Also keep these considerations in mind Place the projector on a sturdy level surface Make sure there is plenty of space for ventilation around and under the projector Do not set the projector on top of anything that could block the vents under the project...

Page 15: ...age 22 For instructions on installing the projector in a permanent location such as a theater or conference room see page 87 Turning On and Off the Projector Turn on any connected computer or video equipment before starting the projector so it can automatically detect and display the image source If you turn on the projector first or have multiple pieces of connected equipment you may have to sele...

Page 16: ... Power light turns orange note You can set the projector to automatically turn off the projector lamp and enter sleep mode when it has not received any signals for 30 minutes This conserves electricity cools the projector and extends the life of the lamp If you want to start projecting again press the P Power button If you are done using the projector unplug the power cord To enable sleep mode see...

Page 17: ... when you plug it in or turn it on with a wall switch You don t have to press the PPower button Follow these steps to enable Direct Power On 1 Press the Menu button on the remote control or projector and select the Extended menu 2 Choose Operation and press Enter 3 Choose Direct Power On and press Enter 4 Highlight On and press Enter 5 Press Menu to exit The setting will take effect the next time ...

Page 18: ...range Power light is not flashing then press the PPower button Displaying an Image You may need to select the image source if you have multiple video sources connected to the projector such as a computer or DVD player Selecting the image source lets you switch between images input from different pieces of connected equipment If you don t see the image you want press the Search button on the remote...

Page 19: ...er pressing the button If you re using a PC notebook press the function key on your keyboard that lets you display on an external monitor It may be labeled CRT LCD or have an icon such as You may have to hold down the Fn key while pressing it Allow a few seconds for the projector to sync up after changing the setting The Projector and Notebook Don t Display the Same Image If you re projecting from...

Page 20: ...varies by brand you may need to click a Monitor tab then make sure the external Monitor port is set as your primary display and or enabled See your computer s documentation or online help for details If you re using Mac OS X You may need to set up your system to display on the projector screen as well as the LCD screen Follow these steps 1 From the Apple menu select System Preferences then select ...

Page 21: ...fine tune the image and or sound see Chapter 4 Adjusting the Height of the Image If the image is too low on the screen you can use the front adjustable foot to raise it 1 Stand behind the projector Press the foot release lever up and lift the front of the projector 2 Once the image is positioned where you want it release the lever to lock the foot in position 3 If necessary you can fine tune the h...

Page 22: ...ar image by placing the projector directly in front of the screen and keeping it level This also produces the best picture quality If the projector is tilted up or placed at an angle you ll need to correct the image shape by using one of the functions described below Automatic Image Adjustment Use the projector s Quick Setup feature to set up quickly for a presentation This function automatically ...

Page 23: ...ime you turn it on To fine tune the Quick Setup adjustment use Quick Corner below Using Quick Corner Use Quick Corner to adjust the shape and size of the image when it s uneven on all sides or to finely adjust the image after performing Quick Setup If you just used Quick Setup you can use the projector s arrow buttons to make the Quick Corner adjustment If not you ll have to select Quick Corner as...

Page 24: ... corners 8 When done press Menu to exit the menu system Using Keystone Correction The projector automatically corrects vertical keystone distortion when it is tilted within a range of 30 up or down It takes about one second after projection starts for the image to be corrected During this time a vertical keystone correction gauge appears on the screen If keystone correction isn t automatically car...

Page 25: ...ystone for horizontal adjustment or V Keystone for vertical adjustment and use the l and r arrow buttons to adjust the shape of the image If the image becomes smaller use the zoom ring to enlarge the image so it fits the screen If the image contains faint lines or a gridlike pattern decrease the sharpness setting see page 51 Selecting the Color Mode The Color Mode adjusts the brightness contrast a...

Page 26: ...in a bright room Emphasizes dark gradations sRGB Matches the color palette of standard sRGB computer displays Blackboard Projects accurate colors on a green chalkboard adjusts the white point Customized For manual color adjustment see page 51 Resizing Video Images You can use the Resize button on the remote control to adjust how an image fits into the display area Press Resize to switch the aspect...

Page 27: ...ointer to highlight your presentation page 31 You can also use it as a wireless mouse when projecting from a computer page 32 or to control two or more projectors at the same time page 33 This chapter covers Using the remote control Controlling the picture and sound Highlighting your presentation Operating your computer with the remote control Operating two or more projectors with the remote contr...

Page 28: ... freeze the action zoom in on the picture and adjust the volume Switching Between Picture Sources If your projector is connected to more than one computer and or video source you can switch between the different sources The easiest way to select your source is to press the Search button on the remote control or the Source Search button on the projector repeatedly until you see the image you want o...

Page 29: ...ant to redirect your audience s attention There are two ways to do this Close the A V mute slide as shown below Press the A V Mute button on the remote control This turns the image black and stops the sound To turn the image and sound back on press the button again You can have the screen turn blue when you press the A V Mute button You can also have an image such as a company logo display on the ...

Page 30: ... Press the E Zoom button on the remote control You see a crosshair indicating the center of the zoom in area 2 Use the pointer button to position the crosshair 3 Continue pressing the E Zoom button to enlarge the selected area up to 4 times 4 While the image is enlarged you can Use the pointer button to move around the screen Press the E Zoom button to zoom out 5 When done press the ESC button to ...

Page 31: ...If you want to customize the pointer tool you can choose from three alternative shapes Using the Pointer Tool 1 To activate the pointer tool press the Pointer button on the remote control A pointer appears on the screen If you prefer to use a different style of pointer see the instructions in the next section 2 Use the pointer button on the remote control to position the pointer on the screen note...

Page 32: ...pe you want and press Enter 3 Highlight Return and press Enter 4 Press Menu to exit from the menu system Operating Your Computer with the Remote Control If you connect a computer to the projector with a USB cable you can use the remote control in place of your computer s mouse This gives you more flexibility when delivering slideshow style presentations since you won t have to stand next to the co...

Page 33: ...one projector you can control all the projectors or just selected ones by using the projector ID system To operate a projector you have to set the remote control s ID to match that of the projector Or you can control all the projectors at once by setting the remote control s ID to zero Setting the Projector ID The projector s default ID is set to Off This lets it respond to commands from any remot...

Page 34: ... to control all projectors or select a number to match the ID of the projector s you want to operate After setting the ID you can check whether the remote control works with a specific projector 1 Point the remote control at the projector you want to check 2 Press the ID button on the remote control You see a message on the screen like one of these If the message says the remote control is On then...

Page 35: ...nnect the projector to a notebook or desktop computer and or to video equipment such as a VCR DVD player or video camera Follow the instructions in this chapter on Connecting to a computer Connecting video equipment Connecting an external monitor Playing sound through the projector ...

Page 36: ...puter cable that came with it the monitor port on your computer must be a mini D sub 15 pin port 1 If you re using the VGA computer cable connect one end to the projector s Computer1 or Computer 2 port and the other end to your computer s monitor port 2 You may need to change the Computer1 Input or Computer2 Input setting in the projector s Signal menu to RGB see page 53 3 You can connect an optio...

Page 37: ...eshow style presentations such as PowerPoint from up to 20 feet away The wireless mouse function is supported on systems with a USB port running Windows Vista TM Windows XP 98SE Me or 2000 or Mac OS X 10 2 x to 10 4 x 1 Connect the square end of a USB cable to the projector s USB port 2 Connect the flat end of the cable to any available USB port on your notebook or desktop computer 3 If necessary ...

Page 38: ...s an S video connector see Connecting an S Video Source on page 40 If your video player has a component video port three connectors labeled either Y Cb Cr or Y Pb Pr see Connecting a Component Video Source on page 41 If your video player has an RGB video port either a single connector for a VGA style monitor cable or three connectors labeled R G B see Connecting an RGB Video Source on page 42 Afte...

Page 39: ...r and the yellow Video connector on the projector 3 If you want to play sound through the projector see page 44 for instructions on connecting audio cables 4 If you don t need to make any other connections see page 15 for instructions on turning on the projector and adjusting the image Once the projector is turned on select the image source press the Search button on the remote control or press th...

Page 40: ...ideo connector on the projector 3 If you want to play sound through the projector see page 44 for instructions on connecting audio cables 4 If you don t need to make any other connections see page 15 for instructions on turning on the projector and adjusting the image Once the projector is turned on select the image source press the Search button on the remote control or press the Source Search bu...

Page 41: ...page 53 4 If you want to play sound through the projector see page 44 for instructions on connecting audio cables 5 If you don t need to make any other connections see page 15 for instructions on turning on the projector and adjusting the image Once the projector is turned on select the image source press the Search button on the remote control or press the Source Search button on the projector s ...

Page 42: ... play sound through the projector see page 44 for instructions on connecting audio cables 5 If you don t need to make any other connections see page 15 for instructions on turning on the projector and adjusting the image Once the projector is turned on select the image source press the Search button on the remote control or press the Source Search button on the projector s control panel repeatedly...

Page 43: ...tched to a different picture source First make sure your computer s VGA cable is connected to the projector s Computer1 port see page 36 Then connect your monitor to the projector s Monitor Out port as shown note The monitor cannot display component video nor computer images via the Computer2 port Some LCD monitors may not be able to display the image correctly If you have trouble displaying the i...

Page 44: ...iate cable and connect it to the Audio jack on the projector If you have equipment connected to the Computer 1 or Computer 2 port use a stereo mini jack cable Connect the cable to the Audio1 port for Computer1 or the Audio2 port for Computer2 If you have equipment connected to the Video or S Video port connect an RCA style audio cable to L Audio R 2 Connect the other end of the cable to the audio ...

Page 45: ... speakers you may be able to use a commercially available audio cable with a stereo mini jack connector on one end and pin jacks on the other end For some speakers you may have to purchase a special cable or use an adapter 2 Connect the stereo mini jack end of the audio cable to the Audio Out port on the projector 3 Connect the other end of the cable to your speakers The projector s internal speak...

Page 46: ...46 Connecting to Computers and Other Equipment ...

Page 47: ...ust the image sound and other features This chapter covers the following information Using the menu system Adjusting the image Adjusting signal settings Customizing projector features Using the projector security features Customizing power and operation Multi screen color adjustment ...

Page 48: ... on the left and the options available for the highlighted menu are shown on the right 2 Use the pointer button on the remote control or the navigational buttons on the projector to scroll through the menu list When you ve highlighted the desired menu press the Enter button to select it 3 Once you ve selected the menu use the pointer button to scroll through the list of options Some of the options...

Page 49: ... You can also press the Menu button to exit Restoring the Default Settings You can use the menu system s Reset options to restore the factory default settings for all the settings listed in a specific menu or all the settings in all menus To restore the settings in a specific menu enter the menu whose settings you want to change select Reset and confirm as needed The example below shows how to res...

Page 50: ...e Color Mode setting in the Image menu You can save a different setting for each source Select from these settings Game Ideal for use in bright rooms and when playing video games this mode produces the brightest images and most vivid colors Presentation For making presentations with color materials in bright rooms Text For making presentations with black and white materials in bright rooms Theatre...

Page 51: ...olor Mode setting Color Adjustment Adjusts the color values For Customized color mode select RGBCMY to adjust individual red green blue cyan magenta and yellow hue and saturation values For other color modes RGB may be selected to adjust red green and blue hue and saturation values Not available if sRGB is selected as the Color Mode setting Six Axis Color Adjustment For special projection material...

Page 52: ...een When you are satisfied with the color press Esc 6 Repeat steps 4 and 5 for each color axis you want to adjust You may need to readjust the color as the lamp in your projector changes over time Adjusting Signal Settings Although the projector normally detects and optimizes the input signal automatically you can use the Signal menu to make manual adjustments In addition to changing the position ...

Page 53: ...es it may not be centered exactly Select this setting and use the pointer button to center it Computer1 Input Computer2 Input If the colors don t look right on the Auto setting select the setting for the type of equipment you ve connected to the Computer1 or Computer2 port RGB For a computer or RGB video connection Component For a video player that outputs a component video signal with connectors ...

Page 54: ... on or off see page 24 Select Quick Corner to adjust the shape and position of the projected image see page 23 Operation Lock Lets you disable all of the buttons on the projector except the PPower button See page 59 for more information Pointer Shape Lets you choose from three pointer shapes See page 31 for more information Brightness Control Lets you select from two levels of brightness The Low s...

Page 55: ...ed at startup and or when the A V Mute button is pressed The screen can be locked with a password to discourage theft and provides a way to identify the projector should it be stolen See page 57 Disable the projector s buttons this is useful for example if you re projecting in a classroom and you want to ensure that no one touches the projector s buttons while you re using the remote control See p...

Page 56: ...een To set security options access the Password Protect screen as described above and then turn on any of the following options Power On Protect to prevent unauthorized use of the projector After the projector is plugged in and turned on you must enter a password to use the projector For details see page 57 User s Logo Protect to prevent your custom screen and display settings from being changed N...

Page 57: ...screen again you can try to enter the correct password If you enter an incorrect password 30 times in succession the projector remains locked and you must contact Epson to unlock it If you have forgotten the password contact Epson with the request code number that appears in the Password screen for assistance See Where To Get Help on page 83 Creating Your Own Startup Screen You can transfer any im...

Page 58: ...ys over the image 4 Use the pointer button to select the area of the image you want to use Then press Enter 5 When you see the message Select this Image highlight Yes and press Enter 6 Use the arrow buttons to select a zoom factor display size and press Enter 7 When the message Save this image as the user s logo appears select Yes and press Enter Saving the logo may take a few moments Do not use y...

Page 59: ... exit Disabling the Projector s Buttons When you enable the Operation Lock function you can lock all the projector s buttons or all buttons except the Power button The remote control can still be used to operate the projector 1 Press the Menu button highlight the Settings menu and press Enter 2 Select Operation Lock and press the Enter button 3 Select Full Lock to lock all projector buttons or Par...

Page 60: ...en as described on page 57 Projection Select Front to project from the front of a screen and right side up Front Ceiling when the projector is mounted upside down from the ceiling Rear to project from behind onto a transparent screen or Rear Ceiling to project from behind onto a transparent screen when the projector is mounted upside down from the ceiling Operation Enable Direct Power On if you wa...

Page 61: ...atch two or more projectors that are being used to display images near each other You can make image adjustments at each of five adjustment levels First choose an Adjustment Level and then adjust the settings for each level Brightness Correct to adjust the brightness and Color Correct to adjust the balance between red and green or blue and yellow See page 62 for more information about multi screen...

Page 62: ...the projector s menu screen 3 Select Extended Multi screen 4 Start by setting the Adjustment Level to 1 for two projectors Then use Brightness Correct to match the darker projector to the lighter one Press Enter to see the effects of your adjustments 5 Next adjust the brightness of Level 5 for the same two projectors Match the brighter projector to the darker one 6 Adjust and match the brightness ...

Page 63: ...s chapter covers the following Cleaning the lens Cleaning the projector case Cleaning the air filter and vent Replacing the lamp and air filter Replacing the remote control batteries Transporting the projector warning Before you clean any part of the projector turn it off and unplug the power cord Never open any cover on the projector except the lamp cover Dangerous electrical voltages in the proj...

Page 64: ... soft cloth with lens cleaner and gently wipe the lens Cleaning the Projector Case Before you clean the case turn off the projector and unplug the power cord To remove dirt or dust wipe the case with a soft dry lint free cloth To remove stubborn dirt or stains moisten a soft cloth with water and a neutral detergent Then wipe the case caution Do not use wax alcohol benzene paint thinner or other ch...

Page 65: ...ower cord 2 Turn the projector upside down 3 To clean the intake vent and filter use a small vacuum cleaner designed for computers and other office equipment If you don t have one gently clean the vent with a soft brush such as an artist s paintbrush 4 If the dirt is difficult to remove or the filter is broken replace the filter as described on page 68 Contact your dealer or call Epson at 800 GO E...

Page 66: ...s to deteriorate The message Replace the lamp appears on the screen when the lamp comes on and the lamp warning light flashes orange To maintain projector brightness and image quality replace the lamp as soon as possible The lamp warning light flashes red the lamp is burnt out Contact your dealer or call Epson at 800 GO EPSON 800 463 7766 Request part number V13H010L40 note When you get a replacem...

Page 67: ...ft it off of the projector 4 Loosen the two screws holding the lamp in place you can t remove them warning Let the lamp cool fully before replacing it In the unlikely event that the lamp has broken small glass fragments may be present and should be removed carefully to avoid injury If the lamp is used after the replacement period has passed the possibility that the lamp may break increases When a ...

Page 68: ...ed tighten its screws 8 Replace the lamp cover then tighten its screw 9 Turn the projector over 10 Slide the air filter out and remove it 11 Slide in the new air filter until it clicks in place 12 Reset the lamp timer as described in the next section note The lamp s in this product contain mercury Please consult your state and local regulations regarding disposal or recycling Do not put in the tra...

Page 69: ...te control or the arrow buttons on the projector to highlight Reset then press Enter You see this screen 3 Select Reset Lamp Hours and press Enter 4 When you see the prompt select Yes and press Enter 5 When you re finished press Menu to exit the menu system Checking Lamp Usage To check the number of hours the lamp has been used press the Menu button and highlight the Info menu You see a screen lik...

Page 70: ...e remote control over 2 Press down on the tab on the battery cover as you lift the cover off 3 Install two AAA batteries inserting the and ends as shown 4 Position the cover as shown then press down until it snaps into place caution When replacing batteries take the following precautions Replace the batteries as soon as they run out If the batteries leak wipe away battery fluid with a soft cloth I...

Page 71: ...aterial if possible If you do not have the original packaging use equivalent materials placing plenty of cushioning around the projector When transporting the projector a long distance first place it in a hard shell shipping case then pack it in a firm box with cushioning around the case Close the A V mute slide lens cover to protect the lens note Epson shall not be liable for any damages incurred...

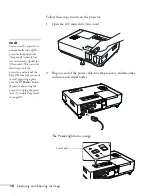
Page 72: ...72 Maintaining the Projector ...

Page 73: ...port for problems you can t solve yourself The following information is included Using the projector s on screen help system What to do when the projector s status lights flash Solving projector operation problems Solving problems with the image or sound Solving problems with the remote control Contacting technical support ...

Page 74: ...the remote control or on the projector You see the Help menu 2 Use the pointer button on the remote control or the navigational buttons on the projector to highlight menu items 3 Press the Enter button on the remote control or on the projector to select the menu item 4 To exit the help system press the Help button If none of the suggestions solve your problem see additional solutions to problems i...

Page 75: ... following table for a complete description of the projector s status lights Temperature light Lamp light Power light Status lights Light Status Description Orange The projector is in sleep or standby mode You can unplug it or press the P Power button to turn it on Flashing green The projector is warming up Wait for the image to appear Green The projector is operating normally Flashing orange The ...

Page 76: ...fter you clean the air filter the problem may be caused by damage to the cooling fan or temperature sensor Contact Epson for help as described on page 83 Warning Except as specifically explained in this User s Guide do not attempt to service this product yourself Flashing red There is a problem with the fan or temperature sensor Stop using the projector disconnect the power cable and contact Epson...

Page 77: ...ontrol instead See page 59 for information about the Operation Lock function Solving Problems with the Image or Sound No image appears on the screen Check that the Power light is green not flashing The projector may be in standby or sleep mode If the Power light is orange press the PPower button to turn the projector on If the power was switched off and then on again the projector may be cooling d...

Page 78: ...the function key that lets you display on an external monitor It may have an icon such as or it may be labelled CRT LCD Allow a few seconds for the projector to sync up after pressing it Check your notebook s manual or online help for details On most systems the key lets you toggle between the LCD screen and the projector or display on both at the same time Depending on your computer s video card ...

Page 79: ...e Resize button on the remote control Press the Esc button on the remote control to cancel the E Zoom function Make sure your computer s resolution setting is correct Ideally it should be 1024 768 to match the projector s native resolution If this option isn t available select one of the other compatible video formats listed on page 91 You also may need to modify existing presentation files if you...

Page 80: ...ck Setup Quick Corner or Keystone adjustment you may need to decrease the Sharpness setting in the Image menu see page 51 The image is blurry There may be dirt or smears on the lens Clean the lens as described on page 64 Adjust the focus using the focus ring see page 22 If the projector is angled sharply toward the screen it may not be possible to focus the entire image Move the projector to posit...

Page 81: ...ch as a pattern to appear as your desktop background or try projecting black text on a white background 2 Adjust the Tracking to eliminate vertical bands 3 Adjust the Sync setting to increase the image sharpness The image is too light or dark or colors are incorrect Use the Color Mode option in the projector s Image menu to adjust the color see page 50 If you re displaying video adjust the Color A...

Page 82: ...cludes computer audio make sure the volume control on your computer is not turned all the way down or muted In Windows you may be able to check this by clicking the volume control in your Windows system tray lower right corner of the screen On a Mac you may be able to adjust the volume from your menu bar top right corner of the screen or via the volume control function keys If you re using a DVD p...

Page 83: ...turn off any nearby equipment that emits infrared energy such as a radiant room heater If necessary use the Remote Receiver setting to disable the projector s front or back sensor if it continues to pick up interference see page 55 Make sure the Remote Receiver setting isn t disabling both of the projector s sensors see page 55 If any buttons are held for longer than 30 seconds the remote enters s...

Page 84: ...ng to a live representative and it s free This service is available 6 AM to 6 PM Pacific Time Monday through Friday for the duration of your warranty period You may also speak with a projector support specialist by dialing one of these numbers U S 562 276 4394 6 AM to 6 PM Pacific Time Monday through Friday Canada 905 709 3839 6 AM to 6 PM Pacific Time Monday through Friday Toll or long distance c...

Page 85: ... purchase such as a store receipt and date of purchase Computer or video configuration Description of the problem Purchase Supplies and Accessories You can purchase screens or other accessories from an Epson authorized reseller To find the nearest reseller call 800 GO EPSON 800 463 7766 Or you can purchase online at www epsonstore com U S sales or www epson ca Canadian sales ...

Page 86: ...86 Solving Problems ...

Page 87: ...nal ceiling mounting hardware see page 11 You ll also need to select the appropriate Projection setting in the projector s Extended menu to flip the image upside down see page 60 If you re mounting the projector on the ceiling and you place it above screen level you ll have to tilt the projector down to position the image on the screen This causes the image to lose its square shape You can correct...

Page 88: ...ble security cable as shown below to secure the projector to a table or ceiling mount Kensington security slot The security slot is compatible with the MicroSaver security systems manufactured by Kensington You can purchase this lock from Epson see page 11 In addition the projector includes several menu operated security features See page 55 Kensington security slot Security cable attachment ...

Page 89: ...s mode Contrast ratio 500 1 Image size 30 to 300 inches Projection distance 2 7 to 48 2 feet 0 8 to 14 7 meters Projection methods Front rear upside down ceiling mount Internal sound system 5 W monaural Optical aspect ratio 4 3 horizontal vertical Zoom ratio 1 1 6 Noise level 32 dB in Low Brightness mode 37 dB in High Brightness mode Keystone correction 30 vertical automatic manual 20 horizontal m...

Page 90: ...t 3 4 inches 86 mm feet retracted Width 13 6 inches 345 mm Depth 10 1 inches 257 mm Weight 6 5 lb 2 9 kg Electrical Rated frequency 50 60 Hz AC Power supply 100 to 120 VAC 3 4 A 200 to 240 VAC 1 5 A Power consumption Operating 100 to 120 VAC 306 W 220 to 240 VAC 286 W Standby 100 to 120 VAC 2 6 W 220 to 240 VAC 4 6 W note Lamp life results will vary depending upon mode selected environmental condi...

Page 91: ... EN 55022 EN 55024 Pixelworks DNX ICs are used in this projector Compatible Video Formats The projector supports the high definition video and computer display formats listed below as well as traditional NTSC PAL and SECAM video standards To project images output from a computer the computer s video card must be set at a refresh rate vertical frequency that s compatible with the projector Some ima...

Page 92: ...A 75 XGA 85 XGA 120 60 70 75 85 120 1024 768 1024 768 1024 768 1024 768 1024 768 SXGA1 70 SXGA1 75 SXGA1 85 SXGA1 120 70 75 85 120 1152 864 1152 864 1152 864 1152 864 SXGA2 60 SXGA2 75 SXGA2 85 SXGA 60 SXGA 75 SXGA 85 60 75 85 60 75 85 1280 960 1280 960 1280 960 1400 1050 1400 1050 1400 1050 SXGA3 60 SXGA3 75 SXGA3 85 60 75 85 1280 1024 1280 1024 1280 1024 UXGA 60 60 1600 1200 iMAC VGA iMAC SVGA i...

Page 93: ...TSC NTSC 4 43 PAL N PAL M PAL PAL 60 SECAM 60 60 50 50 60 60 50 HDTV 720p HDTV 720p HDTV 1080i HDTV 1080i 60 50 60 50 TV480i TV625i SDTV 480p SDTV 576p 60 50 60 50 Compatible video formats continued Mode Refresh Rate Hz Resolution ...

Page 94: ...94 Technical Specifications ...

Page 95: ... use with this projector Do not stand on the projector or place heavy objects on it Do not use the projector where it may be exposed to rain water or excessive humidity Unplug the projector from the wall outlet before cleaning Use a damp cloth for cleaning Do not use liquid or aerosol cleaners Never spill liquid of any kind into the projector Do not use the projector where it may be exposed to exc...

Page 96: ...lug is damaged or frayed If liquid or foreign objects get inside the projector or if it has been exposed to rain or water If it has been dropped or the housing has been damaged Except as specifically explained in this User s Guide do not attempt to service this product yourself Refer all servicing to qualified personnel Opening or removing covers may expose you to dangerous voltages and other haza...

Page 97: ...arantee that interference will not occur in a particular installation If this equipment does cause interference to radio and television reception which can be determined by turning the equipment off and on the user is encouraged to try to correct the interference by one or more of the following measures Reorient or relocate the receiving antenna Increase the separation between the equipment and re...

Page 98: ... This Class B digital apparatus meets all requirements of the Canadian Interference Causing Equipment Regulations Cet appareil numérique de la classe B respecte toutes les exigences du Règlement sur le materiel brouilleur du Canada ...

Page 99: ...bles HD15 to component 10 41 illustrations 10 mouse 37 ordering 11 remote control cable set 11 security 88 S video 11 40 VGA 36 VGA to component 10 41 Capturing image 58 Carrying case 10 Ceiling mount 11 87 Cleaning air filter 65 lens 64 projector case 64 Color correcting 25 multi screen adjustment 62 problems 81 to 82 saturation 51 settings 50 to 51 temperature 51 Color Mode 25 to 26 50 to 51 Com...

Page 100: ...ing and saving in projector 58 correcting shape 22 to 25 54 79 fitting on screen 53 79 height adjusting 21 problems with 77 to 82 projecting on chalkboard 25 raising 21 selecting source 18 28 39 to 42 shape correcting 22 to 25 size and projection distance 14 89 turning off using A V Mute 29 turning off temporarily 29 zooming 22 30 Image menu 50 to 51 Info menu 69 to 70 Input signal selecting 18 28...

Page 101: ...to 32 Positioning image 21 projector 14 to 15 87 to 88 Power button 17 specifications 90 status light 17 75 to 76 Presentation color mode 26 50 Presentations computer 36 to 37 room conditions 14 28 tips and training 9 using the pointer tool 31 to 32 video 38 to 42 Presenters Online 9 PrivateLine Support 8 Problems color 81 to 82 image 77 to 82 no signal 19 78 remote control 83 sound 82 using on sc...

Page 102: ...rom projector 14 89 ordering 11 startup screen creating 57 to 58 Screen image see Image Security cables 88 identifying logo 58 to 59 Kensington lock 11 88 Operation Lock 59 password protection 55 to 57 Sharpness setting 51 Signal menu 52 to 53 Six axis color adjustment 51 to 52 Sleep mode 16 Sound troubleshooting 82 Source selecting 18 28 Speaker specifications 89 Speakers connecting 45 Specificat...

Page 103: ...e control problems 83 tapered image 22 to 25 Turning off picture using A V Mute 29 Turning off projector 18 U Unpacking projector 10 USB cable 10 37 User s Logo creating 58 display settings 59 V VCR connecting 38 to 42 Video cables 10 11 38 connecting video equipment 38 to 42 formats supported 91 to 93 selecting source 18 28 39 40 Video Signal setting 53 Volume controlling 31 54 W Warning lights 7...

Page 104: ...104 Index ...

Reviews: