www.Fisher.com
D101402X012
Type 3660 and 3661 Positioners
Contents
Introduction
. . . . . . . . . . . . . . . . . . . . . . . . . . . . . . .
Scope of Manual
. . . . . . . . . . . . . . . . . . . . . . . . . .
Description
. . . . . . . . . . . . . . . . . . . . . . . . . . . . . . .
Specifications
. . . . . . . . . . . . . . . . . . . . . . . . . . . .
Educational Services
. . . . . . . . . . . . . . . . . . . . . .
Installation
. . . . . . . . . . . . . . . . . . . . . . . . . . . . . . . .
Special Instructions for Safe Use and
Installation in Hazardous Locations
. . . . . . .
CSA
. . . . . . . . . . . . . . . . . . . . . . . . . . . . . . . . . . .
FM
. . . . . . . . . . . . . . . . . . . . . . . . . . . . . . . . . . . .
ATEX Intrinsic Safety
. . . . . . . . . . . . . . . . . . . . .
ATEX Type n
. . . . . . . . . . . . . . . . . . . . . . . . . . . .
SAA Intrinsic Safety, Type n
Positioner Mounting
. . . . . . . . . . . . . . . . . . . . . . .
Mounting on the Type 1250, 1250R, 3024S
and GX Actuators
. . . . . . . . . . . . . . . . . . . . .
Mounting on Baumann
t
Actuators
. . . . . . .
Mounting on the Type 657 and
667 Actuators
. . . . . . . . . . . . . . . . . . . . . . .
Feedback Lever Assembly and
Range Spring Installation
11
. . . . . . . . . . . . . .
Pressure Connections
14
. . . . . . . . . . . . . . . . . . .
Supply Connection
. . . . . . . . . . . . . . . . . . . . .
Output Connection
. . . . . . . . . . . . . . . . . . . . .
Instrument Connection
. . . . . . . . . . . . . . . . .
Diagnostic Connections
. . . . . . . . . . . . . . . .
Vent Connection
. . . . . . . . . . . . . . . . . . . . . . . .
Electrical Connections for
Type 3661 Positioners
. . . . . . . . . . . . . . . .
Calibration
. . . . . . . . . . . . . . . . . . . . . . . . . . . . . .
Split Range Operation
. . . . . . . . . . . . . . . . . . .
Type 3660 Bypass Operation
. . . . . . . . . . . . . .
Principle of Operation
. . . . . . . . . . . . . . . . . . . . .
Maintenance
. . . . . . . . . . . . . . . . . . . . . . . . . . . .
Changing the Positioner Action
. . . . . . . . . . .
Changing the Range Spring
. . . . . . . . . . . . . .
Changing the Input Signal Range on
Type 3660 Positioners
. . . . . . . . . . . . . . . .
Removing the Positioner from the Actuator
.
Center-Bolt Mounting on the Type 1250,
1250R, 3024S and Baumann Actuators 26
Clamp Mounting on the Type 1250,
1250R and 3024S Actuators
. . . . . . . . . .
Mounting Bracket/U-Bolt Mounting on
Type 657, and 667 Actuators
. . . . . . . . .
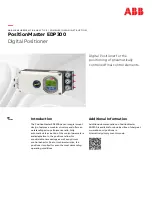
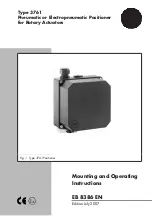
W7174 / IL
Figure 1. Type 3660 Positioner Mounted on a
Baumann
t
Actuator
Changing the Input Module
Diaphragm Assembly
. . . . . . . . . . . . . . . . .
Disassembling and Assembling Relay
Components
. . . . . . . . . . . . . . . . . . . . . . . . .
Disassembling and Assembling the Bypass
Valve
. . . . . . . . . . . . . . . . . . . . . . . . . . . . . . .
Replacing the Type 3661 Converter Module 28
Parts Ordering
. . . . . . . . . . . . . . . . . . . . . . . . . . .
Parts Kits
. . . . . . . . . . . . . . . . . . . . . . . . . . . . . . .
Repair Kits
. . . . . . . . . . . . . . . . . . . . . . . . . . . . .
Mounting Kits
. . . . . . . . . . . . . . . . . . . . . . . . . .
Parts List
. . . . . . . . . . . . . . . . . . . . . . . . . . . . . . .
Positioner Common Parts
. . . . . . . . . . . . . . . .
Diagnostic Connections
. . . . . . . . . . . . . . . . . .
Mounting Parts
. . . . . . . . . . . . . . . . . . . . . . . . .
Loop Schematics/Nameplates
. . . . . . . . . . . . .
CSA Loop Schematics for Type 3661
. . . . . .
CSA and FM Approvals
Nameplate for Type 3661
. . . . . . . . . . . . .
FM Loop Schematic for Type 3661
. . . . . . . .
ATEX Approvals Nameplate for Type 3661
.
SAA Approvals Nameplate for Type 3661
. .
Instruction Manual
Form 5265
March 2006
3660 and 3661 Positioners